
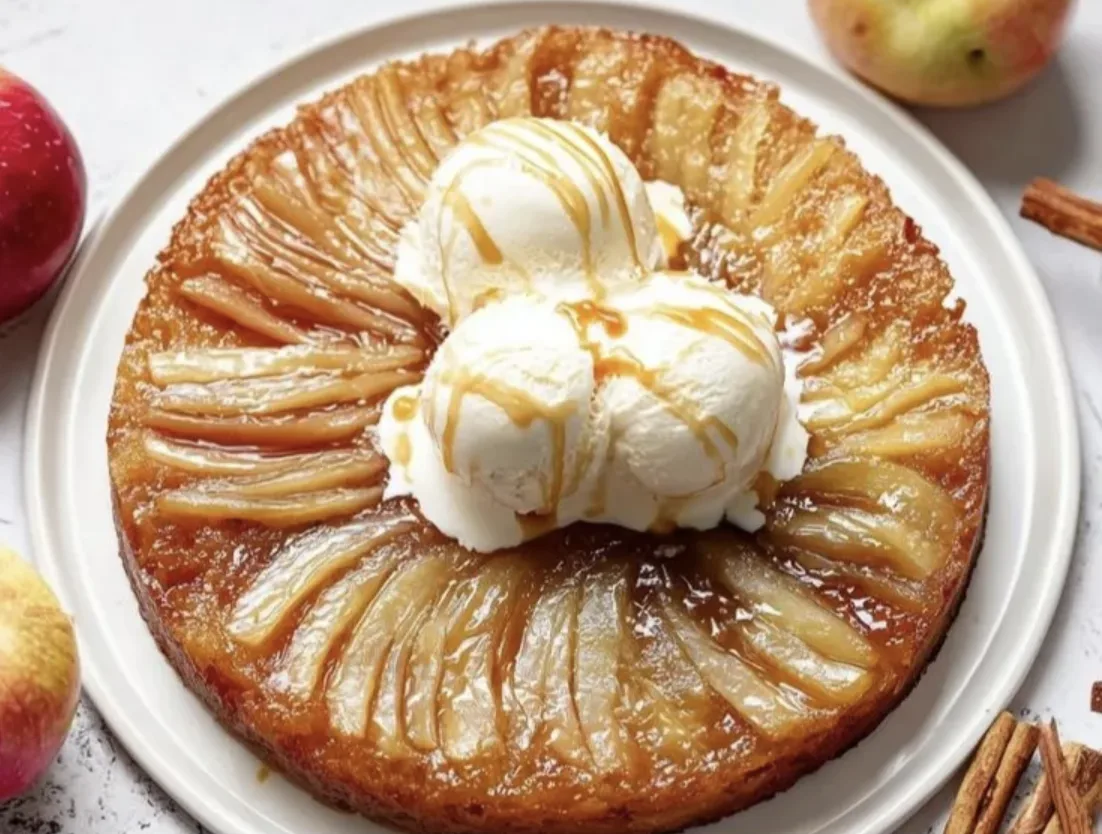
This Easy Apple Upside Down Cake is a delicious fall dessert featuring tender, caramelized apples arranged over a soft, buttery cake. Made with Honeycrisp apples, brown sugar, butter, cinnamon, and vanilla, this simple homemade cake combines the comforting flavors of apple pie with the light, tender texture of a classic cake.
The best part is the beautiful topping revealed when you turn the cake upside down. As the butter and brown sugar melt together in the oven, they create a rich caramel-like layer that coats the apples and adds sweetness to every slice. Beneath the fruit is a soft cake flavored with cinnamon and vanilla, making each bite warm, fragrant, and satisfying.
You do not need complicated baking techniques or special ingredients to make this dessert. The apples are arranged directly over the buttery brown sugar mixture, and the cake batter is poured on top before everything goes into the oven. After baking, a short cooling period makes it easier to invert the cake and reveal the glossy apple topping.
Ready in approximately 47 minutes, this Apple Upside Down Cake is perfect for fall gatherings, family dinners, weekend baking, brunch, or an afternoon treat with coffee. Serve it warm on its own, or add vanilla ice cream or whipped cream for an extra-special dessert.
Why You’ll Love This Apple Upside Down Cake
There are plenty of reasons to keep this easy apple cake in your collection of homemade desserts.
1. Beautiful Caramelized Apple Topping
The apple topping makes this cake especially appealing. Slices of Honeycrisp apple are arranged in overlapping circles over melted butter and brown sugar. During baking, the mixture develops a glossy, caramel-like finish that looks beautiful when the cake is inverted.
You get an attractive dessert without needing complicated decorations or frosting.
2. Soft, Moist, and Buttery Cake
The cake batter combines flour, granulated sugar, baking powder, cinnamon, milk, melted butter, vanilla extract, and an egg.
The result is a tender cake with a delicate crumb. The buttery apple topping adds extra flavor, while cinnamon and vanilla create a warm aroma throughout the dessert.
3. Simple Ingredients
You can make this cake with common baking ingredients and fresh apples. There is no need for a mixer, elaborate filling, or separate caramel sauce.
A couple of mixing bowls, a whisk, a spatula, and a 9-inch round cake pan are enough to get started.
4. Ready in Less Than an Hour
The recipe takes approximately 15 minutes to prepare and around 32 minutes to bake, for a total time of about 47 minutes.
The oven does most of the work, making this a convenient option when you want a homemade dessert without spending the entire afternoon baking.
5. Perfect for Fall and Holiday Gatherings
Apples, cinnamon, and brown sugar are classic autumn flavors. This cake fits naturally into fall celebrations, Thanksgiving dessert tables, family dinners, and cozy weekends.
It is also a lovely alternative to a traditional apple pie when you want something with a similar flavor but a different presentation.
6. Easy to Customize
You can experiment with different apple varieties, add warm spices, include chopped pecans, or finish the cake with caramel sauce.
The original recipe also allows dairy-free and gluten-free adaptations, making it easier to adjust the dessert to different preferences.
Apple Upside Down Cake Recipe Details
- Prep Time: 15 minutes
- Cook Time: 32 minutes
- Total Time: 47 minutes
- Servings: 8
- Course: Dessert
- Cuisine: American
- Oven Temperature: 350°F (175°C)
- Calories: Approximately 327 per serving, as listed in the original recipe
Ingredients for Easy Apple Upside Down Cake
This recipe has two main components: the caramelized apple topping and the soft cake batter.
Ingredients for the Apple Topping
1. Unsalted Butter — ¼ Cup
Butter creates the rich base of the topping. It melts beneath the brown sugar and helps produce the glossy layer that coats the apples after baking.
Using unsalted butter gives you more control over the flavor.
2. Light Brown Sugar — ½ Cup
Brown sugar provides sweetness and a warm, molasses-like flavor. Combined with melted butter, it creates the caramel-like topping that makes an upside-down cake distinctive.
Spread it evenly over the melted butter so the apples have a consistent layer beneath them.
3. Honeycrisp Apples — 3
Honeycrisp apples are the main feature of the topping. They offer a crisp texture and balanced sweetness that works well in baked desserts.
Slice the apples into ¼-inch half circles. Arrange them in overlapping circles to create an attractive pattern.
You can leave the apple skins on or peel them according to your preference, although the original recipe does not specify whether peeling is necessary.
Ingredients for the Cake
1. All-Purpose Flour — 1¼ Cups
Flour provides the structure of the cake. Measure it carefully to help maintain a tender crumb.
Too much flour can make a cake dense, so avoid packing it tightly into the measuring cup.
2. Granulated Sugar — ½ Cup
Granulated sugar sweetens the cake batter and helps create its soft texture.
It works alongside the brown sugar in the topping, giving the dessert sweetness in both the fruit layer and the cake.
3. Baking Powder — 1½ Teaspoons
Baking powder helps the cake rise as it bakes. Make sure it is fresh for reliable results.
4. Ground Cinnamon — ½ Teaspoon
Cinnamon adds a warm, fragrant flavor that complements the apples and brown sugar.
It gives the cake a comforting autumn character without overpowering the fruit.
5. Salt — ¼ Teaspoon
Salt balances the sweetness and helps bring out the flavors of the butter, cinnamon, and vanilla.
6. Milk — ¾ Cup
Dairy milk provides moisture and helps bring the batter together. You can also use plant-based milk, such as oat, almond, or soy milk, if you prefer.
7. Unsalted Butter, Melted — ¼ Cup
Melted butter adds richness and flavor to the cake itself.
Allow it to cool slightly before mixing it with the other wet ingredients so it does not unnecessarily heat the egg.
8. Vanilla Extract — 1 Teaspoon
Vanilla adds a sweet, aromatic note that complements the apples and cinnamon.
9. Large Egg — 1
The egg helps bind the ingredients and contributes to the structure and texture of the finished cake.
Kitchen Equipment You’ll Need
You do not need advanced baking equipment to make this recipe.
- 9-inch round cake pan: Holds the apple topping and cake batter.
- Mixing bowls: One for the dry ingredients and another for the wet ingredients.
- Whisk: Helps combine the ingredients evenly.
- Measuring cups and spoons: Ensure accurate ingredient quantities.
- Spatula: Helps spread the batter evenly over the apples.
- Knife and cutting board: Used to slice the apples.
A 9-inch round pan is specified in the original recipe. Using a different pan size may change the cake’s thickness and baking time.
How to Make Easy Apple Upside Down Cake
Follow these steps to create a tender cake with a glossy, caramelized apple topping.
Step 1: Prepare the Pan and Apple Topping
Preheat your oven to 350°F (175°C).
Place ¼ cup of unsalted butter in a 9-inch round cake pan. Put the pan in the oven and allow the butter to melt.
Carefully remove the pan from the oven once the butter has melted.
Sprinkle ½ cup of light brown sugar evenly over the melted butter. Try to distribute it across the bottom of the pan rather than leaving it in one concentrated area.
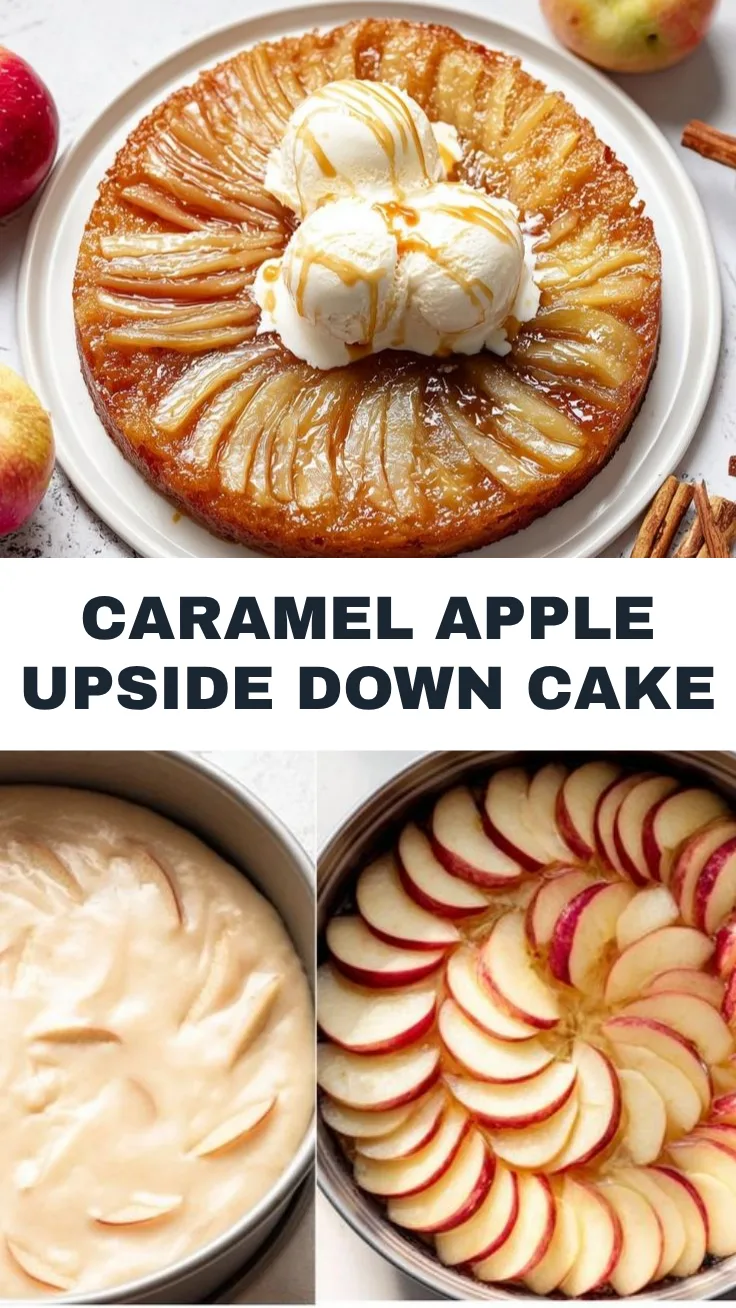
Next, arrange the sliced Honeycrisp apples over the sugar mixture. Place the ¼-inch half circles in overlapping circles to create an attractive pattern.
Take a little time with this step because the arrangement will become the top of the cake once it is inverted.
Handle the hot pan carefully, as the melted butter can make it slippery.
Step 2: Mix the Dry Ingredients
In a large mixing bowl, combine the all-purpose flour, granulated sugar, baking powder, ground cinnamon, and salt.
Whisk until the ingredients are evenly distributed.
This step helps prevent pockets of baking powder, cinnamon, or salt from remaining in one part of the batter.
Set the bowl aside while you prepare the wet ingredients.
Step 3: Mix the Wet Ingredients
In a separate bowl, combine the milk, ¼ cup melted unsalted butter, vanilla extract, and large egg.
Whisk until the mixture looks smooth and the egg is fully incorporated.
If the melted butter is very hot, allow it to cool slightly before adding it to the egg. This helps prevent the egg from cooking prematurely.
The mixture should be evenly blended before you combine it with the dry ingredients.
Step 4: Combine the Wet and Dry Ingredients
Pour the wet ingredients into the bowl containing the dry ingredients.
Using a whisk or spatula, stir gently until the ingredients are just combined.
Avoid overmixing. Excessive mixing can develop the flour’s gluten and make the finished cake tougher than intended.
A few small lumps are generally preferable to mixing the batter for too long. Make sure there are no large pockets of dry flour remaining at the bottom of the bowl.
The batter should be smooth enough to spread over the apples without being excessively runny.
Step 5: Pour the Batter Over the Apples
Carefully pour the prepared batter over the arranged apple slices.
Use a spatula to spread it evenly from one side of the pan to the other.
Try not to disturb the apple arrangement beneath the batter. An even layer of batter helps the cake bake consistently and gives the finished dessert a more uniform appearance.
Once the surface is smooth, the cake is ready for the oven.
Step 6: Bake the Cake
Place the cake pan in the preheated oven and bake for 30–35 minutes.
The cake should rise and develop a light golden color.
Begin checking for doneness around the 30-minute mark. Insert a toothpick into the center of the cake, avoiding a large piece of apple if possible.
If the toothpick comes out clean or with a few dry crumbs, the cake is ready. If wet batter remains on it, continue baking for a few more minutes and check again.
The cake may also begin pulling slightly away from the sides of the pan as it finishes baking.
Ovens can vary, so use the toothpick test rather than relying on time alone.
Step 7: Cool the Cake Briefly
Remove the cake from the oven and let it cool in the pan for 10 minutes.
This short resting period allows the cake to settle and gives the buttery brown sugar topping a chance to firm up slightly.
Do not leave the cake in the pan for too long, because the caramelized topping may become more difficult to release as it cools.
Run a thin knife around the edges to loosen any areas that may be sticking.
Step 8: Invert the Cake
Place a serving plate over the top of the cake pan.
Holding the plate and pan securely together with oven protection as needed, carefully turn them upside down.
Lift the pan away slowly to reveal the caramelized apple topping.
If a few apple slices remain attached to the pan, gently lift them off and place them back onto the cake while the topping is still warm.
Allow the cake to settle briefly before slicing.
Step 9: Slice and Serve
Cut the cake into eight portions and serve warm or at room temperature.
For a classic dessert, add a scoop of vanilla ice cream or a spoonful of whipped cream.
You can also serve it with coffee or tea for an afternoon treat.
The contrast between the soft cake and glossy apples makes every slice both comforting and visually appealing.
Pro Tips for the Best Apple Upside Down Cake
A few simple techniques can help you achieve a tender cake and a topping that releases cleanly from the pan.
Use Room-Temperature Ingredients
When practical, allow the milk and egg to come closer to room temperature before preparing the batter.
Ingredients at similar temperatures tend to combine more evenly, which can help create a consistent cake texture.
The melted butter should be warm rather than piping hot before you mix it with the egg.
Choose Firm Apples
Firm apples are ideal for upside-down cakes because they are better able to maintain their shape during baking.
Honeycrisp apples are used in the original recipe, but Granny Smith, Fuji, and Pink Lady apples are also suitable alternatives.
Avoid varieties that become excessively soft when cooked if you want distinct apple slices in the finished topping.
Slice the Apples Evenly
Cut the apples into slices approximately ¼ inch thick, as specified in the recipe.
Slices of similar thickness cook more consistently and are easier to arrange into an attractive pattern.
If some pieces are much thicker than others, the topping may have an uneven texture.
Arrange the Apples Carefully
Remember that the bottom of the pan becomes the top of the cake after inversion.
Arrange the apple slices in overlapping circles and fill large gaps where possible. This helps create a more complete and attractive topping.
Do Not Overmix the Batter
Once the wet and dry ingredients are combined, stir only until no large pockets of dry flour remain.
Overmixing can make the cake denser and less tender.
Check the Cake Early
Start checking the cake at around 30 minutes, even though the recipe allows up to 35 minutes.
If the toothpick comes out clean and the cake looks golden, remove it from the oven. Baking it longer than necessary can dry out the crumb.
Flip After the Recommended Cooling Time
The original recipe recommends cooling the cake for 10 minutes before inverting it.
Flipping too early may cause the topping to slide, while waiting too long may allow the caramelized sugar to stick more firmly to the pan.
Run a knife around the edges and invert carefully.
Keep the Cake Pan Level
Before placing the pan in the oven, check that it sits level on the rack.
This helps the butter and brown sugar remain distributed across the bottom of the pan and supports a more even topping.
Ingredient Substitutions and Variations
This Apple Upside Down Cake is easy to customize with different ingredients and flavors.
Use Different Apple Varieties
Honeycrisp apples are the original choice, but you can use other firm varieties.
- Granny Smith: Adds a tart flavor that balances the sweet topping.
- Fuji: Offers crisp texture and natural sweetness.
- Pink Lady: Provides a balance of sweetness and acidity.
Whichever variety you choose, cut the apples into similar-sized slices.
Make It Dairy-Free
To prepare a dairy-free version, replace the butter with plant-based butter or coconut oil and use non-dairy milk.
Oat, almond, and soy milk are all options mentioned in the original recipe.
Choose a plant-based butter intended for baking if you want a result closer to the original texture. Coconut oil may produce a slightly different flavor and texture.
Make It Gluten-Free
Replace the all-purpose flour with a 1:1 gluten-free all-purpose baking blend designed for cakes.
Different gluten-free blends can absorb liquid differently, so follow the blend’s instructions where relevant. The texture may vary slightly from the original cake.
Adjust the Sugar
The original recipe suggests replacing half the granulated sugar with coconut sugar as an alternative.
This will change the cake’s flavor and color. Coconut sugar can contribute a deeper, caramel-like taste, which complements the apples and brown sugar topping.
Keep in mind that this substitution does not automatically make the dessert low in sugar.
Add Nutmeg or Allspice
For a stronger autumn flavor, add a small pinch of nutmeg or allspice to the dry ingredients.
These spices complement cinnamon and apples, but a little goes a long way. Start with a small amount so the spice blend does not overwhelm the fruit.
Maple Pecan Apple Upside Down Cake
For a nutty variation, add approximately ¼ cup chopped pecans to the topping and drizzle with maple syrup before baking.
The pecans add crunch, while maple syrup provides a deeper sweetness that works well with the apples.
Arrange the nuts thoughtfully so they are distributed across the topping.
Caramel Apple Upside Down Cake
After inverting the cake, drizzle a little caramel sauce over the apples.
This creates a richer dessert with a stronger caramel flavor. Because the cake already contains a sweet brown sugar topping, use the extra sauce sparingly.
Ginger Apple Upside Down Cake
Add approximately one teaspoon of grated fresh ginger to the batter for a warming flavor.
Ginger pairs well with apples and cinnamon, adding a subtle spicy note that makes the cake feel especially suitable for cooler weather.
Cranberry Apple Upside Down Cake
Add a small handful of cranberries to the apple topping before pouring over the batter.
Cranberries introduce a tart, colorful contrast to the sweet apples and brown sugar. This variation is particularly suitable for holiday meals.
What to Serve with Apple Upside Down Cake
This cake can be served in several ways, depending on the occasion.
Vanilla Ice Cream
A scoop of vanilla ice cream is a classic accompaniment. The cold, creamy texture contrasts with the warm cake and caramelized apples.
For the best experience, serve the cake slightly warm so the ice cream softens around the edges.
Whipped Cream
A spoonful of lightly sweetened whipped cream adds a creamy finish without overpowering the apple flavor.
It is also a simple way to dress up individual slices when serving guests.
Greek Yogurt
For a less dessert-like presentation, serve a slice with plain or lightly sweetened Greek yogurt.
Its tangy flavor provides a contrast to the brown sugar topping, making it a nice option for brunch or an afternoon snack.
Coffee or Tea
Apple and cinnamon flavors pair naturally with coffee, chai tea, and other warm drinks.
Serve a slice with your favorite beverage for a cozy afternoon break.
Caramel Sauce
For special occasions, add a small drizzle of caramel sauce just before serving.
Since the cake already has a caramel-like apple topping, avoid adding too much sauce if you want the apple flavor to remain prominent.
A Dusting of Powdered Sugar
For a simple presentation, lightly dust the cake with powdered sugar just before serving.
This adds visual contrast without requiring additional frosting or elaborate decoration.
Make-Ahead Instructions
You can bake this cake a day before serving, which makes it convenient for gatherings and holiday meals.
Bake the Cake Ahead
Prepare and bake the cake according to the recipe. Allow it to cool and store it covered at room temperature if you plan to serve it within two days and the room conditions are suitable.
The original recipe recommends storing the covered cake at room temperature for up to two days.
Reheat Before Serving
If you prefer warm cake, reheat individual slices in the microwave for approximately 15–20 seconds, as suggested in the original recipe.
Heating times vary by microwave, so start with the shorter interval and add a little more time if needed.
Avoid overheating the cake, which can make the crumb dry or cause the topping to become excessively hot.
Prepare for a Gathering
If serving guests, you can bake the cake in advance and arrange the serving plate before dessert time.
Add ice cream, whipped cream, or caramel sauce only when serving so the cake maintains its appearance.
Storage and Freezing Instructions
Room-Temperature Storage
Store the cake covered at room temperature for up to 2 days, according to the original recipe.
Keep it covered to help prevent the cake from drying out. Store it in a cool, suitable location away from direct sunlight or heat.
Because the cake contains fresh fruit and a moist topping, consider your kitchen conditions and use safe food-storage practices.
Refrigerator Storage
For longer storage, place the cake in an airtight container and refrigerate for up to 4 days, as specified in the original recipe.
Refrigeration may make the cake feel firmer. Let a slice sit briefly at room temperature or warm it gently before serving if desired.
Freezing the Cake
The original recipe recommends freezing individual slices for up to 2 months.
Wrap each slice individually and place the wrapped portions in a freezer-safe container or bag.
To serve, thaw the slices overnight in the refrigerator and warm them briefly in the microwave if you prefer a warm dessert.
The texture of the apples and cake may change slightly after freezing and thawing, but individual portions make it convenient to enjoy leftovers later.
Frequently Asked Questions
Can I make Apple Upside Down Cake ahead of time?
Yes. You can bake it a day in advance and store it covered at room temperature for up to two days, following the original recipe’s storage guidance.
Warm individual slices for approximately 15–20 seconds in the microwave before serving if you prefer them warm.
What are the best apples for upside-down cake?
Honeycrisp apples are used in this recipe because they offer a crisp texture and balanced sweetness.
Granny Smith, Fuji, and Pink Lady apples are also good options. Choose firm apples that can maintain their shape during baking.
Do I need to peel the apples?
The original recipe does not require peeling, so it is a matter of preference.
Leaving the skin on can add color and texture, while peeled apples create a more uniform appearance. Whichever option you choose, slice the apples evenly.
Why did my apple topping stick to the pan?
The topping may stick if the cake cools in the pan for too long or if some areas are not adequately coated with the butter and brown sugar mixture.
Allow the cake to cool for the recommended 10 minutes, run a knife around the edges, and invert it carefully onto a serving plate.
If a few apple slices remain attached, gently reposition them on the cake.
Why is my cake dense instead of fluffy?
One possible reason is overmixing the batter after the wet and dry ingredients are combined.
Stir gently until the ingredients are just incorporated. Also, check that your baking powder is fresh and that the flour is measured accurately.
How do I know when the cake is done?
Insert a toothpick into the center of the cake, avoiding a large apple piece if possible.
If it comes out clean or with a few dry crumbs, the cake is ready. If wet batter remains, continue baking briefly and test again.
The original recipe recommends a baking time of 30–35 minutes.
Can I use a boxed cake mix?
Yes. The original recipe suggests using a yellow or vanilla cake mix as a shortcut.
Prepare the apple topping in the same way, then prepare the cake mix according to its package instructions and pour the batter over the apples. Baking time and batter quantity may differ, so follow the package guidance and check for doneness.
Can I make this cake without dairy?
Yes. Use plant-based butter or coconut oil instead of dairy butter, and replace the milk with oat, almond, or soy milk.
The flavor and texture may differ slightly, but these substitutions can help create a dairy-free version.
Can I make the cake gluten-free?
Yes. Use a 1:1 gluten-free all-purpose baking blend intended for baking.
The finished texture may vary depending on the blend, so choose one suitable for cakes and follow its instructions.
Why should I wait 10 minutes before flipping the cake?
The short cooling period allows the cake to settle while keeping the topping warm enough to release from the pan.
Flipping immediately may cause the cake or topping to shift, while waiting too long can make the sugar mixture more likely to stick.
Can I serve Apple Upside Down Cake cold?
Yes. The cake can be served at room temperature or chilled.
For a softer texture and more pronounced aroma, many people prefer it slightly warm, especially when paired with vanilla ice cream.
Final Thoughts
This Easy Apple Upside Down Cake is a wonderful example of how simple ingredients can create a beautiful homemade dessert. Sweet Honeycrisp apples, buttery brown sugar, cinnamon, and vanilla come together to create a cake that tastes comforting and looks impressive without requiring complicated baking techniques.
The preparation is straightforward, the ingredients are familiar, and the upside-down presentation gives the finished cake a glossy apple topping that needs very little decoration.
Serve it warm with vanilla ice cream, enjoy it with coffee, or add it to your fall and holiday dessert table. Whether you are baking for family, friends, or simply treating yourself, this apple cake is an easy and satisfying way to celebrate the flavors of autumn.
Recipe Card: Easy Apple Upside Down Cake
Prep Time: 15 minutes
Cook Time: 32 minutes
Total Time: 47 minutes
Servings: 8
Course: Dessert
Cuisine: American
Ingredients
For the topping:
- ¼ cup unsalted butter
- ½ cup light brown sugar
- 3 Honeycrisp apples, sliced into ¼-inch half circles
For the cake:
- 1¼ cups all-purpose flour
- ½ cup granulated sugar
- 1½ teaspoons baking powder
- ½ teaspoon ground cinnamon
- ¼ teaspoon salt
- ¾ cup milk, dairy or plant-based
- ¼ cup unsalted butter, melted
- 1 teaspoon vanilla extract
- 1 large egg
Instructions
- Preheat the oven to 350°F (175°C).
- Place ¼ cup butter in a 9-inch round cake pan and let it melt in the oven.
- Carefully remove the pan and sprinkle the light brown sugar evenly over the melted butter.
- Arrange the apple slices in overlapping circles over the sugar mixture.
- In a large bowl, whisk together the flour, granulated sugar, baking powder, cinnamon, and salt.
- In a separate bowl, whisk together the milk, melted butter, vanilla extract, and egg until smooth.
- Pour the wet ingredients into the dry ingredients and stir gently until just combined.
- Pour the batter evenly over the apples and smooth the top with a spatula.
- Bake for 30–35 minutes, or until a toothpick inserted into the center comes out clean.
- Let the cake cool in the pan for 10 minutes.
- Run a knife around the edges, place a serving plate over the pan, and carefully invert the cake.
- Lift off the pan and serve the cake warm, with vanilla ice cream or whipped cream if desired.
Notes
- Honeycrisp apples can be replaced with Granny Smith, Fuji, or Pink Lady apples.
- For a dairy-free version, use plant-based butter and non-dairy milk.
- For a gluten-free version, use a 1:1 gluten-free baking blend.
- Store covered at room temperature for up to 2 days or refrigerate in an airtight container for up to 4 days.
- Freeze individually wrapped slices for up to 2 months.
- Reheat individual slices in the microwave for approximately 15–20 seconds if desired.
Nutrition information: The original recipe lists approximately 327 calories per serving. Actual nutrition values may vary depending on ingredient brands, substitutions, and serving sizes.