
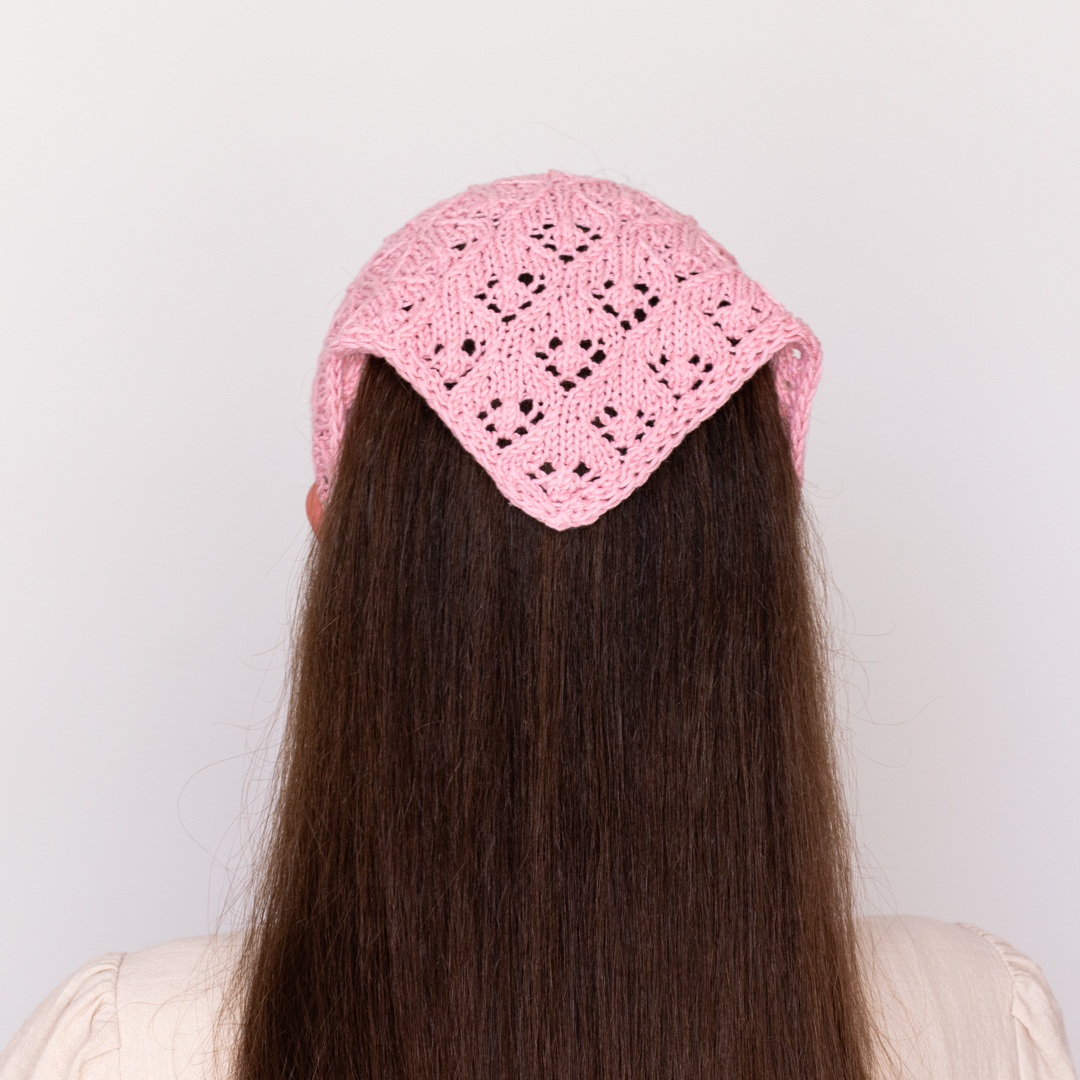
The In Bloom Bandana is a delicate spring and summer knitting project designed for anyone who loves lightweight handmade accessories with beautiful stitch detail. Worked in sport-weight cotton yarn, this triangular bandana combines a simple construction with an attractive lace pattern, making it a satisfying project for knitters who want to practice increases, decreases, yarn overs, and i-cord techniques in one small project.
The bandana is knitted back and forth rather than in the round. Construction begins at the bottom edge with just 5 stitches, and the triangle gradually grows through increases worked on the right side. The lace pattern develops as the number of stitches increases, while the first and last 2 stitches of every row create a tidy i-cord edging. Once the triangular section reaches the desired length, the live stitches are incorporated into the i-cord edging, which continues around the bandana and becomes the second tie.
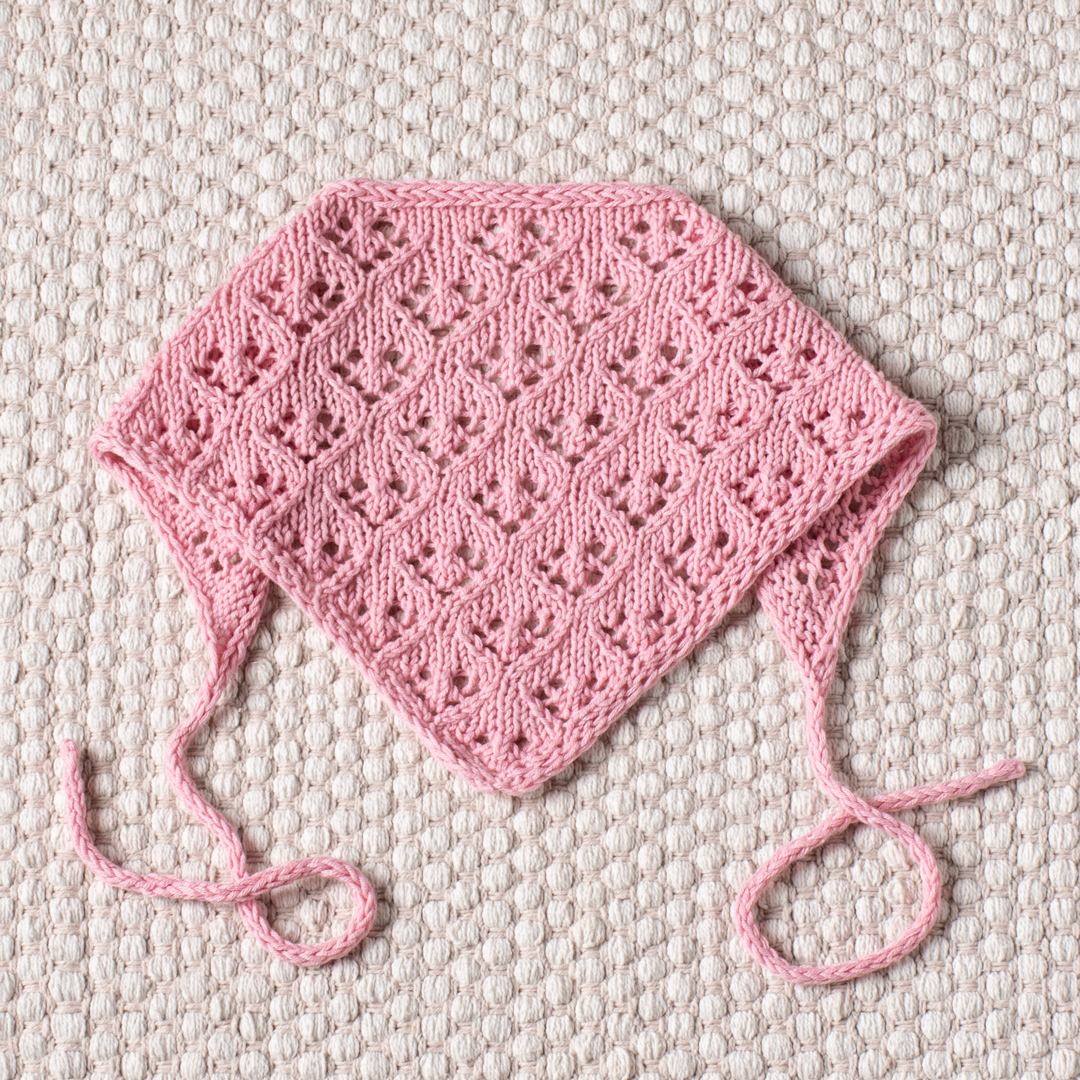
One of the useful features of this design is that the size can be adjusted. The original instructions repeat the pattern rows 1-8 seven more times or until you reach your desired length. This gives you some flexibility while keeping the construction straightforward. The finished measurements for the stated version are approximately 46cm (18in) in length without the ties and 21cm (8.25in) in height.
Why This Bandana Makes a Great Knitting Project
A small accessory such as this is an excellent way to explore lace knitting without committing to a large garment. The project uses a limited amount of yarn, has only one main knitted piece, and introduces several techniques that are useful in other knitting patterns.
The fabric is built with a combination of knit stitches, purl stitches, yarn overs, decreases, and increases. Because the increases happen on every right-side row, the triangular shape develops progressively from the bottom upward. The lace motifs are integrated directly into the shaping, so the stitch pattern and the construction work together.
The i-cord edging is another important design feature. The first 2 stitches are knitted at the beginning of every row, while the last 2 stitches are slipped with the yarn in front. This creates a clean edge and helps prevent curling. The same i-cord concept is then extended into the ties, giving the finished bandana a coordinated appearance.
Project Details at a Glance
- Project: In Bloom Bandana
- Size: One size
- Finished length without ties: 46cm / 18in
- Finished height: 21cm / 8.25in
- Gauge: 10 x 10 cm (4 x 4in) = 24 sts x 32 rows in stockinette stitch after blocking
- Yarn: Drops Safran in the color light rose (uni color 77), 1 ball
- Main needles: 3mm (US 2.5) knitting needles
- Tie needles: A pair of 3mm (US 2.5) DPNs
- Notions: Tapestry needle, measuring tape, and scissors
- Construction: Knitted back and forth from the bottom edge upward
- Edging: I-cord edging and i-cord ties
Materials You Will Need
Yarn
The pattern uses Drops Safran in the color light rose (uni color 77), with 1 ball required. This sport-weight cotton yarn suits the lightweight nature of the accessory and complements the delicate lace appearance of the design.
Using the specified yarn is particularly useful if you want to reproduce the original look and work toward the stated finished measurements. If you substitute yarn, remember that the fabric characteristics and gauge can change, so the finished dimensions may also change.
Knitting Needles
The main bandana is knitted using 3mm (US 2.5) knitting needles. A pair of 3mm (US 2.5) DPNs is used for the i-cord ties.
Other Supplies
- Tapestry needle
- Measuring tape
- Scissors
Understanding the Abbreviations
Before beginning, it is helpful to review the abbreviations used throughout the pattern. The lace section combines several decreases and yarn overs, so becoming familiar with these terms beforehand makes the knitting easier to follow.
- k – knit.
- k2tog – knit 2 stitches together.
- k3tog – knit 3 stitches together: slip the next 2 stitches knitwise (slip both stitches together, not one by one) to the right-hand needle, knit the next stitch, pass the 2 slipped stitches over the knit stitch.
- M1L – make 1 left.
- M1R – make 1 right.
- p – purl.
- RS – right side.
- sl – slip stitch as if to purl with yarn in front.
- ssk – slip 1 stitch knitwise, slip the next stitch knitwise, return the 2 stitches back to the left needle, knit those 2 stitches together through the back loops.
- WS – wrong side.
- yo – yarn over.
- *-* – repeat the instructions in between the asterisks the number of times specified.
Before You Cast On
The In Bloom Bandana is worked flat from the bottom edge toward the upper edge. Keeping this construction in mind will make the progression of the pattern much easier to understand.
The beginning is intentionally small: you cast on only 5 stitches. The right-side rows then increase by 2 stitches, gradually widening the triangle. The wrong-side rows are comparatively simple and mainly consist of purl stitches between the two i-cord edge sections.
There are two details worth paying attention to from the very beginning. First, the edge stitches should not be tightened. Second, the increases should also not be tightened. Maintaining a relaxed tension at these points helps the edge remain neat and makes the growing fabric easier to work.
How the I-Cord Edges Work
The first and last 2 stitches form the i-cord edging throughout the triangular bandana section. At the beginning of each row, the first 2 stitches are knitted. At the end of each row, the final 2 stitches are slipped with yarn in front.
This treatment gives the sides a polished appearance and helps prevent the knitted fabric from curling. It is important not to pull these edge stitches tightly. A relaxed edge allows the i-cord structure to form naturally.
The same design idea continues into the ties. Rather than adding a separate decorative border after the main knitting is finished, the live bandana stitches are connected directly to the first i-cord tie. The i-cord then becomes the edging across the bandana and continues into the second tie.
Beginning the Triangular Bandana
Start by casting on 5 stitches.
Set-Up Rows
Set-up row (WS): k2, p1, sl2.
Row 1 (RS): k2, M1R, k1, M1L, sl2 (7sts).
Row 2: k2, p to last 2 sts, sl2.
At this stage, the shaping is easy to see: the first right-side increase occurs after the first 2 edge stitches, while the second increase occurs before the final 2 edge stitches. The wrong-side row maintains the edge structure while working the center stitches in purl.
Building the First Lace Motifs
Row 3: k2, M1R, k2tog, yo, k1, M1L, sl2 (9sts).
Row 4: k2, p to last 2 sts, sl2.
Row 5: k2, M1R, k2tog, yo, k1, yo, ssk, M1L, sl2 (11sts).
Row 6: k2, p to last 2 sts, sl2.
Row 7: k2, M1R, k2tog, yo, k3, yo, ssk, M1L, sl2 (13sts).
Row 8: k2, p to last 2 sts, sl2.
These rows introduce the lace vocabulary that will continue through the main pattern. The yarn overs create openings in the fabric, while the decreases balance those openings and help define the decorative motif.
Completing the Set-Up Sequence
Row 9: k2, M1R, k3, yo, k3tog, yo, k3, M1L, sl2 (15sts).
Row 10: k2, p to last 2 sts, sl2.
After Row 10, the bandana is ready for the repeating pattern section. Checking the stitch count after each right-side row is useful because every shaping row adds exactly 2 stitches.
The Main Lace Pattern
The main pattern consists of 8 rows. The right-side rows contain the lace and shaping instructions, while every even-numbered row maintains the established edge treatment.
Pattern Row 1
Row 1 (RS): k2, M1R, *k2tog, yo, k6* to last 5sts, k2tog, yo, k1, M1L, sl2 (2sts increased).
The two shaping increases are positioned around the central lace section. The repeat between the asterisks should be followed exactly as written, and the final stitches complete the row symmetrically.
Pattern Row 2
Row 2 (WS): k2, p to last 2 sts, sl2.
This wrong-side row is intentionally straightforward. Keep the edge stitches relaxed and maintain the established pattern.
Pattern Row 3
Row 3: k2, M1R, *k2tog, yo, k1, yo, ssk, k3* to last 7sts, k2tog, yo, k1, yo, ssk, M1L, sl2 (2sts increased).
Pattern Row 4
Row 4: k2, p to last 2 sts, sl2.
Pattern Row 5
Row 5: k2, M1R, *k2tog, yo, k3, yo, ssk, k1* to last 9sts, k2tog, yo, k3, yo, ssk, M1L, sl2 (2sts increased).
Pattern Row 6
Row 6: k2, p to last 2 sts, sl2.
Pattern Row 7
Row 7: k2, M1R, *k3, yo, k3tog, yo, k5* to last 8 sts, yo, k3tog, yo, k3, M1L, sl2 (2sts increased).
Pattern Row 8
Row 8: k2, p to last 2 sts, sl2.
Repeat rows 1-8 7 more times or until you reach your desired length.
Keeping Track of the Lace Pattern
The easiest way to stay organized through the repeating section is to treat each group of 8 rows as one complete lace unit. The wrong-side rows are always k2, p to last 2 sts, sl2, while the right-side rows provide the changing lace arrangement.
It is also helpful to remember that the right-side shaping increases the stitch count by 2 each time. The original pattern specifically identifies this at the end of Rows 1, 3, 5, and 7. If a stitch count unexpectedly changes by anything other than the expected 2 stitches on a shaping row, pause and check the previous row before continuing.
When repeating the 8-row sequence, avoid relying solely on memory. Marking each completed repeat on paper can make the process easier, especially because the lace instructions contain several different combinations of yarn overs and decreases.
Optional Size Adjustment
The pattern notes that the bandana can be modified by adding or subtracting repeats. The main repeat is rows 1-8, and the instructions say to repeat these rows 7 more times or until you reach your desired length.
This makes the pattern adaptable without changing its fundamental construction. If you want a different length, the repeat count can be adjusted according to the intended result. The important point is to preserve the complete 8-row pattern structure rather than stopping partway through a repeat unless the source instructions specifically support that choice.
Finishing the Main Triangle
After completing the desired number of lace repeats, work the following rows:
Row 1: k2, M1R, k to last 2 sts, M1L, sl2.
Row 2: k2, p to last 2 sts, sl2.
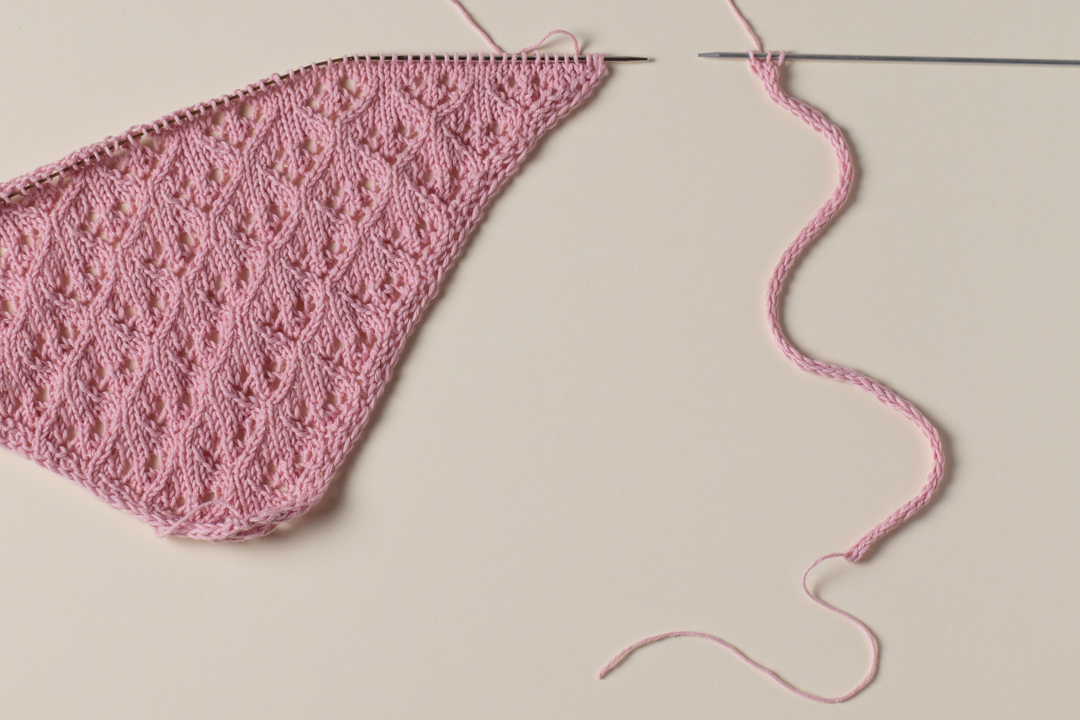
Break the yarn, leaving a 10cm (4″) long tail. Set the bandana aside, leaving the stitches on the needle as is.
Do not remove or bind off the live bandana stitches at this point. They are needed for the i-cord edging construction.
Making the First I-Cord Tie
The first tie begins separately from the bandana. Cast on 3 stitches and do not turn.
Repeat:
*Slip the 3 stitches to the right side of the needle. Knit 3.*
Continue knitting the i-cord until the tube measures approximately 30 cm. Do not cut the yarn.
The i-cord creates a narrow knitted tube that will become the first tie. Keeping the work on the needles and continuing directly into the edging is an important part of the construction.
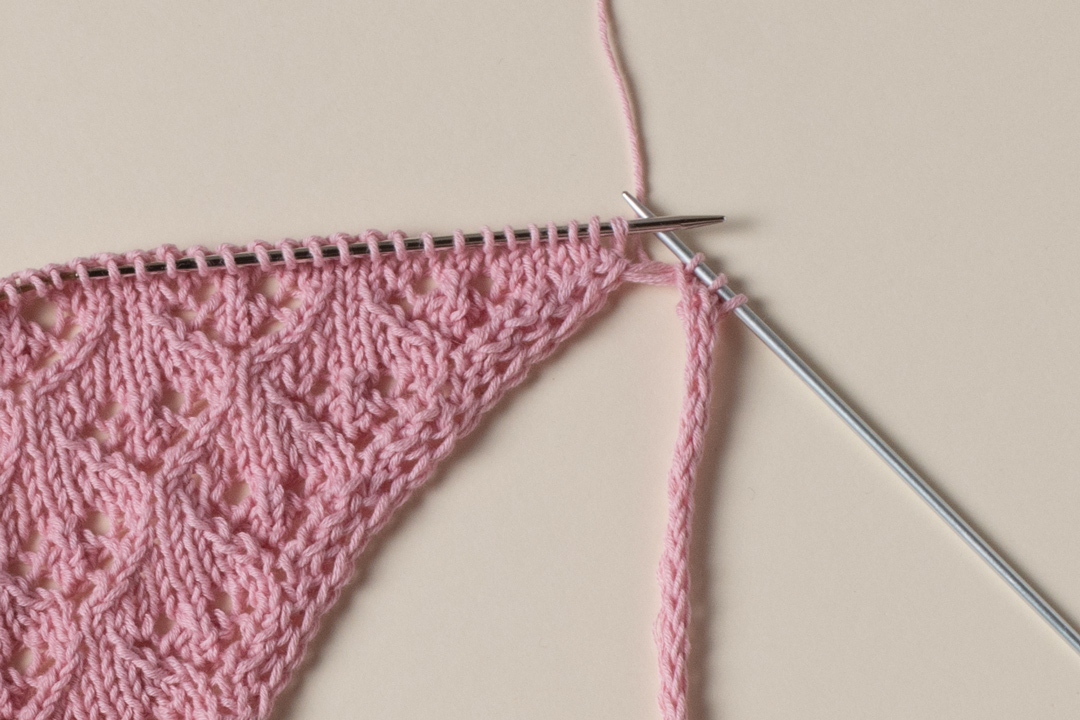
Connecting the I-Cord to the Bandana
Transfer the 3 i-cord stitches to the needle, holding the live bandana stitches.
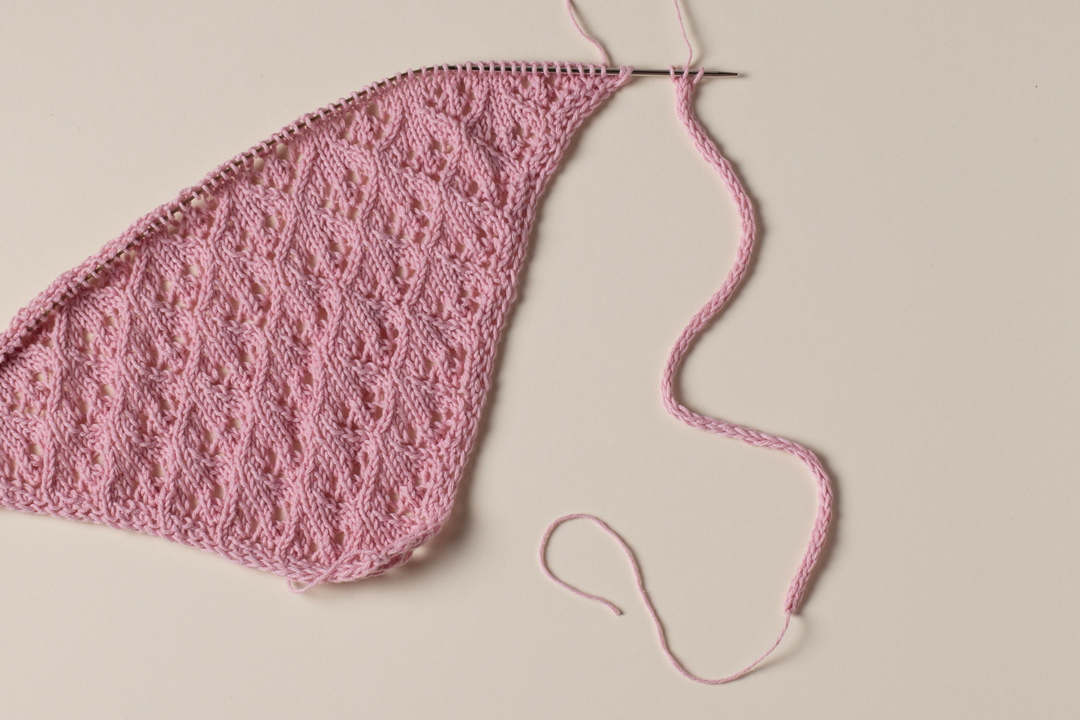
Knit the first two i-cord stitches, then work ssk, knitting the last i-cord stitch together with the first bandana stitch.
This is the point where the separate tie becomes attached to the knitted triangle. The ssk effectively joins one bandana stitch to the i-cord while maintaining the narrow cord structure.
Working the I-Cord Edging Across the Bandana
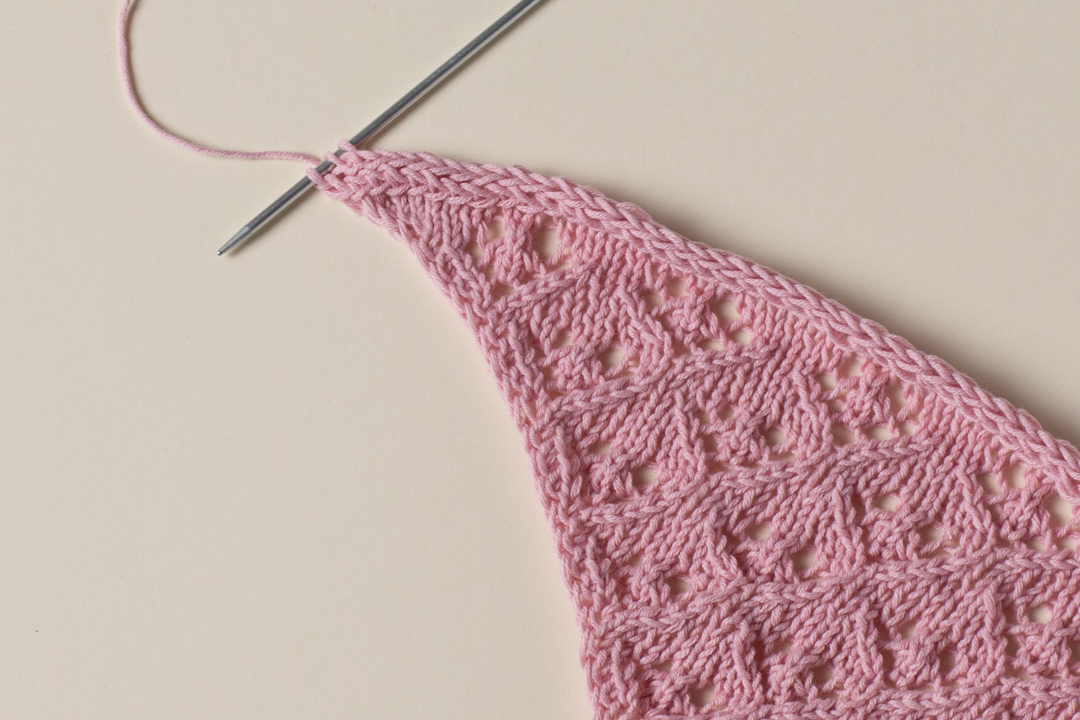
Transfer the first 3 stitches to the needle, holding the live bandana stitches.
Then repeat the following sequence:
*k2, ssk, transfer 3 stitches to the needle, holding the live bandana stitches*
Continue until you have 3 stitches left.
This technique gradually incorporates the live bandana stitches into the i-cord edging. It is a clever construction because the border is created at the same time as the stitches are worked off, rather than requiring a separate sewn-on trim.
Creating the Second Tie
Once the bandana stitches have been incorporated into the edging and you have 3 stitches left, work the second i-cord tie in the same manner as the first.
Repeat:
*Slip the 3 stitches to the right side of the needle. Knit 3.*
Knit the i-cord until the tube measures approximately 30 cm.
Then bind off, cut the yarn, and weave in the tails.
Practical Tips for a Clean Finish
Keep the Edge Tension Relaxed
The pattern specifically instructs you not to tighten the edge stitches or the increased stitches. This is particularly important with i-cord edging because pulling too firmly can make the side edge narrower and less flexible than intended.
Watch the Yarn Overs
Yarn overs are a major part of the lace design. They create the open spaces that give the bandana its delicate appearance. When working a yarn over next to a decrease, make sure the yarn movement is clear before proceeding to the next stitch.
Use Stitch Counts as Checkpoints
The set-up section gives explicit stitch counts after the right-side shaping rows: 7 stitches after Row 1, 9 after Row 3, 11 after Row 5, 13 after Row 7, and 15 after Row 9. These checkpoints are useful for confirming that the increases and decreases have been worked correctly.
Measure the I-Cord Rather Than Guessing
Both ties are approximately 30 cm long. Using a measuring tape provides a more reliable result than estimating the length by eye. The first tie should reach approximately 30 cm before it is connected to the bandana, and the second tie is also worked to approximately 30 cm before binding off.
Troubleshooting Common Pattern Issues
The Triangle Does Not Look Symmetrical
Check the right-side increases first. The pattern increases 2 stitches on every right-side shaping row by using M1R and M1L around the center section and the i-cord edges. If one increase is missing, the shape can become uneven.
The Edge Looks Tight
Review your tension on the first and last 2 stitches. The pattern notes specifically say not to tighten the edge stitches. Keeping them relaxed helps the i-cord edging form properly.
The Lace Pattern Looks Confusing
Work through the 8-row repeat one row at a time. The lace rows change from Row 1 through Row 7, while Rows 2, 4, 6, and 8 are the same simple wrong-side structure. Separating the repeat into individual rows can make the sequence easier to follow.
The I-Cord Connection Is Difficult to Follow
Remember that the 3 i-cord stitches are repeatedly transferred back to the needle while the live bandana stitches remain available to be incorporated. The key joining movement is the ssk, which knits the last i-cord stitch together with the next bandana stitch.
Blocking and Finished Measurements
The specified gauge is measured after blocking: 10 x 10 cm (4 x 4in) = 24 sts x 32 rows in stockinette stitch. Blocking is therefore relevant when comparing your finished fabric with the stated gauge and measurements.
The finished measurements for the one-size bandana are 46cm / 18in in length without ties and 21cm / 8.25in in height.
Because this is a lace accessory, blocking can help the stitch pattern open and allow the shape to settle. If you are aiming for the stated dimensions, use the measurements as a reference when determining whether your fabric has reached the intended size.
Quick Construction Checklist
- Gather the Drops Safran light rose yarn, 3mm (US 2.5) needles, 3mm (US 2.5) DPNs, tapestry needle, measuring tape, and scissors.
- Cast on 5 stitches.
- Work the set-up rows through Row 10.
- Begin the 8-row lace pattern repeat.
- Repeat rows 1-8 seven more times or until you reach your desired length.
- Work the two final shaping rows.
- Break the yarn, leaving a 10cm (4″) tail, and leave the live stitches on the needle.
- Cast on 3 stitches for the first i-cord tie.
- Work the first tie to approximately 30 cm.
- Connect the i-cord to the live bandana stitches using the specified ssk construction.
- Continue the i-cord edging until 3 stitches remain.
- Work the second i-cord tie to approximately 30 cm.
- Bind off, cut the yarn, and weave in the tails.
Frequently Asked Questions
What size is the In Bloom Bandana?
The pattern is written for one size. The finished measurements are 46cm (18in) in length without ties and 21cm (8.25in) in height.
What yarn does the pattern use?
The original pattern uses Drops Safran in light rose, uni color 77, with 1 ball required.
What knitting needle size is required?
The main bandana uses 3mm (US 2.5) knitting needles. A pair of 3mm (US 2.5) DPNs is used for the ties.
Can the bandana size be changed?
Yes. The pattern states that you can modify the size by adding or subtracting repeats. The main pattern is an 8-row repeat, and the instructions say to repeat rows 1-8 seven more times or until you reach your desired length.
Why does the pattern use i-cord edging?
The i-cord edging gives the bandana neat-looking sides and helps prevent the edges from curling. It also provides a clean transition into the i-cord ties.
How long are the ties?
Each i-cord tie is worked to approximately 30 cm.
Can M1L and M1R be simplified?
The pattern notes that if you want to simplify the pattern, you can replace M1L/M1R with yarn over.
Final Thoughts
The In Bloom Bandana brings together several useful knitting techniques in a compact project. Its triangular construction begins with only 5 stitches, then expands through carefully placed increases while the lace motifs develop across the growing fabric. The repeated 8-row pattern provides a recognizable rhythm, and the simple wrong-side rows give you natural checkpoints between the more involved lace rows.
The finished accessory is especially suited to spring and summer because the design uses sport-weight cotton yarn and an open lace stitch. The i-cord edging adds structure without making the project visually heavy, while the matching i-cord ties complete the design and make the bandana easy to wear.
For the cleanest result, take your time with the stitch counts, keep the edge tension relaxed, and measure the ties rather than estimating their length. Most importantly, preserve the order of the construction steps when transitioning from the triangular bandana to the first tie, the i-cord edging, and finally the second tie.
With its manageable size, adaptable length, and combination of lace and i-cord techniques, this project is a useful addition to a knitter’s handmade accessory collection. Once the final tails are woven in and the fabric has been blocked, the delicate triangular shape and floral-inspired lace character of the In Bloom Bandana can be appreciated in full.:::