
Super Soft Christmas Sprinkle Pudding Cookies Recipe
The festive season is notorious for bringing families together through baking, a practice that not only fills the house with delightful aromas but also creates cherished memories. Among the gems of holiday baking are Christmas sprinkle pudding cookies, which perfectly encapsulate the spirit of the season. These cookies present a delightful amalgamation of textures that begin with a soft, cake-like center enveloped in colorful festivity from the sprinkles. The combination of vanilla pudding mix and softened butter ensures an exceptionally moist bite, while the warm sweetness of sugar adds a flavor that’s comforting and familiar.
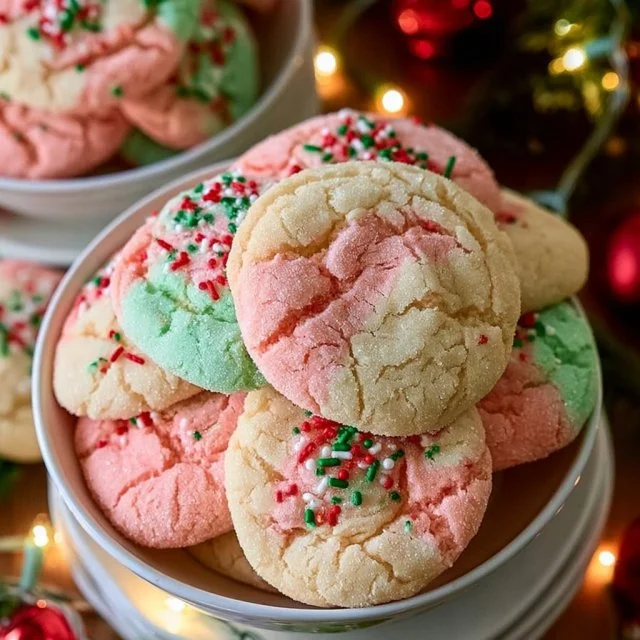
Visually, these cookies are a celebration on their own. The bright, festive red and green sprinkles peeking through the soft golden dough create a cheerful display that can instantly elevate any holiday gathering. Each bite offers a comforting softness that almost melts in your mouth, making them perfect for both seasoned cookie lovers and those who may not have a sweet tooth. Given their inviting flavors and textures, these cookies are more than just a seasonal treat; they’re a delightful way to spread cheer during family gatherings, holiday parties, or simply as an everyday snack to enjoy with a warm cup of cocoa.
These cookies not only offer deliciousness but also versatility. Their soft texture and rich flavor make them adaptable for any occasion, whether it’s a cookie swap, a family dessert after Christmas dinner, or as a sweet surprise for Santa on Christmas Eve. As you gather around the kitchen with family or friends, the experience of baking and enjoying these cookies becomes just as significant as the treats themselves.
What Makes This Recipe Special
What sets these Christmas sprinkle pudding cookies apart from standard cookies is their unique use of vanilla pudding mix, which contributes to their remarkable softness. The pudding mix provides additional moisture, ensuring that the cookies maintain their tender, almost cake-like texture even after baking. Coupled with the sprinkles, which add not just a visual flair but also a subtle crunch, each bite is a delightful experience that freshens the traditional cookie recipe palette.
Furthermore, this recipe offers an easy preparation method, making it accessible for bakers of all skill levels. Many cookie recipes can be intimidating with their complex techniques or long ingredient lists, but this particular one simplifies the process without sacrificing flavor or presentation. The steps are straightforward and forgiving, allowing for minor adjustments without the need for advanced baking knowledge. This attribute makes it a popular choice during the busy holiday season when everyone seeks efficiency while still wanting to impress their guests.
Another aspect to appreciate is the versatility of this recipe. While the original calls for red and green sprinkles, feel free to adapt based on what you have on hand or tailored to specific festive themes. Pastel shades for Easter or thematic colors for birthdays can easily replace traditional holiday hues. This little bit of flexibility enhances the cookies with personal touches, making them suitable for various celebrations throughout the year.
Ingredient Overview and Helpful Notes
Understanding the components of this recipe sheds light on how each ingredient contributes to the delicious outcome. The primary ingredients include vanilla pudding mix, softened butter, sugar, all-purpose flour, baking soda, salt, an egg, vanilla extract, and festive sprinkles. Each plays a crucial role in creating the lovely, tender cookies that are so appealing.
-
Vanilla Pudding Mix: This is the star ingredient that differentiates these cookies from standard recipes. The pudding mix adds moisture and a unique flavor profile, resulting in a cookie that has a soft, cake-like texture. When selecting your pudding mix, look for a high-quality brand without artificial flavorings to ensure the best taste.
-
Butter: Softened butter is essential for creating the right texture. It helps to cream with sugar, which in turn traps air and contributes to the fluffiness of the final cookie. Always allow the butter to reach room temperature to ensure it incorporates smoothly; this results in a more uniform dough.
-
Sugar: Granulated sugar adds sweetness and also aids in the cookie’s browning. It’s important to measure accurately, as too much sugar can lead to overly sweet cookies, whereas too little can cause a bland flavor.
-
All-Purpose Flour: This ingredient provides structure to the cookies. The gluten development during mixing gives the cookies their necessary support. When measuring flour, ensure it’s spooned into the measuring cup and leveled off for accuracy; packing flour can lead to denser cookies.
-
Baking Soda and Salt: Baking soda acts as a leavening agent, helping the cookies to rise and become fluffy. Salt enhances the overall flavors and balances the sweetness, making every bite enjoyable.
-
Egg and Vanilla Extract: The egg binds the ingredients together while adding richness. The vanilla extract enhances the sweet, comforting flavors, making each cookie taste homemade. Opt for pure vanilla extract for the best flavor profile.
-
Sprinkles: These are not only decorative but also provide a fun crunch. The choice of sprinkles can reflect the occasion, making these cookies adaptable beyond the holiday season. Choose vibrant, high-quality sprinkles to ensure they maintain their color during baking.
Choosing high-quality, fresh ingredients is paramount to achieving the best results in baking. Each ingredient complements the others, creating a harmony of flavor and texture that results in delicious cookies that will impress anyone who tries them.
Nutrition & Recipe Details
Nutritional values can vary greatly based on specific brands, ingredient variations, and portion sizes. However, it’s useful to get a general idea of what to expect nutritionally when indulging in these delicious cookies.
| Item | Value |
|---|---|
| Prep time | 15 minutes |
| Cook time | 10-12 minutes |
| Store time | 3-5 days at room temperature |
| Calories | Approximately 120 per cookie |
| Protein | 1.5g |
| Carbohydrates | 17g |
| Fat | 5g |
These estimates provide an approximation for personal tracking of nutritional intake and can help when planning servings for events. Customizing the cookies with different add-ins can alter their nutritional profiles further, allowing for creative adjustments suited to various dietary needs.
How to Make Super Soft Christmas Sprinkle Pudding Cookies
While baking may seem daunting, the process for these cookies is straightforward and enjoyable. Before diving in, it’s always best to prepare your ingredients, ensuring that everything is measured out and ready to go. This not only streamlines the baking process but also makes it easier to enjoy the experience of creating something delicious.
The first step is to gather your ingredients and equipment, which includes a large mixing bowl, a whisk or electric mixer, measuring cups, a baking sheet, and parchment paper. Having everything organized will help you keep track of what you need at each stage and avoid forgetting any crucial steps.
Once your ingredients are prepped and your workspace is clear, you can begin the mixing process. Combining the wet and dry ingredients thoughtfully is key to achieving not just the right texture, but also the best flavor in your cookies.
Ingredients
| Ingredient | Quantity |
|---|---|
| Vanilla pudding mix | 1 cup |
| Butter, softened | 1 cup |
| Sugar | 1 cup |
| All-purpose flour | 2 cups |
| Baking soda | 1 teaspoon |
| Salt | 1/2 teaspoon |
| Egg | 1 |
| Vanilla extract | 1 teaspoon |
| Festive red and green sprinkles | 1/2 cup |
Before you start the mixing process, it’s important to prepare your ingredients properly. Begin by measuring the butter, ensuring it’s soft but not melted. If your butter is too hard, you can cut it into smaller pieces to soften more quickly. Next, gather the flour, baking soda, and salt to combine in one bowl for dry ingredients, while whisking together the pudding mix separately. This method prevents clumping and ensures even distribution of flavors.
Once all preparations are complete, you’ll be ready to mix the ingredients into a cohesive dough that will transform into delicious cookies.
Step-by-Step Instructions
Baking Christmas sprinkle pudding cookies is wonderfully straightforward, and following each step carefully will lead you to achieve delightful results. Here’s the detailed breakdown of the baking process:
-
Preheat the oven to 350°F (175°C): This step is vital as it prepares the oven for the baking process, ensuring the right temperature when you place the tray of cookies inside. A preheated oven helps cookies bake evenly, providing a consistent texture.
-
Cream together the softened butter and sugar: In a large mixing bowl, use an electric mixer or a whisk to combine the softened butter and sugar. Mix until the mixture is light and fluffy, typically 2-3 minutes. The goal here is to incorporate air into the butter, which helps the cookies rise nicely and gives them a delightful texture.
-
Beat in the egg and vanilla extract: Next, add the egg and the vanilla extract to the creamed butter and sugar mixture. Beat until well-combined. The egg adds moisture and richness, while the vanilla boosts the flavor.
-
Stir in the vanilla pudding mix: Pour in the vanilla pudding mix and mix until fully incorporated. This step is crucial, as the pudding mix contributes significantly to the moisture and softness of the cookies, ensuring they are tender bites reminiscent of cake.
-
Combine dry ingredients: In a separate bowl, whisk together the flour, baking soda, and salt. This step ensures that the baking soda is evenly distributed throughout the flour, preventing any clumping, and guaranteeing even rising.
-
Gradually combine wet and dry ingredients: Carefully add the dry ingredient mixture to the wet mixture, stirring gently until a dough forms. Avoid overmixing, as this can lead to tougher cookies. Scrape the sides of the bowl to incorporate all ingredients, ensuring everything is well-combined.
-
Fold in the sprinkles: Once the dough is ready, gently fold in the festive red and green sprinkles. Be careful not to overmix at this stage; you want the sprinkles distributed throughout but without breaking them down.
-
Drop dough onto a baking sheet: Using a spoon or cookie scoop, drop tablespoons of dough onto a baking sheet lined with parchment paper, ensuring they are spaced about 2 inches apart. Spacing is essential as the cookies will spread while baking.
-
Bake for 10-12 minutes: Place the baking sheet in the preheated oven and bake for 10-12 minutes, or until the edges are lightly golden. It’s important to keep an eye on them as baking time can vary slightly depending on your oven. When the edges start to golden, they are typically done.
-
Cool before transferring: Allow the cookies to cool for a few minutes on the baking sheet before transferring them to a wire rack to cool completely. This step allows them to set without becoming too firm. Enjoy your festive treats!
Understanding the Flavor and Texture
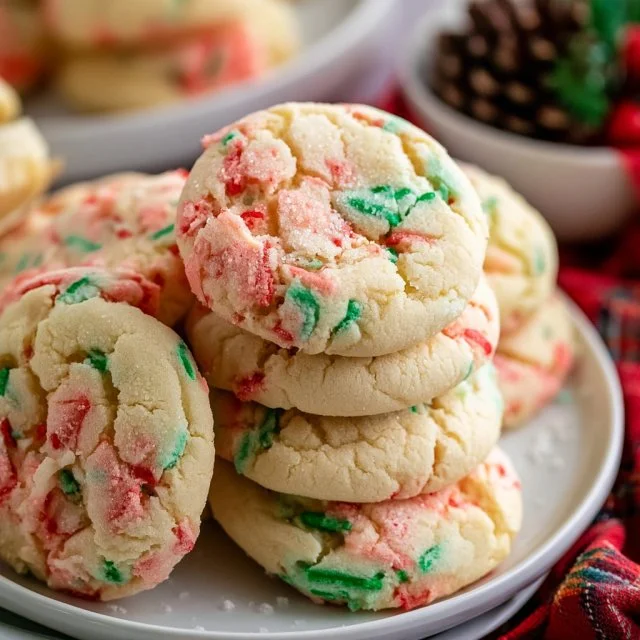
Upon first bite of a freshly baked Christmas sprinkle pudding cookie, your taste buds are greeted with a delightful blend of flavors. The rich buttery sweetness complements the warmth of the vanilla, which fills your mouth with a comforting embrace reminiscent of home. Each cookie offers a tender softness, thanks to the pudding mix, creating a pleasing texture that contrasts beautifully with the crunch of the festive sprinkles.
The visual appeal of the cookies plays a significant role in their charm. The bright red and green sprinkles stand out against the pale, golden dough, radiating a joyful holiday spirit. Texturally, the cookies present a soft chew in the center with slightly crisp edges. The combination of softness and a slight crunch provides a multi-dimensional eating experience that leaves one wanting another.
One of the most admired aspects of these cookies is their ability to maintain their moisture and freshness for days. Thanks to the pudding mix and butter, even after a day or two, the texture remains inviting rather than becoming dry or stale. Each cookie remains soft and tender, making them perfect for snacking throughout the holiday season and beyond.
Pro Tips
Mastering the art of cookie baking can significantly enhance the results. A few simple tips can take your Christmas sprinkle pudding cookies from good to extraordinary. Here are some expert suggestions to make your cookies even better:
| Tip | Description |
|---|---|
| Use room temperature ingredients | Let your butter and egg sit out for about 30 minutes before starting. This ensures they mix well, resulting in a smoother dough and a better texture. |
| Don’t overmix the dough | Once you incorporate the dry ingredients with the wet, mix just until combined. Overmixing can lead to tougher cookies, which isn’t the goal for this soft recipe. |
| Chill the dough for perfect shaping | If you find your cookie dough a bit sticky, chilling it for 15-20 minutes can make it easier to handle and form perfect dough mounds. |
| Try different sprinkle colors | Feel free to change up the colors for various holidays or occasions. This customization keeps your cookies festive all year round! |
In addition to these specific tips, consider the baking environment. Ensuring your oven is properly calibrated can yield more consistent results. If baked too fast or at the wrong temperature, you may end up with cookies that are either raw in the middle or overly crispy.
You might also want to experiment with your own add-ins, such as chocolate chips or nuts. While this recipe shines as it is, these variations can infuse new flavors and textures while retaining the soft cookie essence.
Why You’ll Love This Recipe
This cookie recipe boasts a delightful combination of factors that not only simplifies the baking experience but produces eye-catching and delicious results. They’re soft, flavorful, and festive, appealing to both young and old alike. The ease of preparation makes them perfect for a holiday bake in which several people can join in, creating treasured memories as they mix, bake, and enjoy these treats together.
The availability of ingredients is another appealing factor. Butter, flour, sugar, and vanilla extract are staples in most kitchens, meaning you likely won’t have to run out to buy any special components to make this recipe. The pudding mix, while slightly less common, is widely available at grocery stores, making this recipe accessible and accommodating for last-minute baking needs.
Another strength of this recipe is its adaptability. As mentioned, the cookie can easily cater to many occasions beyond Christmas by altering the sprinkles or adding new flavors. Whether you’re prepping for a birthday, an Easter celebration, or just looking for a fun afternoon treat, this recipe can be reimagined to fit any theme.
Lastly, they are perfect for sharing. Package them in festive tins or boxes for gifting, or arrange them neatly on a platter for parties. Either way, you’ll be providing a treat that garners smiles and appreciation, making your baking efforts worthwhile.
How to Serve Super Soft Christmas Sprinkle Pudding Cookies
Presentation is key when serving baked goods, and these cookies can shine on any table. Start by arranging them on a large platter or tiered cake stand, allowing the colorful sprinkles to grab everyone’s attention. For an additional festive touch, consider garnishing the plate with fresh mint leaves or holly sprigs, giving your cookie display a heartwarming holiday vibe.
Pair these cookies with complementary beverages for added enjoyment. Hot cocoa topped with whipped cream, a classic eggnog, or a spiced chai tea harmonize beautifully with the sweet flavors of the cookies. For an adult gathering, consider a warm spiced cider, which brings out the cookie’s sweetness while introducing comforting spices.
Additionally, consider offering these cookies with an assortment of dips or spreads. A smooth chocolate ganache or a sweet vanilla glaze can take the indulgence up a notch. Guests may enjoy mixing and matching bites, allowing their creative flavors to come into play.
Remember, these cookies can shine as the main attraction, but they can also be paired tastefully with other holiday treats such as peppermint bark or a cheese platter, creating a delightfully balanced dessert table fit for gatherings of all types.
How to Store Super Soft Christmas Sprinkle Pudding Cookies
Storing your cookies properly is essential for maintaining their soft, delicious texture. The first step is to ensure your cookies have cooled completely after baking. Placing warm cookies in a container can trap steam, leading to a soggy outcome rather than the desired soft texture.
For short-term storage, keep them in an airtight container at room temperature. These cookies will typically stay fresh and maintain their soft texture for about 3-5 days. To prevent them from sticking together, consider placing parchment paper between layers in the container.
For longer storage, you may want to freeze the cookies. Place cooled cookies in a single layer on a baking sheet to freeze initially. Once they are solid, transfer them to a zip-top freezer bag or an airtight container, separating layers with parchment paper. This method helps them maintain their freshness and prevents them from becoming freezer burnt. Frozen cookies can last for up to 3 months.
Before serving frozen cookies, allow them to thaw at room temperature for about 15-20 minutes. You may also choose to warm them slightly in the microwave for 10-15 seconds to restore some of their freshly-baked texture. Be careful not to overheat, as this can cause them to become dry.
Tips to Make Super Soft Christmas Sprinkle Pudding Cookies
Improving your cookie-making skills is a rewarding endeavor, especially with this delightful recipe. Begin by focusing on ingredient temperature. Ensure that your butter is at room temperature, as this promotes better mixing and ensures the cookie dough incorporates smoothly. Cold butter can lead to uneven baking and incorrect dough consistency, resulting in flat or tough cookies.
Next, pay close attention to mixing. When you combine the wet and dry ingredients, take care not to overmix. Overmixing can lead to gluten development, resulting in cookies that are more like biscuits than the soft, tender treats you want. Mix just until the ingredients are combined; the dough should feel cohesive but not overly smooth.
Timing is also paramount; remove cookies from the oven when the edges appear set and slightly golden, as they continue baking on the warm baking sheet even after being taken out. Aim for a balance between underbaked and overbaked. For soft cookies, a slightly underbaked center will maintain moisture, resulting in the desired cake-like texture.
Lastly, do not hesitate to taste and adjust your ingredients in subsequent batches. If you desire a sweeter cookie, add a touch more sugar, or if you prefer a richer vanilla flavor, increase the amount of vanilla extract slightly. Baking is a science, but it can also accommodate personal preferences lovingly.
Variations and Substitutions
Once you master the base recipe, feel free to experiment with various adaptations to cater to different tastes or dietary needs. Here are some practical variations and substitutions:
-
Gluten-Free Version: To make these cookies gluten-free, substitute the all-purpose flour with a gluten-free blend that works well for baking. Products containing xanthan gum can help replicate the texture traditionally provided by gluten.
-
Dairy-Free Option: For those avoiding dairy, substitute softened butter with a plant-based butter stick. Ensure that any pudding mix used is dairy-free; there are options available that cater to lactose intolerance.
-
Nutty Flavoured Cookies: For an added crunch and flavor, consider mixing in chopped nuts, such as walnuts, pecans, or almonds, into the dough. These nuts can contrast beautifully with the soft texture while offering a delicious, nutty flavor.
-
Chocolate Chips or Other Mix-Ins: Feel free to fold in semi-sweet chocolate chips or even white chocolate chunks to balance the sweetness of your cookies. Mixing in other types of candy can provide a burst of flavor and excitement for each bite.
-
Seasonal Flavor Infusions: You can easily tweak the recipe to suit different times of the year. For example, adding a teaspoon of peppermint extract can infuse the cookies with a refreshing twist perfect for the winter months. Likewise, cinnamon or nutmeg can provide warmth and festive flavors if desired.
These variations encourage creativity while keeping the integrity of the original recipe intact, making it suitable for various palates.
Storage and Reheating
When storing leftover cookies, consider dividing them into smaller portions, which can help maintain freshness. Package cookies in airtight containers and store them in a cool, dry place or in the refrigerator if you’ve added dairy elements. Properly wrapped, they can last up to a week. Freezing cookies is also an excellent option if you want to save them for later; simply reheat to enjoy fresh flavors again.
When it comes to reheating, there are several methods. For the microwave, place one cookie on a plate and heat on medium power for about 10-15 seconds, until warmed but not hot. Be cautious with this method, as microwaving for too long can result in a dry texture.
If you prefer a crispier exterior, a toaster oven or conventional oven will serve you better. Preheat the oven to 350°F (175°C), place the cookies on a baking sheet, and reheat for about 5-7 minutes. This longer approach helps rejuvenate the cookies while maintaining their overall moisture.
For an even more delightful texture, consider adding a small drizzle of melted chocolate over the cookies after reheating. It’s a simple way to elevate your cookies from day-old to a gourmet treat.
Customization Ideas
Tailoring flavors and textures to your liking is a highly enjoyable aspect of baking. With these cookies, you can experiment with various enhancements.
Start by adjusting the sweetness level. If you prefer a less sweet cookie, consider reducing the sugar slightly; however, be cautious as this may impact the overall texture. If you’re a fan of spices, adding a pinch of cinnamon or ginger could infuse them with a lovely warmth.
You might also consider swapping the vanilla pudding mix for a butterscotch or caramel-flavored substitute, which would dramatically alter the cookie’s flavor while keeping the delightful softness intact.
For texture adjustments, incorporating shredded coconut or oats could create an exciting twist. Coconut provides a chewy texture that contrasts beautifully with the soft cookie base, while oats add a hearty flavor.
Lastly, toppings can be a great area for customization. Prior to baking, sprinkle additional festive sprinkles or even a light dusting of powdered sugar once cooled for an inviting look. Each of these ideas paves the way for truly personalized cookies that speak to your preferences.
Common Mistakes to Avoid
Baking cookies can be simple, but various pitfalls could hinder your results. Here are five common mistakes to keep in mind:
-
Using cold butter: Cold butter doesn’t cream well, leading to dense cookies. Always ensure your butter is at room temperature before starting to achieve a fluffy dough.
-
Overmixing the dough: Overmixing leads to gluten development, resulting in tough cookies instead of soft ones. Mix just until combined, ensuring a tender cookie.
-
Baking at the wrong temperature: An uncalibrated oven can cause uneven baking. Always check your oven’s temperature with an oven thermometer and adjust accordingly to ensure perfect baking.
-
Not cooling cookies properly: Transferring cookies while still too warm can cause them to break apart or become soggy. Always allow them to cool slightly on the baking sheet before moving them to a wire rack.
-
Ignoring the importance of rest time: If you’re in a hurry and skip the resting time in the refrigerator for stickier doughs, you’ll end up with cookies that spread too much. Resting the dough allows for better shape and texture.
By being mindful of these common mistakes, you can refine your baking skills and produce consistently wonderful cookies.
Serving Occasions
These Christmas sprinkle pudding cookies are versatile treats suitable for various occasions. Their bright colors and delightful flavors make them an excellent choice for holiday gatherings, potlucks, or festive celebrations. Place them on a dessert table, and they will surely catch everyone’s eye.
They’re also ideal for cozy family nights gathered around the kitchen table, providing a delicious way to continue traditions. With their soft texture, these cookies can even be enjoyed as a sweet breakfast paired with a hot drink or as a midday snack alongside lunch.
Moreover, they serve as great gifts. Packing them in decorative tins or holiday-themed bags makes for thoughtful homemade gifts that showcase your baking prowess while spreading joy during the holiday season.
Why Make This Recipe?
Opting for these Christmas sprinkle pudding cookies means bringing warmth and cheer into your kitchen during the festive season. Their unique blend of softness, flavor, and visual appeal sets them apart from many traditional cookie recipes, ensuring they remain memorable for all who enjoy them.
Not only do they cater to diverse tastes but they also allow for personalization and adaptation, making them a perennial favorite for many baking occasions. Whether you bake them for personal enjoyment or share them with family and friends, the positive responses will encourage you to keep this recipe in rotation year after year.
Furthermore, it’s a fantastic way to introduce younger bakers to the kitchen, allowing them to enjoy the process of creating something beautiful and delicious that symbolizes togetherness. The fond memories created during baking are just as cherished as the cookies themselves.
Make-Ahead Preparation
If you’re planning to bake with limited time, there are components of this recipe you can make ahead. To save time, try preparing the cookie dough in advance and refrigerating it in an airtight container. Chilling the dough helps it firm up, making it easier to scoop and bake, and can enhance the flavors through additional resting.
If you want to go further, you can portion the cookie dough onto baking sheets, freeze them, and transfer them into labeled zip-top bags. This allows you to bake fresh cookies whenever you desire; simply pull out as many cookie dough balls as you need, letting them thaw slightly before baking.
It’s important to note that while the cookie dough can be made in advance, baking should generally be done close to serving time when possible. Freshly baked cookies maintain a delightful texture and flavor, often surpassing those that have been stored for extended periods.
Equipment and Kitchen Preparation
Having the right equipment can streamline your baking process and enhance the final outcome of your cookies. Begin with a large mixing bowl and an electric mixer or whisk—these are essential for creaming together the butter and sugar.
Consider using cookie sheets lined with parchment paper to prevent sticking and allow for even baking. If you’re using metal sheets, ensure they’re standard-sized for consistent heat distribution while baking.
A cookie scoop or a spoon is useful for portioning the dough accurately, ensuring uniform cookie sizes for even cooking. Finally, having a wire cooling rack will provide optimal airflow around your cookies, preventing a soggy bottom when cooling.
Keep your baking station organized with all ingredients pre-measured and available to minimize interruptions during the process for a smoother baking experience.
FAQs
-
Can I make these cookies in advance?
- Yes, you can make the dough ahead of time and refrigerate it for up to 3 days. You may also freeze the cookie dough for longer storage. Just be sure to thaw the dough slightly before baking.
-
What should I do if I don’t have vanilla pudding mix?
- If vanilla pudding mix is not available, you can substitute it with a similar flavor pudding mix or make a homemade version using cornstarch, sugar, and milk, adding vanilla extract for flavor.
-
How do I know when the cookies are done baking?
- Cookies are usually ready when the edges appear set and golden. The centers might look slightly underbaked, as they will continue cooking once removed from the oven.
-
What should I do if my cookies are flat?
- Flat cookies could be a result of not creaming the butter and sugar properly or using insufficiently cold butter. Check your butter’s temperature and make sure to measure ingredients accurately.
-
Can I freeze baked cookies?
- Yes, these cookies freeze well! Place them in airtight containers or zip-top bags separating layers with parchment paper, and they can last for up to 3 months. Thaw at room temperature before serving.
-
Can I add other mix-ins to the dough?
- Absolutely! Feel free to add chocolate chips, nuts, or dried fruit to customize the flavor and texture to your liking.
-
Are these cookies suitable for gift-giving?
- Yes, these cookies are perfect gifts! Package them in decorative tins or boxes to share with friends and family during the holiday season.
-
How do I store leftover cookies?
- Store cookies in an airtight container at room temperature for up to 5 days. Alternatively, you can freeze them for longer storage.
Disclaimer
Nutritional information is approximate and may vary based on ingredient brands, substitutions, portion sizes, and preparation methods.