
The Sage Garden Granny Square Tote is a beautiful crochet bag that combines classic granny square motifs with structured half double crochet panels. The result is a roomy everyday tote with a distinctive handmade character, decorative colorwork, and a sturdy shape. This project brings together traditional granny square construction, half-granny triangles, flat joining, seaming, blocking, and simple bag hardware in one satisfying pattern.
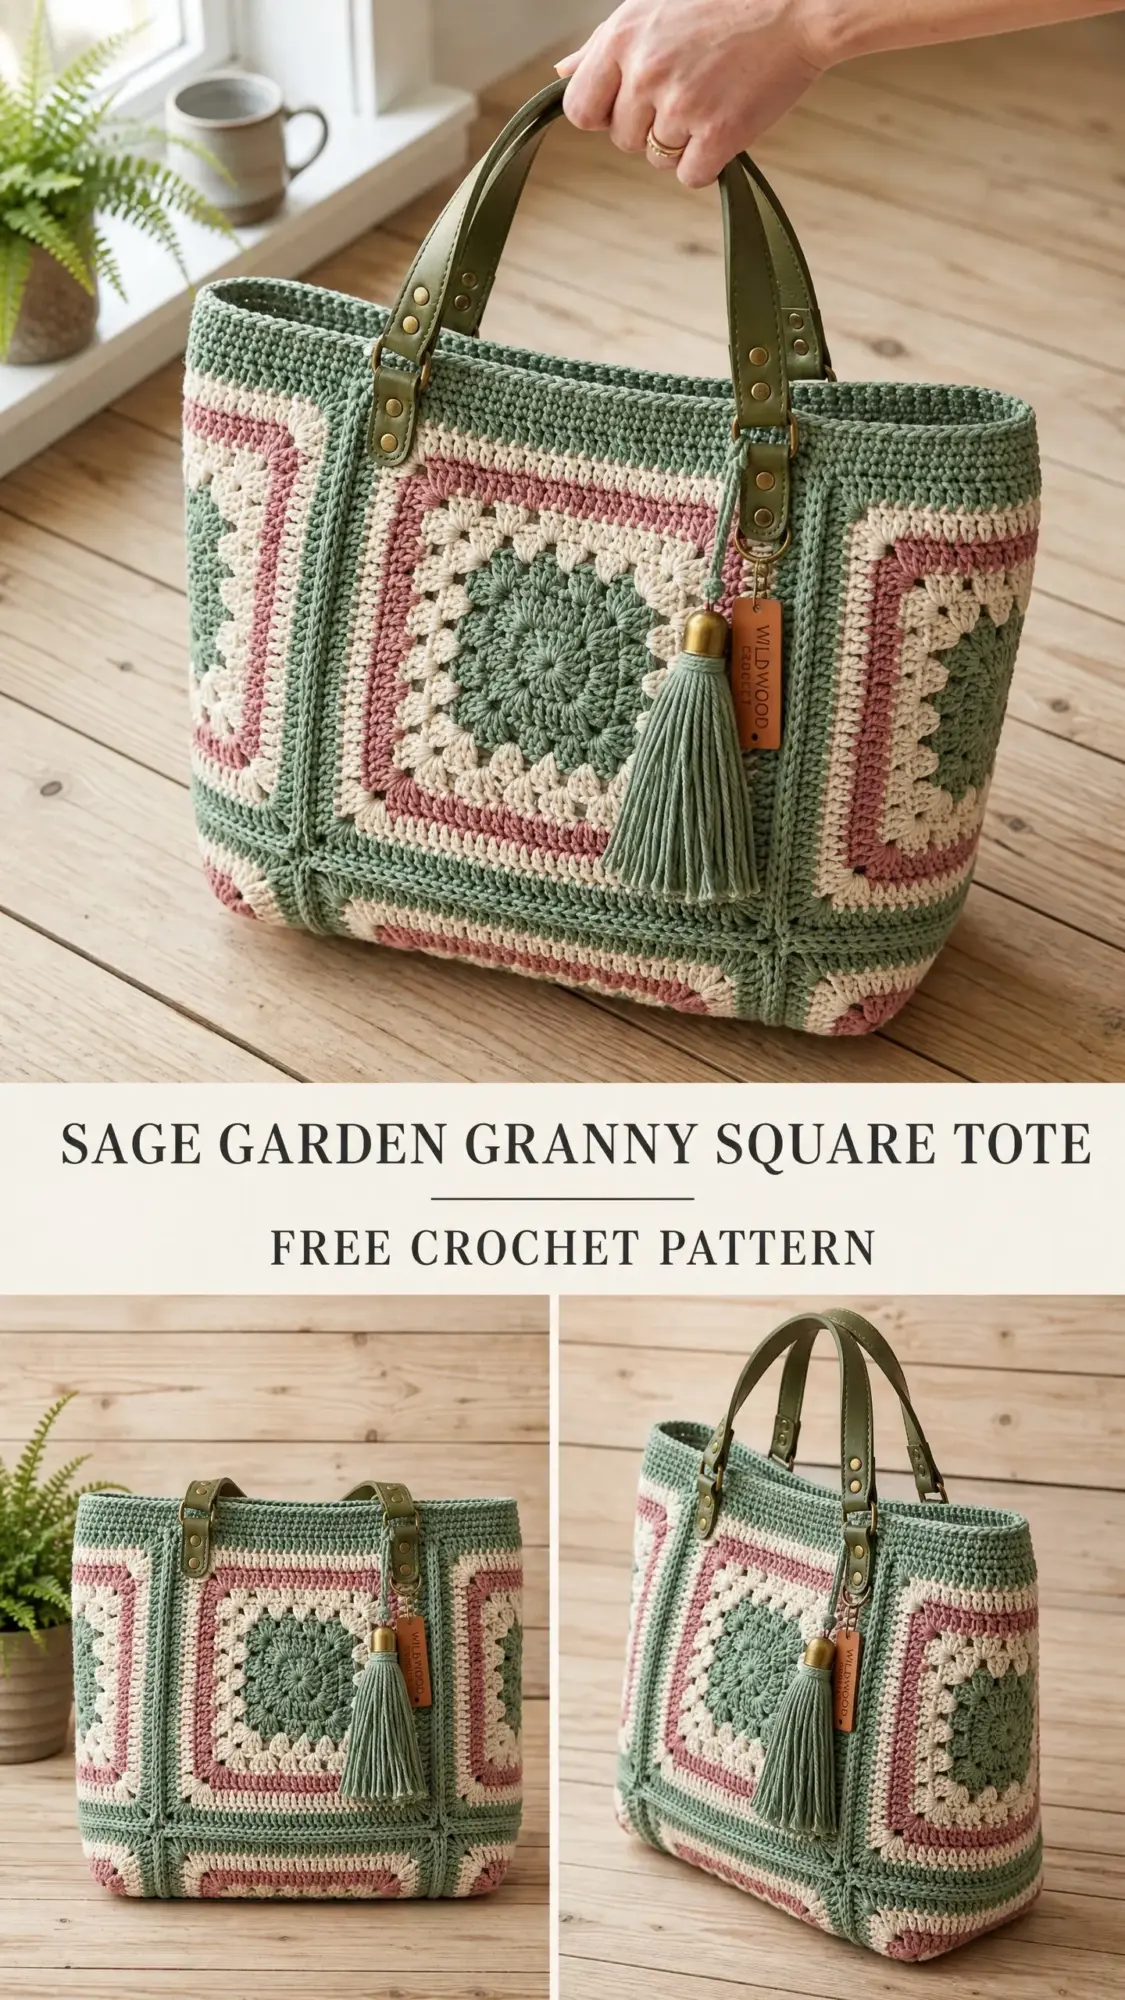
The inspiration behind this tote comes from a vintage bag discovered at a flea market. Its original color combination of sage green, dusty rose, and cream became the starting point for the design. The finished crochet version keeps that timeless feeling while adding the texture and visual interest of traditional granny motifs.
This is not simply a flat granny square bag. The construction uses separate front and back decorative panels, a solid base rectangle, and two side gussets. Once those components are joined, the bag develops a structured three-dimensional shape with enough room for everyday essentials.
What Makes This Crochet Tote Special?
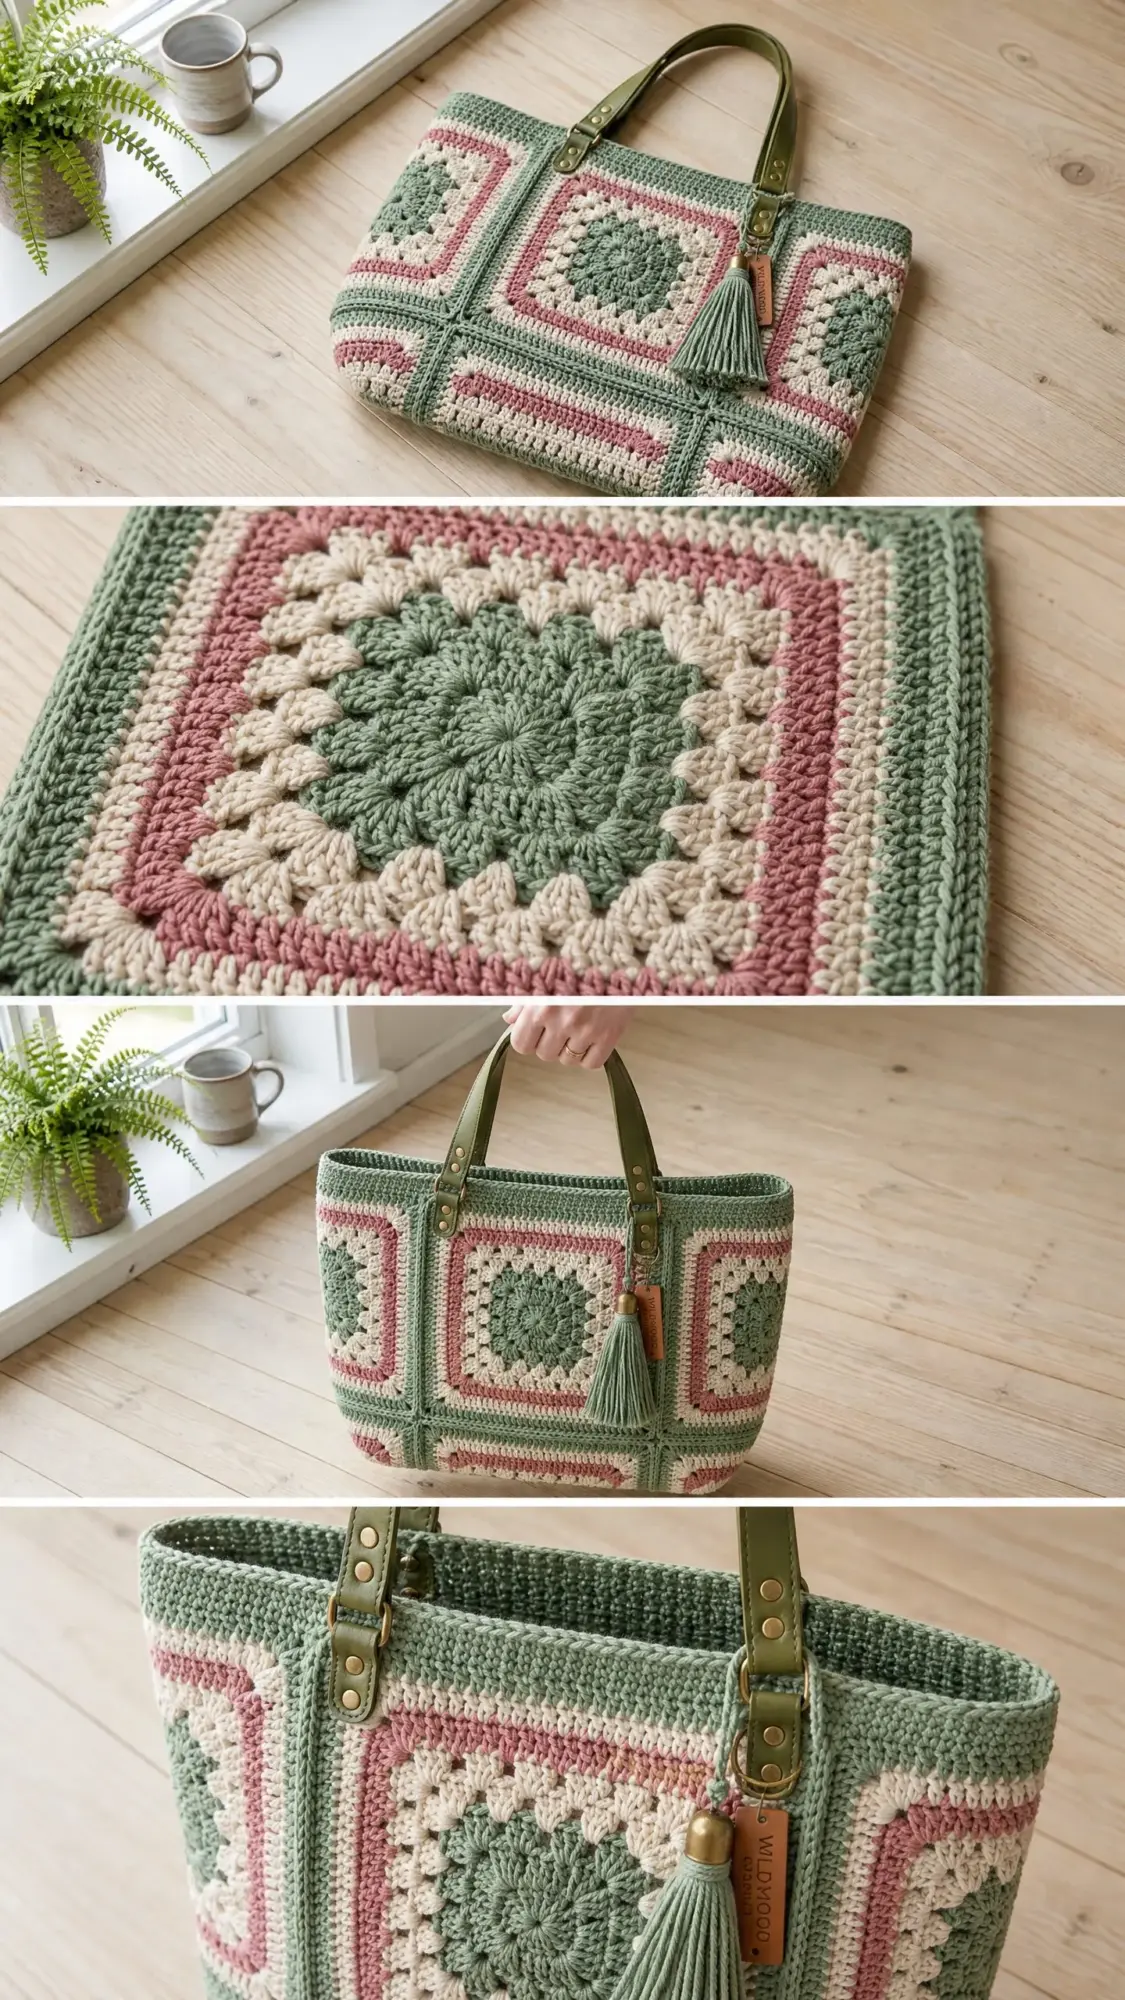
The Sage Garden Tote is designed for crocheters who want a project that feels decorative while still being practical. The front and back panels feature four large granny squares and four half-granny triangles. These motifs are framed with coordinating borders before they are connected to the base and side gussets.
The combination of granny clusters and solid half double crochet fabric creates an interesting contrast. The granny squares provide the main decorative element, while the hdc sections give the bag a more substantial structure.
The project is rated advanced beginner to intermediate. You should be comfortable reading multi-round crochet instructions, changing colors, making granny squares, joining motifs, and sewing crochet pieces together.
Finished Tote Dimensions
- Width: 15 inches / 38 cm
- Height: 11.5 inches / 29 cm for the body only
- Depth: 5 inches / 12.5 cm
- Handle drop: 9 inches / 23 cm
The dimensions are controlled largely by the size of the blocked granny squares, so checking gauge before beginning the complete bag is especially important.
Materials for the Sage Garden Tote
Yarn
The pattern uses DK weight yarn in three colors. Cotton or a cotton blend is recommended because it provides useful structure and clear stitch definition.
- Color A — Sage Green: 310 yards / 284 meters
- Color B — Dusty Rose: 180 yards / 165 meters
- Color C — Cream/Natural: 220 yards / 201 meters
- Total: approximately 710 yards / 649 meters
The suggested yarn options are Lion Brand 24/7 Cotton, Paintbox Yarns Simply DK, and Drops Safran. The original pattern recommends avoiding fuzzy or halo yarns because they can obscure the granny square structure.
Crochet Hooks
- US G-6 / 4.0 mm: for the granny motifs and bag body
- US F-5 / 3.75 mm: for the top border only
Notions
- Blunt-tip yarn needle
- Scissors
- 6 to 8 locking stitch markers
- Blocking mats
- Rust-proof pins
- Spray bottle with water
Bag Hardware
- One pair of olive green vegan leather or genuine leather bag handles, 22 to 24 inches total length
- Antique brass D-rings or rivets
- 4 antique brass Chicago screws or rivets with a 0.25-inch post
- 1 antique brass lobster clasp, 0.75 inch
- 1 small leather hang tag, optional
The pattern also provides optional materials for additional structure and lining: plastic canvas or firm craft foam measuring 14.5 inches x 4.5 inches for the base insert, and woven cotton lining fabric measuring 32 inches x 28 inches.
Gauge You Should Check First
Gauge is particularly important for this project because the granny square dimensions directly influence the finished bag measurements.
- Large granny square: 7 inches x 7 inches / 18 cm x 18 cm after blocking, through Round 7
- Solid hdc fabric: 16 hdc x 12 rows = 4 inches x 4 inches / 10 cm x 10 cm
Use the G-6 / 4.0 mm hook and DK weight cotton when checking gauge. Block the gauge square before measuring it. Do not skip this step if you want the finished components to correspond to the stated measurements.
Crochet Abbreviations
- ch: chain
- sl st: slip stitch
- sc: single crochet
- hdc: half double crochet
- dc: double crochet
- sp: space
- ch-sp: chain space
- sk: skip
- st(s): stitch(es)
- RS: right side
- WS: wrong side
- rep: repeat
- MR: magic ring
- PM: place marker
Understanding the Granny Cluster
The classic granny cluster is the main building block of the decorative squares. A three-double-crochet cluster is worked into the designated chain space. For a corner, the pattern uses two clusters separated by a chain-2 space. Along the sides, clusters are separated by chain-1 spaces.
For a corner, work a 3-dc cluster, chain 2, and another 3-dc cluster into the same corner chain space. For the sides, work a 3-dc cluster, chain 1, and another 3-dc cluster as specified by the pattern.
The Color Sequence for the Granny Squares
Each of the four large granny squares follows the same seven-round color sequence. Fasten off and change color after every round.
- Round 1: Color A — Sage
- Round 2: Color C — Cream
- Round 3: Color B — Dusty Rose
- Round 4: Color C — Cream
- Round 5: Color A — Sage
- Round 6: Color B — Dusty Rose
- Round 7: Color A — Sage
How to Crochet the Four Large Granny Squares
Make four identical large granny squares using Color A and the G-6 / 4.0 mm hook. Begin with a magic ring.
Round 1 — Color A
Chain 3, counting as the first double crochet. Work 2 dc into the ring, chain 2, then repeat 3 dc into the ring followed by chain 2 three times. Slip stitch to the top of the beginning chain 3. Fasten off.
Checkpoint: 4 clusters and 4 chain-2 corner spaces.
Round 2 — Color C
Join Color C with a slip stitch into any chain-2 corner space. Chain 3, work 2 dc into the same space, chain 2, and work 3 dc into the same space. Chain 1. Repeat the corner sequence around the square, placing 3 dc, chain 2, 3 dc into each next corner space with chain-1 spaces between the clusters. Slip stitch to the top of the beginning chain 3 and fasten off.
Checkpoint: 8 clusters, 4 chain-2 corner spaces, and 4 chain-1 side spaces.
Round 3 — Color B
Join Color B into a chain-2 corner space. Work the corner cluster sequence, then use chain-1 spaces and 3-dc clusters to build the sides. Continue around the square and join with a slip stitch to the beginning chain 3. Fasten off.
Checkpoint: 12 clusters, 4 chain-2 corner spaces, and 8 chain-1 side spaces.
Round 4 — Color C
Join Color C into any chain-2 corner space. Work the corner sequence, then work two 3-dc clusters along each side between the corners, using chain-1 spaces. Continue around and finish with a slip stitch to the top of the beginning chain 3. Fasten off.
Checkpoint: 16 clusters, 4 chain-2 corner spaces, and 12 chain-1 side spaces.
Round 5 — Color A
Join Color A into a chain-2 corner space. Work the corner sequence, followed by three 3-dc clusters along each side with chain-1 spaces between them. Continue around the square and slip stitch to the beginning chain 3. Fasten off.
Checkpoint: 20 clusters, 4 chain-2 corner spaces, and 16 chain-1 side spaces.
Round 6 — Color B
Join Color B into a chain-2 corner space. Work the corner sequence and four 3-dc clusters along each side, using chain-1 spaces between clusters. Complete the round and fasten off.
Checkpoint: 24 clusters, 4 chain-2 corner spaces, and 20 chain-1 side spaces.
Round 7 — Color A
Join Color A into a chain-2 corner space. Work the corner sequence and five 3-dc clusters along each side, separated by chain-1 spaces. Finish with a slip stitch to the top of the beginning chain 3 and fasten off.
Final square checkpoint: 28 clusters, 4 chain-2 corner spaces, and 24 chain-1 side spaces. After blocking, each square should measure exactly 7 inches x 7 inches.
Make Four Half-Granny Triangles
The half-granny triangles are used to fill the side areas of the front and back panels. Make four triangles using Color A and the G-6 / 4.0 mm hook.
Foundation
Chain 6.
Row 1 — WS, Color A
In the fourth chain from the hook, work the corner sequence of 3 dc, chain 2, and 3 dc. Chain 1, then work 3 dc into the last chain. Turn and fasten off.
Checkpoint: 2 clusters, 1 chain-2 space, and 1 chain-1 space.
Row 2 — RS, Color C
Join Color C to the top of the turning chain. Chain 3, work 2 dc into the same stitch, chain 1, then work the corner sequence into the chain-2 space. Chain 1 and work 3 dc into the top of the chain 3. Turn and fasten off.
Checkpoint: 4 clusters, 1 chain-2 space, and 2 chain-1 spaces.
Row 3 — WS, Color B
Join Color B to the top of the chain 3. Work 3 dc into the same stitch, chain 1, then work 3 dc into the chain-1 space. Continue to the center chain-2 corner, where you work the corner sequence. Finish the row with the corresponding chain-1 spaces and 3-dc cluster at the top of the chain 3. Turn and fasten off.
Checkpoint: 6 clusters, 1 chain-2 space, and 4 chain-1 spaces.
Row 4 — RS, Color C
Join Color C to the top of the chain 3. Work 3 dc into the same stitch. Continue with chain-1 spaces and 3-dc clusters until reaching the center chain-2 space. Work the corner sequence there, then mirror the cluster arrangement on the opposite side. Finish with 3 dc into the top of the chain 3 and fasten off.
Checkpoint: 8 clusters, 1 chain-2 space, and 6 chain-1 spaces.
Each finished triangle should span approximately 3.5 inches across its widest row.
Build the Front and Back Panels
Each panel uses one half-triangle on the left, one large granny square in the center, and one half-triangle on the right. Arrange the pieces horizontally with the top and bottom edges aligned.
Use the flat join technique or single crochet through both layers to connect the vertical edge of each half-triangle to the corresponding vertical edge of the large granny square.
Why the Flat Join Works Well
The flat join creates a less noticeable seam between motifs. Instead of chaining, insert the hook into the corresponding chain space on the neighboring finished motif, draw up a loop, and pull that loop through the loop already on the hook. Continue working the current motif.
Add the Panel Border
After the triangles and granny square have been joined, work a border around the complete perimeter of each panel.
Border Rounds 1–3 — Color B
Join Color B and work 1 sc into each dc, 1 sc into each chain-1 space, and 2 sc into each chain-2 corner space. At every outer corner, work the corner combination of sc, chain 1, sc. Continue for three rounds while maintaining the corners.
Border Rounds 4–5 — Color A
Switch to Color A and work two rounds of sc while maintaining the corners. Fasten off both panels when complete.
Panel checkpoint: Each panel should measure approximately 15 inches wide x 8 inches tall.
Crochet the Base Rectangle
The solid base gives the tote its depth and helps create a stable foundation for the side gussets and panels.
Using Color A and the G-6 / 4.0 mm hook, chain 61.
Row 1
Work hdc into the second chain from the hook and into every chain across. Turn.
Stitch count: 60 hdc.
Rows 2–20
Chain 2, counting as the first hdc, then work hdc in each stitch across. Turn after every row.
Stitch count: 60 hdc per row.
Fasten off after Row 20 and leave a 36-inch sewing tail.
Base checkpoint: approximately 15 inches wide x 5 inches tall.
Create the Two Side Gussets
The gussets transform the flat panels into a roomy tote with a 5-inch depth.
Using Color A and the G-6 / 4.0 mm hook, chain 21.
Row 1
Work hdc into the second chain from the hook and in each chain across. Turn.
Stitch count: 20 hdc.
Rows 2–36
Chain 2 and work hdc in every stitch across. Turn after every row.
Stitch count: 20 hdc per row.
Fasten off after Row 36, leaving a 36-inch sewing tail.
Gusset checkpoint: Each gusset should measure approximately 5 inches wide x 11.5 inches tall.
Assemble the Crochet Tote
Assembly is where all the individual components come together. Take your time during this stage and use the stitch markers if needed to keep edges aligned.
Step 1: Attach the Front Panel
Place the front panel and base rectangle with right sides together. Single crochet through both layers along the bottom edge.
Approximate count: 60 sc.
Step 2: Attach the Back Panel
Repeat the same process on the opposite long edge of the base, attaching the back panel.
Step 3: Add the Gussets
Attach the short bottom edge of each gusset to a short edge of the base using sc. Then continue upward along each long edge to connect the gussets to the front and back panels.
Step 4: Reinforce the Corners
Strengthen all corners with 2 to 3 additional slip stitches. Once the construction is complete, turn the bag right side out.
Work the Top Border
For the top border, switch to Color A and use the smaller F-5 / 3.75 mm hook. The smaller hook is used specifically for this part of the pattern.
Round 1
Join Color A and work 1 sc into each stitch around the top opening. At each corner, work sc, chain 1, sc. Join.
Stitch count: 168 sc.
Round 2
Chain 1, work sc in each sc, and work sc, chain 1, sc into each corner space. Join.
Stitch count: 176 sc.
Round 3
Chain 1, work sc in each sc, and work sc, chain 1, sc into each corner space. Join and fasten off.
Stitch count: 184 sc.
Attach the Handles
Measure 4 inches inward from each upper corner on both the front and back. Mark these positions before attaching the handles.
Thread the handle ends through the border at the marked positions. Secure the handles using the specified Chicago screws or rivets. Take care to keep the handle placement even on both sides so the finished tote hangs symmetrically.
Add the Tassel Loop
At the right front corner, join Color A. Chain 5 and slip stitch back into the same space. Fasten off.
The antique brass lobster clasp can then be attached through this loop.
Make the Tassel
For the tassel, cut 30 strands of Color A, with each strand measuring 12 inches long. Hold the strands together and fold them in half twice.
Tie one strand tightly around the bundle approximately 0.75 inch from the top to create the tassel head. Loop another strand through the top for hanging, then trim the tassel ends to 4.5 inches.
Blocking and Finishing the Tote
Once all construction and hardware work is complete, weave in all loose yarn ends securely.
For wet blocking, submerge the bag in cool water for 10 minutes. Press out excess moisture without wringing the bag. Lay it flat to dry while shaping it carefully to the finished dimensions.
If you want extra support underneath the bag, cut plastic canvas to 14.5 inches x 4.5 inches and place the insert inside the tote.
Optional Fabric Lining
A lining is optional. If you choose to add one, cut woven cotton fabric to 32 inches x 28 inches. Sew the fabric into a bag shape and hand stitch the lining to the inside of the top border.
Helpful Tips for a Neater Finished Bag
- Block the granny squares before assembling the panels so each motif reaches the required 7-inch x 7-inch measurement.
- Keep the color sequence consistent across all four large granny squares.
- Fasten off and change colors after every granny square round as specified.
- Check stitch counts at the end of each round and row rather than waiting until the entire section is complete.
- Keep the panel edges aligned when joining the triangles to the central square.
- Use the long sewing tails left on the base and gussets during assembly.
- Pay particular attention to corner reinforcement because the corners connect several structural pieces.
- Mark the handle positions carefully so the handles sit evenly on both sides.
- Shape the bag during blocking instead of trying to force the final dimensions after it has dried.
Common Checkpoints Before Moving Forward
Checking the measurements at several stages makes the construction easier to manage.
- Large granny square: 7 inches x 7 inches after blocking
- Half-granny triangle: approximately 3.5 inches across its widest row
- Completed panel: approximately 15 inches wide x 8 inches tall
- Base: approximately 15 inches wide x 5 inches tall
- Each gusset: approximately 5 inches wide x 11.5 inches tall
- Bag body: 15 inches wide x 11.5 inches high x 5 inches deep
- Handle drop: 9 inches
Size Customization Options
The original pattern includes two alternative size directions while retaining the same general design.
Smaller Tote
For a smaller bag of approximately 12 inches x 9 inches, work the granny squares through Round 5 only and work the triangles through Row 3. Reduce the base to chain 49 and reduce the gussets to chain 17.
Larger Tote
For a larger bag of approximately 18 inches x 13 inches, add Rounds 8 and 9 to the granny squares. Increase the base to chain 73 and increase the gussets to chain 25.
These customization instructions are part of the original pattern and are intended to change the overall scale while maintaining the basic construction concept.
Caring for Your Finished Crochet Tote
The recommended care method is gentle hand washing. Wash the tote in cool water using a gentle detergent. Do not wring it, as twisting can distort the crochet structure.
After washing, lay the bag flat to dry. Do not bleach and do not tumble dry.
Frequently Asked Questions
Is this tote suitable for a beginner?
The pattern is rated advanced beginner to intermediate. It is best suited to someone who is already comfortable with granny squares, multi-round patterns, color changes, joining motifs, and basic sewing or seaming.
How many large granny squares are needed?
The pattern requires four large granny squares. Each one is worked through Round 7 and should measure 7 inches x 7 inches after blocking.
How many half-granny triangles are needed?
You will make four half-granny triangles. They are arranged with one triangle on each side of the central granny square for each panel.
What hook is used for most of the project?
The G-6 / 4.0 mm hook is used for the granny motifs and bag body. The smaller F-5 / 3.75 mm hook is used for the top border.
What yarn weight does the pattern use?
The tote uses DK weight yarn in three colors: Sage Green, Dusty Rose, and Cream/Natural.
Can I add a lining?
Yes. The pattern includes an optional woven cotton lining using fabric measuring 32 inches x 28 inches. The lining is sewn into a bag shape and hand stitched to the inside of the top border.
Is a base insert required?
No. The base insert is optional. If you want to add one, the pattern specifies plastic canvas or firm craft foam cut to 14.5 inches x 4.5 inches.
Final Project Checklist
- 4 large granny squares completed through Round 7
- 4 half-granny triangles completed through Row 4
- Front and back panels assembled
- Panel borders completed through Border Round 5
- Base completed through Row 20
- 2 gussets completed through Row 36
- Bag body assembled
- All corners reinforced
- Top border completed through Round 3
- Handles securely attached
- Tassel loop added
- Tassel completed and trimmed
- Loose ends woven in
- Bag blocked and shaped
- Optional base insert added if desired
- Optional lining added if desired
Final Thoughts on the Sage Garden Tote
The Sage Garden Granny Square Tote is a rewarding project for crocheters who enjoy combining traditional motifs with practical construction. The repeating granny square color sequence creates a strong visual identity, while the half-granny triangles help form the wide decorative panels. The hdc base and gussets then give those panels the depth needed for a functional tote.
Although the project involves several separate components, the construction is organized into clear stages: make the granny squares, create the triangles, assemble the decorative panels, crochet the base and gussets, join the bag body, finish the top edge, and add the handles and tassel.
Taking time to verify the measurements at each checkpoint will make the final assembly much easier. In particular, the 7-inch blocked granny square measurement is an important reference because the motif dimensions influence the overall proportions of the tote.
With its sage green, dusty rose, and cream palette, antique brass details, and classic granny square texture, this tote has a handmade vintage-inspired character while remaining useful for everyday essentials. It is a project that combines decorative crochet techniques with practical bag-making skills in a single finished piece.
Once completed, the Sage Garden Tote can be cared for with gentle hand washing in cool water, followed by flat drying. Whether you keep the classic size, choose the smaller variation, or work the larger version described in the pattern, the project offers plenty of satisfying crochet work from the first granny round through the final finishing details.