

The Sky Rover Bandana is a delicate crochet accessory with a distinctive triangular shape, an airy openwork pattern, and simple braided ties that make the finished piece easy to fasten. The design is worked back and forth from the middle outward, allowing the triangle to grow gradually while the treble crochet groups and chain spaces create the characteristic lace-like appearance.
This tutorial presents the Sky Rover Bandana, DROPS 265-8, as a detailed project guide while keeping the original technical information intact. The pattern uses DROPS Belle from Garnstudio, a 3.5 mm crochet hook, and diagrams A.1 through A.7. The main section is built from the centre outward, followed by a finished edge along the longest side and two braided ties.
Although the finished accessory is relatively compact, the construction gives you several useful crochet skills to practise. You will work with a foundation ring, chain stitches, treble crochets, chain spaces, double crochets, slip stitches, charted pattern sections, and a simple braided finishing technique.
The finished kerchief measures approximately 44 cm in length without the string and approximately 21 cm in height. The stated crochet tension is 20 treble crochets in width and 10 rows vertically with patterns A.1 to A.6 on a 3.5 mm hook, measuring 10 x 10 cm.
Sky Rover Bandana at a Glance
Before picking up the hook, it helps to understand the overall construction. The bandana is not crocheted as a rectangle and then folded. Instead, the work begins in the middle and grows outward in a triangular shape.
The first stage follows diagram A.1. Once the initial section has been worked, the pattern continues with A.2 to A.6 over A.1. As these sections are worked vertically, the piece becomes wider. The pattern specifically notes that there is room for two additional repetitions of A.3 and A.5 on each side each time A.2 to A.6 are worked vertically.
When the main triangle measures approximately 21 cm along the middle, the next stage begins along the longest side. A row with double crochets and chain stitches is worked first. The piece is then rotated so that A.7 can be worked along the complete long side.
Finally, after the edge is completed and the yarn has been fastened, one braided tie is made at each end of the long side using six strands of DROPS Belle for each tie.
Materials and Pattern Information
- Pattern name: Sky Rover Bandana
- Pattern number: DROPS 265-8
- DROPS design: Pattern vs-137
- Yarn group: B
- Yarn: DROPS Belle from Garnstudio
- Yarn quantity: 50 g
- Listed colours: Colour 15, Jeans Blue / Colour 04, Dandelion / Colour 26, Pearl
- Crochet hook: DROPS Crochet Hook 3.5 mm
- Finished length: approximately 44 cm without string
- Finished height: approximately 21 cm
- Gauge: 20 treble crochets in width and 10 rows vertically with A.1 to A.6 on a 3.5 mm hook = 10 x 10 cm
The hook size is a recommendation rather than an unchangeable requirement. The original instructions explain that if you have too many stitches over 10 cm, you should switch to a larger hook. If you have too few stitches over 10 cm, you should switch to a smaller hook.
This makes the gauge an important early checkpoint. Instead of changing the pattern itself when your tension is different, use the hook adjustment described in the original instructions.
Understanding the Crochet Diagram
The Sky Rover Bandana is designed around a charted construction, so becoming familiar with the diagram before starting can make the project much easier to follow. The chart contains A.1 through A.6 for the main triangular section and A.7 for the long-edge finish.
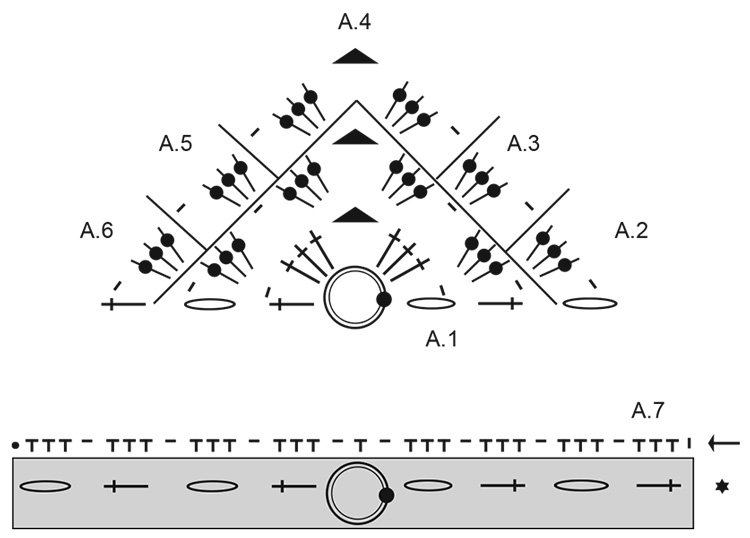
The central part of the chart shows the starting ring. From there, the crochet direction moves outward. The chart places A.2 and A.3 on one side, A.5 and A.6 on the other side, and A.4 toward the upper centre.
The symbols represent the different stitches and placements used throughout the pattern. You will see chain stitches, treble crochets, chain spaces, double crochets, and slip stitches.
One important detail concerns the grey area shown in A.7. The grey fields represent chain stitches and treble crochets that have already been worked at the beginning and end of A.1 to A.6. They are included in the diagram to make it easier to understand how A.7 is worked along the edge of the kerchief.
Stitch Symbols Used in the Pattern
The chart uses several symbols that correspond directly to the written explanation in the original pattern.
- Starting point: Work 4 chain stitches and join them into a ring with 1 slip stitch in the first chain stitch.
- Beginning of row: 3 chain stitches.
- Chain stitch: Used throughout the openwork pattern.
- Treble crochet: The chart shows treble crochets around the chain stitch ring or in the 3rd chain stitch from the row below, depending on the location.
- Chain space: 3 chain stitches form a chain space where indicated.
- Treble around chain space: The treble crochet is worked around the chain stitch or chain space below according to the chart.
- Double crochet: Used along the longest side before the A.7 edging.
- Slip stitch: Used where indicated at the end of a row.
The chart also shows previously completed rows in places where they are needed to clarify how the next row should be worked. These symbols do not mean that you should crochet those completed sections again.
Step 1: Create the Central Ring
Start with the 3.5 mm crochet hook and DROPS Belle.
Work 4 chain stitches. Bring the chain stitches together and form a ring by working 1 slip stitch in the first chain stitch. The starting point is marked in the diagram, along with the direction in which you continue crocheting.
This small ring becomes the centre of the entire triangular kerchief, so take care at this stage. The ring should be joined securely and should match the starting structure shown in the chart.
Starting Checkpoint
- Use a 3.5 mm crochet hook.
- Use DROPS Belle.
- Work 4 chain stitches.
- Join them with 1 slip stitch in the first chain stitch.
- Continue in the direction shown by the diagram.
Avoid adding extra foundation chains. The original pattern specifically begins with four chain stitches, so keeping this starting point accurate helps preserve the intended construction.
Step 2: Work Pattern A.1
After creating the central ring, begin working according to diagram A.1.
This first diagram establishes the central structure from which the entire bandana grows. The chart shows how the treble crochet groups and chain spaces are positioned around the centre.
At the beginning of rows, the pattern uses 3 chain stitches. Keep these beginning chains consistent with the chart because they are part of the overall structure.
As you work A.1, pay close attention to the difference between a treble crochet worked around the chain stitch ring and a treble crochet worked into a specific chain stitch. The diagram distinguishes these placements.
The open spaces created by the chain stitches are intentional. They are responsible for the airy appearance of the finished bandana, so try to maintain an even tension rather than pulling the chain spaces extremely tightly.
Step 3: Continue Through A.2 to A.6
Once the diagrams have been worked, continue as shown in A.2 to A.6 over A.1.
This is the main growth stage of the bandana. The piece is worked back and forth from the middle outward, gradually becoming wider and developing its triangular form.
The original instructions contain an important expansion detail: every time A.2 to A.6 are worked vertically, there is room for two repetitions more of A.3 and A.5 on each side of the piece.
This detail is worth checking as the project becomes larger. Rather than expecting the triangle to grow simply because more rows are added, observe the way the A.3 and A.5 sections increase on both sides.
How to Check the Triangle While Crocheting
Every few sections, lay the work flat. Look at the centre and then follow the pattern toward each outer side. The triangle should continue expanding naturally, with the open spaces and treble crochet groups forming a balanced pattern.
If one side looks substantially different from the other, compare your most recent work with the corresponding section of the diagram before continuing. Correcting a mistake early is much easier than finding it after many additional sections have been completed.
Step 4: Keep the Correct Crochet Tension
Gauge is an important part of this project because the pattern includes specific finished measurements and an open stitch structure.
The stated tension is 20 treble crochets in width and 10 rows vertically with pattern A.1 to A.6 on a 3.5 mm hook = 10 x 10 cm.
If your sample contains too many stitches across 10 cm, change to a larger hook. If it contains too few stitches across 10 cm, change to a smaller hook.
This adjustment is specifically described in the original instructions. The pattern sequence itself should not be changed to compensate for a tension difference.
Step 5: Continue Until the Main Triangle Measures Approximately 21 cm
Keep working back and forth through the established pattern until the piece measures approximately 21 cm when measured along the middle.
The original pattern also states that you may work until the desired length. The reference measurement for the design is approximately 21 cm along the middle.
When checking the measurement, lay the openwork fabric flat and measure gently. Avoid pulling the triangle tightly because stretching an open crochet fabric can give you a misleading measurement.
There is also an important instruction at this stage:
Do not cut the yarn.
The yarn remains attached because the next section continues directly along the longest side of the triangle.
Step 6: Work the First Row Along the Longest Side
Once the triangular section has reached the required length, identify the longest side of the triangle.
Along this long side, work a row with double crochets and chain stitches.
This row prepares the edge for the final A.7 section. Follow the placements indicated by the pattern rather than adding or removing stitches to make the edge fit.
After this row is complete, rotate the piece so that you can continue working from the same side of the piece, now along the long side.
Step 7: Complete the A.7 Edge
Work A.7 along the entire long side of the kerchief.
The A.7 chart shows the beginning, middle, and end of the row. The diagram represents the structure needed to understand the edge, but more rows have been worked on the triangle than are shown in the chart.
Pay special attention to the grey fields. They show chain stitches and treble crochets that have already been worked at the beginning and end of A.1 to A.6. Their purpose is to make the relationship between the existing triangle and the new A.7 edge easier to see.
Continue across the entire long side. Once the complete edge has been worked, cut and fasten the yarn.
Step 8: Prepare the First Braided Tie
The ties are made after the crocheted triangle and long edge have been completed.
For the first tie, cut 6 strands of DROPS Belle. Each strand should be approximately 80 cm long.
Pull the six strands halfway through the piece at the edge of one long side of the kerchief. Because the strands are folded through the edge, you will have 12 strands with the same length.
Divide the 12 strands into 3 piles, with 4 strands in each pile.
Plait the three piles together until approximately 3 cm of strand remains at the end of the braid.
Tie a knot around one end of the braid and fasten it tightly.
First Tie Checklist
- Cut 6 strands of DROPS Belle.
- Make each strand approximately 80 cm long.
- Pull the strands halfway through the edge.
- Confirm that you have 12 strands after folding them through the fabric.
- Divide the strands into 3 piles.
- Put 4 strands in each pile.
- Plait the three piles together.
- Leave approximately 3 cm at the end of the braid.
- Tie a knot around the end.
- Fasten the knot tightly.
Step 9: Make the Second Tie
Make another string in exactly the same way at the other end of the long side of the triangle.
Using the same construction on both ends keeps the finished accessory balanced. Each side uses six strands of DROPS Belle, folded through the edge to produce twelve strands, then divided into three groups of four before being plaited.
When both ties are complete, check the knots carefully and make sure they are fastened tightly.

Understanding the Finished Shape
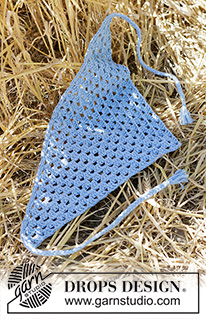
Once the two ties are attached, the Sky Rover Bandana has a clear triangular silhouette. The longest side forms the upper fastening edge, while the opposite point creates the lower point of the kerchief.
The openwork pattern remains visible across the entire triangle. Because the main fabric is worked from the middle outward, the pattern has a natural sense of expansion from the centre toward the outer edges.
The finished measurements are approximately 44 cm in length without the string and approximately 21 cm in height.
These measurements are useful as a reference while working, but remember that the original instructions allow the main section to be worked until the desired length. Your final size therefore depends on where you choose to stop if you do not follow the approximately 21 cm reference exactly.
Beginner Tips for the Sky Rover Pattern
Read the Chart in Small Sections
There is no need to memorize the entire A.1 to A.7 diagram. Treat the chart as a visual map and concentrate on the section you are currently working.
Check the Centre Frequently
Because the bandana grows from a central ring, mistakes in the early structure can affect the appearance of the entire triangle. If the centre does not resemble the chart, correct it before continuing.
Keep Chain Spaces Consistent
The open texture depends on the chain spaces. Try to keep their tension similar throughout the project. Very tight chains can make the pattern appear less open, while inconsistent tension can make the triangle look uneven.
Pay Attention to Placement
The pattern distinguishes between treble crochets worked around chain stitches, treble crochets worked around chain spaces, and treble crochets placed in the third chain stitch from the row below. Follow the chart carefully because these placements create the pattern structure.
Use Gauge as Your Measurement Tool
The stated gauge is 20 treble crochets by 10 rows over 10 x 10 cm using a 3.5 mm hook. If your gauge differs, adjust the hook size according to the original instructions rather than altering the pattern.
Common Problems to Watch For
The Triangle Looks Uneven
Compare the two sides of your work with the chart. Look particularly at the A.3 and A.5 sections because the pattern explains that two additional repetitions of these sections appear on each side as A.2 to A.6 are worked vertically.
The Openwork Does Not Look Like the Photograph
Check your chain-space tension and treble crochet placement. The open spaces are an intentional feature of the design, and the stitch placement shown in the chart is responsible for the repeating texture.
The Bandana Is the Wrong Width
Check your crochet tension before changing anything in the pattern. The original instructions give 20 treble crochets in width and 10 rows vertically over 10 x 10 cm.
The Edge Does Not Look Correct
Remember that A.7 is worked along the longest side after the row of double crochets and chain stitches. The grey fields in the A.7 chart represent stitches already worked in earlier sections and help explain the relationship between the main triangle and the finishing edge.
The Ties Look Different From Each Other
Make sure both ties use six strands, with each strand approximately 80 cm long. After pulling the strands halfway through the fabric, divide the resulting 12 strands into three piles of four before plaiting.

A Complete Project Checkpoint List
- Prepare DROPS Belle yarn.
- Use a DROPS Crochet Hook size 3.5 mm.
- Check the 10 x 10 cm crochet tension if needed.
- Work 4 chain stitches.
- Join them into a ring with 1 slip stitch in the first chain stitch.
- Follow A.1.
- Continue with A.2 to A.6 over A.1.
- Work back and forth from the middle outward.
- Allow the additional A.3 and A.5 repetitions to develop as specified.
- Continue until the middle measures approximately 21 cm or until the desired length is reached.
- Do not cut the yarn at this stage.
- Work the row of double crochets and chain stitches along the longest side.
- Rotate the piece as instructed.
- Work A.7 across the entire long side.
- Cut and fasten the yarn.
- Cut 6 strands approximately 80 cm long for the first tie.
- Pull them halfway through the edge to create 12 strands.
- Divide the strands into 3 piles of 4.
- Plait the piles together.
- Leave approximately 3 cm at the end.
- Tie and fasten the braid securely.
- Repeat the process at the opposite end.
How the Colour Options Change the Look
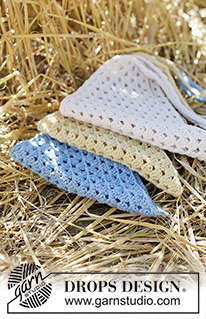
The original yarn information lists three colour options: colour 15, Jeans Blue; colour 04, Dandelion; and colour 26, Pearl.
The construction remains the same regardless of which listed colour is used. The triangle, openwork pattern, A.7 edge, and braided ties follow the same instructions.
The blue version gives the bandana its distinctive fresh appearance, while the additional listed shades provide alternative ways to approach the same accessory. Since the original pattern identifies the colours specifically, keep the yarn information consistent with the version of the project you are following.
Why the Centre-Out Construction Works So Well
One of the most appealing features of this pattern is the way the fabric grows from a very small starting point into a complete triangular kerchief. The centre acts as the foundation for every later section, so the progression is easy to see as the project grows.
The A.1 section establishes the centre, while A.2 to A.6 build the repeating structure around it. The additional A.3 and A.5 repetitions are what allow the fabric to expand outward on both sides.
This type of construction also makes it easier to understand why the finished item has a triangular form. Rather than creating a large rectangle and shaping it afterward, the shape is developed naturally through the arrangement of the crochet pattern.
The Importance of the A.7 Finishing Edge
The final edge is an important part of the design because it transforms the raw longest side of the triangle into a finished band that also provides the location for the two ties.
The preliminary row of double crochets and chain stitches establishes the edge. A.7 then continues along the complete long side.
When reading A.7, remember that the grey fields are explanatory. They represent chain stitches and treble crochets that were already completed earlier in the project. This makes the chart easier to interpret because it shows how the new edging relates to the existing triangle.
Once the entire long side has been completed, cut and fasten the yarn before beginning the two ties.
Final Finishing Advice
After both ties have been completed, lay the bandana flat and inspect the finished piece from the centre outward.
Check the triangular shape, the openwork pattern, the long edge, and the two braided ties. The edge should run continuously along the longest side, while each tie should be positioned at one end of that side.
Compare the main fabric with the stated finished measurements of approximately 44 cm in length without the string and approximately 21 cm in height. Remember that the string is excluded from the 44 cm length measurement.
Also check that both braided ties have been fastened securely. The original instructions specifically call for the knot to be fastened tightly.
Frequently Asked Questions
What yarn is required for the Sky Rover Bandana?
The pattern uses 50 g of DROPS Belle from Garnstudio, which belongs to yarn group B. The listed colours are colour 15, Jeans Blue, colour 04, Dandelion, and colour 26, Pearl.
What crochet hook size is used?
The specified hook is a DROPS Crochet Hook size 3.5 mm.
What is the crochet tension?
The stated tension is 20 treble crochets in width and 10 rows vertically with patterns A.1 to A.6 on a 3.5 mm hook, measuring 10 x 10 cm.
What are the finished measurements?
The finished length is approximately 44 cm without the string, and the height is approximately 21 cm.
How does the main piece grow?
The kerchief is worked back and forth from the middle outward. After A.1, the pattern continues through A.2 to A.6, with additional A.3 and A.5 repetitions appearing on each side as the vertical pattern sections are worked.
Should I cut the yarn when the triangle reaches 21 cm?
No. The original instructions specifically say not to cut the yarn at that point. The next stage continues along the longest side of the triangle.
What is worked along the longest side?
First, work a row with double crochets and chain stitches. Rotate the piece and then work A.7 along the entire long side.
How much yarn is needed for each tie?
For each tie, cut 6 strands of DROPS Belle, with each strand approximately 80 cm long. Pull them halfway through the edge to create 12 strands, then divide them into three piles of four strands each and plait them.
How long should the braided tie be?
The instructions say to plait the piles together until approximately 3 cm of strand remain at the end of the braid. The braid is then knotted and fastened tightly.
Final Thoughts
The Sky Rover Bandana is a beautiful example of how a relatively small amount of crochet can create a distinctive handmade accessory. The project begins with a simple four-chain ring and develops into a triangular kerchief through a carefully arranged combination of treble crochet groups and chain spaces.
The chart is central to understanding the project. A.1 establishes the starting structure, A.2 through A.6 expand the triangle, and A.7 finishes the longest side. Keeping these sections organized is the key to maintaining the intended shape and openwork texture.
For the best result, keep the original technical specifications in view throughout the project: DROPS Belle, 3.5 mm crochet hook, 20 treble crochets and 10 rows over 10 x 10 cm, approximately 21 cm measured along the middle, and approximately 44 cm in finished length without the strings.
The finishing process is straightforward once the crocheted triangle is complete. The long edge is strengthened and decorated with the double-crochet and chain-stitch row followed by A.7. The two braided ties are then made from six 80 cm strands each, folded through the edge to create twelve strands, divided into three groups of four, and plaited.
Whether you are comfortable reading crochet charts or are learning to follow them for the first time, working through the project in small checkpoints can make the construction much more manageable. Focus on the centre first, then the expanding A.2 to A.6 sections, then the long edge, and finally the braided ties.
The result is a lightweight triangular kerchief with a delicate openwork appearance and a practical fastening system. By maintaining the original measurements, tension, stitch placements, and construction sequence, you can reproduce the intended Sky Rover Bandana design while enjoying the process of building the accessory from the centre outward.