
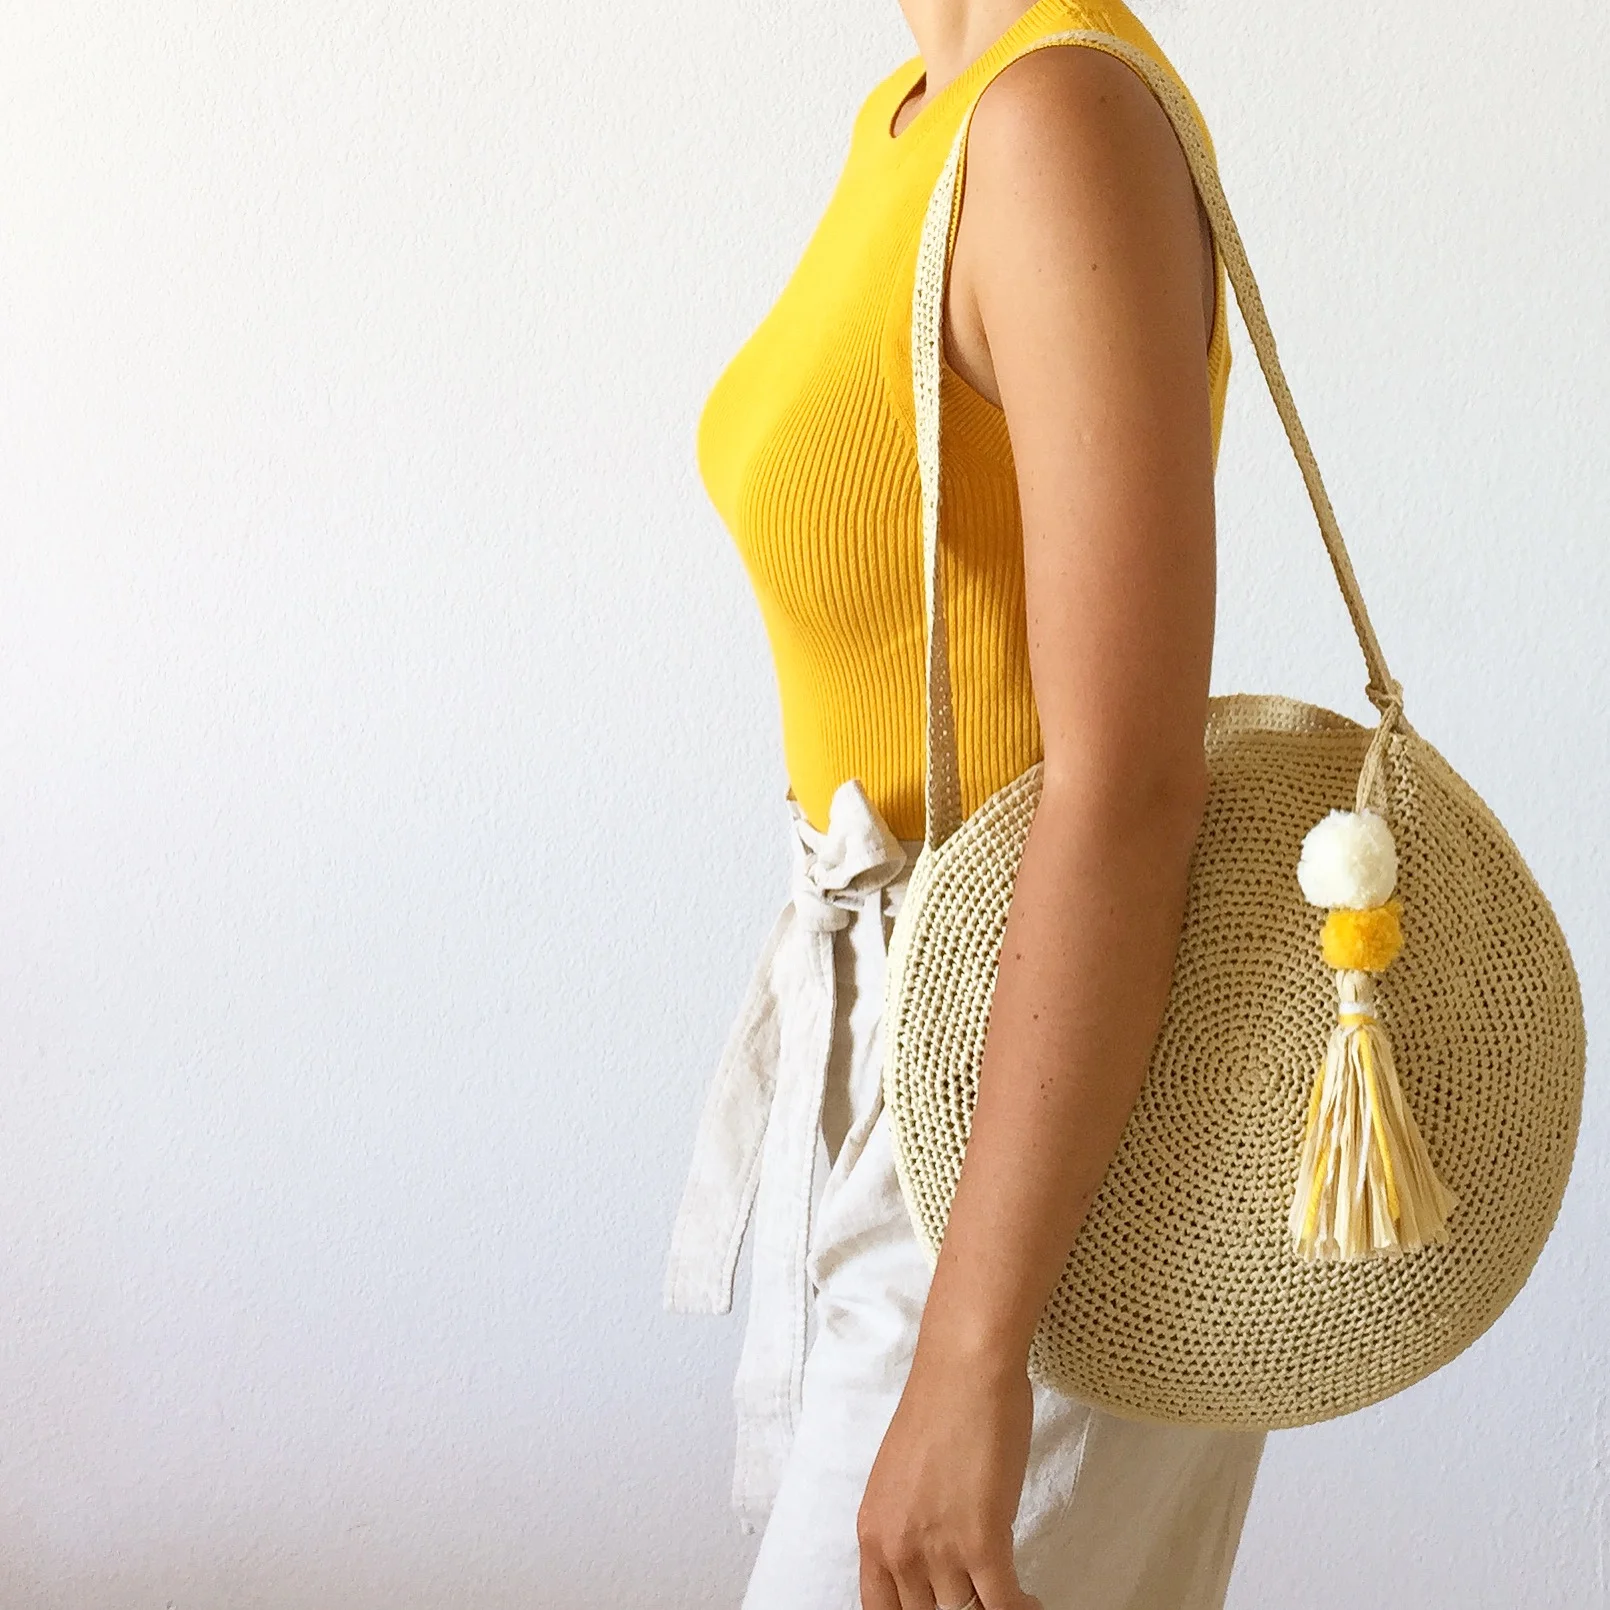

If you are looking for a crochet project that feels both practical and stylish, the Sun City Bag is a wonderful raffia crochet project to add to your handmade wardrobe. Its circular silhouette gives it a distinctive modern appearance, while the roomy construction makes it useful for carrying much more than just the daily essentials.
This pattern combines simple single crochet with carefully planned increases to create two large, identical round panels. The panels are then extended with a handle and bottom section before being joined together. The result is a structured round bag measuring approximately 13 inches (33 cm) in diameter, with adjustable 29-inch (74 cm) straps.
One of the most interesting details is the optional millinery wire. It can be incorporated into selected rounds to help the raffia bag maintain a firmer shape. If you prefer a softer bag, those directions can be skipped. The original pattern also suggests invisible hanging cord as an alternative to millinery wire.
To finish the project, a decorative tassel with pompoms adds a playful and polished touch. The tassel can be made in different colors, allowing you to customize the accessory to suit different outfits, seasons, or moods.
Why the Sun City Bag Is a Fun Crochet Project
The Sun City Bag has a construction that looks complicated when finished but is based largely on repeated single crochet increases. The round panel grows gradually from a six-stitch magic circle, with the stitch count increasing in a consistent progression until the large circular panel is complete.
Because there are two identical halves, you do not need to learn two completely different shapes. The same round panel instructions are repeated, followed by the handle and bottom construction. This makes the project particularly useful for crocheters who enjoy working through a predictable sequence and checking their stitch count at the end of every round.
The raffia material also gives the finished bag a summery character. The recommended yarn is King Cole Raffia in the natural color, but the pattern notes that other raffia yarns can be substituted. The decorative tassel provides another opportunity to introduce colors that complement your personal style.
Materials You Will Need
- Yarn: King Cole Raffia, 100% cellulose rayon, 1.75 oz/50 g, 124 yds/114 m per ball.
- Color: 1456/natural.
- Quantity: approximately 7 oz/200 g, or 4 balls.
- Hook: 3 mm (US C/2 or D/3), or the size needed to obtain the stated gauge.
- Stitch marker.
- Tapestry needle.
- Optional millinery wire: approximately 11 yds/10 m.
- Optional tassel yarn: yarn in the colors of your choice.
The pattern allows other raffia yarns to be used as well. One example given in the source is Ra-Ra Raffia from Wool and the Gang. If substituting yarn, the most important technical reference remains the stated gauge and the ability to work comfortably with a 3 mm hook or the hook size required to match the gauge.
Gauge and Finished Measurements
The stated gauge is 20 stitches and 21 rows in 4 inches/10 cm, steam-blocked.
The completed bag is approximately 13 inches/33 cm in diameter. The straps are approximately 29 inches/74 cm long and are adjustable through the construction of the handle section.
Gauge is especially useful for a project such as this because the round panels determine the overall size of the bag. Before changing hook size or yarn, remember that substitutions can affect both the finished measurements and the way the raffia behaves during blocking.
Understanding the Construction Before You Begin
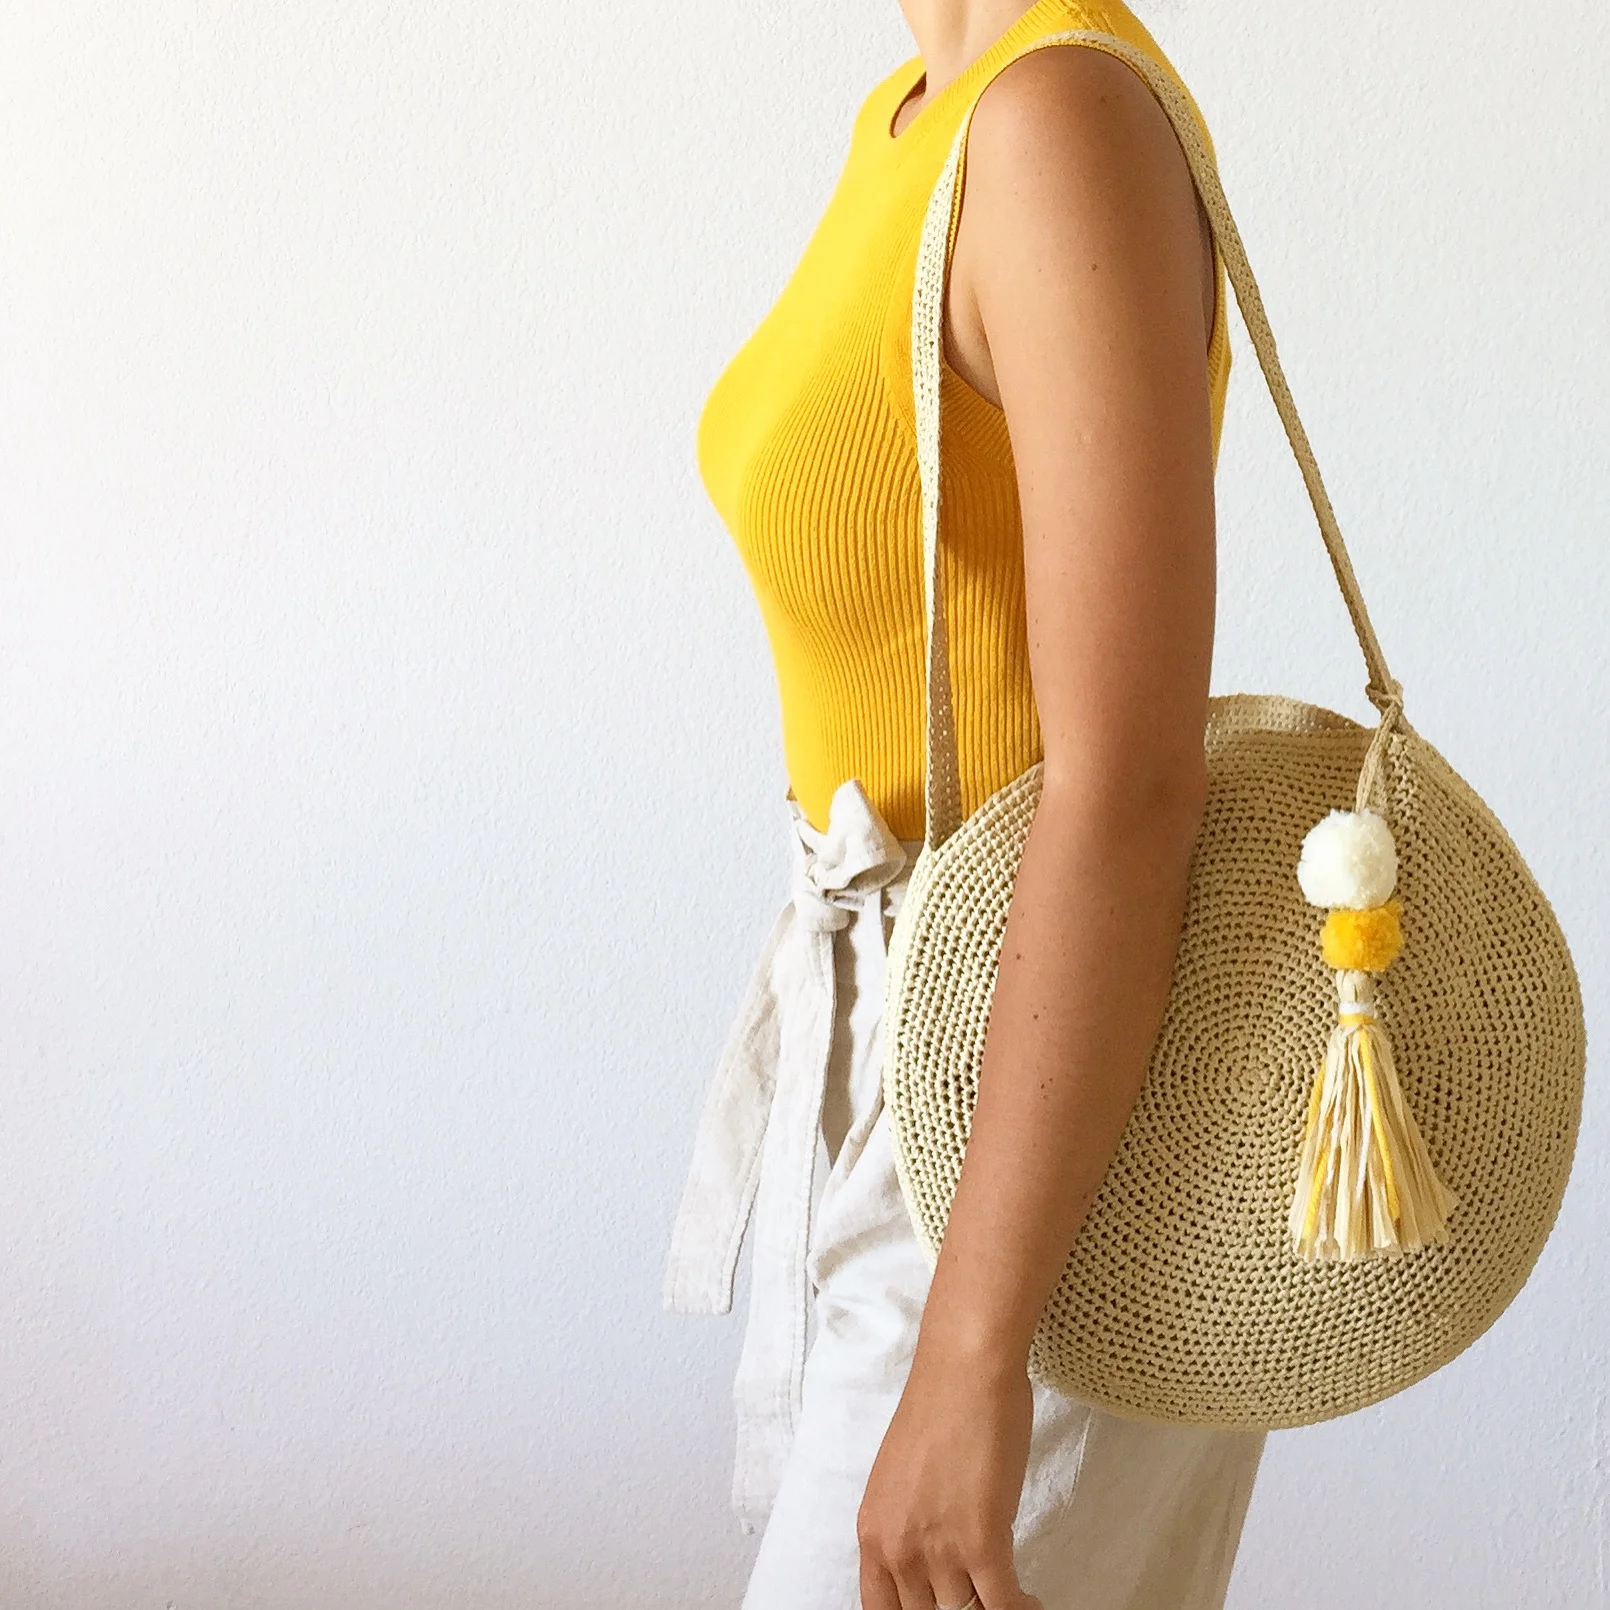
The bag consists of two identical halves. Each half begins with a magic circle and is crocheted in the round. The circular panel gradually expands through regular increases. After the main panel is completed, the handle and bottom are worked from the edge of the panel.
Round 34 is particularly important because the pattern changes to two strands of raffia held together and introduces two millinery wires. After the panel is steam-blocked, the handle and bottom are formed. Two completed halves are ultimately placed with their wrong sides facing each other and crocheted together along the corresponding bottom stitches.
The handles should not be joined if you want the finished bag to have two separate handles. This construction detail is worth keeping in mind before you begin assembly.
Abbreviations Used in the Pattern
- ch: chain
- sc: single crochet
- st(s): stitch(es)
- R / rnd(s): round(s)
- M: marker
- PM: place marker
The pattern uses US crochet terminology, with single crochet abbreviated as sc. Keep the stitch marker in the indicated position because it identifies the beginning of the round and becomes important when the handle section begins.
Creating the Round Panel
Begin by making a magic circle, also called a magic loop. Work 6 single crochet into the circle, join them in a round, and tighten the loop. Place a marker to identify the beginning of the round.
Rounds 1–9: Establishing the Circular Shape
R1: Make 6 sc into the circle. Combine them in a round, tightening the loop. Place a marker to mark the beginning. 6 sts.
R2: Work 2 sc in the next stitch, repeated 6 times. 12 sts.
R3: Work sc, 2 sc in the next stitch, repeated 6 times. 18 sts.
R4: Work 2 sc in the next stitch, then 2 sc, repeated 6 times. 24 sts.
R5: Work 3 sc, then 2 sc in the next stitch, repeated 6 times. 30 sts.
R6: Work 2 sc, then 2 sc in the next stitch and 4 sc, repeated 5 times or until the last 3 stitches. Work 2 sc in the next stitch, then 2 sc. 36 sts.
R7: Work 5 sc, then 2 sc in the next stitch, repeated 6 times. 42 sts.
R8: Work 3 sc, then 2 sc in the next stitch and 6 sc, repeated 5 times or until the last 4 stitches. Work 2 sc in the next stitch, then 3 sc. 48 sts.
R9: Work 7 sc, then 2 sc in the next stitch, repeated 6 times. 54 sts.
At this stage, the circular panel should be visibly expanding. The stitch counts provide useful checkpoints. If your count does not match the stated number at the end of a round, it is worth locating the discrepancy before continuing.
Round 10: First Wire Round
R10: Crochet while adding a round of millinery wire. Work 4 sc, then 2 sc in the next stitch and 8 sc, repeated 5 times or until the last 5 stitches. Work 2 sc in the next stitch, then 4 sc. 60 sts.
The source provides a video reference for adding the millinery wire. If using the plastic type, the ends can be secured by briefly melting them and holding them together until the plastic hardens. Take care when working with any heated material.
If you do not want a firmer structure, the pattern notes that the wire can be omitted. Invisible hanging cord, the transparent plastic wire commonly used for hanging pictures, is also suggested as an accessible substitute.
Rounds 11–21: Continuing the Increase Pattern
R11: Work 9 sc, then 2 sc in the next stitch, repeated 6 times. 66 sts.
R12: Work 5 sc, then 2 sc in the next stitch and 10 sc, repeated 5 times or until the last 6 stitches. Work 2 sc in the next stitch, then 5 sc. 72 sts.
R13: Work 11 sc, then 2 sc in the next stitch, repeated 6 times. 78 sts.
R14: Work 6 sc, then 2 sc in the next stitch and 12 sc, repeated 5 times or until the last 7 stitches. Work 2 sc in the next stitch, then 6 sc. 84 sts.
R15: Work 13 sc, then 2 sc in the next stitch, repeated 6 times. 90 sts.
R16: Work 7 sc, then 2 sc in the next stitch and 14 sc, repeated 5 times or until the last 8 stitches. Work 2 sc in the next stitch, then 7 sc. 96 sts.
R17: Work 15 sc, then 2 sc in the next stitch, repeated 6 times. 102 sts.
R18: Work 8 sc, then 2 sc in the next stitch and 16 sc, repeated 5 times or until the last 9 stitches. Work 2 sc in the next stitch, then 8 sc. 108 sts.
R19: Work 17 sc, then 2 sc in the next stitch, repeated 6 times. 114 sts.
R20: Work 9 sc, then 2 sc in the next stitch and 18 sc, repeated 5 times or until the last 10 stitches. Work 2 sc in the next stitch, then 9 sc. 120 sts.
R21: Work 19 sc, then 2 sc in the next stitch, repeated 6 times. 126 sts.
Round 22: Second Wire Round
R22: Crochet while adding another round of millinery wire. Work 10 sc, then 2 sc in the next stitch and 20 sc, repeated 5 times or until the last 11 stitches. Work 2 sc in the next stitch, then 10 sc. 132 sts.
This is the second designated wire round in the main circular panel. The optional wire helps the bag retain a more defined shape while the raffia construction still gives it a handmade, flexible character.
Rounds 23–33: Completing the Large Circle
R23: Work 21 sc, then 2 sc in the next stitch, repeated 6 times. 138 sts.
R24: Work 11 sc, then 2 sc in the next stitch and 22 sc, repeated 5 times or until the last 12 stitches. Work 2 sc in the next stitch, then 11 sc. 144 sts.
R25: Work 23 sc, then 2 sc in the next stitch, repeated 6 times. 150 sts.
R26: Work 12 sc, then 2 sc in the next stitch and 24 sc, repeated 5 times or until the last 13 stitches. Work 2 sc in the next stitch, then 12 sc. 156 sts.
R27: Work 25 sc, then 2 sc in the next stitch, repeated 6 times. 162 sts.
R28: Work 13 sc, then 2 sc in the next stitch and 26 sc, repeated 5 times or until the last 14 stitches. Work 2 sc in the next stitch, then 13 sc. 168 sts.
R29: Work 27 sc, then 2 sc in the next stitch, repeated 6 times. 174 sts.
R30: Work 14 sc, then 2 sc in the next stitch and 28 sc, repeated 5 times or until the last 15 stitches. Work 2 sc in the next stitch, then 14 sc. 180 sts.
R31: Work 29 sc, then 2 sc in the next stitch, repeated 6 times. 186 sts.
R32: Work 15 sc, then 2 sc in the next stitch and 30 sc, repeated 5 times or until the last 16 stitches. Work 2 sc in the next stitch, then 15 sc. 192 sts.
R33: Work 31 sc, then 2 sc in the next stitch, repeated 6 times. 198 sts.
Round 34: Double Raffia and Two Wires
R34: Attach one more strand of raffia. Crochet this round holding two threads together and adding two millinery wires. Work 198 sc, placing 1 sc in each stitch. Leave the marker in its place and do not cut the yarn.
This round changes the character of the edge by doubling the raffia and introducing two wires. Follow the source instructions carefully at this point because the yarn is intentionally held double for the round.
Steam-Blocking the Round Panel
After completing Round 34, steam-block the panel so that it becomes a flat round. Raffia requires care when exposed to heat. If using an iron, do not touch the raffia directly with the iron. The source recommends working through a piece of cotton fabric instead.
Blocking is especially useful here because the project depends on a clean circular panel and a defined transition between the panel and the bottom. Allow the panel to settle into its intended flat shape without forcing the material beyond what the raffia can comfortably handle.
Building the Handle and Bottom

Once the round panel has been blocked, continue directly into the handle and bottom construction.
R1, in two threads: Remove the marker, work 2 sc, and place a marker. Chain 145. Count 55 stitches to the left on the edge of the round panel and make 1 sc into the next stitch, attaching the future handle. Then work 142 sc, placing 1 sc in each stitch until the end of the round.
Fold the stitches of this new round so that they stand at a right angle to the wrong side of the round panel. This forms the bottom portion of the bag.
At this point, cut one thread and continue crocheting with the remaining strand.
R2: Work 1 sc in each stitch of the chain, then 1 sc in each stitch until the end of the round.
R3: Work as R2.
R4: Work as R2.
The same process must be completed for the second identical half of the bag. Keeping both halves consistent is important because they will later be positioned together and joined.
Blocking the Completed Halves
After both identical round panels, handles, and bottoms have been completed, steam-block the pieces. The source recommends placing a folded towel inside along the angle between the round panel and the bottom. Shape the angle into a right angle while stretching the raffia gently with your hands.
This stage is less about changing the dimensions and more about helping the construction settle into the intended bag shape. Work patiently around the angle so that the bottom is clearly defined and the circular panels remain smooth.
Joining the Two Bag Halves
Place the two halves together so that their wrong sides are facing each other. On the wrong side, use single crochet to work into corresponding stitches of the bottoms, crocheting the two halves together.
Do not connect the handles if you want to have two handles. This gives the finished Sun City Bag its two separate adjustable straps.
After joining the bottom, weave in the yarn ends. Turn the bag to the right side. If necessary, steam-block it once more to even the bottom and improve the final shape.
Making the Decorative Pompoms
The finishing decoration begins with two pompoms. Use the yarn of your choice and make one pompom with a 1.5-inch/3.5 cm pompom maker and another with a 1-inch/2.4 cm pompom maker.
The ability to choose the pompom yarn colors is one of the easiest ways to personalize the bag without changing the technical construction. You can coordinate the colors with clothing, use contrasting shades, or keep the decoration understated.
Creating the Tassel

The tassel gives the finished bag a more polished and festive appearance. Make the tassel with raffia together with two or three threads of the yarn used for the pompoms. The source provides a separate mini-tutorial for the tassel construction.
Tie the tassel tightly with an extra thread, leaving the ends at least 20 inches/50 cm long. Braid these long ends into a simple braid.
Attach the pompoms to the top of the tassel by pulling the braid through them. Fold the braid in half and tie its end tightly close to the pompom, positioning the knot so that it is almost hidden within the yarn.
Finally, attach the completed tassel to the bag.
Tips for Keeping the Round Panels Even
Large crochet circles can become difficult to manage if stitch counts are not checked regularly. This pattern provides an exact stitch count after every round, making those numbers valuable checkpoints rather than optional details.
- Keep the beginning-of-round marker in place as directed.
- Check the stitch count at the end of each round before moving forward.
- Pay special attention to the increase stitches because they control the growth of the circular panel.
- Keep the tension as consistent as possible when working the single crochet rounds.
- When reaching Round 34, remember that the raffia is held double.
Tips for Working with Raffia
Raffia behaves differently from soft wool or acrylic yarn. It can have a more structured feel and responds differently to tension and blocking. Avoid pulling excessively hard on the strand while crocheting, especially when working the large circular panels.
The pattern specifically recommends steam-blocking the completed panels. When using an iron, protect the raffia with a piece of cotton fabric rather than placing the iron directly against it.
If you want a more structured bag, follow the directions for the millinery wire. If you prefer a softer construction, the wire can be omitted. The source also suggests invisible hanging cord as a substitute when millinery wire is difficult to find.
Common Construction Checkpoints
- R1: 6 sts
- R5: 30 sts
- R9: 54 sts
- R10: 60 sts with the first wire round
- R15: 90 sts
- R21: 126 sts
- R22: 132 sts with the second wire round
- R27: 162 sts
- R33: 198 sts
- R34: 198 sc, worked with two strands and two millinery wires
These checkpoints are especially helpful when working a large circular project. If a stitch count is incorrect, finding the problem close to the round where it occurred is generally easier than trying to correct it several rounds later.
Frequently Asked Questions
Can I use a different raffia yarn?
Yes. The pattern states that it can be adjusted to other raffia yarns. Ra-Ra Raffia from Wool and the Gang is specifically mentioned as an example. The recommended hook is 3 mm, or another size needed to achieve the stated gauge.
Can I make the bag without millinery wire?
Yes. The wire is optional. The pattern notes that it can be skipped if you prefer a softer bag. Invisible hanging cord is also suggested as a substitute for millinery wire.
How many round panels are needed?
The bag is constructed from two identical halves. Each half consists of a round panel followed by the handle and bottom construction.
Do the handles have to be joined together?
No. The finishing instructions specifically state not to connect the handles if you want to have two of them.
Can I skip the tassel?
Yes. The tassel is an optional decorative element. It adds a playful and polished finish, but it can be omitted if you prefer a simpler bag.
Can I change the tassel colors?
Yes. The pattern allows yarn of desired colors for the tassel and recommends making the two pompoms with yarn of your choice. This makes the decoration easy to coordinate with your wardrobe.
Final Finishing Checklist
- Two identical round panels have been completed.
- Each panel has been steam-blocked.
- The handle and bottom sections have been completed on both halves.
- The bottom angle has been shaped with a folded towel during blocking.
- The two halves have been positioned with their wrong sides facing each other.
- The corresponding bottom stitches have been crocheted together.
- The handles have been left separate if two handles are desired.
- All ends have been woven in.
- The bag has been turned right side out.
- The bottom has been steam-blocked again if necessary.
- Two pompoms have been made using the 1.5-inch/3.5 cm and 1-inch/2.4 cm pompom makers.
- The tassel has been made and finished with the braided ends.
- The tassel has been attached to the bag.
A Handmade Bag Designed for Personal Style
The Sun City Bag is more than a basic crochet accessory. Its circular construction creates a memorable silhouette, while the raffia gives it a natural, summery appearance. The optional wire allows the maker to influence how firmly the bag holds its shape, and the detachable-looking decorative character of the tassel makes personalization easy.
Because the main body is built from two identical circular halves, the project also has a satisfying rhythm. The increasing stitch counts provide clear progress markers, and the final transition into the handle and bottom gives the large circles their practical purpose.
With approximately 7 oz/200 g of King Cole Raffia, a 3 mm hook, and the specified construction, you can create a bag measuring approximately 13 inches/33 cm in diameter. The 29-inch/74 cm straps provide a practical carrying length, while the optional tassel adds the final decorative detail.
Whether you keep the natural raffia color or introduce your own choices through the tassel and pompoms, the design offers plenty of room for personal expression without changing the original crochet construction. Follow the rounds carefully, use the stitch counts as checkpoints, take care when blocking raffia, and give the finishing stages enough attention to create a clean, balanced result.
The finished Sun City Bag is a stylish handmade project that combines a simple single-crochet foundation with thoughtful shaping, optional structural support, and a decorative finish. It is a satisfying project to make and an equally enjoyable accessory to carry on sunny days.