
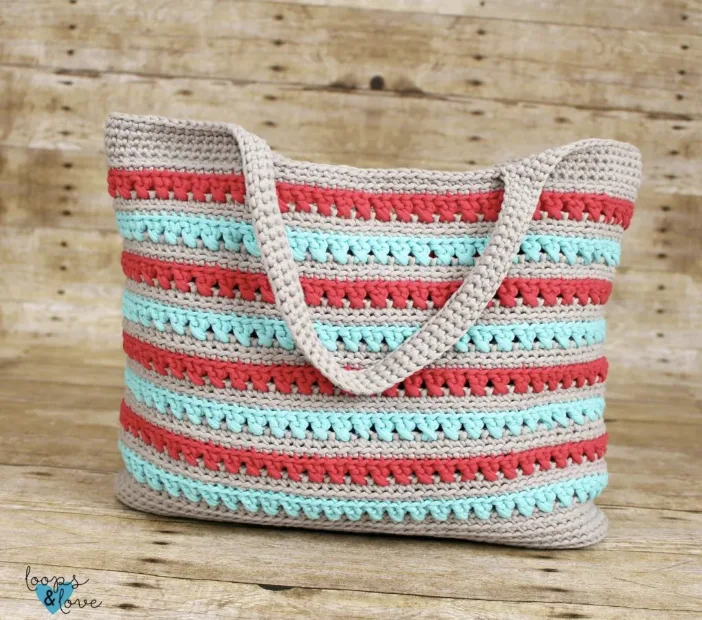
If you are looking for a crochet bag that is practical enough for everyday adventures while still having a cheerful summer style, the Beach Please Summer Tote is a wonderful project to add to your handmade collection. This roomy crochet tote combines sturdy construction, simple single crochet rounds, textured back-loop stitches, and colorful criss cross stitch sections to create a bag that is both useful and eye-catching.

The original project was designed as a generously sized tote that can carry everything from bathing suits and extra clothes to snacks and towels. It can also serve as a crochet project bag when you want to take your current work with you. When laid flat, the finished bag measures approximately 16 inches wide and 12 inches tall, not including the handles.
This tutorial keeps the original pattern information intact while organizing the project into a clear, easy-to-follow crochet workshop. The stitch counts, rounds, measurements, color changes, hook size, yarn requirements, gauge, and construction instructions remain exactly as specified in the source pattern.
Why This Summer Tote Makes a Great Crochet Project
The Beach Please Summer Tote is designed around a practical combination of structure and flexibility. The original pattern uses Bernat Maker yarn, a soft cotton tube-shaped yarn with nylon filling. The resulting fabric has gentle stretch, allowing items of different shapes and sizes to fit inside while helping the bag maintain its shape.
The bag is also large enough to be useful beyond the beach. It can accompany you to the zoo, splash pad, or other family outings, and it can hold a larger crochet project together with several skeins of yarn. That versatility makes it more than a decorative crochet project: it is intended to become a working part of your everyday routine.
The pattern begins with a shaped oval base. Once the base is complete, the sides are built upward using back-loop-only single crochet rounds. Later, decorative criss cross double crochet rounds are introduced between sections of back-loop-only single crochet. The final rounds create the handles and reinforce them by crocheting around the bag and handle chains.
Materials You Will Need
- Bulky Weight Yarn: Any bulky #5 weight yarn can be used. A cotton yarn or cotton blend is recommended. Approximately 300 yards are needed in total.
- Main Color: Most of the approximately 300 yards is used for the main color.
- Accent Colors: Approximately 30 yards of each accent color are needed. The original sample uses one main color and two accent colors.
- Crochet Hook: 6mm crochet hook.
- Yarn Needle: Used for weaving in ends.
If you do not have bulky yarn available, the source pattern explains that doubled strands of a #3 DK yarn or a thinner #4 worsted-weight yarn can also be used. Because changing yarn weight can significantly affect the finished dimensions, the gauge should be checked when making substitutions.
Color Organization for the Pattern
The original pattern identifies the colors as follows:
- Color A: Grey
- Color B: Turquoise
- Color C: Coral
The project begins with Color A, which is the main bag color. The accent colors are introduced at specific points throughout the body. Keeping the colors clearly separated before starting will make the repeated color-change sequence much easier to follow.
Gauge and Finished Measurements
Gauge is especially important for this project because yarn substitutions can make the finished tote significantly smaller or larger.
- Gauge: 8 back loop SC stitches = 2 inches wide.
- Gauge: 7 rows of back loop SC stitches = 2 inches tall.
- Finished Size: Approximately 16 inches wide and 12 inches tall when laid flat, not including the handles.
Before deciding that your gauge is close enough, remember that both stitch width and stitch height matter. A difference in gauge can affect the overall size of the bag and the amount of yarn required.
Understanding the Crochet Abbreviations
The pattern uses standard crochet abbreviations together with one decorative stitch technique.
- Ch: Chain
- Sl St: Slip Stitch
- SC: Single crochet
- DC: Double crochet
- BLO: Back Loops Only
- Criss Cross Stitch: Skip a stitch, double crochet in the next stitch, then go back and double crochet in the skipped stitch.
The BLO technique is particularly important throughout the body because it creates the characteristic horizontal texture of the tote. The criss cross stitch sections provide the contrasting decorative bands.
Before You Begin: How the Rounds Work
This tote is worked in joined rounds. At the end of every round, the final stitch is joined to the first stitch with a slip stitch.
There is an important starting-round rule: the first stitch of every round is worked in the same stitch as the chain 1 or chain 2. The chain stitches do not count toward the stitch count of the round.
This detail is worth remembering from the very beginning. Accidentally treating the starting chain as a counted stitch can change the stitch count and make later rounds difficult to align.
Building the Bag Base
The foundation of the tote is created as an oval-shaped base. Start with Color A.
Round 1
Chain 41. Work SC in the second chain from the hook and in each chain across. Make 4 SC in the last chain. Continue around so that you are now working along the other side of the starting chain. Work SC in each stitch across, then make 3 SC in the last stitch. Join with a slip stitch to the first SC and chain 1.
Stitch count: 84.
Round 2
Work 2 SC in the first stitch, then SC in the next 38 stitches. Work 2 SC in each of the next 4 stitches. Continue with SC in the next 38 stitches, then work 2 SC in each of the last 3 stitches. Join and chain 1.
Stitch count: 92.
Round 3
Work 2 SC in the first stitch, then SC in the next 39 stitches. Repeat the following sequence three more times: 2 SC in the next stitch, 1 SC in the next stitch. Then work SC in the next 38 stitches. Repeat the sequence of 2 SC in the next stitch and 1 SC in the next stitch two more times. Join and chain 1.
Stitch count: 100.
Round 4
Work 2 SC in the first stitch, followed by SC in the next 40 stitches. Repeat the sequence of 2 SC in the next stitch and SC in the next 2 stitches three more times. Work SC in the next 38 stitches. Repeat the same increase sequence two more times. Join and chain 1.
Stitch count: 108.
Round 5
Work 2 SC in the first stitch and SC in the next 41 stitches. Repeat 2 SC in the next stitch and SC in the next 3 stitches three more times. Work SC in the next 38 stitches. Repeat the same increase sequence two more times. Join and chain 1.
Stitch count: 116.
At this point, the bag base should measure approximately 15 inches long and 3 inches wide. This is the transition point where you stop shaping the base and begin building the height of the tote.
Keeping the Bag Right Side Out

As you continue working the single crochet rounds, the sides of the bag will begin curling upward. Keep the right side of the stitches facing toward the outside of the bag. The backs of the stitches should face toward the inside.
If the right side is facing inward, the bag is simply inside out. Turn it right side out and continue. A useful visual checkpoint is the texture created by the back-loop-only single crochet stitches. The outside should have the intended stitch appearance while you continue working around the bag.
Creating the Textured Body
Rounds 6 through 11 establish the first major section of the bag body.
Rounds 6–11
Work each round in the back loops only. SC in each stitch around. Join and chain 1 at the end of each round.
Stitch count for each round: 116.
After Round 11, chain 2 instead of chain 1. Change to Color B at the end of Round 11 before joining.
Adding the First Criss Cross Band
Round 12
Work criss cross stitches around. Skip the first stitch, DC in the next stitch, then DC in the skipped stitch. Repeat around. Change to Color A before joining, then join and chain 2.
Stitch count: 116.
The criss cross round creates a decorative textured band that contrasts with the rows of BLO single crochet.
Rounds 13–14
Work both rounds in the back loops only. SC in each stitch around. Join and chain 1.
Stitch count: 116 for each round.
After Round 14, chain 2 instead of chain 1. Change to Color C at the end of Round 14 before joining.
Round 15
Work criss cross stitches around by skipping the first stitch, working DC in the next stitch, and then working DC in the skipped stitch. Repeat around. Change to Color A before joining, then join and chain 2.
Stitch count: 116.
Continue the Repeating Color and Texture Sequence
From this point, the tote follows a clear rhythm: BLO single crochet rounds create the main fabric, while individual criss cross rounds introduce the accent colors.
Rounds 16–17
Work in the back loops only. SC in each stitch around. Join and chain 1.
Stitch count: 116 for each round.
After Round 17, chain 2 instead of chain 1 and change to Color B at the end of the round before joining.
Round 18
Work criss cross stitches around: skip the first stitch, DC in the next stitch, and DC in the skipped stitch. Repeat around. Change to Color A before joining, then join and chain 2.
Stitch count: 116.
Rounds 19–20
Work both rounds in the back loops only. SC in each stitch around. Join and chain 1.
Stitch count: 116 for each round.
After Round 20, chain 2 instead of chain 1 and change to Color C before joining.
Round 21
Work the criss cross stitch pattern around. Skip the first stitch, DC in the next stitch, and DC in the skipped stitch. Repeat around. Change to Color A before joining, then join and chain 2.
Stitch count: 116.
Rounds 22–23
Work both rounds in the back loops only, making SC in each stitch around. Join and chain 1.
Stitch count: 116 for each round.
After Round 23, chain 2 instead of chain 1 and change to Color B at the end of Round 23 before joining.
Round 24
Work criss cross stitches around: skip the first stitch, DC in the next stitch, and DC in the skipped stitch. Repeat around. Change to Color A before joining, then join and chain 2.
Stitch count: 116.
Rounds 25–26
Work both rounds in the back loops only. SC in each stitch around. Join and chain 1.
Stitch count: 116 for each round.
After Round 26, chain 2 instead of chain 1 and change to Color C at the end of the round before joining.
Round 27
Work criss cross stitches around: skip the first stitch, DC in the next stitch, then DC in the skipped stitch. Repeat around. Change to Color A before joining, then join and chain 2.
Stitch count: 116.
Rounds 28–29
Work both rounds in the back loops only. SC in each stitch around. Join and chain 1.
Stitch count: 116 for each round.
After Round 29, chain 2 instead of chain 1 and change to Color B at the end of the round before joining.
Round 30
Work criss cross stitches around: skip the first stitch, DC in the next stitch, then DC in the skipped stitch. Repeat around. Change to Color A before joining, then join and chain 2.
Stitch count: 116.
Rounds 31–32
Work both rounds in the back loops only. SC in each stitch around. Join and chain 1.
Stitch count: 116 for each round.
After Round 32, chain 2 instead of chain 1 and change to Color C at the end of Round 32 before joining.
Round 33
Work criss cross stitches around: skip the first stitch, DC in the next stitch, then DC in the skipped stitch. Repeat around. Change to Color A before joining, then join and chain 2.
Stitch count: 116.
Final Body Rounds
Rounds 34–35
Work both rounds in the back loops only. SC in each stitch around. Join and chain 1.
Stitch count: 116 for each round.
These final body rounds prepare the tote for the handle construction.

Creating the Tote Handles
The handles are formed directly from chain stitches in Round 36. The original construction is designed so that the handles are integrated into the bag rather than attached separately.
Round 36
SC in the first 16 stitches, chain 50, skip 23 stitches, then SC in the next 34 stitches. Chain 50, skip 23 stitches, and SC in the last 20 stitches. Join and chain 1.
The two sets of 50 chain stitches form the handle openings. If you would like longer handles, the source pattern allows you to add more chain stitches in Round 36. When doing so, make sure both handles contain the same number of chain stitches so that they remain equal in length.
Round 37
SC in each stitch around and in each of the chain stitches forming the handles. Join and chain 1.
This round works around the handle chains and begins building their thickness while continuing around the body of the bag.
Rounds 38–39
SC in each stitch around. Join and chain 1.
After Round 39, do not chain 1. Fasten off and weave in the ends.
Color-Change Technique
The color changes are made at the end of a round before joining. Complete the final stitch of the round until the last yarn over. Then use the new color for the final pull-through.
For example, when completing a double crochet, yarn over, insert the hook into the final stitch, pull up a loop, yarn over and pull through 2 loops on the hook. Then yarn over with the new color and pull through the final 2 loops. Join with a slip stitch to the first stitch of the round.
This method keeps the color transition at the correct point and follows the construction used throughout the original tote.
Managing the Yarn Tails
The original sample keeps the grey main color attached throughout the bag and pulls it upward when it is needed again. This can be slightly visible on the inside of the tote.
For the two accent colors, the original approach is different. After each color change, the yarn tail is worked over to secure it before cutting. The accent colors could also be left attached, but because the colored rows are farther apart, carrying those colors upward would create longer floats and make them more noticeable inside the bag.
For a clean finish, pay attention to the inside of the tote while carrying or securing yarn. The outside should remain focused on the textured BLO stitches and decorative criss cross bands.
Helpful Checkpoints While Crocheting
- After Round 1, confirm the stitch count is 84.
- After Round 2, confirm the stitch count is 92.
- After Round 3, confirm the stitch count is 100.
- After Round 4, confirm the stitch count is 108.
- After Round 5, confirm the stitch count is 116.
- After Round 5, the base should be approximately 15 inches long and 3 inches wide.
- Rounds 6–35 should maintain 116 stitches.
- Keep the right side of the stitches facing outward as the sides rise.
- Make color changes before joining at the end of the specified rounds.
- Keep both 50-chain handle sections equal in Round 36.
- After Round 39, fasten off without adding the usual chain 1.
Common Beginner Mistakes to Watch For
One of the easiest mistakes in joined-round projects is accidentally counting the starting chain as a stitch. In this pattern, the chain 1 or chain 2 does not count toward the stitch count. The first stitch is worked in the same stitch as the starting chain.
Another common issue is losing the intended stitch texture by working through both loops when a round specifically calls for BLO. Take a moment at the beginning of every BLO round to identify the back loop before continuing.
It is also important to watch the direction of the fabric. As the tote sides begin curling upward, make sure the right side of the stitches remains on the outside.
Finally, color changes should happen at the end of the specified round before joining. Changing at a different point can shift the decorative stripe placement.
A Visual Reference for the Finished Tote

The combination of the roomy shape, sturdy yarn, textured body, and colorful accent bands makes this tote particularly suited to warm-weather outings. Its generous size also means that it can transition naturally from a beach or family bag into an everyday carryall.
Finishing the Project
Once Round 39 is complete, fasten off and weave in all remaining ends. Take a final moment to inspect the handles and the inside of the bag. Make sure the handle sections are secure and that the yarn ends have been properly woven in.
Because the finished size is approximately 16 inches wide by 12 inches tall without the handles, the completed tote offers plenty of room for the kinds of items that make summer outings easier. The original design was specifically appreciated for holding bathing suits, extra clothes, snacks, towels, and crochet supplies.
Beach Please Summer Tote Quick Reference
- Yarn Weight: Bulky #5.
- Recommended Fiber: Cotton or cotton blend.
- Total Yarn: Approximately 300 yards.
- Accent Yarn: About 30 yards of each accent color.
- Hook: 6mm.
- Gauge: 8 BLO SC = 2 inches wide.
- Height Gauge: 7 rows of BLO SC = 2 inches tall.
- Finished Width: Approximately 16 inches.
- Finished Height: Approximately 12 inches, excluding handles.
- Color A: Grey.
- Color B: Turquoise.
- Color C: Coral.
- Construction: Joined rounds.
- Base: Rounds 1–5.
- Main Body: Rounds 6–35.
- Handles: Round 36 onward.
- Final Round: Round 39.
Final Thoughts on This Crochet Tote
The Beach Please Summer Tote is a useful project for crocheters who enjoy making items that can immediately become part of their everyday life. The pattern combines a carefully shaped base with repeated BLO single crochet rounds, colorful criss cross stitch bands, and integrated handles.
For beginners, the most important strategy is to work methodically and check the stitch count regularly. The base increases from 84 stitches in Round 1 to 116 stitches in Round 5, and from there the body rounds maintain 116 stitches. Once the base is complete, the project becomes much more repetitive, allowing you to concentrate on the texture and color changes.
The finished tote is especially appealing as a summer accessory, but its usefulness extends far beyond the beach. Whether you use it for family outings, everyday essentials, or a larger crochet project, the roomy construction gives you plenty of space while the sturdy yarn helps the bag retain its shape.

With the original stitch counts and construction kept intact, this project provides a straightforward path from the first foundation chain to the finished tote. Take your time with the base, keep the right side facing outward, follow the specified color-change points, and check the stitch counts as you progress. These small habits will make the entire construction process easier to manage.