
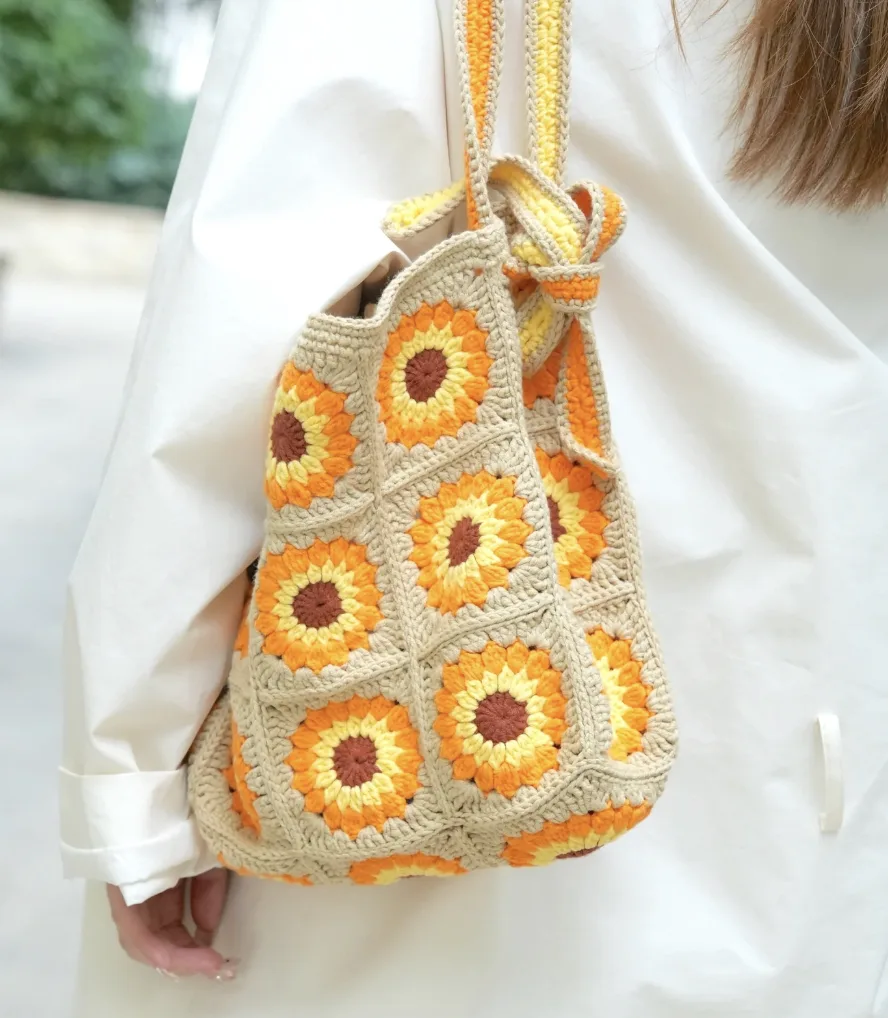

If you love crochet bags with a cheerful handmade character, the Sunburst Granny Square Bag is a wonderful project to add to your summer crochet list. This design brings together vibrant sunburst motifs, traditional granny-square construction, and a practical bag shape. The individual squares create a repeating collection of warm rays and contrasting backgrounds, while the finished construction gives the project a modern and wearable appearance.
The project is made from 27 individual granny squares. Each square measures approximately 3.1 inches, and once the pieces are joined, the completed bag measures about 9.2 inches in height and 9.4 inches in width. The relatively compact size makes it suitable for carrying everyday essentials while still giving the sunburst motifs plenty of room to stand out.
This tutorial follows the original pattern information closely, including the 3.0mm crochet hook, Loopara 5ply combed cotton yarn, US crochet terminology, the four-round square construction, the assembly sequence, the three rounds of single crochet around the opening, and the instructions for making two straps.
What Makes the Sunburst Granny Square Bag Special?
The visual character of this bag comes from the way each granny square develops from a central sunburst into a larger square. Warm yellow or golden tones can be used at the center, followed by peach or light orange rays and a cream or white background. The original pattern also suggests alternative color directions, including sunset-inspired combinations with orange centers, yellow rays, coral borders, rust orange with golden rays and beige, or sunny yellow centers with light orange rays and white borders.
The important thing is that the color palette remains flexible. The pattern specifically encourages you to choose colors that suit your own style while keeping the construction and stitch sequence unchanged.

Finished Size and Project Requirements
Before beginning, it helps to understand the scale of the project. Each completed sunburst square is approximately 3.1 inches. You will make 27 squares in total. After joining the pieces, the bag body measures approximately 9.2 inches high and 9.4 inches wide.
The pattern recommends Loopara 5ply combed cotton yarn. This yarn is described as having a smooth texture and good stitch definition, qualities that help the sunburst details remain visible. The recommended crochet hook is 3.0mm. The smaller hook size is intended to produce neat, firm stitches with less space between them, which is useful for a bag that needs structure.
Materials You Need

- Loopara 5ply combed cotton yarn
- 3.0mm crochet hook
- Scissors
- Stitch marker
The tutorial uses different yarn colors during the crochet and assembly stages. You can select the colors you prefer while keeping the stitch instructions the same. The original color suggestions include warm yellow or golden centers, peach or light orange rays, and a neutral cream or white background.
US Crochet Abbreviations
The pattern uses US crochet terminology. Keeping the terminology consistent is particularly important when moving between the four rounds of each square and the later assembly instructions.
- ch – chain
- dc – double crochet
- sl st – slip stitch
- tr – treble crochet
- bobble st – bobble stitch
- Magic ring – magic circle
Understanding the Square Layout Before You Crochet

The layout is worth studying before assembly begins. Rather than joining the squares randomly, arrange the completed pieces according to the pattern layout. This gives you an opportunity to check the orientation of the sunburst motifs and prepare the stitch markers before the actual joining process.
Because every square contributes to the final visual arrangement, taking time to organize the pieces first can make the later assembly process much easier. The goal is to have the motifs positioned consistently while the individual stitch matches are completed.
How to Crochet the Sunburst Granny Square
You will need to make 27 squares. Each square consists of four rounds. The pattern changes color between rounds, creating the radiating sunburst effect.
Round 1: Create the Center

Begin with a magic ring. Chain 3, then work 15 double crochet into the magic ring. Finish the round by slip stitching to the top of the beginning chain-3.
This first round establishes the center that the remaining rounds will build around. Keep your tension consistent so the foundation remains even and ready for the next color.
Round 2: Add the First Bobble Detail


Change color. Work (chain 3, double crochet, chain 1), followed by (2 double crochet bobble stitch, chain 1). Repeat this sequence 15 times. Finish by slip stitching to the top of the beginning chain-3.
The bobble stitches are one of the defining visual features of the center. Consistent tension is especially helpful here because uneven bobbles can affect the appearance of the radiating design.
Round 3: Build the Radiating Motif

Change color again. Work (chain 3, 3 double crochet bobble stitch, chain 2), followed by (4 double crochet bobble stitch, chain 2). Repeat this sequence 15 times, then slip stitch to the top of the beginning chain-3.
At this stage, the circular center begins to take on the recognizable sunburst character. Continue to watch your tension as you work the bobble stitches and chain spaces.
Round 4: Turn the Motif Into a Square

For Round 4, change color. Work (chain 3, 2 double crochet), then (3 double crochet) twice. Work (3 treble crochet, chain 2, 3 treble crochet). Then work [(3 double crochet) repeat 3 times, (3 treble crochet, chain 2, 3 treble crochet)] repeat 3 times. Finish by slip stitching to the top of the beginning chain-3.
Fasten off and weave in all ends.
The corner groups created by the treble crochet sections establish the square shape that will later allow the individual motifs to be joined together. Take care not to rush this final round, because uneven corner tension can make the squares more difficult to align during assembly.
Stitch Checkpoints for the 27 Squares
When making a large collection of identical motifs, it can be useful to use the same checkpoints every time. After Round 1, confirm that the center has been completed according to the pattern. After Round 2, check the repeated bobble-and-chain sequence. After Round 3, look at the developing radial texture. After Round 4, check the four corners and overall square shape.
Repeat these checks for all 27 squares. Consistency between the individual motifs will make the final bag look much more balanced.
Preparing the Squares for Assembly
Once all 27 squares are complete, arrange them according to the provided layout. The original assembly instructions recommend blocking the squares before joining so that they have even sizing. This can make the edges easier to align and helps the sunburst centers sit neatly beside one another.
Place your stitch markers as indicated by the assembly diagram. The markers are especially useful once multiple squares are connected and the bag begins to take shape.
Joining the Granny Squares: Horizontal Assembly

Begin by aligning the pieces according to the picture. Place your stitch markers in the indicated positions.


Insert your hook through the center of each corner motif and match the stitches one by one. Place the pattern pieces back to back. Pick up half a stitch from each inside edge, and keep the working yarn below the hook with your left hand.

Keep your tension relaxed while joining. Tight joins can pull the pieces together and affect the shape of the bag.

Continue matching each stitch carefully. Accuracy at this stage helps preserve the alignment of the repeating sunburst motifs.

Join the remaining two rows of pattern pieces.

Complete the horizontal rows of joining. Fasten off and weave in the ends.
Vertical Joining and Flat Bag Assembly

Begin vertical joining according to the picture. Use the slip stitch method for joining.

Add one lock stitch at the vertical pattern intersections.

At this point, the flat arrangement of the joined pieces should be complete.

Turn the pattern pieces inside out. Fold the bag body and align the stitch markers. Match the bottom markers carefully before continuing.

Follow the joining path shown in the picture.

Complete the bag body assembly before moving to the opening and straps.

Work 3 rounds of single crochet around the opening. This completes the upper edge treatment described in the original pattern.

The bag body is now complete. Before adding the straps, check the joined seams, weave in any remaining ends, and make sure the body has maintained its intended shape.
How to Crochet the Two Bag Straps
The pattern calls for 2 straps. The strap construction uses standing single crochet, chain stitches, single crochet worked into spaces, and a final color change.
Strap Step 1

Begin with standing single crochet and keep it loose. Chain 2, then work into the standing stitch.
Strap Step 2

Chain 2 and work into the space between posts.
Strap Step 3: Continue to the Desired Length


Repeat for the desired length. Work 2 single crochets in each space around.
For everyday use, the pattern recommends working the strap stitches a bit tighter than usual to help prevent stretching over time. This is especially useful for a crochet bag because the straps are subjected to repeated pulling and weight.
Strap Step 4: Add the Final Color

Change color and work one round of single crochet. Fasten off and weave in the ends.
Strap Step 5: Thread the Straps

Thread the straps through the side holes.
Strap Step 6: Finish the Sides

Tie a butterfly bow or your preferred knot on the sides. The two straps complete the practical construction of the bag while also adding a decorative finishing detail.
Helpful Assembly Tips for a Cleaner Finish
One of the most important parts of this project is maintaining consistent tension. The original pattern specifically recommends relaxed tension during bag assembly so the finished body can retain its shape. When joining the squares, concentrate on matching the stitches carefully rather than pulling the yarn tightly.
Blocking the squares before joining can also help produce more even pieces. If your individual motifs vary in size, laying them out first can help you identify which pieces need attention before the seams are permanently joined.
Another useful practice is to keep the sunburst centers visually aligned. Since the bag is built from repeating motifs, even small differences in orientation can become noticeable after several squares have been connected.
Common Problems to Watch For
Uneven Sunburst Centers
If the bobble stitches look inconsistent, review your tension rather than changing the stitch instructions. The original pattern emphasizes consistent tension, particularly while working bobble stitches.
Squares That Do Not Look Square
Check the final round and the corner sections. Round 4 is responsible for converting the circular motif into the square form, so the treble crochet corner groups need to be worked carefully.
Bag Seams That Pull
Keep the joining tension relaxed. Tight joining can draw the squares inward and make the completed bag less natural in shape.
Stretching Straps
The strap instructions recommend working the stitches somewhat tighter than usual. This small tension adjustment helps the straps resist stretching during regular use.
Finishing and Care
Once the bag is completely assembled, take a final look at all joins and loose ends. Any remaining ends should be woven in securely. The original pattern also recommends keeping the bag from becoming overstuffed, since excessive weight can affect its shape.
Daily Care
Gently brush away dust or dirt after use. If you notice loose threads, trim them carefully instead of pulling on them. Avoid overstuffing the bag so the granny-square structure can retain its intended shape.
Washing
For cleaning, hand washing is recommended. Use cool water and mild detergent, and gently squeeze the bag rather than wringing it. Lay it flat to dry in a shaded area. The original care instructions recommend avoiding direct sunlight because it can fade the colors.
Storage
Store the finished bag in a cool, dry place. When it is not being used, lightly stuff it with tissue paper to help maintain its shape. For longer storage, a cotton bag is recommended instead of plastic so the crochet can breathe. Store the bag flat rather than hanging it, which can contribute to strap stretching.
Sunburst Granny Square Bag Quick Reference
- Project: Sunburst Granny Square Bag
- Square count: 27 squares
- Approximate square size: 3.1 inches
- Finished bag height: approximately 9.2 inches
- Finished bag width: approximately 9.4 inches
- Yarn: Loopara 5ply combed cotton
- Hook: 3.0mm
- Scissors: Required
- Stitch marker: Required
- Terminology: US crochet terms
- Square rounds: 4
- Bag straps: 2
- Bag opening: 3 rounds of single crochet
Final Thoughts
The Sunburst Granny Square Bag is a satisfying project because it divides a larger finished item into a collection of manageable motifs. Each square develops through four distinct rounds, beginning with a magic-ring center and gradually transforming into a colorful square with a radiant sunburst design. Once all 27 motifs are complete, the assembly process brings them together into a practical bag measuring approximately 9.2 inches high by 9.4 inches wide.
The most important things to focus on are consistency, careful alignment, and relaxed joining tension. Make each square with the same attention to stitch placement, arrange all 27 pieces according to the layout, and use the stitch markers during assembly. When the body is complete, the three rounds of single crochet around the opening provide the final edge before the two straps are attached.
Whether you stay with warm golden, peach, orange, cream, and white shades or choose your own color combination, the finished bag keeps the distinctive character of the original sunburst concept. With careful stitching and thoughtful assembly, the individual motifs come together to create a bright crochet accessory that is both decorative and practical.