

Chocolate Thumbprint Cookies
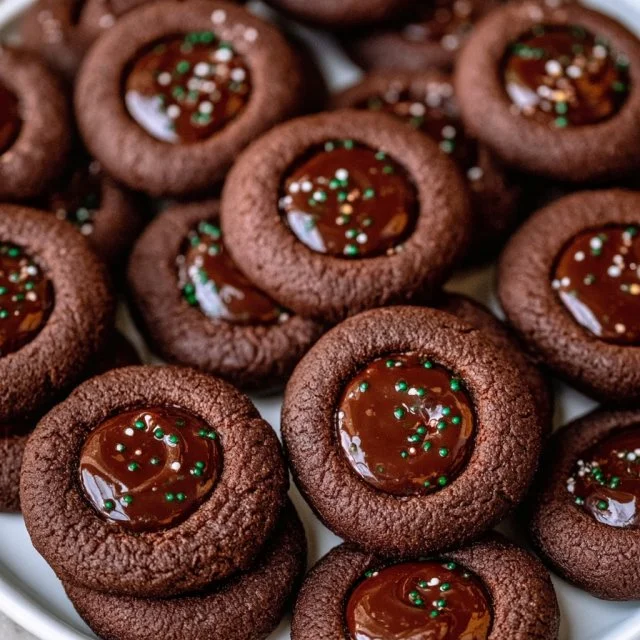
There’s something incredibly nostalgic about baking cookies, especially when they are as delightful as chocolate thumbprint cookies. These treats combine the rich, velvety taste of chocolate with a smooth, luscious center of chocolate ganache, creating an indulgent bite that’s hard to resist. The cookies offer the perfect balance of sweetness and texture, with a crisp edge and a soft, chewy interior. Each cookie is not only a delight for the taste buds but also an appealing treat to look at, showcasing a beautiful shine from the ganache filling nestled in their centers. The earthy aroma of cocoa wafting through your kitchen as these cookies bake is sure to evoke warm memories of family gatherings and cozy afternoons.
Ideal for various occasions, chocolate thumbprint cookies are perfect for holiday cookie trays, casual family dinners, potluck parties, or even a sweet afternoon snack. They offer an elegant touch, making them an excellent choice for gifting as well. These cookies are incredibly versatile and can be served at room temperature, which makes them easy to transport and share. Just imagine the excitement on your friends’ faces as they take their first bite of these bite-sized confections!
In addition to their delicious flavor, one of the fantastic aspects of chocolate thumbprint cookies is the creative freedom they offer. You can experiment with different fillings, such as fruit preserves, caramel, or various types of chocolate, allowing you to customize the cookies to suit your preferences or seasonal themes. Whether you’re a novice baker or a kitchen whiz, this recipe is simple and rewarding, perfect for getting everyone involved in the fun of baking!
What Makes This Recipe Special
Chocolate thumbprint cookies stand out not only for their delightful flavor but also for their unique texture profile. The combination of the dough’s soft chewiness juxtaposed against the silky ganache creates an extraordinary mouthfeel that entices cookie lovers of all ages. Each element of the recipe plays a key role in crafting this delicious treat. The cocoa powder infuses the cookies with a deep chocolate flavor while maintaining a rich brown color, which is visually appealing. The thumbprint itself is an innovative feature that invites a luscious filling, adding a surprise element to every bite.
Unlike other cookie varieties that may be overly sweet or dry, the perfect ratios of butter, sugars, and chocolate in this recipe ensure that the thumbprint cookies emerge from the oven moist and decadent. The cookies’ slightly crisp edges lead into a soft center that’s just right for holding the ganache. When compared to other cookie recipes like chocolate chip or oatmeal raisin, chocolate thumbprint cookies have a more refined appearance, making them a wonderful option for more formal gatherings.
The ganache filling provides a rich contrast to the cookie itself, making every bite more enjoyable. This interplay of textures and flavors distinguishes chocolate thumbprint cookies from other classic treats. Furthermore, with the option to customize the filling, each batch can provide a variety of flavors that suit different tastes or festivities, solidifying these cookies’ place in any baker’s repertoire.
Ingredient Overview and Helpful Notes
To achieve the perfect chocolate thumbprint cookies, selecting the right ingredients is crucial. Each component not only adds flavor but also contributes to the overall texture and appearance of the finished product. Here’s a breakdown of the key ingredients and their roles:
-
All-Purpose Flour: Provides structure to the cookie. Too much flour can lead to dense cookies, while too little will cause them to spread out excessively. It’s essential to measure accurately, preferably using the spoon-and-level method rather than scooping directly from the bag to avoid compacting the flour.
-
Cocoa Powder: This is the star flavor ingredient, providing depth and richness. Unsweetened cocoa powder is typically used for a balanced flavor as it allows the sweetness from the sugars and chocolates to shine. When purchasing cocoa powder, look for high-quality brands as it impacts the overall chocolate flavor significantly.
-
Baking Powder and Salt: These are small but essential elements in this recipe. Baking powder helps the cookies rise and achieve a soft texture, while salt elevates the chocolate flavor and balances the sweetness.
-
Unsalted Butter: The fat in the butter provides flavor and moisture. Using unsalted butter allows you to control the overall salt level in the cookies. Softer butter is crucial for creating the desired light and fluffy texture when creamed with sugars.
-
Granulated and Brown Sugars: Together, these sugars give the cookies the right sweetness. Granulated sugar contributes to crispiness, while brown sugar adds moisture due to its molasses content, resulting in a chewier texture.
-
Vanilla Extract: This ingredient enhances the overall flavor, complementing the cocoa beautifully. Using pure vanilla extract is recommended as it provides a natural flavor that artificial extracts may lack.
-
Egg Yolk: The egg yolk adds richness and helps bind the ingredients together, providing moistness to the final cookie. Be sure not to use the whole egg, as the additional egg white could affect the cookie’s texture.
-
Chocolate Ganache: The filling for the thumbprints can be made from high-quality chocolate combined with cream. This luscious ganache is where you can get creative, adjusting the chocolate choices to dark, milk, or even white chocolate based on personal preference.
When gathering ingredients, ensure that butter is at room temperature for optimal creaming with sugars. Always sift cocoa powder and flour to prevent lumps that could affect the texture of the dough. Each of these ingredients works together harmoniously, creating a delectable outcome. Sticking to the original ingredient list will yield the best results, but there are always flexible options for sweetening or spicing up these delightful cookies.
Nutrition & Recipe Details
Nutritional values for homemade cookies can fluctuate based on ingredient brands and exact measurements. The following table is an estimate reflecting common values for chocolate thumbprint cookies.
| Item | Value |
|---|---|
| Prep time | 20 minutes |
| Cook time | 10-12 minutes |
| Store time | Up to 1 week in airtight container |
| Calories | 120 per cookie (approx.) |
| Protein | 1.5 grams |
| Carbohydrates | 18 grams |
| Fat | 5 grams |
How to Make Chocolate Thumbprint Cookies
Creating chocolate thumbprint cookies is a straightforward process that is well-suited to bakers of all levels. To successfully embark on your journey, start by gathering all the necessary ingredients and equipment, which include mixing bowls, a whisk, a cookie sheet, parchment paper, and an oven. Preparing an organized workspace will help streamline the baking process and minimize mess.
Before you begin mixing, it’s beneficial to have your ingredients measured and ready. This not only helps you keep track of each component but also ensures accuracy in the recipe. Work efficiently by softening the butter, as the creaming process between the butter and sugars forms a fluffy base for your cookies.
Now let’s proceed to the ingredients.
Ingredients
| Ingredient | Quantity |
|---|---|
| All-purpose flour | 1 cup |
| Unsweetened cocoa powder | 1/4 cup |
| Baking powder | 1/2 teaspoon |
| Salt | 1/4 teaspoon |
| Unsalted butter, softened | 1/2 cup |
| Granulated sugar | 1/2 cup |
| Brown sugar, packed | 1/4 cup |
| Vanilla extract | 1 teaspoon |
| Egg yolk | 1 large |
| Chocolate ganache | 1/2 cup |
After collecting the ingredients, the first step is to preheat your oven to 350°F (175°C). As the oven achieves the desired temperature, prepare your baking tray by lining it with parchment paper to prevent the cookies from sticking. This step also makes cleanup much more manageable.
Then, gather two mixing bowls: one for dry ingredients and another for the wet mixture. In the first bowl, whisk together the all-purpose flour, cocoa powder, baking powder, and salt. Mix these elements thoroughly to create a uniform dry mixture. In the second bowl, use an electric mixer or a good old-fashioned wooden spoon to cream the softened butter, granulated sugar, and brown sugar until the mixture appears light and fluffy. This caressing process usually takes about 2-4 minutes. Beat in the vanilla extract and egg yolk until well-blended, then gradually incorporate the dry ingredients, mixing just until the dough forms.
Once your dough is ready, take a small scoop or simply use your hands to roll the dough into balls about one inch in diameter. Space them evenly on the prepared cookie sheet to allow for spreading during baking. Remember to make a thumbprint in the center of each ball, as this will create space for your rich chocolate ganache filling. Once assembled, place the tray in the oven and bake for about 10 to 12 minutes. The cookies should appear set when done but slightly soft in the center, which is what you want for that chewy texture! Allow the cookies to cool for a few minutes before transferring them to a wire rack and then filling the thumbprints with ganache. Let them cool completely to allow the ganache to firm up slightly.
Step-by-Step Instructions
-
Preheat the Oven: Preheat your oven to 350°F (175°C). This step is critical as it ensures the cookies bake evenly. Preheating sets the right environment for the cookies to rise properly and develop the right texture.
-
Whisk Dry Ingredients: In a bowl, whisk together the all-purpose flour, cocoa powder, baking powder, and salt. This helps to combine the ingredients uniformly, ensuring that the leavening agent and salt are evenly distributed throughout the dough.
-
Cream Butter and Sugars: In another bowl, cream the softened unsalted butter, granulated sugar, and packed brown sugar until the mixture turns light and fluffy. This process typically takes about 2-3 minutes if you’re using an electric mixer. Creating air pockets in this mixture is essential as it will help the cookies rise and maintain their soft texture.
-
Incorporate Vanilla and Egg Yolk: Beat in the vanilla extract and the egg yolk, mixing until everything is well incorporated. The egg yolk adds moisture and richness to the dough, giving the cookies their deliciously tender texture.
-
Combine Dry Ingredients: Gradually mix in the previously whisked dry ingredients until just combined. Be careful not to overmix at this stage, as doing so can develop gluten and create a tougher cookie. You should stop mixing once you no longer see dry flour in the dough.
-
Shape the Dough: Roll the dough into 1-inch balls and place them on a lined baking sheet. Leave enough space between each ball as they will spread during baking. This spacing ensures that the cookies bake evenly.
-
Make Thumbprints: Use your thumb to make an indent in the center of each dough ball. This thumbprint is crucial as it will hold the ganache filling later, so press down gently but deeply enough to create a nice cavity.
-
Bake Cookies: Place the baking sheet in the preheated oven and bake for about 10-12 minutes, or until the cookies are set. You’ll notice they will look soft but firm to the touch. Do not overbake as they will continue to firm up after being removed from the oven.
-
Cool and Fill: Remove the cookies from the oven and allow them to cool on the baking sheet for a few minutes. This step is essential to let them set slightly before transferring them to a wire rack. Once cooled, fill the thumbprints with the prepared chocolate ganache. The warmth of the cookies can slightly melt the ganache, resulting in a more luscious finish.
-
Let Cool Completely: Allow the cookies to cool completely on the wire rack so the ganache can set before serving. This helps maintain the cookie’s structure and ensures that the ganache is easy to enjoy.
Understanding the Flavor and Texture
The flavor of chocolate thumbprint cookies is a dynamic combination of rich chocolate, buttery undertones, and the sweet, creamy ganache filling. The cocoa powder used in the cookies gives a deep, chocolatey flavor without overwhelming sweetness, which is perfectly balanced by the sugars incorporated during mixing. The inclusion of butter adds a delightful richness that allows these cookies to melt in your mouth, giving an indulgent experience every time you take a bite. When paired with the silky chocolate ganache, the flavor profile becomes even more complex and satisfying.
Texture also plays a significant role in this cookie’s appeal. With a soft and chewy center framed by crisp edges, each bite reveals a different mouthfeel that enhances the overall experience. The slight crunchiness from the edges contrasts beautifully with the gooey chocolate ganache filling in the center, offering a delightful chewiness that feels satisfying. When baked correctly, the cookies should have an appealing exterior, retaining a slight softness within, which pairs excellently with the smooth, rich ganache that oozes joy with every taste.
During baking, the dough darkens and puffs slightly but should still form that cherished thumbprint, a signature feature of these cookies. Recognizing when they are done will come with practice. The cookies should look set but a little soft; allowing them to cool on the sheet helps them become perfect. A well-baked thumbprint cookie will yield a comforting, familiar taste that brings joy and nostalgia to those who enjoy them.
Pro Tips
Even small adjustments in technique can drastically improve the outcome of your chocolate thumbprint cookies. Here are some pro tips to help you achieve perfection:
| Tip | Description |
|---|---|
| Measure Ingredients Accurately | Use a kitchen scale or measuring cups and spoons to ensure precision in your measurements. Accurate measurements can significantly affect the cookie’s texture and structure. |
| Chill the Dough | If the dough feels too soft to handle, refrigerate it for 20-30 minutes. Chilling firms up the butter, making it easier to roll into balls without a sticky mess. |
| Uniformly Roll Dough Balls | Use a small cookie scoop or measure out the dough so that each ball is uniform in size. Consistent sizes result in even baking. |
| Don’t Skip Ganache Preparation | Allow your ganache ample time to cool and thicken slightly before filling the cookies. This prevents leaks and ensures a perfect thumbprint presentation. |
To further enhance your baking experience, consider using a higher percentage of cocoa chocolate if you prefer a more intense flavor in your ganache. Ensure that your cookies are arranged in a single layer for cooling to prevent them from becoming soggy. Another beneficial tip is to invest in quality baking sheets—non-stick or heavy-duty pans typically yield better results than thinner, flimsy varieties, reducing the chances of burnt bottoms.
Why You’ll Love This Recipe
What makes these chocolate thumbprint cookies so appealing is their perfect balance of ease of preparation and sublime flavor. They’re ideal for both novice bakers and seasoned pros, making baking them a delightful experience rather than a chore. With every step accompanied by easy instructions, anyone can achieve cookie greatness without needing extensive prior knowledge. The result? Sweet, mouthwatering cookies that are sure to garner compliments from family and friends.
Moreover, the cookies’ adaptability is another draw. You can easily swap out the chocolate ganache for various fillings like fruit jams, peanut butter, or other flavored chocolates, providing a fresh take on this classic dessert. Their rich chocolate flavor and chewy texture pair excellently with coffee or tea, making them suitable for afternoon snacks, dessert after dinner, or as sweet take-home treats for guests.
These cookies are destined to become a favorite in your baking repertoire not just for their taste but also for their aesthetic appeal. Bring them to a party or add them to holiday dessert trays, and watch as friends and family are enchanted by the charming little thumbprints topped with beautiful chocolate ganache.
How to Serve Chocolate Thumbprint Cookies
Presenting chocolate thumbprint cookies can be just as delightful as making them! To create an inviting display, arrange the cookies on a decorative platter or cake stand, allowing the ganache-filled centers to be prominently visible. A dusting of confectioners’ sugar or cocoa powder can elevate their appearance, giving a touch of elegance. Alternatively, you might consider placing the cookies in individual cellophane bags tied with twine for gifting or showcasing at a dessert table.
These cookies pair beautifully with beverages such as coffee, tea, or milk. Consider serving them alongside a selection of hot cocoa or chai tea for a cozy gathering. If you’re planning to serve them during the holidays, consider complementary flavors such as peppermint or ginger for an added holiday twist. Pairing the cookies with fresh berries or a scoop of ice cream adds a delightful contrast against the chocolate richness.
If you’re serving these cookies as a dessert at a family meal, consider offering a fruit salad or mixed greens with a light vinaigrette as a contrast to the sweetness of the cookies. This combination allows for a well-rounded dessert experience. Remember, the visual aspect matters; a colorful selection can entice guests and enhance the enjoyment of your delicious thumbprints!
How to Store Chocolate Thumbprint Cookies
Storing your chocolate thumbprint cookies properly is important to maintain their freshness and the delightful texture that makes them so special. Once cooled, transfer the cookies to an airtight container. This storage method helps retain moisture and prevents the cookies from becoming stale. If you plan to consume them within a week, storing them at room temperature is acceptable. Just be sure to keep them away from direct sunlight or heat sources.
For longer storage, consider refrigerating the cookies, where they can last for up to two weeks. Be aware that refrigeration may affect the texture slightly, but wrapping them carefully can minimize any changes. If you wish to store the cookies even longer, consider freezing them. Place them in a single layer on a baking sheet until fully frozen, then transfer them to a freezer-safe container or bag. Properly stored, they can last up to three months in the freezer.
When ready to enjoy frozen cookies, remove them from the freezer and let them thaw at room temperature for a couple of hours. Keep in mind that ganache may lose some of its smooth texture when frozen, so it’s often best to fill the cookies right before serving if you’ve planned to freeze. If you’ve made extra ganache, you can store it in the fridge and reheat gently when you’re ready to fill more cookies.
Tips to Make Chocolate Thumbprint Cookies
When it comes to baking chocolate thumbprint cookies, a few practical strategies can help elevate your results. One of the most crucial aspects is to pay close attention to creaming the butter and sugars adequately. This step incorporates air into the mixture, resulting in a lighter, fluffier cookie. Don’t rush this process; it’s key to achieving that desirable chewy texture.
Monitoring the doneness of the cookies is also vital. Since baking times may vary based on the size of your cookies and individual oven variances, watch for visual cues. The edges should just begin to look set, while the centers may appear slightly soft. Remember that cookies will continue to bake on the sheet after removing from the oven, so pull them at the right moment.
Another important tip involves cooling the cookies on a wire rack instead of keeping them on a baking sheet. This allows air circulation around the cookies, preventing them from becoming soggy. While cooling, you can make your ganache—a great multitasking strategy that ensures all components of your cookie are ready for assembly.
Lastly, experiment with flavors! Chocolate thumbprint cookies are versatile, so don’t hesitate to play around with different types of chocolate for the ganache or vanilla. Adding espresso powder to the dough can also intensify the chocolate flavor. Tailoring the recipe to your taste makes the baking more fun and personal.
Variations and Substitutions
While classic chocolate thumbprint cookies are delightful, there are numerous ways you can adapt this recipe to suit various dietary preferences or flavor inclinations. Here are some recommended variations and substitutions:
-
Gluten-Free: Substitute the all-purpose flour with a gluten-free flour blend. Typically, these blends contain a mixture of rice flour, potato starch, or tapioca flour that works well in cookie recipes. Always ensure gluten-free baking powder is used for the best results.
-
Dairy-Free: For a dairy-free version, use vegan butter instead of unsalted butter. Dark chocolate chips can be swapped for dairy-free chocolate chips for the ganache. These substitutions maintain that delightful chocolatey richness while catering to those with dairy sensitivities.
-
Nut Variations: Consider adding finely chopped nuts to the dough for an added crunch. Walnuts or pecans work well and add a deeper dimension to the flavor. Alternatively, roll the dough in crushed nuts before baking to create a nut-studded exterior.
-
Flavored Ganache: Switch up the ganache filling by infusing flavors. Add peppermint extract for a refreshing minty chocolate thumbprint perfect for the holidays or orange zest for a citrusy contrast. You can also swap the chocolate for coconut milk chocolate for a tropical twist.
-
Lower Sugar: If you’re looking to reduce sugar, consider using less sugar or substituting with a natural sugar alternative, like stevia or erythritol, for a lower-calorie option. Keep in mind that the texture may vary, but it’s a heart-healthy twist on this classic recipe.
Each of these variations allows for unique flavor experiences, keeping the essence of the thumbprint cookie while accommodating various tastes or dietary needs.
Storage and Reheating
Proper storage of leftover chocolate thumbprint cookies can help maintain their beautiful texture and flavor. Start by ensuring the cookies have cooled to room temperature before transferring them to an airtight container. This method not only keeps them moist but also prevents the ganache from smearing or melting onto other cookies.
For short-term storage, place cookies in a single layer and cover them with a light cloth or wax paper to ensure a soft skin that holds cookies collectively without generating stickiness. If you prefer, you can place parchment paper between layers if stacking them to avoid sticking.
If you have a significant number of leftovers or want them to last longer, consider freezing the cookies. After cooling, lay them out neatly on a baking sheet and place them in the freezer until they harden, and then transfer them to a freezer-safe container or bag. This method prevents them from sticking together, allowing you to take out just the right amount as needed.
To reheat, set your oven to a lower setting (around 300°F or 150°C) and place the cookies on a baking sheet for about 5-10 minutes. This will help restore their original texture. If using a microwave, be careful not to overheat them, as this can lead to a chewy rather an ideal warm texture. Reheat for just a few seconds at a time, checking continuously to avoid overheating.
Customization Ideas
Chocolate thumbprint cookies allow room for abundant creativity, leading to tasty variations your family will love. Consider adding spices or flavors to the dough itself, such as cinnamon, nutmeg, or even chili powder for an unexpected kick. These flavors can enhance the chocolate profile further by adding complexity to the taste experience.
If you want a fun twist, try filling the thumbprints with different types of jelly or preserves, such as raspberry or apricot, for a delightful contrast with the chocolate flavor. Each fruit preserves a unique aspect, giving the cookie a playful display and a burst of sweetness that complements the cocoa.
Another clever idea is to incorporate a topping on the ganache, such as a sprinkle of flaky sea salt or crushed candy canes. This addition can heighten the flavor profile and give a more visually appealing finish to your cookies. Furthermore, finishing with citrus zest adds freshness and brightness to the robust chocolate experience.
Finally, don’t shy away from creating themed finger sweets based on seasons or holidays. Shape the cookies differently or utilize vibrant colored ganache to match events like birthdays, weddings, or holiday festivities. Your chocolate thumbprint cookies will not only taste fantastic but will also be a centerpiece attraction at gatherings.
Common Mistakes to Avoid
Mistakes can happen in the kitchen that may compromise the quality of your cookies. Here are five common pitfalls and how to avoid them:
-
Overmixing the Dough: Mixing too much after adding the dry ingredients can develop gluten, resulting in tough cookies. Mix until just combined to maintain a tender texture.
-
Inaccurate Measurements: Skimping on measuring can lead to cookies that are too dry or too wet. Always use the scoop-and-level method to ensure precision—this technique helps avoid packing flour into your measuring cup.
-
Ignoring Cooling Times: If cookies are moved from the baking sheet too quickly, they may collapse or break. Allow them to set for a few minutes before transferring to a wire rack. This precaution keeps them intact while cooling.
-
Having Cold Ingredients: If you start with cold butter or eggs, the cookie’s texture may not be uniform. Ensure that butter is at room temperature; set eggs out ahead of time to warm as needed.
-
Baking Too Long: Baking your cookies for too long will dry them out. Keep a close eye on your cookies during the last few minutes of baking. They should feel soft when first removed from the oven but firm up as they cool.
Avoiding these misunderstandings can help ensure your cookies turn out consistently delicious! Keeping these tips in mind will lead to a happier baking experience and delicious results!
Serving Occasions
Chocolate thumbprint cookies are incredibly versatile, making them suitable for a wide array of occasions. They are perfect for holiday gatherings, bringing a festive touch to cookie exchanges, potlucks, or holiday dessert tables. Their charming appearance is bound to impress guests, making them an excellent choice for celebrating special occasions.
For casual family gatherings or weekend bake-offs, these cookies make a perfect sweet with afternoon tea or coffee. They are simple yet delightful, inviting everyone to indulge in a bit of decadence while relaxing with a warm drink. Additionally, during birthday parties, these cookies can be a hit on sweets tables, tailored with different fillings to please every guest’s palate.
Want to bring a delightful homemade treat to the office? These cookies are a crowd-pleaser, easy to share, and can be individually wrapped for convenience. Their chocolatey richness serves as a delightful pick-me-up during break times, making them perfect for busy weekdays or team celebrations.
No matter the event, chocolate thumbprint cookies are easy to make and offer a touch of glamour that contrasts with their comforting taste, ensuring they are suitable for both formal and informal gatherings alike.
Why Make This Recipe?
Choosing to bake chocolate thumbprint cookies instead of other treats is a decision rewarded with rich flavors and satisfying textures. These cookies possess a unique visual appeal thanks to their thumbprint design and glossy ganache, setting them apart from standard cookie offerings. The versatility in fillings and garnishes enables complete customization, allowing bakers to explore creativity without straying far from a classic base.
They also offer a blend of familiarity and adventure that is appealing to many palates. Unlike regular chocolate chip cookies, chocolate thumbprint cookies provide a sophisticated touch suitable for both kids and adults, making them a fantastic option for family gatherings or parties. Their ease of preparation means that novice bakers can confidently embark on this recipe, while seasoned cooks will appreciate the opportunity to experiment and refine personal touches.
Overall, this recipe deserves a place in your regular baking repertoire as it brings a combination of simplicity and indulgence that can make any gathering special. The balance of rich chocolate flavor and the potential for creativity means there’s something here for everyone to appreciate, making them ideal for sharing and enjoyment.
Make-Ahead Preparation
When it comes to make-ahead preparation for chocolate thumbprint cookies, there are several steps you can take to streamline your baking experience. The cookie dough can be made in advance and stored in the refrigerator for up to three days. This preparation saves time while allowing the flavors to meld and develop further. Just be sure to cover the dough tightly to avoid it drying out.
Similarly, you can prepare the chocolate ganache filling ahead of time. Store the ganache in an airtight container in the refrigerator, allowing it to maintain freshness and taste. Just note that the ganache may need to be slightly warmed before filling the cookies, depending on how thick it has become during refrigeration.
If you opt to bake the cookies in advance, consider freezing them after they have cooled completely. The texture maintains best if you freeze the cookies without ganache, then thaw and fill before serving. This approach is particularly helpful for event planning when you want to avoid the last-minute rush.
Preparing the cookies the day before an event enhances the overall experience, ensuring flavor and texture remain intact while allowing you to focus on other aspects of your gathering.
Equipment and Kitchen Preparation
To whip up a batch of chocolate thumbprint cookies effortlessly, equipping yourself with the right tools is essential. A high-quality mixing bowl is vital for combining ingredients effectively, while an electric mixer can help achieve that light and fluffy consistency when creaming butter and sugars. If you don’t have an electric mixer, a sturdy wooden spoon and a little extra effort will work just as well.
Using a sturdy baking sheet lined with parchment paper ensures even baking and prevents sticking, simplifying cleanup. Consider having an additional cooling rack to allow the cookies to cool evenly and rapidly after baking; this helps retain their desired texture. A set of measuring cups and spoons is necessary for accuracy in ingredient quantities, while a cookie scoop or spoon is helpful for uniformly sizing the dough balls.
Finally, a fine-mesh sifter comes in handy for whisking together dry ingredients. This step ensures no lumps in the cocoa powder or flour blend, leading to a smoother batter. Preparing your kitchen beforehand, having all tools and ingredients within reach, enables the process to flow seamlessly, allowing the baking experience to be efficient and enjoyable.
FAQs
-
Can I use cake flour instead of all-purpose flour?
Yes, you can use cake flour for a lighter texture, but you may need to adjust the amount slightly, as cake flour has a lower protein content compared to all-purpose flour. -
What can I substitute for the egg yolk to make it vegan?
You can use a flaxseed egg (1 tablespoon of ground flaxseed mixed with 2.5 tablespoons of water), or applesauce also works as an egg replacement, typically using 1/4 cup for each egg. -
How can I make the ganache thicker?
To thicken ganache, allow it to cool down at room temperature before using. Alternatively, adjust the chocolate-to-cream ratio by adding more chocolate, which will yield a thicker consistency. -
Is it okay to freeze these cookies?
Yes, you can freeze chocolate thumbprint cookies for up to three months. It’s best to freeze them without the ganache filling and add this later to maintain their texture. -
What’s the best way to store leftovers?
Store leftovers in an airtight container at room temperature for up to a week. If you want to keep them longer, consider refrigerating or freezing them for extended freshness. -
Can I use flavored extracts in the cookies?
Absolutely! Feel free to experiment with almond, coconut, or peppermint extracts to enhance the flavor of your cookies. Just be mindful of the strength of the flavor you choose. -
How can I ensure even baking?
Make sure to rotate your baking sheet halfway through the baking time. Positioning the sheet differently in the oven can help prevent uneven baking, especially in hotter ovens. -
Can I use different fillings other than ganache?
Certainly, you can fill the thumbprints with fruit preserves, peanut butter, or other sweet fillings that can complement the chocolate flavor beautifully.
Disclaimer
Nutritional information provided in this article is approximate and may vary based on ingredient brands, substitutions, portion sizes, and preparation methods.