

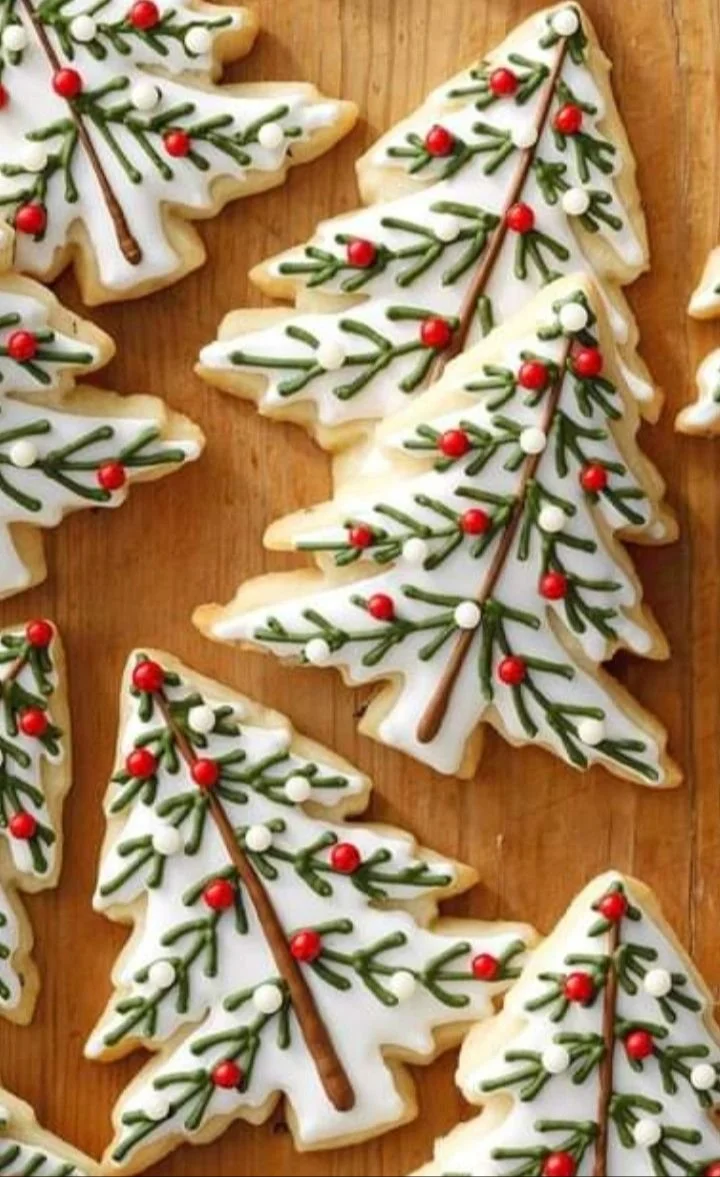
Festive Christmas Tree Cookies | Best christmas cookie decorations, Christmas cookies with festive designs, Christmas tree cookie ideas
The holiday season is a time for warmth, joy, and indulgence, and what better way to celebrate than with Festive Christmas Tree Cookies? These charming cookies not only take on the delightful shape of evergreen trees but also allow for a burst of creativity during the decorating process. Expect a delightful amalgamation of buttery sweetness with a hint of vanilla and a delicate crunch that gives way to a chewy center. Each bite evokes the spirit of Christmas, making these cookies a perfect treat for family gatherings, festive parties, or simply as a cheerful snack while watching your favorite holiday movie.
When decorated, Expect to see a rainbow of colors from icing, sprinkles, and edible glitter, transforming each cookie into a unique piece of edible art. The vibrant green of the cookies with the glistening decorations often reflects a playful, whimsical aesthetic—ideal for engaging little ones in the kitchen to help create Christmas cheer. The anticipation of pulling these cookies out of the oven and customizing each one is part of the joy they bring, making them an integral part of holiday traditions in families across the globe.
Whether you are hosting a holiday party or just looking to create some seasonal magic at home, these cookies are sure to impress. They are also perfect for gifting; a lovely tin filled with these decorative treats can brighten anyone’s day and warm their heart during the chilly winter months. And with the simplicity of their base recipe, they are adaptable enough for any level of baker to create an impressive display that will captivate loved ones and guests alike.
Lastly, the joy of creating and sharing Festive Christmas Tree Cookies is not only about flavor but also about the experience itself. It’s an invitation to gather around the kitchen, an opportunity to bond with family or friends while rolling dough, cutting out shapes, and decorating the cookies—all in merry anticipation of the season’s festivities.
What Makes This Recipe Special
The unique charm of Festive Christmas Tree Cookies lies in their delightful shape and the versatility they offer in decoration. Unlike regular cookies, the tree shape invites creativity and whimsy, inspiring bakers to let their imaginations run wild with various icings, toppings, and color combinations. Use traditional green frosting to mimic real fir trees or build on the festive theme with bright colors and patterns—think of candy cane stripes, golden star toppers, or even edible glitter for that extra sparkle. This allows each person’s personality to shine through in their creations, which is one of the many reasons these cookies are beloved during holiday celebrations.
Moreover, this cookie recipe provides a wonderful balance of textures. The outside is slightly crisp, giving way to a moist, chewy interior. This combination keeps cookie enthusiasts returning for more, as it satisfies both crunch and chew preferences. The buttery vanilla flavor, coupled with a touch of sugar, creates a perfect base that allows the decorations to shine without being overly sweet or heavy. The balance of flavors ensures that everyone can enjoy them, including those who are particular about their cookie preferences.
Another aspect that sets these cookies apart is their adaptability. While they are a delicious treat on their own, you can easily transform them into themed cookies for various occasions beyond Christmas. By altering the colors and decorations, a batch of these cookies can be tailored for birthdays, holidays, or any festive gathering—turning chocolate-colored trees for Halloween or pastel shades for spring events. This flexibility makes them a staple recipe worth having on hand for various celebrations throughout the year, extending their joy far beyond the holiday season.
Finally, the process of making these festive cookies presents an opportunity to share the spirit of the holidays with family and friends. This recipe is not just a guideline for baking but an invitation to create memories in the kitchen. The laughter, stories, and teamwork help cement cherished traditions passed down through generations while creating something delicious to enjoy together. These cookies encapsulate the essence of holiday spirit, highlighting love, creativity, and togetherness in every delicious bite.
Ingredient Overview and Helpful Notes
To create the perfect batch of Festive Christmas Tree Cookies, choosing high-quality ingredients is pivotal. The primary components include flour, sugar, butter, eggs, baking powder, and vanilla extract. Each ingredient plays a crucial role in the overall flavor, texture, and structure of the cookies. For instance, the flour is responsible for the cookie’s density and structure, while the baking powder contributes to the rising aspect, ensuring a light and fluffy center that doesn’t become dense during baking.
When selecting butter, opt for unsalted versions for clearer control over the overall flavor profile. Unsalted butter allows you to manage the salt levels independently, ensuring balanced sweetness. The butter must be softened to room temperature to achieve the right consistency when creamed with sugar, which creates a light and airy mixture. Understanding this step can dramatically impact the texture of your cookies; melted butter can lead to flat, greasy cookies, while overly cold butter makes mixing challenging and can result in uneven baking.
Granulated sugar is the next key player in this recipe, contributing not just sweetness but also enhancing texture. It helps to create a tender crumb—combining it with confectioner’s sugar allows for a different level of sweetness and smoothness, especially if you plan on making decorative icing later on. It’s also essential to blend the sugars properly with butter; this step introduces air into the mixture and triples its volume, which is critical for the cookies’ lightness and chewiness.
As the flavor-building blocks, vanilla extract and eggs are also pivotal in this recipe. The eggs bind the ingredients while also adding moisture, which helps achieve a chewy consistency. Fresh eggs yield the best results, so sourcing quality eggs should be prioritized. Similarly, using pure vanilla extract rather than imitation flavor will significantly enhance the flavor profile of your cookies. The aroma and taste of real vanilla are instantly recognizable and contribute to the overall deliciousness of the cookies.
For those who might want to take their cookies to the next level, consider experimenting with add-ins such as chocolate chips, crushed candy canes, or chopped nuts. These additional elements can contribute not only to flavor but also to texture and visual appeal. Just ensure that they complement the base flavors without overwhelming them, creating a harmonious blend of tastes that makes every cookie a delightful surprise.
Nutrition & Recipe Details
Nutritional values may vary based on ingredient brands, portion sizes, and preparation methods. Here’s a quick overview of some key recipe details:
| Item | Value |
|---|---|
| Prep time | 30 minutes |
| Cook time | 12-15 minutes |
| Store time | Up to 1 week |
| Calories | Approx. 120 |
| Protein | 1.5g |
| Carbohydrates | 17.5g |
| Fat | 6g |
These estimates are based on traditional ingredients and portion sizes. Adjustments in preparation methods or ingredient types can certainly affect the caloric and nutritional content of your cookies. Always feel free to experiment and find the perfect balance that works best for you and your family.
How to Make Festive Christmas Tree Cookies
To prepare your Festive Christmas Tree Cookies, begin by ensuring your kitchen is organized. Before starting, gather all the necessary ingredients and tools, which may include mixing bowls, a rolling pin, cookie cutters shaped like trees, and a baking sheet lined with parchment paper. Preheating your oven to the appropriate temperature (typically around 350°F) is also essential, as this step ensures your cookies will have a consistent rise as they bake, resulting in a perfectly textured cookie.
When you have all your tools and ingredients ready, the process becomes significantly smoother. Begin by combining the dry ingredients in one bowl—flour, baking powder, and salt—while creaming the butter and sugars in another. Once these mixtures are ready, they’re incorporated, followed by your eggs and vanilla. This step is crucial, as it ensures an even distribution of flavor and texture throughout the dough, minimizing any lumps or uneven mixing.
Once your dough is prepared, roll it out onto a lightly floured surface until it’s about a quarter-inch thick; this thickness allows for a nice crisp edge while maintaining a chewy interior. From here, it’s time to cut the dough into the tree shapes using your cookie cutters. Once the shapes have been cut, place them onto your prepared baking sheet and bake until the edges are lightly golden and the cookies have risen slightly. Watching out for visual cues during this step is crucial, as cookies can quickly go from perfectly baked to overdone.
Once baked, cool the cookies on a wire rack to prevent sogginess. This cooling is essential before the decorating stage, allowing the cookies to firm up and hold their shape when they are being handled. Gather your various decorating materials—frosting, sprinkles, and other toppings—and prepare for the creative aspect of assembling your festive masterpieces.
Ingredients
| Ingredient | Quantity |
|---|---|
| All-purpose flour | 2.5 cups |
| Granulated sugar | 1 cup |
| Butter (unsalted) | 1 cup, softened |
| Baking powder | 1.5 teaspoons |
| Eggs | 2 large |
| Vanilla extract | 1 teaspoon |
| Salt | 1/2 teaspoon |
| Powdered sugar (for icing) | Optional, as needed for decoration |
| Food coloring (optional) | Optional, for icing |
| Sprinkles (optional) | Optional, for decoration |
Before starting with the cookies, ensure you have already prepped your workspace by cleaning surfaces and ensuring your tools are readily available. Having your flour measured out and sugar sifted can save time and make the process more enjoyable. Keep an eye on the texture of your dough; it should be soft but not sticky, allowing for easy handling as you shape and cut it into festive forms. Always remember to scrape down the sides of your bowl to ensure that all ingredients are fully incorporated, especially during the mixing process. Having everything in place before starting significantly enhances the overall experience of making these delightful cookies.
Step-by-Step Instructions
-
Preheat the Oven: Start by preheating your oven to 350°F (175°C). This step is crucial to ensure that your cookies bake evenly and achieve the right texture.
-
Prepare Dry Ingredients: In a mixing bowl, combine the all-purpose flour, baking powder, and salt. Use a whisk to ensure that these ingredients are evenly combined, which helps with proper rising during baking.
-
Cream Butter and Sugar: In a separate large mixing bowl, beat together the softened butter and granulated sugar until the mixture is light and fluffy. This process usually takes about 3 to 5 minutes at medium speed. Incorporating air during this step is essential for achieving a light cookie texture.
-
Add Eggs and Vanilla: Once the butter-sugar mixture is fluffy, add the eggs one at a time, mixing well after each addition. Then, stir in the vanilla extract until fully incorporated. The eggs help bind the ingredients, contributing to the structure and moisture of the cookies.
-
Combine Ingredients: Gradually add the dry ingredient mixture to the wet ingredients, mixing until just combined. Be cautious not to over-mix, as this can lead to tough cookies. The dough should come together but still be slightly sticky.
-
Roll Out the Dough: On a lightly floured surface, turn out the cookie dough. Roll it out to about a quarter-inch thickness. Aim for uniform thickness so that all cookies bake evenly.
-
Cut Shapes: Using a tree-shaped cookie cutter, cut out the cookies and place them on a baking sheet lined with parchment paper. Leave about an inch between each cookie to allow for spreading.
-
Bake the Cookies: Bake in the preheated oven for about 12-15 minutes, or until the edges are lightly golden. Check frequently towards the end of the baking time to prevent over-baking.
-
Cool Them Down: Once baked, remove the cookies from the oven and transfer them to a wire rack. Allow them to cool completely before decorating. This cooling process ensures that the icing doesn’t melt off the cookies.
-
Decorate: Once cooled, decorate with icing, sprinkles, or any other festive toppings. Get creative with colors and designs to personalize each cookie.
Understanding the Flavor and Texture
The expected flavor and texture of Festive Christmas Tree Cookies are a delightful balance of sweetness, buttery richness, and a hint of vanilla. The cookies are invitingly aromatic when fresh out of the oven, with a heavenly scent that fills the room and evokes holiday nostalgia. The combination of ingredients creates a flavor profile that is pleasing yet not overwhelmingly sweet, making for a perfect treat that can be enjoyed by both children and adults alike.
As for the texture, these cookies typically feature a lightly crisp exterior, which gives way to a chewy and tender inside. The edges attain a slight golden hue, signaling that they are crisp around the rim while maintaining softness in the center. The presence of proper baking powder is vital here, allowing the cookies to rise without making them too dense, resulting in the perfect balance of chewiness and firmness. Each bite should provide satisfaction, feeling rich but not heavy.
The decorating icing, when added, introduces not just an aesthetic appeal but also additional layers of flavor. If using flavored icing, like almond or peppermint, it can elevate the cookie experience, harmonizing beautifully with the base cookie flavors. The various toppings—whether sprinkles, candies, or nuts—add crunch and colorful visual appeal, enhancing both flavor and texture in delightful ways. Overall, the combination of a subtly sweet, buttery cookie with decorative embellishments creates a beautifully balanced festive treat that excites the palate.
Pro Tips
A few simple techniques can significantly enhance the results of your Festive Christmas Tree Cookies. Here are several tips to ensure successful baking and decorating:
| Tip | Description |
|---|---|
| Use Room Temperature Ingredients | Ensuring that butter and eggs are at room temperature allows for better incorporation, creating a smoother batter and improving overall texture in the cookies. |
| Don’t Overmix the Dough | Mixing only until ingredients are combined helps maintain a tender crumb. Overmixing can lead to tough cookies due to gluten formation. |
| Chill the Dough if Necessary | If the dough feels too sticky or difficult to work with, chilling it in the refrigerator for 20-30 minutes makes it easier to roll out and cut shapes. |
| Experiment with Decorations | Vary your icing colors and types for each cookie, and feel free to add textured items like crushed peppermint or chocolate chips to elevate the overall appearance and taste. |
Don’t forget to be patient and allow cooling time to prevent decorations from melting when applying icing and toppings. For the best results, once cookies are frosted, let them rest for a while before serving, allowing the icing to set. With creativity and these helpful tips, you can make beautiful and delicious Christmas tree cookies that are bound to impress family and friends throughout the holidays.
Why You’ll Love This Recipe
This cookie recipe stands out for its exceptional flavor and versatile nature. Whether you’re new to baking or a seasoned chef, the simplicity of the steps and the familiar ingredients make it accessible for everyone. The cookies achieve a wonderful balance of sweetness and butteriness, with a distinctly soft yet chewy texture that’s likely to resonate with everyone who tries them.
Additionally, this recipe is excellent for occasions beyond the holiday season, as mentioned earlier. It adapts so well to different themes and events, meaning you won’t just be using it during the holidays. Plus, kids and adults alike are drawn to decorating; it offers a fun-filled experience that encourages creativity. Preparing these cookies together with family or friends can help create lasting memories while embracing the fun of the holiday season.
Another reason to love this recipe is its potential for variations. You can easily switch out food colorings, add different flavored frostings, or mix in fun toppings to change them with little effort. This adaptability to personal taste helps you customize and enjoy these cookies in countless ways. Whether you keep it simple with classic decorations or go all out with a festive display, it offers endless possibilities for fun and creativity in the kitchen.
Lastly, the impressive presentation of these cookies makes them perfect for gifting. A beautifully arranged box filled with artistic cookie trees can serve as a heartfelt gift during the holiday season, spreading love and joy. Every bite is an invitation to indulge in delightful flavors, making these festive cookies a favorite treat for everyone fortunate enough to indulge in them.
How to Serve Festive Christmas Tree Cookies
Serving your Festive Christmas Tree Cookies can be as festive and creative as the cookies themselves. A beautiful presentation can elevate even the simplest of treats. Consider arranging the cookies on a decorative platter with a holiday theme or placing them in a whimsical cookie jar for a cozy appeal. You might use parchment paper or festive cloth at the bottom of the serving dish to enhance the display, as these small additions can add charm and warmth to your presentation.
When entertaining, these cookies can be a centerpiece on dessert tables alongside other traditional holiday sweets like gingerbread men and peppermint bark. Serving them alongside hot cocoa or a warm spiced apple cider is a pleasant way to round out the flavors for guests, ensuring they enjoy a truly seasonal experience.
For gatherings, consider creating "cookie decorating stations" where kids and guests can personalize their cookies with icing, sprinkles, and candies. This interactive approach not only makes for a fun activity but also allows each cookie to represent the individual creativity of your guests, providing entertainment while indulging in delightful treats.
Ultimately, these cookies can be served as desserts or a sweet snack during Christmas brunch or afternoon tea. Paired with seasonal fruits like oranges or cranberries, they can create a colorful platter. If you have more elaborate meals planned, consider overlapping flavors and creating bite-sized cookies to complement your main dishes, serving a variety across multiple courses. This thoughtful presentation showcases your festive spirit and offer guests a delightful culinary experience.
How to Store Festive Christmas Tree Cookies
Storing your Festive Christmas Tree Cookies properly is crucial to maintaining their texture and freshness. Start by ensuring that your cookies have cooled completely to avoid excess moisture build-up, which can result in sogginess. Place your cooled cookies in an airtight container lined with parchment paper or wax paper to preserve their quality.
If you plan to eat the cookies within a week, they can safely be stored at room temperature. For longer storage, consider placing them in the refrigerator or freezing them. When refrigerated, the cookies can last up to two weeks. However, heat in the microwave for 5-10 seconds before serving to help them regain some of that fresh-baked softness.
For freezing, wrap each cookie tightly in plastic wrap or place them in a freezer-safe bag, ensuring to remove as much air as possible before sealing. They can be stored in the freezer for up to three months. When ready to enjoy, simply remove the desired number of cookies from the freezer and let them thaw at room temperature or reheating them in a microwave for a few seconds to restore tenderness.
Keep in mind that decorated cookies require special attention. If you used frosting to decorate, freezing may alter the appearance and texture of the icing, causing it to become watery upon thawing. If you want to store decorated cookies, stick to refrigeration, or store them in the fridge’s cooling drawer, but ensure they are in an airtight container to keep them intact and delicious for the week ahead.
Tips to Make Festive Christmas Tree Cookies
Improving the quality of your Festive Christmas Tree Cookies can be achieved through several simple kitchen tips. Start by accurately measuring all your ingredients. Using a kitchen scale can help if you prefer precision and consistency in your baking. Measuring flour incorrectly, whether packed or aerated, can lead to dry cookies or dough that’s too sticky, affecting the texture significantly.
Next, focus on the mixing method. When creaming butter and sugar, ensure to mix thoroughly but avoid over-mixing once you incorporate the dry ingredients. Less gluten formation means the cookies will remain softer and more tender. Using a spatula for the final mixing can ensure everything is combined without overworking your dough.
Rolling the dough evenly also plays a significant part in their final appearance and bake. Using a rolling pin with guide rings can help achieve uniform thickness, which ensures even baking. Use light pressure and work quickly; warm dough can become harder to manage as you roll it out.
Lastly, don’t forget about the baking time and spacing. Monitor your cookies closely in the oven as you approach the end of the suggested baking time. The cookies will continue to firm up as they cool on the baking sheet, so it is better to pull them out slightly underbaked for ideal chewy cookies. Proper spacing on the baking sheet prevents cookies from merging during baking, allowing for crisp edges while keeping the soft center intact.
Variations and Substitutions
The beauty of Festive Christmas Tree Cookies lies in their versatility, offering several ways to customize the recipe to fit your seasonal celebrations. Start with the base cookie and consider adding various flavors. For a richer cookie, swap out some of the vanilla extract for almond extract, imparting a nuttier taste that could elevate your holiday treat. Additionally, incorporating citrus zest—such as lemon or orange—adds a refreshing brightness that contrasts nicely with the rich butter and sugar.
For healthier alternatives, consider substituting part of the all-purpose flour with whole wheat flour. This change will provide additional fiber without drastically altering the taste or texture. However, be aware that a full substitution can lead to a denser cookie.
If you are looking for a gluten-free option, substitute the flour with certified gluten-free flour blends, often made with a combination of rice flour, potato starch, and tapioca flour. It’s essential to ensure that any other ingredients used are also gluten-free, especially baking powder and food colorings for decorations.
Another delightful variation is to include seasonal add-ins. Dried fruit, such as cranberries or apricots, can be mixed into the dough for added texture and flavor. As for the decorations, you can switch it up from traditional green icing to red or white to create a festive candy cane look or even dark chocolate for a winter wonderland theme. These customizations allow you to craft cookies that are not only delicious but also visually appealing, catering to different tastes and occasions.
Storage and Reheating
When it comes to storage, leftover Festive Christmas Tree Cookies can be easily managed with the right approach. Once cooled, these cookies should be transferred to an airtight container lined with parchment paper, which absorbs excess moisture and helps preserve their freshness. They can be stored at room temperature for about a week and will maintain their delightful texture if sealed properly.
For longer storage, placing your cookies in the refrigerator is an option, where they will last for up to two weeks. Just be mindful of any frosting or decorative items that may lose their appeal in the refrigerator. Cookies without extensive decorations can be stored beautifully in the freezer for up to three months. When you’re ready to enjoy them, move the desired number to the refrigerator for a few hours to allow gradual thawing, or leave them at room temperature.
Reheating is also a straightforward process. If you prefer the freshness of a just-baked cookie, a quick spin in the microwave for 5-10 seconds will warm them up nicely without drying them out. Another option is to reheat them in the oven at a low temperature for around 5 minutes, which helps soften the cookies back to their original delicious state.
Always avoid storing cookies at room temperature for a long time, especially if left uncovered, as they can dry out quickly or become hard. By following these storage tips, you can keep your Festive Christmas Tree Cookies fresh and tasty, perfect for any holiday gathering or general enjoying throughout the season.
Customization Ideas
Baking Festive Christmas Tree Cookies comes with an open invitation for customization. Start with the basic dough recipe as your canvas and consider different flavors for your cookies. You might add a hint of peppermint extract or cinnamon to the batter to bring a seasonal aroma that complements the festive feel, making the cookie experience even more delightful.
When it comes to topping the cookies, the options are virtually endless. Use royal icing or buttercream in various colors and let them dry prior to stacking for easy transport and storing. If you’re aiming for a more rustic look, consider using a glaze of powdered sugar mixed with milk for a simple yet effective alternative that adds only sweetness without overwhelming flavor.
Don’t hesitate to go beyond traditional decor here either. Sliced almonds can resemble ornaments when arranged attractively; use colorful candies or sprinkles to celebrate the colors of holiday joy. You could even craft cookie decorating kits with different toppings available for your guests during holiday parties or gatherings, creating a fun, hands-on decorating experience for young ones and adults alike.
Additionally, consider packaging options as a form of customization if gifting these cookies. Box them in festive tins adorned with ribbons or use simple cellophane bags with tied ribbons to present them. Labeling the bags can add a personal touch, letting everyone know the cookies have been made with love this holiday season.
Common Mistakes to Avoid
While making Festive Christmas Tree Cookies can be simple and enjoyable, there are common pitfalls to heed that can affect the final outcome of your treats. Here are five mistakes to avoid:
-
Underestimating Dough Temperature: Working with overly warm dough can make it challenging to cut and shape. Warm dough can lead to flat cookies. Ensure your butter is at the right temperature and chill the dough if it becomes too soft.
-
Neglecting Texture: Failing to combine ingredients thoroughly can lead to uneven cookies, resulting in lumpy textures or areas that are overly floury. Always mix until just combined and incorporate your wet ingredients fully for consistency.
-
Overbaking: Leaving the cookies in the oven for too long can lead to dry, hard cookies. Always set a timer and check for slight golden browning around the edges for that perfect chewy consistency.
-
Skipping Cooling Time: Not allowing your cookies to cool completely before adding decorations can cause the icing to melt, resulting in a sloppy appearance. Be patient while the cookies cool completely on a wire rack.
-
Improper Storage: Storing cookies while still warm can lead to condensation, making them soggy. Ensure the cookies are completely cooled before packaging and storing them to preserve their freshness.
By avoiding these common mistakes, your Festive Christmas Tree Cookies will turn out beautifully, ensuring that everyone enjoys a delightful culinary experience during the holiday season.
Serving Occasions
Festive Christmas Tree Cookies are incredibly versatile, making them suitable for various occasions throughout the holiday season. Of course, they shine brightly during family gatherings and Christmas parties, serving as both a delightful dessert and a charming decorative centerpiece. Guests of all ages appreciate the creativity involved in decorating their tree cookies, making them an excellent activity during holiday get-togethers.
These cookies also stand out during potlucks or cookie exchanges, where you can present them in fun, festive tins or boxes that enhance their visual appeal. Their unique shape and vibrant colors can whisper cheer to any gathering, making them the center of attention while inviting others to experience a piece of holiday magic.
Moreover, they can be perfect holiday gifts. A beautifully presented box of decorated cookies conveys thoughtfulness and care, sure to brighten anyone’s season. This creative gift allows your friends and family to indulge in a sweet treat while offering a tactile, homemade touch that store-bought goodies often lack.
Don’t forget about casual occasions, such as movie nights or weekend brunches, where cookies can be served alongside seasonal beverages. Their cheerful appearance can lift the mood any day, encouraging people to gather and share in sweet moments that embody the spirit of friendship and joy during the entire season. Use your Festive Christmas Tree Cookies to spread cheer and warmth as you celebrate this special time of the year with the ones you love.
Why Make This Recipe?
Choosing to make Festive Christmas Tree Cookies isn’t just about having another sweet treat; it’s about participating in a beloved tradition that evokes the spirit of the holidays. The familiar combination of accessible ingredients makes this recipe easy for both novice bakers and experienced cooks to enjoy, embodying the spirit of togetherness that holiday baking brings.
The cookie’s charming tree shape adds a sense of excitement and festivity, offering an opportunity for creativity that simple round cookies lack. Through decorating, each cookie becomes a unique masterpiece, reflecting personal creativity and making the experience tailored for everyone involved.
Furthermore, the adaptability and personalization of this recipe make it versatile for various occasions, extending beyond Christmas and into other celebrations throughout the year. Being able to customize decorations allows you to cater to different events and tastes, ensuring that this recipe remains relevant in your baking repertoire.
Overall, making these cookies is about more than just taste—it’s about sharing memories, fostering connections, and embracing the joy of the season. The sweet flavor, delightful texture, and visual appeal of Festive Christmas Tree Cookies elevate them beyond ordinary baked goods, fostering a sense of warmth and comfort during the holiday, making it a recipe worth keeping in your archive.
Make-Ahead Preparation
If you’re planning to bake Festive Christmas Tree Cookies but want to ease the time crunch during the busy holiday season, several aspects can be prepared ahead of time. You can prepare the cookie dough a day in advance and store it in the refrigerator. Wrap it tightly in plastic wrap to keep it fresh. When you’re ready to bake, simply let the dough warm up slightly before rolling it out, preventing it from cracking as you shape it into trees.
Additionally, cookie decorations can also be made in advance. Icing can be prepared ahead of time and stored in airtight containers. If you plan on using different color decorations, prepare various icing colors separately and also cover tightly to retain moisture. This preparation allows you to set up a fun icing station when it’s time to decorate, making the task quicker and easier without the pressure of preparing everything on the same day.
For optimal freshness, avoid assembling your decorated cookies too early. If you decorate them in advance, consider storing them in a single layer in airtight containers lined with parchment paper so that the decorations do not transfer or get damaged. This way, they can absorb the flavors and remain festive even days after baking.
Overall, these make-ahead tips can help streamline your baking experience, allowing you to focus on enjoying the season and spending quality time with loved ones while still delivering delicious, festive treats.
Equipment and Kitchen Preparation
Before diving into making your Festive Christmas Tree Cookies, ensuring you have the right equipment can make a significant difference in your baking experience. Start with basic items such as mixing bowls, measuring cups and spoons, a rolling pin, and a spatula. Having these tools ready will facilitate a smooth process from start to finish.
A good set of baking sheets is vital; consider using ones that are light in color, as dark pans can cause cookies to brown too quickly. Also, non-stick baking sheets or parchment paper are your best friends for ensuring easy removal of cookies after baking, preventing any from breaking during transfer. A cooling rack is essential too, allowing air to circulate and cool cookies without trapping moisture on the bottom.
When preparing your workspace, keeping everything neatly organized is crucial. Gather all your ingredients, tools, and decorations before you start, preventing any frantic searches mid-recipe. It’s also wise to keep a clean dish towel handy for quick cleanups and any spills that may happen along the way. Pre-measuring ingredients not only streamlines your process but also minimizes the possibility of missing something during mixing.
Having the right kitchen tools and preparing your space ensures you can focus entirely on the joy of baking without distractions, leading to a fun and fulfilling cookie-making experience you’ll look forward to time and time again.
FAQs
-
Can I use a cookie mix for this recipe?
Yes, you can use a pre-made cookie mix to save time, but be sure to follow the mix’s instructions closely for achieving the right texture and flavor. -
Can I freeze the cookie dough?
Absolutely! The cookie dough can be frozen for up to three months. Wrap it tightly in plastic wrap and place it in an airtight container or freezer-safe bag before freezing. -
What can I use if I don’t have cookie cutters?
If you lack cookie cutters, you can use knife or stencils to cut the dough into tree shapes. Alternatively, roll the dough into balls or squares for a rustic non-ornamental cookie. -
How thick should the dough be when rolling it out?
Aim for about a quarter-inch thickness for best results, as this thickness allows for a perfect balance between a crispy edge and a chewy center. -
What’s the best way to decorate the cookies?
Use a piping bag for precision when icing and a small spatula for spreading. Add sprinkles and candies while the icing is still wet to ensure they stick well. -
How long do the cookies stay fresh?
When stored properly in an airtight container at room temperature, the cookies should remain fresh for up to a week, while refrigeration can extend that to two weeks. -
Can I skip icing and just sprinkle sugar on top?
Absolutely, for a simpler treat, sprinkle coarse sugar or colored sugar on top before baking for a sparkly finish without the need for icing. -
What decorative options are available for my cookies?
Consider options like colored icing, nonpareils, edible glitter, or even mini candies to create a whimsical look. You can mix and match for personalized decorations!
Disclaimer
Nutritional information is approximate and may vary based on ingredient brands, substitutions, portion sizes, and preparation methods.