
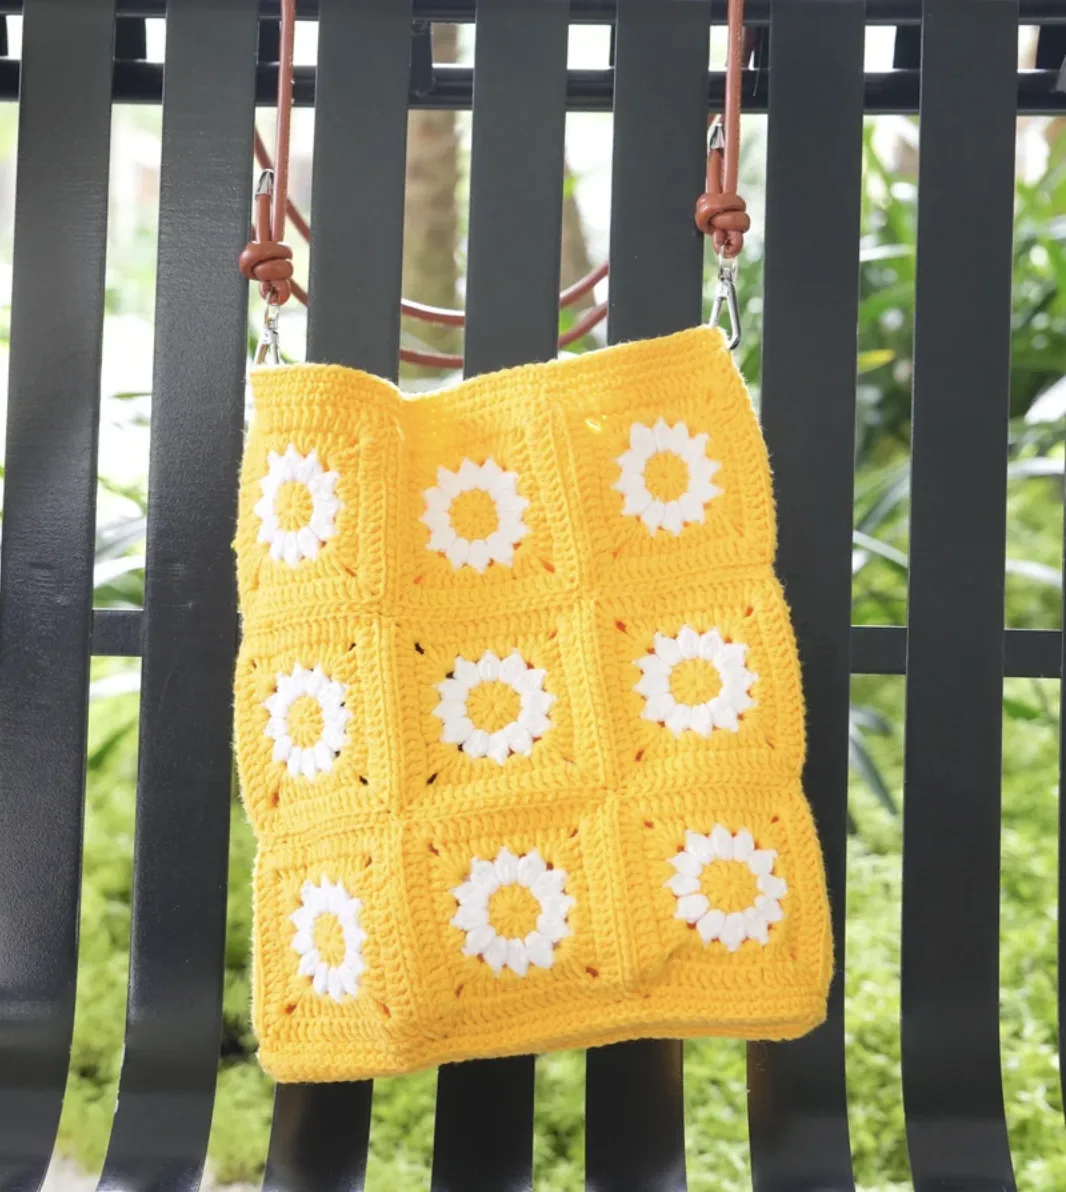

If you love crochet projects that combine a classic handmade look with something practical enough to use every day, this Daisy Granny Square Bag is a beautiful project to add to your list. The design brings together cheerful daisy motifs, traditional granny-square construction, and a useful bag shape in one charming accessory.
The finished bag has a distinctly handmade character while remaining simple enough to approach as a focused crochet project. Instead of building the entire bag as one complicated piece, you create individual flower-centered squares and then assemble them into two panels. This construction makes the project especially interesting because every small square becomes part of the larger floral design.
For the example shown in the original pattern, a light yellow background surrounds white daisy petals and cream-colored centers. However, the pattern also notes that the color palette can be changed to suit your preference. A soft pink background, sunny yellow base, natural ecru, or another combination can give the same construction a completely different personality.
This guide walks through the project from the basic materials and abbreviations to the four-round granny square, panel assembly, bag bottom, opening, and strap attachment. The original stitch instructions and numerical details are kept intact so the pattern remains practical to follow.
Project Overview
The Daisy Granny Square Bag is made from 18 individual granny squares. Nine squares form the front panel and nine squares form the back panel. Each completed granny square measures approximately 2.9 inches.
- Number of granny squares: 18 total
- Front panel: 9 squares
- Back panel: 9 squares
- Finished height: approximately 10 inches
- Finished width: approximately 9.2 inches
- Granny square size: approximately 2.9 inches
- Crochet hook: 3.0 mm
- Yarn: Loopara 5ply combed cotton / Loopara 5 ply milk cotton
The compact square size is useful for creating a detailed floral surface without making the finished bag excessively large. The repeated daisy motif also gives you a natural opportunity to check your tension while working. If the squares remain consistent in size, the final panels will be easier to arrange and join.
Materials for the Daisy Granny Square Bag
Gather the following supplies before beginning:
- Yarn: Loopara 5ply combed cotton
- Hook: 3.0mm crochet hook
- Scissors
- Stitch marker
- Yarn needle

The original example uses a light yellow background, white petals, and cream centers. The tutorial also explains that you can choose different colors. If you change the colors, keep the three functional color roles clear: the center color, the petal color, and the background color.
The 3.0mm hook is paired with the 5 ply yarn for the project. Maintaining consistent tension is particularly useful here because all 18 squares need to work together during assembly.
US Crochet Abbreviations
The pattern uses the following US crochet terminology:
- ch: chain
- sc: single crochet
- dc: double crochet
- hdc: half double crochet
- sl: slip stitch
- bo: bobble stitch
- sc inc: single crochet increase
- dc bo: double crochet bobble stitch
Because the project moves between double crochet, half double crochet, bobble stitches, chains, and single crochet, it is helpful to keep this abbreviation list nearby while crocheting. The granny-square section and the later bag construction use different stitch combinations, so checking the abbreviation list can make the transition between sections easier.
Understanding the Daisy Granny Square
Each square is worked in four rounds. The first round establishes the central ring of double crochet stitches. The second round changes to the center color and creates the bobble-based flower center. The third round changes to the petal color and builds the daisy petals. The fourth round changes to the background color and transforms the flower into a square.

The layout is important because the finished bag depends on arranging the nine flower squares into an organized panel. Before sewing, take time to place the squares according to the layout and make sure the flowers are facing the intended direction.
How to Crochet the Daisy Granny Square
Round 1 – Create the Center Ring

Round 1: Chain 3, work 11 double crochet into the ring. Join with a slip stitch to the top of beginning chain-3.
This first round forms the foundation for the flower center. Take care when joining the round so the beginning chain and final slip stitch create a clean, closed circle.
Round 2 – Build the Bobble Center


Round 2: Change to center color. Chain 3, work 2 double crochet bobble stitch, chain 2. Work (bobble stitch, chain 2) 11 times around. Join with a slip stitch to the top of beginning chain-3.
This is the round that gives the motif its raised center texture. Since bobble stitches create more physical volume than ordinary stitches, consistent tension will help keep the centers visually similar from square to square.
Round 3 – Form the Daisy Petals

Round 3: Change to petal color. Chain 3, work 2 double crochet, chain 3, work 3 double crochet. Work (3 half double crochet in first stitch) twice. Repeat (3 double crochet, chain 3, 3 double crochet, work (3 half double crochet in first stitch) twice) 3 times around. Join with a slip stitch to the top of beginning chain-3.
At this stage, the floral design becomes recognizable. The petal color surrounds the contrasting center, while the chain spaces help define the corners that will become important in the next round.
When working multiple squares, compare the petal shapes as you go. Consistent tension and similar stitch placement will help the 18 completed squares look like one coordinated collection rather than unrelated individual motifs.
Round 4 – Turn the Flower into a Square

Round 4: Change to background color. Chain 3, work 1 double crochet, chain 1, work 2 double crochet. Work 12 double crochet. Repeat (12 double crochet, 2 double crochet, chain 1, 2 double crochet) 3 times around. Join with a slip stitch to the top of beginning chain-3. Fasten off and weave in all ends.
Keep your tension consistent and weave ends securely. This final round is what gives the floral motif its square outline, so consistent sizing matters when the squares are later placed next to one another.
Prepare the 18 Squares Before Assembly
Once the four-round motif is complete, repeat the granny-square pattern until you have 18 squares. The finished pattern calls for nine squares on the front and nine squares on the back.
Before sewing, arrange each group of nine squares according to the layout. This is a useful checkpoint because changing the arrangement after sewing can be much more difficult. Check the direction of each flower and make sure neighboring squares are aligned as intended.
The original instructions emphasize keeping the daisy squares carefully aligned during joining. This is especially important because the floral motifs create a visual grid across the finished bag.
Joining the Granny Squares
The bag uses a roll stitch method for joining. Place the flower panels back-to-back and pick up half of each inner stitch for the roll stitch. The goal is to match the stitches precisely while avoiding excessive tension that could distort the bag.

Joining the First Panels
Step 1: Follow the roll stitch method shown in Figure 1. Align stitches precisely. Place flower panels back-to-back. Pick up half of each inner stitch for the roll stitch.

Step 2: Sew the first stitch twice in the same hole to prevent unraveling. Don’t pull the thread too tight to maintain the bag’s shape.

Step 3: Continue sewing, matching stitches one-by-one.

Step 4: Connect two more panels. Tighten the loops when connecting. Sew the first stitch twice.

Step 5: Continue sewing, matching stitches. Sew an extra stitch at the end. Leave a long thread for further sewing. Cut the thread.
Step 6: Repeat the process for the other row of panels.

Step 7: Sew the vertical rows of panels. Follow the arrangement in Figure 2. Use the roll stitch method.

Step 8: When connecting the middle, join 4 panels. Sew an extra round here.
Step 9: Continue sewing, matching stitches until finished.
Step 10: Repeat this sewing method for the other 9 panels.
Connect the Front and Back Panels

Step 11: Connect the front and back. Follow Figure 3 for roll stitch sewing. Sew an extra stitch at the end. Don’t cut the thread, hide it instead.
Step 12: Follow Figure 4 for roll stitch sewing. Sew an extra stitch at the end. Don’t cut the thread, hide it instead.
During these seams, avoid pulling the thread so tightly that the square edges contract. The finished bag should retain the shape created by the individual squares rather than becoming gathered along the seams.
Build the Bottom of the Bag

Step 13: Crochet two rounds of single crochet at the bottom. Use unfinished single crochet to connect the middle seam of the first row. Crochet a normal round of single crochet for the second row.
The bottom construction then continues with the following exact sequence:


Step 14: Chain 42, 40 single crochet in second chain from hook, 3 single crochet in 1 stitch, 39 single crochet, single crochet increase. Chain 1, single crochet increase, 39 single crochet, 3 single crochet increase, 39 single crochet, 2 single crochet increase. Chain 1, single crochet, single crochet increase, 39 single crochet, 3(single crochet, single crochet increase), 39 single crochet, 2(single crochet, single crochet increase).
Because this section contains a long numerical sequence, work slowly and check each part as you go rather than relying on memory. The exact stitch sequence is an important part of the bag construction.
Step 15: Connect the bottom to the bag body. Match stitches and use slip stitch to join.
Finish the Bag Opening

Step 16: Crochet 3 rounds of single crochet at the bag opening. Use unfinished single crochet to connect the middle seam of the first row. Crochet normal rounds for the second and third rows.
This creates the finished upper edge of the bag and provides the final crocheted structure before the strap is attached.
Attach the Bag Strap

Step 17: Attach the bag strap.
Once the strap is attached, the main construction of the Daisy Granny Square Bag is complete. Take a final look around the seams, edges, and strap attachment points and make sure the finishing work is secure.
Assembly Checkpoints for a Neat Finish
- Square size: Each completed granny square should measure approximately 2.9 inches.
- Total squares: Confirm that you have 18 squares before beginning the full assembly.
- Panel count: Nine squares belong to the front and nine to the back.
- Flower alignment: Arrange the daisies carefully before sewing.
- Seam tension: Do not pull the joining thread too tightly.
- First stitch: Sew the first stitch twice where instructed to prevent unraveling.
- Stitch matching: Continue matching stitches one-by-one.
- Center connection: When connecting the middle, join four panels and sew an extra round as instructed.
- Loose ends: Hide or weave in ends as directed rather than leaving them unsecured.
Common Assembly Problems to Watch For
Uneven Granny Squares
If some squares are noticeably different in size, compare your tension and stitch execution before joining all 18 pieces. Consistency is important because the squares are designed to form connected panels.
Over-Tight Seams
The original assembly instructions specifically caution against pulling the thread too tight. Tight seams can affect the shape of the bag. Allow the joined squares to remain flexible while still keeping the stitches secure.
Misaligned Flowers
Before sewing, lay the nine squares out according to the layout. Look at the complete panel rather than checking only two squares at a time. This makes it easier to notice an incorrectly oriented flower before it becomes part of the seam.
Unsecured First Stitches
Several assembly instructions call for sewing the first stitch twice. This helps prevent the seam from unraveling and should not be skipped when the pattern specifically requests it.
Care and Cleaning
Daily Care
After using the bag, gently reshape it if necessary so the daisy motifs and overall structure remain neat. If you notice a loose end, secure it rather than allowing it to catch on surrounding objects. Giving the bag a little air after use can also help keep it fresh.
Washing
The original care instructions recommend hand washing with cool water and mild detergent. Gently swish the bag rather than handling it roughly. To remove excess water, roll the bag in a clean towel and then reshape it before laying it flat to dry.
Avoid wringing or twisting the bag. Gentle handling helps preserve the crocheted structure and the shape of the floral motifs.
Storage
Store the finished bag in a cool, dry place away from direct sunlight. The original instructions suggest using acid-free tissue paper inside the bag to help maintain its shape and placing it inside a cotton pillowcase to protect it from dust while allowing it to breathe.
Quick Reference: The Complete Construction
- Gather Loopara 5ply combed cotton, a 3.0mm hook, scissors, stitch marker, and yarn needle.
- Make 18 daisy granny squares.
- Use the four-round square pattern for every motif.
- Arrange 9 squares for the front panel.
- Arrange 9 squares for the back panel.
- Join the squares using the roll stitch method.
- Connect the front and back panels.
- Crochet two rounds of single crochet at the bottom.
- Work the detailed bottom sequence beginning with Chain 42.
- Join the bottom to the bag body with slip stitch.
- Crochet 3 rounds of single crochet around the opening.
- Attach the bag strap.
- Secure and hide the remaining ends as instructed.
Final Project Details
The completed Daisy Granny Square Bag measures approximately 10 inches in height and 9.2 inches in width. Its construction uses 18 small flower squares, giving the finished accessory a repeating garden-inspired appearance.
The design is especially appealing because the same four-round motif can look quite different when the colors change. The original example uses a light yellow background, white petals, and cream centers, but the pattern encourages experimentation with alternative color combinations.
Whether you keep the original palette or create your own version, the most important part of the project is maintaining the original stitch sequence and careful assembly. Make each square consistently, arrange the flowers before sewing, match the stitches during joining, and keep the seams secure without pulling them excessively tight.
Frequently Asked Questions
How many granny squares are needed for this bag?
The pattern uses 18 granny squares in total: 9 squares for the front and 9 squares for the back.
How large is each granny square?
Each completed granny square measures approximately 2.9 inches.
What is the finished size of the bag?
The finished bag measures approximately 10 inches in height and 9.2 inches in width.
What crochet hook size is used?
The pattern uses a 3.0mm crochet hook.
What yarn is recommended?
The original pattern recommends Loopara 5ply combed cotton, also described in the tutorial as Loopara 5 ply milk cotton.
Can the colors be changed?
Yes. The original tutorial notes that the example uses a light yellow background, white petals, and cream centers, but different colors can be selected. The important point is to keep the center, petal, and background color roles clear while following the same stitch instructions.
How should the granny squares be joined?
The assembly uses a roll stitch method. The instructions emphasize precise stitch alignment, picking up half of each inner stitch, and avoiding excessive tension.
Why is it important not to pull the joining thread too tightly?
The original assembly instructions specifically state that the thread should not be pulled too tight so the bag can maintain its shape.
What should I do at the beginning of a joining seam?
Where instructed, sew the first stitch twice in the same hole. This helps prevent the seam from unraveling.
How many single crochet rounds are worked at the bag opening?
The pattern calls for 3 rounds of single crochet at the bag opening. The first row uses unfinished single crochet to connect the middle seam, while the second and third rows are normal rounds.
Enjoy Your Handmade Daisy Bag
The Daisy Granny Square Bag is a lovely example of how a small repeated crochet motif can become a practical finished accessory. The individual squares provide manageable sections to crochet, while the assembly transforms those flowers into a coordinated front and back panel.
As you work, focus on consistency rather than speed. Keep your square sizes similar, check the floral arrangement before joining, follow the stitch counts exactly, and pay attention to the specific assembly instructions at the bottom and opening. Those small details help the finished bag retain the proportions and structure described in the pattern.
Once the final strap is attached and the ends are secured, your handmade bag is ready to become part of your everyday crochet collection. Its daisy motifs bring a cheerful floral character, while the granny-square construction gives it the familiar warmth of a classic handmade project.