
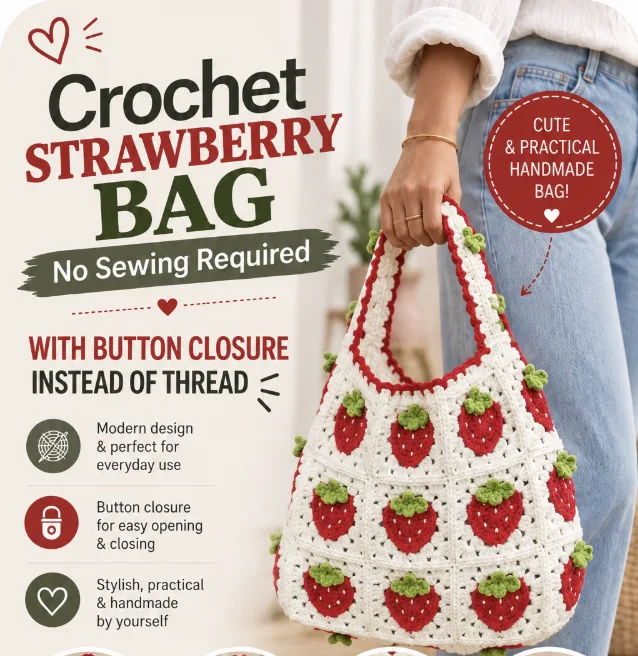
If you love crochet projects that combine traditional construction with a playful modern motif, this Strawberry Granny Square Bag is a wonderful project to add to your handmade collection. The design brings together classic granny-square construction, bright strawberry motifs, delicate white seed details, and fresh green leaves to create a cheerful bag with a distinctly summery character.

Each strawberry square measures approximately 2.5 inches. The finished bag is approximately 12 inches (30 cm) high and 8.2 inches (21 cm) wide, making it a practical size for summer outings and market trips. The bag is constructed from 33 granny squares arranged according to the supplied layout: 9 strawberry squares for the front, 9 for the back, 3 for the bottom and sides, and 7 for the straps.
This guide keeps the original stitch instructions and construction sequence intact while organizing the project into a clear workflow. The result is a crochet tutorial that can be followed from the first strawberry motif through the final decorative strap border.
Project Overview
The visual identity of this bag comes from the strawberry motif. The strawberries are worked in bright cherry red, the seeds are added with white yarn, and the leaves use fresh lime green. White surrounds the strawberry motifs, allowing the red berries to stand out, while the red trim brings the finished design together.
The original design uses Loopara 5 ply milk cotton yarn and a 3.0mm crochet hook. The smooth yarn texture is suited to the detailed strawberry motif and helps the finished granny squares maintain a firm, defined shape.
- Individual square size: approximately 2.5 inches
- Finished bag height: approximately 12 inches (30 cm)
- Finished bag width: approximately 8.2 inches (21 cm)
- Total granny squares: 33
- Front arrangement: 9 squares in a 3×3 pattern
- Back arrangement: 9 squares in a 3×3 pattern
- Bottom and sides: 3 squares
- Straps: 7 squares
Materials and Crochet Tools
Gather all of the basic supplies before beginning. Having the yarn needle, stitch markers, scissors, and hook nearby is particularly useful because this project moves between crocheting individual motifs and assembling multiple panels.
- Yarn: Loopara 5ply combed cotton / Loopara 5 ply milk cotton yarn
- Yarn colors: bright cherry red, pure white, and fresh lime green
- Crochet hook: 3.0mm
- Scissors
- Stitch marker
- Yarn needle
The source recommends a 3.0mm hook throughout the project. It also notes that crocheters who naturally work tightly may want to try a 3.5mm hook, while loose crocheters may consider a 2.75mm hook. The important consideration is consistent tension so the strawberry squares remain uniform and the finished bag keeps its shape.
US Crochet Abbreviations
The pattern uses standard US crochet terminology. Keep this list available while working through the rounds.
- ch: chain
- sc: single crochet
- dc: double crochet
- hdc: half double crochet
- sl: slip stitch
- BLO: back loops only
- FLO: front loops only
- inc: increase
- sk: skip
- sp: space
Understanding the Strawberry Granny Square Layout

Before sewing anything together, study the layout carefully. The diagram shows the arrangement of the squares and the seams needed to form the bag. Green lines indicate vertical seams, while red lines indicate horizontal seams. The upper portion of the diagram also shows the squares used for the strap, creating a continuous strawberry-themed pattern.
Because 33 individual granny squares are involved, accurate positioning is one of the most important preparation steps. Stitch markers will help hold the pieces in their intended positions before sewing.
Step 1: Crochet the Strawberry Body
The strawberry body is built over three rounds. The first round establishes the circular base, while the following rounds shape it into the strawberry motif.

Round 1
Begin with a magic ring. Chain 3, which counts as the first double crochet, then work 11 double crochet in the ring. Slip stitch to join in the top of the starting chain 3.
Round 2

Chain 2, half double crochet in the same stitch, 4 double crochet. Work (half double crochet, single crochet), single crochet, single crochet increase, 2 half double crochet, single crochet increase, single crochet. Then work (single crochet, half double crochet), 4 double crochet, half double crochet. Slip stitch to join in the first stitch.
Round 3

Chain 1, 2 single crochet, 3 single crochet increase, 5 single crochet. Work (single crochet, half double crochet), chain 1, (half double crochet, single crochet), 5 single crochet, 3 single crochet increase, 2 single crochet. Fasten off and weave in ends.
Stitch checkpoint: Maintain consistent tension throughout all three rounds. The original pattern specifically recommends this because even tension helps preserve a symmetrical strawberry shape.
Step 2: Add the Connecting Petal
The connecting petal forms the structured area around the strawberry and provides the foundation for the granny-square border. This section is worked in two rounds.

Round 1
Working in Back Loop Only: single crochet, chain 1, skip 3 stitches. Work (3 double crochet, chain 2, 3 double crochet), chain 1, skip 2 stitches, single crochet increase. Chain 1, skip 2 stitches, (2 single crochet, half double crochet), chain 2, 3 half double crochet. Chain 1, skip 2 stitches, 2 half double crochet, chain 1, skip 2 stitches, 3 half double crochet. Chain 2, (half double crochet, 2 single crochet), chain 1, skip 2 stitches, single crochet increase. Chain 1, skip 2 stitches, (3 double crochet, chain 2, 3 double crochet), chain 1, skip 3 stitches, single crochet. Fasten off.
Round 2

Work (chain 3, 2 double crochet, chain 2, 3 double crochet, chain 1), (3 double crochet, chain 1) twice. Then work [(3 double crochet, chain 2, 3 double crochet, chain 1), (3 double crochet, chain 1) twice] 3 times. Slip stitch to join, fasten off, and weave in ends.
Construction tip: Round 1 is worked in the back loop only to create a defined edge for the strawberry. Keep your tension even in Round 2 so the completed square stays flat and neat.
Step 3: Crochet the Leaf
The lime-green leaf is a small but important detail because it gives the strawberry its recognizable fruit-and-leaf appearance. The leaf uses front-loop-only work and chain-4 sections to create pointed edges.

Round 1
Chain 1. Working in front loops only, make 2 slip stitches. Chain 4. Work 3 slip stitches in the 2nd chain from the hook. Working in front loops only, make 1 slip stitch. Working in front loops only, make 2 slip stitches.
Round 2

Work (chain 4, working in front loops only, make 1 slip stitch) 5 times. Fasten off and weave in ends.
The chain-4 spaces create the pointed edges of the leaf. Keep your tension consistent for a symmetrical shape. After finishing, gently shape the leaf with your fingers to enhance its natural curve.
Step 4: Add the Strawberry Seeds

Once the strawberry motif has been crocheted, sew white yarn onto the front of the strawberry for the seeds. These small white details contrast with the bright cherry-red strawberry and help define the fruit motif.
Because the seed details are added separately, take care to position them neatly and keep the overall appearance balanced. The source does not specify a numerical seed count or exact placement pattern, so no additional placement measurements should be assumed.
Preparing the Granny Squares for Assembly

After completing the required strawberry granny squares, arrange them according to the layout diagram. The complete bag uses thirty-three granny squares. Taking time to arrange and secure the pieces before sewing will make the assembly stage considerably easier to manage.
Assembly: Building the Bag Panels
Step 1: Secure the Squares

Following the layout diagram, join thirty-three granny squares to create three panels. Secure the granny squares in position using stitch markers before beginning the seams.
Step 2: Join the Panels

Place the panels wrong sides together and join them using whip stitch through the inner braids.
Step 3: Match the Stitches

Match stitches one-to-one as you sew. This keeps the seam even and helps the joined granny squares retain their intended alignment.
Step 4: Set Aside the Joined Panels

Once the panels are joined, set aside the three joined panels as instructed. Keeping the pieces organized at this stage makes it easier to identify the correct edges for the strap connection.
Connecting the Strap to the Bag
Step 5: Position the Strap

Next, connect the strap to the bag body. Align the left side first and secure the pieces with stitch markers before sewing.
Step 6: Sew the Strap Edges

Use the same whip stitch method to sew these three edges. Continue matching the pieces carefully so the strawberry motifs remain properly aligned.
Step 7: Attach the Remaining Bag Body Panel

Take the remaining bag body panel and attach it using the same method. Continue checking alignment before sewing each section.
Step 8: Join the Strap Ends

Finally, join the two ends of the strap together. Before sewing, make sure the strap is not twisted. This simple check is important because a twisted strap can affect the finished appearance and how the bag hangs.
Finishing the Strap with a Decorative Border
Step 9: Border the Inner Curve

Work a decorative border around the inner curve of the strap by repeating the single crochet, chain 3 pattern.
Step 10: Repeat on the Other Side

Repeat the decorative border on the other side of the strap using the same single crochet, chain 3 pattern. With this final border complete, the strawberry-themed bag is finished.
Assembly Checkpoints for a Neat Finish
Assembly is where many handmade bags gain or lose their final shape. The source recommends keeping seaming tension consistent but not too tight. This allows the bag to retain its shape instead of becoming distorted at the seams.
- Use plenty of stitch markers before sewing pieces together.
- Match stitches one-to-one when joining seams.
- Keep the wrong sides together when instructed for the panel joins.
- Use whip stitch through the inner braids as specified.
- Check the strap alignment before sewing.
- Make sure the strap is not twisted before joining its ends.
- Maintain consistent seaming tension without pulling the fabric too tightly.
Keeping the Strawberry Motifs Consistent
Because the bag is made from many individual squares, consistency is more important than speed. Work with the same hook size and maintain steady tension across the strawberry body, connecting petal, and leaf. Uniform tension will help the individual motifs sit together naturally when the bag is assembled.
The source recommends 3.0mm throughout the project. If your natural tension requires a different hook size, the suggested alternatives are 3.5mm for tight crocheters or 2.75mm for loose crocheters. Once you choose your working size, keep your tension as consistent as possible across the project.
Color Ideas Without Changing the Pattern Structure
The original palette uses bright cherry red strawberries, pure white for the background and seeds, and fresh lime green leaves. This combination gives the bag a crisp summer appearance.
The design can also inspire alternative color choices without changing the construction. The source suggests dark red strawberries for a richer appearance, pink berries for a playful variation, or combinations of red and purple for a wild-berry effect. The white background can remain as a clean neutral foundation that helps the fruit colors stand out.
These are color variations rather than changes to the stitch instructions. The construction, rounds, stitch sequences, and assembly order remain the same.
How to Weave in Ends
Weaving in ends is an important finishing stage for a project made from many individual motifs. The strawberry body instructions specifically call for fastening off and weaving in ends after Round 3, while the connecting petal and leaf also include fastening-off and weaving-in instructions at their designated points.
During assembly, keep the finished pieces organized rather than allowing loose ends to become tangled with neighboring squares. A tidy preparation stage makes the later joining process easier to control.
Care and Cleaning

Daily Care
A gentle brush with a soft-bristled brush after use can help keep the berry motifs looking crisp. Check occasionally for loose threads, especially around the white seed details, and trim them carefully if necessary. A lint roller can also be useful for quick touch-ups.
Washing
For everyday cleaning, spot cleaning with a damp cloth is recommended in the source. When a deeper clean is necessary, hand wash the bag in cool water with a gentle detergent. Avoid wringing or twisting because these actions can affect the structure and the three-dimensional strawberry details.
After washing, gently reshape the bag while it is damp and dry it flat on a clean towel away from direct heat or sunlight.
Storage
To help the bag retain its shape between uses, lightly stuff it with tissue paper. Avoid hanging the bag for storage because this can distort the granny-square pattern. A breathable fabric bag can protect it from dust while still allowing air circulation.
If the bag is stored with other items, place it on top rather than underneath heavier objects. Keep it in a cool, dry place away from excessive heat and humidity.
Quick Project Checklist
- Loopara 5 ply combed cotton / milk cotton yarn prepared
- Bright cherry red, pure white, and fresh lime green colors available
- 3.0mm crochet hook ready
- Scissors ready
- Stitch markers ready
- Yarn needle ready
- Strawberry body completed through Round 3
- Connecting petal completed through Round 2
- Leaf completed through Round 2
- White seed details added
- 33 granny squares arranged according to the layout
- Three panels joined
- Strap connected without twisting
- Decorative border worked on both sides of the strap
Frequently Asked Questions
How large is each strawberry granny square?
Each strawberry granny square measures approximately 2.5 inches.
How large is the finished bag?
The finished bag measures approximately 12 inches (30 cm) in height and 8.2 inches (21 cm) in width.
How many granny squares are required?
The design uses 33 granny squares in total: 9 for the front, 9 for the back, 3 for the bottom and sides, and 7 for the straps.
What crochet hook size is used?
The pattern uses a 3.0mm crochet hook. The source suggests 3.5mm for tight crocheters or 2.75mm for loose crocheters as possible alternatives.
Which yarn is recommended?
The recommended yarn is Loopara 5 ply combed cotton, also described in the source as Loopara 5 ply milk cotton yarn.
Which colors are used?
The original palette uses bright cherry red for the strawberries, pure white for the background and seeds, and fresh lime green for the leaves.
What joining method is used?
The panels are joined with whip stitch through the inner braids, with stitches matched one-to-one for even seaming.
What should I check before joining the strap?
Secure the strap with stitch markers, align the left side first, and make sure the strap is not twisted before joining its ends.
Final Thoughts
The Strawberry Granny Square Bag turns a familiar granny-square concept into a distinctive fruit-inspired accessory. Its charm comes from the combination of several small details: the shaped red strawberry body, white seed stitches, pointed green leaf, clean surrounding border, and repeated motifs across the completed bag.
The key to a successful result is consistency. Keep your crochet tension steady, follow each round in its original order, use the specified BLO and FLO techniques where indicated, and take time to align the 33 squares before sewing. During assembly, match stitches one-to-one and avoid pulling the seams too tightly.
Once the panels, strap, and decorative border are complete, the result is a playful handmade bag measuring approximately 12 inches (30 cm) high and 8.2 inches (21 cm) wide. Whether made in the original strawberry palette or explored with the suggested color variations, this project offers a charming way to bring a little summer character into a handmade wardrobe.
Congratulations on completing your Strawberry Granny Square Bag!