
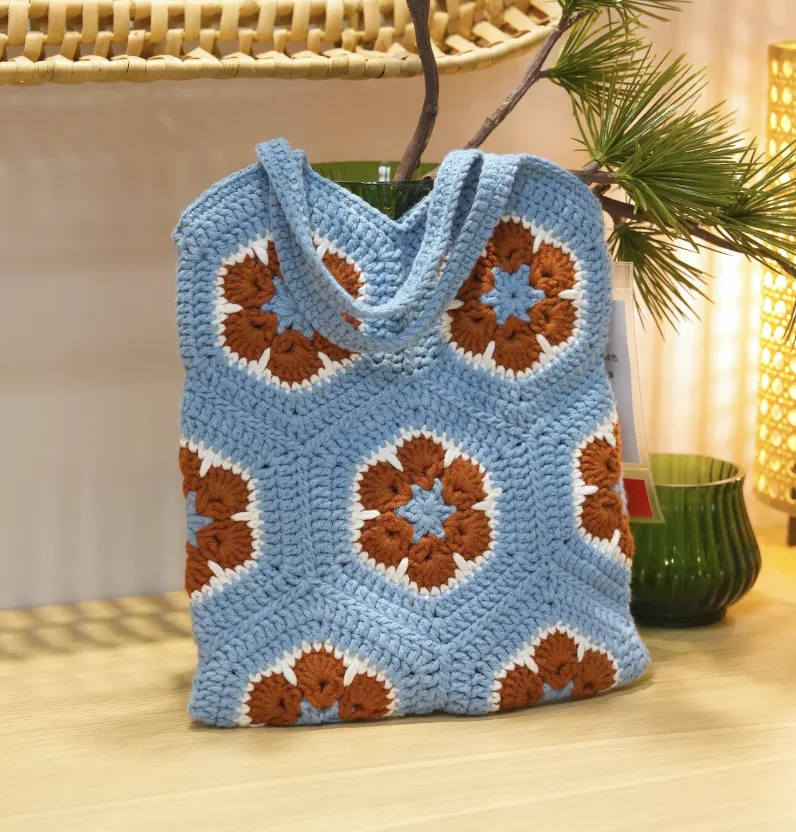

If you love the traditional look of granny squares but want to turn that classic crochet style into something practical for everyday use, this Hexagon Granny Square Bag is a wonderful project to try. The design combines floral-looking hexagonal motifs with a compact bag shape, creating an accessory that feels both vintage-inspired and modern.
The original color combination uses sky blue as the main color, terracotta for the flower petals, and white for the borders. Together, these colors create a soft but distinctive look. The finished bag is approximately 12 inches (30 cm) high and 8 inches (20 cm) wide, while each completed hexagonal granny square measures approximately 4 inches (10 cm) across.
This project is made from 10 hexagon granny squares. Once the motifs are crocheted, they are arranged, secured, sewn together, and finished with a crocheted strap. The construction gives you an excellent opportunity to practice several useful crochet skills, including working into spaces, shaping a hexagonal motif, maintaining consistent tension, whipstitching crocheted pieces together, and forming a sturdy strap.
The instructions below keep the original technical sequence intact while organizing the project into a practical workshop-style guide. If you are a beginner, take your time with each round and use stitch markers whenever you need help identifying the corners and sections of your hexagon.
Project Overview
Before picking up your hook, it helps to understand how the finished bag is constructed. The main body is made from 10 hexagon granny squares. Each motif is worked through six rounds, creating the characteristic six-sided shape.
- Number of hexagon granny squares: 10
- Approximate motif size: 4 inches (10 cm) across
- Approximate finished bag height: 12 inches (30 cm)
- Approximate finished bag width: 8 inches (20 cm)
- Recommended crochet hook: 3.0mm
- Recommended yarn: Loopara 5ply combed cotton
- Yarn colors: Blue 42, Brown 54, White 60
The original pattern recommends a firm fabric because the project is intended to function as a bag. A 3.0mm hook is used with the recommended yarn to create a tight, stable fabric. The source also notes that a 3.5mm hook may be suitable for someone who tends to crochet tightly, while a 2.75mm hook may suit a loose crocheter. The goal is a firm fabric that can maintain its shape.
Materials You Will Need
Gather all of your materials before beginning. Having the tools beside you makes it easier to move from one stage to the next without interrupting your work.
- Loopara 5ply combed cotton: Blue 42, Brown 54, White 60
- Crochet hook: 3.0mm
- Scissors
- Stitch marker
- Yarn needle

The recommended yarn is Loopara 5ply combed cotton. The source describes it as a durable choice for bags, with a smooth texture that helps define the flower-like motifs. If this exact yarn is unavailable, the source indicates that a medium weight cotton yarn with good structure and a smooth finish can also work well.
US Crochet Abbreviations
The pattern uses standard US crochet terminology. Keep this list nearby while working the six rounds of each hexagon.
- ch: chain
- dc: double crochet
- sc: single crochet
- sl: slip stitch
- magic ring: magic ring
- inc: increase
- sp: space
Before You Begin the Hexagon Motifs
You will make 10 identical hexagon granny squares. The most important thing at this stage is consistency. Since the motifs will eventually be joined together, differences in tension can make assembly more difficult.
Pay particular attention to the first two rounds because they establish the foundation of the six-sided shape. The source specifically recommends maintaining consistent tension and using stitch markers to help identify the corners and keep track of the sections.
Do not rush through the increases. If a section looks uneven, pause and check your work before continuing. Counting the stitches in each section can help you maintain balanced sides throughout the motif.
How to Crochet the Hexagon Granny Square
Make 10 hexagon granny squares using the following six-round sequence. The instructions below preserve the original round order and stitch information.
Round 1: Create the Foundation

Round 1: Create a magic ring. Work (chain 2, double crochet, chain 1), then (double crochet increase, chain 1) 5 times. Slip stitch to join.
This opening round creates the center from which the remaining hexagon develops. Work carefully into the magic ring and keep the center controlled as you build the first set of sections.
Round 2: Establish the Hexagon Shape

Round 2: Slip stitch to first chain-1 space. Work (chain 2, double crochet, chain 1, double crochet increase), then (double crochet increase, chain 1, double crochet increase) 5 times. Slip stitch to join.
The increases in this round are especially important because they help establish the characteristic hexagonal form. Check that your sections are developing evenly before moving forward.
Round 3: Build the Flower Motif

Round 3: Slip stitch to first chain-1 space. Work (chain 2, 6 double crochets), then (7 double crochets) 5 times. Slip stitch to join.
This round begins to give the motif its fuller floral appearance. Keep the double crochet groups even and avoid pulling your stitches excessively tight.
Round 4: Add the Single Crochet Definition

Round 4: Chain 1, work (7 single crochets, double crochet) 6 times. Slip stitch to join.
At this point, the six-sided outline should be increasingly recognizable. This is a useful stage to compare your motif with the reference image and make sure the sides are developing symmetrically.
Round 5: Expand the Hexagon

Round 5: Chain 2, work 6 double crochets, (double crochet, chain 1, double crochet), then [7 double crochets, (double crochet, chain 1, double crochet)] 5 times. Slip stitch to join.
The chain-1 spaces help define the corners of the hexagon. When working around the motif, pay attention to these spaces because they are part of the structure that keeps the finished shape balanced.
Round 6: Complete the Granny Square Motif

Round 6: Chain 2, work 7 double crochets, (double crochet, chain 1, double crochet), then [9 double crochets, (double crochet, chain 1, double crochet)] 5 times, work one more double crochet. Slip stitch to join.
Once Round 6 is complete, you have one finished hexagon. Repeat the exact same six-round sequence until you have 10 hexagon granny squares.
Keeping All 10 Hexagons Consistent
When making multiple motifs, consistency becomes more important than speed. Try to maintain the same tension from one hexagon to the next. If one motif is noticeably tighter or looser, it may not line up as neatly during assembly.
- Use the same 3.0mm hook throughout the project.
- Maintain consistent tension from motif to motif.
- Use stitch markers when you need help identifying corners.
- Pay special attention to the increases in Rounds 1 and 2.
- Count the sections as you work to help maintain even sides.
- Compare completed motifs visually before beginning assembly.
Preparing the Main Body for Assembly
Once all 10 hexagons are finished, the project changes from individual motifs into a three-dimensional bag. This is where careful positioning makes a significant difference.
First, align the crocheted granny squares according to the layout plan. Use stitch markers to secure the pieces temporarily. Fold in half at the center line, flip over, and then fold the sides of the granny squares. Secure the folds with stitch markers.

Taking the time to secure the pieces first allows you to check the basic shape before committing to the seams. Once the pieces are held together, the basic bag shape begins to appear.
Whipstitching the Granny Squares Together

Assembly Step 1: Align the pieces and secure them with stitch markers.
Assembly Step 2: Begin sewing with a needle and thread using a whipstitch method. Locate the first stitch position, align two granny squares, and begin sewing. The sewing pattern does not need to be fixed; the pieces can be matched according to your preference. At intersections, sew back and forth twice to create a tighter and neater finish.

Assembly Step 3: Use the same whipstitch method for both the back and front. Make sure the stitches align and sew twice at corners. When sewing the sides of the bag, do not pull the thread too tightly because excessive tension can distort the crocheted pieces.
For the bag bottom, match the stitches at the folded edge of one granny square. After sewing, hide the thread ends by wrapping several times, then cut.
At the end of this process, the main body of the Hexagon Granny Square Bag is complete.
Building the Crochet Bag Strap
The strap is worked directly from the bag. The original instructions use single crochet, single crochet decreases, slip stitches, and two sections of 50 chain stitches to create the strap structure.
Strap Step 1: Attach the Yarn

Make a slip knot, locate the first stitch on the bag, attach the yarn, and make a chain stitch.
Strap Step 2: Work the First 50-Chain Section

Begin with a single crochet decrease, then single crochet in sequence while hiding the yarn tail as you go. After the single crochets, begin the strap by making 50 chain stitches. Slip stitch, then continue single crocheting in sequence.
Strap Step 3: Create the Second 50-Chain Section

After finishing the single crochets, crochet another strap using 50 chain stitches. Slip stitch, then single crochet in sequence. Finish the single crochets, find the first stitch, slip stitch, and fasten off.
Strap Step 4: Work the Inner Side

Start crocheting the strap’s inner side. Make a slip knot, attach the yarn, and chain. Begin with a single crochet decrease, single crochet in sequence, and decrease where the strap meets the granny square.
Strap Step 5: Continue Around the Inner Side

Continue single crocheting in sequence. Single crochet at each granny square intersection, decrease where the strap meets the squares, and single crochet elsewhere. Repeat this process for the opposite inner side of the strap.
Strap Step 6: Finish the Final Round

Start the final round of the strap by making a slip knot and attaching the yarn. The pattern is to decrease between granny squares and where the strap connects, while working single crochet elsewhere. Complete the final strap round following this pattern.
When the strap is finished, hide the thread ends with a needle, wrapping them several times before trimming the excess.
Assembly Tips for a Neater Bag
Assembly is one of the most important parts of this project because the quality of the seams affects the final shape. Keep the crocheted pieces aligned while sewing and use stitch markers before beginning whenever necessary.
At intersections and corners, sew back and forth twice as described in the original instructions. This reinforces those joining points without requiring a different joining method.
Another important detail is thread tension. The source specifically warns against pulling the thread too tightly when sewing the bag sides. A tight sewing thread can distort the crocheted fabric, changing the shape of the finished bag.
Stitch and Shape Checkpoints
Because the bag is made from repeated hexagonal motifs, visual checkpoints can make the process easier to manage.
- After Round 1: Confirm that the magic ring and initial groups are secure.
- After Round 2: Check that the increase structure is producing an even six-sided form.
- After Round 3: Check that the double crochet groups look consistent.
- After Round 4: Look for six balanced sections around the motif.
- After Round 5: Check the corner chain-1 spaces.
- After Round 6: Compare the completed hexagon with the reference image before making the remaining motifs.
These checkpoints do not change the pattern instructions; they simply give you useful moments to pause and inspect your work before continuing.
Common Troubleshooting Points
My Hexagon Does Not Look Symmetrical
First, check your tension and review the increases in Rounds 1 and 2. The original instructions emphasize that these early increases establish the hexagon shape. Stitch markers can also help you identify the corners and keep the six sections organized.
My Motifs Are Different Sizes
Differences between motifs are often related to tension. Try to use the same hook and maintain consistent tension while making all 10 hexagons. Since the finished motifs are assembled into one bag, keeping them consistent will make alignment easier.
The Bag Sides Look Distorted After Sewing
Check the tension of your sewing thread. The assembly instructions specifically advise against pulling the thread too tightly when sewing the sides. Allow the crocheted fabric to remain relaxed while the seams are secured.
The Corners Feel Loose
At intersections, the original instructions recommend sewing back and forth twice. This gives those areas additional reinforcement while keeping the joining method simple.
Finishing the Bag
Once the main body has been assembled and the strap has been completed, inspect the bag carefully. Look over the seams, corners, strap connections, and yarn tails. Use the yarn needle to hide loose ends by wrapping them several times before trimming.
The finished bag should retain the compact proportions described in the source: approximately 12 inches (30 cm) in height and 8 inches (20 cm) in width. The individual hexagon motifs are approximately 4 inches (10 cm) across.
Care and Cleaning
A handmade cotton crochet bag benefits from gentle care. For everyday maintenance, remove debris with a soft brush or lint roller. Pay attention to the textured flower motifs because dust can collect around raised stitches.
Between uses, allow the bag to breathe by keeping it in a well-ventilated area. If you notice loose threads, trim them carefully with sharp scissors rather than pulling on them.
Washing
For light cleaning, spot clean using a damp white cloth and mild soap. For deeper cleaning, the source recommends hand washing in cool water with gentle detergent. Submerge the bag and softly squeeze the soapy water through the fabric.
Do not wring or twist the bag because this can distort the flower motifs. Instead, gently press out excess water, reshape the bag while damp, and air dry it flat on a clean white towel. Keep it away from direct sunlight to help prevent color fading.
Storage
For storage, lightly stuff the bag with acid-free tissue paper to help maintain its shape. For longer-term storage, place it inside a cotton pillowcase so that it is protected from dust while the yarn can still breathe.
Avoid plastic bags because they can trap moisture and create musty odors. Keep the finished bag away from direct sunlight and store it flat rather than hanging it, helping preserve the shape of the crocheted construction.
Quick Project Reference
- Project: Crochet Hexagon Granny Square Bag
- Motifs: 10 hexagon granny squares
- Motif size: approximately 4 inches (10 cm) across
- Finished bag: approximately 12 inches (30 cm) high and 8 inches (20 cm) wide
- Yarn: Loopara 5ply combed cotton
- Colors: Blue 42, Brown 54, White 60
- Hook: 3.0mm
- Tools: scissors, stitch marker, yarn needle
- Hexagon construction: 6 rounds
- Strap chains: 50 chain stitches for each of the two strap sections
- Joining method: whipstitch
Frequently Asked Questions
How many hexagon granny squares are needed?
The pattern calls for 10 hexagon granny squares in total.
How large is each hexagon?
Each completed hexagonal granny square measures approximately 4 inches (10 cm) across.
What size crochet hook is recommended?
The recommended hook is 3.0mm. The source notes that a 3.5mm hook may work for a tight crocheter, while a 2.75mm hook may be suitable for someone who crochets loosely. The aim is a firm, stable fabric.
What yarn is used for this bag?
The recommended yarn is Loopara 5ply combed cotton in Blue 42, Brown 54, and White 60.
Can the colors be changed?
Yes. The original design uses sky blue, terracotta, and white, but the source discusses experimenting with other color combinations. The hexagonal flower motif provides plenty of room for creative color choices while retaining the same crochet construction.
How are the granny squares joined?
The main body uses a whipstitch method. The pieces are aligned, secured with stitch markers, and sewn together using a needle and thread. At intersections, sew back and forth twice for a tighter finish.
How long is the crocheted strap?
The strap instructions include two sections of 50 chain stitches. The first strap section uses 50 chain stitches, and another strap section is made with 50 chain stitches before the inner side is worked.
How should the bag be washed?
Spot cleaning with a damp white cloth and mild soap is suggested for light cleaning. For deeper cleaning, hand wash in cool water with gentle detergent. Do not wring or twist the bag; instead, gently press out excess water and reshape it while damp.
Final Thoughts
The Hexagon Granny Square Bag brings together the decorative appeal of floral-inspired crochet motifs and the usefulness of a handmade everyday accessory. The six-round hexagon is repetitive enough to become comfortable with practice, while the assembly and strap construction give the project a satisfying progression from individual motifs to a finished bag.
The key to a successful result is consistency. Make all 10 hexagons with the same hook and controlled tension, pay close attention to the increases in the first two rounds, and use stitch markers whenever they help you identify corners and sections. During assembly, keep the motifs aligned and avoid pulling the sewing thread too tightly.
Once the final strap round is complete and the yarn ends are securely hidden, your handmade bag is ready to become part of your everyday wardrobe. The original blue, terracotta, and white palette gives the finished accessory a charming vintage character, but the construction also leaves plenty of room for future color experiments.
Whether you are learning how hexagonal granny motifs are constructed or looking for a practical project that uses multiple crochet squares, this pattern offers a rewarding combination of repetition, shaping, sewing, and finishing. Take your time with each stage, keep the technical sequence consistent, and enjoy watching the separate motifs transform into one complete crochet bag.
