
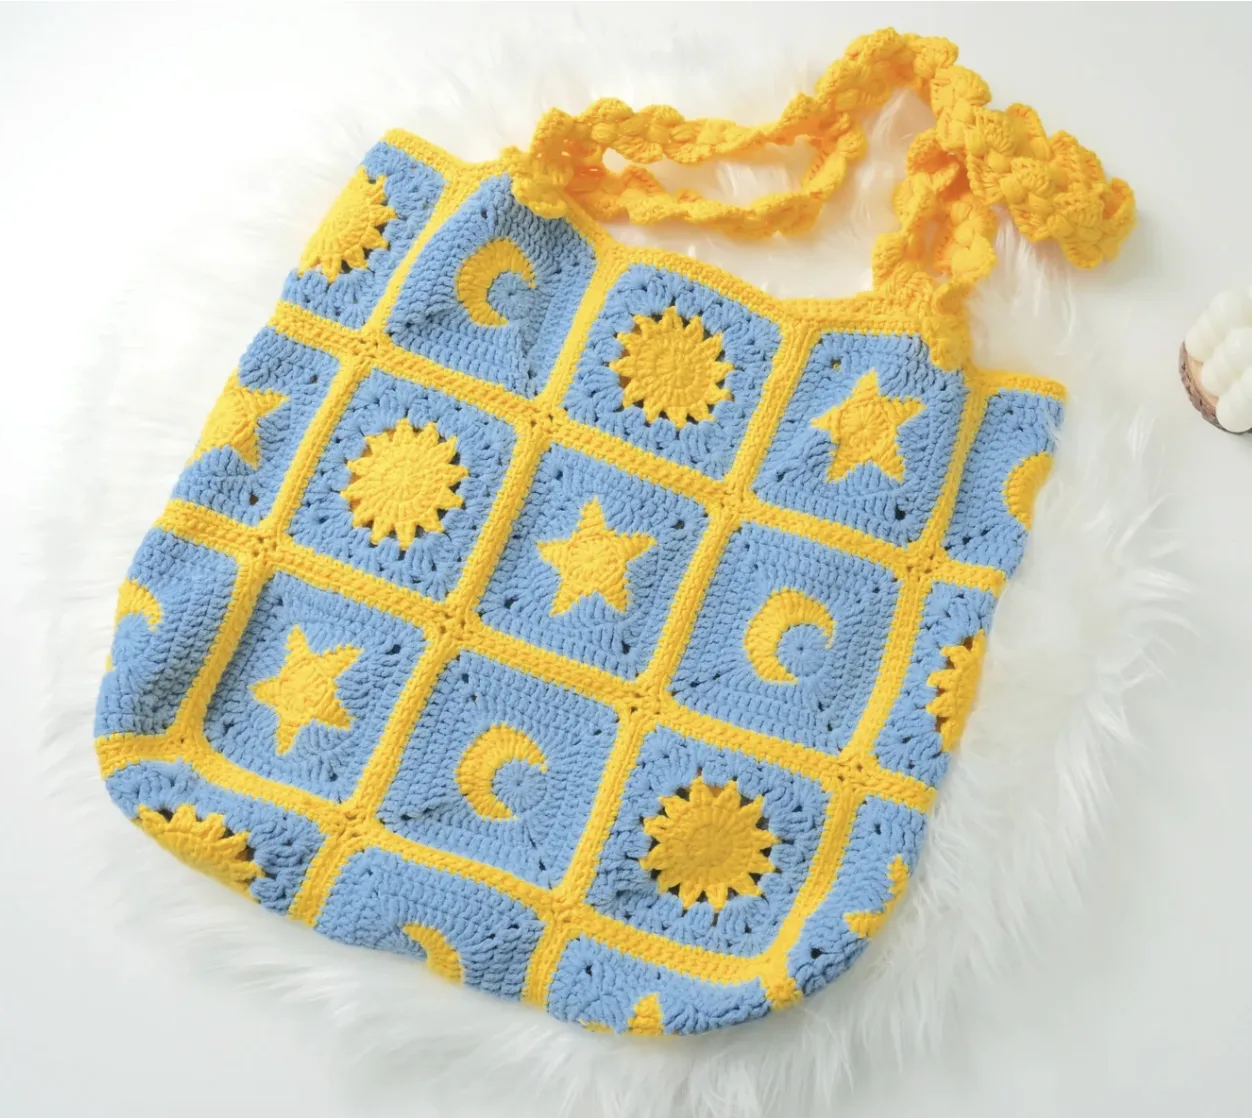
There is something wonderfully charming about combining classic granny square crochet with celestial motifs. This star granny square bag brings together stars, suns, and crescent moons in a beautiful blue-and-yellow design to create a practical handmade tote with plenty of personality. Although the finished bag looks detailed and intricate, the project is achievable for intermediate crocheters who are comfortable working in rounds, changing colors, joining motifs, and sewing crochet pieces together.
The finished bag measures approximately 15 inches (38 cm) wide and 13.4 inches (34 cm) high. Its construction is based on 27 individual granny squares: 9 star squares, 9 sun squares, and 9 moon squares. Each square measures approximately 3.7 x 3.7 inches (9.4 x 9.4 cm). Once the motifs are completed, they are arranged according to the provided layout, joined with whipstitch, shaped into the bag body, finished around the opening, and completed with two handmade straps.
This tutorial keeps the original construction and stitch instructions intact while organizing the project into a beginner-friendly workflow. You can follow the project from yarn preparation through motif making, assembly, strap construction, and finishing.
Project Overview: A Bag Inspired by the Sky
The design uses royal blue as the main background color and golden yellow for the celestial motifs. Together, these colors create a striking night-and-day effect. The same construction can also inspire other color combinations, provided that the celestial motifs contrast clearly with their background.
The project consists of three different granny square designs. You will make 9 sun squares, 9 star squares, and 9 moon squares, for a total of 27 squares. The completed motifs are then positioned according to the supplied Star Granny Square Bag Layout.
The individual squares are relatively small, which makes them convenient to work on separately. It also means you can complete several motifs before beginning the larger assembly stage. Keeping the completed squares organized as you go will make the layout and joining process much easier.

Materials and Tools
Before beginning, gather all of the tools and materials required for the project. The original pattern recommends Loopara 5ply combed cotton, also described as Loopara 5 ply milk cotton yarn, with Royal Blue used as the main color and Golden Yellow for the celestial elements.
- Yarn: Loopara 5ply combed cotton / 5 ply milk cotton yarn
- Main color: Royal Blue
- Celestial color: Golden Yellow
- Crochet hook: 3.0mm
- Scissors
- Stitch marker
- Yarn needle
The recommended 3.0mm hook creates tight stitches that help give the finished bag structure. If you naturally crochet tightly, the source notes that you may want to size up to 3.5mm. If you are a loose crocheter, the 3.0mm hook is recommended.
Before making all 27 squares, it is useful to make a test square with your selected yarn and hook. The goal is to achieve stitches that are firm enough to help hold the bag’s contents while avoiding tension so tight that the square becomes stiff.
US Crochet Abbreviations
The pattern uses US crochet terminology. Keep the following abbreviations available while working through the rounds:
- ch: chain
- sc: single crochet
- dc: double crochet
- inc: increase
- sl: slip stitch
- tr: treble crochet
- hdc: half double crochet
- dc2tog: double crochet 2 together
- dc inc: double crochet increase
- hdc inc: half double crochet increase
- sc inc: single crochet increase
Understanding the 27-Square Construction
The bag is made from three celestial motifs, and each motif has a specific role in the final layout. Make exactly 9 of each type:
- 9 sun granny squares
- 9 star granny squares
- 9 moon granny squares
Every finished square should be approximately 3.7 x 3.7 inches (9.4 x 9.4 cm). Consistent tension is particularly important here because the squares must be joined later. Even if each individual square looks good, noticeable differences in size can make the final assembly more difficult.
How to Crochet the Sun Granny Squares
Make 9 sun granny squares. The sun motif develops through five rounds, with the final round changing color to create the contrasting square structure.

Sun Granny Square Round 1
Round 1: Chain 3, make 11 double crochet into the ring, slip stitch into the top of chain-3 to join.

Sun Granny Square Round 2
Round 2: Chain 3, double crochet, (double crochet increase) 11 times, slip stitch into the top of chain-3 to join.

Sun Granny Square Round 3
Round 3: (Chain 3, double crochet, chain 3), (double crochet 2 together, chain 3) 11 times, slip stitch into the top of chain-3 to join.

Sun Granny Square Round 4
Round 4: (Chain 3, double crochet), [3 double crochet, (3 treble crochet, chain 1, 3 treble crochet, 3 double crochet)] 3 times, (3 double crochet), (3 treble crochet, chain 1, 3 treble crochet, double crochet), slip stitch into the top of chain-3 to join.

Sun Granny Square Round 5
Round 5: Change color. (Chain 3, treble crochet increase), [3 double crochet, (3 double crochet, chain 1, 3 double crochet), 3 double crochet, 3 double crochet] 3 times, 3 double crochet, (3 double crochet, chain 1, 3 double crochet), 3 double crochet, slip stitch into the top of chain-3 to join.
Fasten off, and weave in ends.
As you make all 9 sun squares, keep your tension consistent. The treble crochet sections form the sun-ray effect, so maintaining even spacing helps the finished motif retain its intended appearance.
How to Crochet the Star Granny Squares
Make 9 star granny squares. This motif begins with a ring and develops into a five-pointed star before the final round transforms it into a square.

Star Granny Square Round 1
Round 1: Chain 5, then slip stitch into the first chain to form a ring.

Star Granny Square Round 2
Round 2: Chain 3, work 14 double crochet into the ring, slip stitch into the top of the starting chain-3.

Star Granny Square Round 3
Round 3: (Chain 5, single crochet in 2nd chain from hook, half double crochet, double crochet, treble crochet, skip 2, slip stitch) 5 times, slip stitch into the first slip stitch.

Star Granny Square Round 4
Round 4: Change color. Chain 1, work (single crochet, half double crochet, double crochet, treble crochet, treble crochet increase, treble crochet, double crochet, half double crochet) 5 times around, slip stitch into the first single crochet to join.

Star Granny Square Round 5
Round 5: Chain 4, work 2 double crochet, half double crochet, 3 single crochet, half double crochet, double crochet, treble crochet, then work [(treble crochet, chain 2, treble crochet), 2 double crochet, half double crochet, 3 single crochet, half double crochet, double crochet, treble crochet] 3 times, treble crochet, chain 2, slip stitch into the top of starting chain-4.

Star Granny Square Round 6
Round 6: (Chain 3, double crochet, chain 1, 2 double crochet), 11 double crochet, work [(2 double crochet, chain 1, 2 double crochet), 11 double crochet] 3 times, slip stitch into the top of beginning chain-3.
Fasten off, and weave in ends.
The star points require careful stitch placement. Each point should remain evenly spaced around the circle. Pay particular attention to stitch counting in Rounds 5 and 6 because these rounds transition the star into the square shape required for assembly.
How to Crochet the Moon Granny Squares
Make 9 moon granny squares. The moon motif uses three color-focused rounds before the final two rounds establish the square shape.

Moon Granny Square Round 1
Round 1: Chain 3, work 17 double crochet into the ring, slip stitch into the top of the starting chain-3.

Moon Granny Square Round 2
Round 2: Change color. Chain 1, single crochet, half double crochet increase, (half double crochet, double crochet increase), (double crochet, treble crochet increase), (3 treble crochet), (3 treble crochet), (treble crochet increase, double crochet), (double crochet increase, half double crochet), half double crochet increase, single crochet, slip stitch into the first single crochet.

Moon Granny Square Round 3
Round 3: Change color. (Chain 4, chain 2, treble crochet increase), treble crochet, 5 double crochet, treble crochet, (treble crochet increase, chain 2, treble crochet increase), treble crochet, 5 double crochet, treble crochet, (treble crochet increase, chain 2, treble crochet increase), 2 treble crochet, 4 double crochet, treble crochet, (treble crochet increase, chain 2, treble crochet increase), treble crochet, 4 double crochet, treble crochet, treble crochet, slip stitch into the second chain of beginning chain-4.

Moon Granny Square Round 4
Round 4: (Chain 3, double crochet, chain 2, double crochet), [11 double crochet, (double crochet, chain 2, double crochet)] 3 times, 10 double crochet, slip stitch into the top of chain-3.

Moon Granny Square Round 5
Round 5: (Chain 3, chain 1, double crochet), 13 double crochet, [(double crochet, chain 1, double crochet), 13 double crochet] 3 times, slip stitch into the top of beginning chain-3.
Fasten off, and weave in ends.
For the moon squares, pay attention to the foundation in Round 1. The original instructions emphasize evenly spacing the initial 17 double crochets in the ring because this establishes the foundation for the crescent moon shape. During the final rounds, avoid excessive tension that could make the motif pucker, while also avoiding loose tension that could make it wavy.
Arrange the 27 Squares Before Joining
Once all 27 squares are complete, do not begin sewing immediately. First, arrange them according to the supplied Star Granny Square Bag Layout. This step is important because the final celestial pattern depends on the position of all 9 stars, 9 suns, and 9 moons.

Before picking up the yarn needle, check that the motifs are facing the correct direction and that the color arrangement matches the layout. Stitch markers are especially useful here because they allow you to secure the intended relationships between squares before permanent sewing begins.
Prepare the Squares for Assembly
Step 1: Chain, (15 single crochet, single crochet increase) repeat 4 times. Crochet one round according to the pattern diagram. Do this for all 27 squares.

Step 2: Begin placing stitch markers according to the layout.

Step 3: Use the whipstitch method shown in Figure of step 2 to join squares, matching stitches one-to-one. Place the wrong sides together and pick up half a stitch from each side for the whipstitch.
Step 4: For the first stitch, sew multiple times in the same spot to secure. Do not pull the thread too tight to maintain the bag shape.
Step 5: Continue sewing, matching stitches one-to-one.

Build the Horizontal Rows
Step 6: When connecting granny squares in the middle, sew the last stitch of the first two squares 1-3 times. Begin connecting the next two squares, pulling the loop tight. Similarly, sew the first stitch 1-3 times.
Step 7: Continue sewing, and matching stitches one-to-one.
Step 8: Use the whipstitch method to join the remaining two rows of squares.

Step 9: Horizontal row joining is complete.

Step 10: Next, join the vertical rows of squares using the whipstitch method, following the layout.
Secure the Central Intersections

Step 11: When joining at the middle intersection, connect all four squares together with an extra round of stitches.
Step 12: Continue sewing, and matching stitches one-to-one.
Step 13: Add extra securing stitches at the end of each row. Cut yarn, leaving a long tail for joining.
Step 14: Complete the remaining joining.

Step 15: Flat assembly of the bag body is complete.
Fold and Shape the Bag Body
With the flat arrangement complete, the next stage changes the joined panel into the recognizable bag shape. This is where the stitch markers become particularly valuable.

Step 16: Turn the bag body squares, fold the fourth square from right to left in half, fold the first square on the left in half, and secure with stitch markers.

Step 17: Connect the left and right three squares at the bottom with stitch markers, and place stitch markers at the corresponding squares in the middle.

Step 18: Whipstitch following the sewing line shown in the picture.

Step 19: The bag body assembly is complete.

Step 20: Work one round of single crochet around the bag opening.

Step 21: The bag body is finished.
During assembly, resist the temptation to pull every joining stitch as tightly as possible. The source specifically notes that the first securing stitches should be sewn multiple times without pulling the thread too tight, helping maintain the intended bag shape. Before every major joining stage, compare the pieces against the layout and use stitch markers to keep the sections aligned.
Make the Two Crochet Bag Straps
The bag requires 2 straps. Work both straps using the same construction so they match in appearance and length.

Strap Step 1
Step 1: Chain 6 for braid stitch, double crochet in 5th chain from hook.

Step 2: Chain 3, work 6 half double crochet bobble in adjacent hole, chain, work 6 unfinished front post double crochet next to cluster in 3-chain braid, work off in pairs 6 times.
The original tutorial includes additional images for this strap step to show the stitch formation from different views.


Strap Step 3

Step 3: Repeat step 2 until the desired strap length.
Strap Step 4

Step 4: Sew strap to the bag, securing with multiple stitches.
Make sure the two straps are identical. The source recommends keeping track of strap length as you work and measuring it against your body to find a comfortable carrying length.
Assembly Checkpoint Before Finishing
- Confirm that all 27 squares have been made.
- Check that there are 9 stars, 9 suns, and 9 moons.
- Confirm that the squares are approximately 3.7 x 3.7 inches (9.4 x 9.4 cm).
- Compare the arrangement against the supplied layout before sewing.
- Use stitch markers to maintain alignment.
- Match stitches one-to-one during whipstitching.
- Avoid pulling joining yarn excessively tight.
- Secure intersections carefully.
- Complete one round of single crochet around the bag opening.
- Make 2 straps and keep their lengths identical.
- Secure each strap with multiple stitches.
Common Assembly Problems to Watch For
Squares Do Not Line Up
The first thing to check is whether the squares were placed according to the layout. If the motifs are in the wrong positions, even perfectly sewn squares can create an incorrect overall pattern. Use the stitch markers before beginning the permanent joining process.
The Bag Looks Pulled at the Seams
Joining stitches that are pulled too tightly can affect the shape of the bag. The original instructions specifically advise not pulling the thread too tight when securing the first stitches. Keep the joining tension controlled so the squares remain naturally positioned.
Motifs Look Different in Size
Consistent tension matters throughout the motif-making stage. The sun-square instructions specifically recommend maintaining consistent tension across all 9 squares so they remain the same size for easier joining. The same principle is useful when making the star and moon sets.
The Star Shape Looks Uneven
Pay close attention to stitch placement when creating the five star points. The source emphasizes even spacing around the circle and careful counting in Rounds 5 and 6, where the star becomes a square.
The Moon Motif Puckers or Waves
Check your tension in the final rounds. The source notes that overly tight tension can make the moon pucker, while overly loose tension can make it wavy.
Color Choices for a Different Look
The original design uses Royal Blue and Golden Yellow, producing a strong celestial contrast. However, the source also suggests that the color palette can be adapted creatively. Navy blue with silver can create a nighttime sky effect, while dusty rose with cream can produce a softer sunset-inspired appearance. Purple and gold can give the bag a more mystical character.
Whatever combination you choose, the background shade should provide enough contrast for the celestial motifs to stand out clearly. The important visual principle is not simply choosing two attractive colors, but choosing colors that allow the stars, suns, and moons to remain visually distinct.
Finishing and Care
Once the bag is assembled and the straps are securely attached, proper care will help preserve the crochet structure and colors.
Daily Care
Spot clean small marks with a damp cloth. Empty the bag after use to help maintain its shape. When the bag is not being carried, it can be lightly stuffed with tissue paper to help preserve the star, sun, and moon motifs.
Washing
For washing, hand wash using cool water and mild soap. Gently squeeze the bag rather than wringing it, and avoid harsh scrubbing that could disturb the stitches. After washing, reshape the bag while damp and lay it flat to dry away from direct sunlight.
Storage
Store the finished bag in a cool, dry place away from direct sunlight to help prevent fading. The source recommends stuffing it with acid-free tissue paper to maintain its shape and storing it flat rather than hanging it, which helps prevent stretching. A cotton storage bag can also provide additional protection when the crochet piece is not in use.
Final Thoughts on the Celestial Granny Square Bag
This star granny square bag is a satisfying project because it combines individual motif-making with a larger construction challenge. The 27 squares allow you to work in manageable sections, while the final assembly transforms those separate celestial motifs into a practical tote measuring approximately 15 inches (38 cm) wide and 13.4 inches (34 cm) high.
The most important part of the project is consistency. Make all 9 sun squares, 9 star squares, and 9 moon squares with careful attention to tension and stitch placement. Keep the squares organized, follow the supplied layout, and use stitch markers generously during assembly. When whipstitching, match stitches one-to-one and avoid pulling the thread too tightly.
From the first circular motif to the final strap attachment, every stage contributes to the finished celestial design. Once the bag body is complete and the two straps are securely sewn in place, you have a handmade crochet accessory that combines traditional granny square construction with a distinctive starry-sky theme.
