

Halloween desserts are all about having fun with familiar treats, and these Gooey Eyeball Brownies are one of the easiest ways to create a dessert that looks creepy without requiring complicated decorating skills.
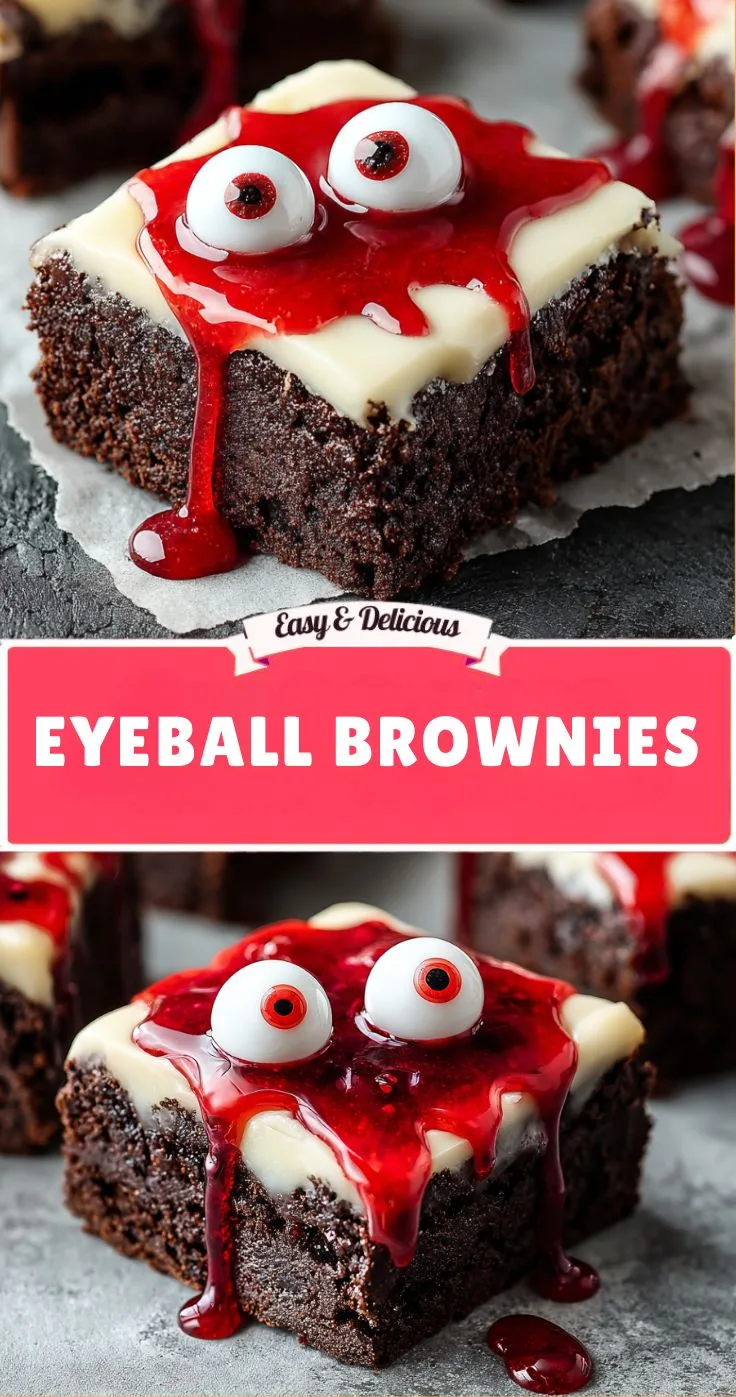
Rich, fudgy brownies are cut into individual portions and topped with smooth white chocolate, colorful candy eyeballs, and thin red decorating-gel lines that resemble bloodshot veins. The result is a spooky Halloween treat that looks like a collection of giant edible eyeballs staring back at you from the dessert table.
The recipe starts with a simple boxed brownie mix, although homemade brownie batter works just as well. After baking and cooling, each brownie gets a spoonful of melted white chocolate and a candy eyeball pressed into the center. A few quick lines of red gel complete the effect.
These brownies are perfect for Halloween parties, family movie nights, school celebrations, trick-or-treat gatherings, or any October event where you want a dessert that gets people talking.
Best of all, the decoration is simple enough that kids can help. Once the brownies are cool and the melted chocolate is safe to handle, children can place the candy eyeballs and help create the spooky designs.
Why You’ll Love These Eyeball Brownies
Easy Halloween Decoration
You do not need advanced cake-decorating skills. The candy eyeballs do most of the visual work, while the red gel adds the final creepy detail.
Rich and Fudgy
The brownie base provides a soft, chocolatey foundation that pairs beautifully with sweet white chocolate.
Perfect for Parties
The brownies can be cut into individual squares or other shapes, making them easy to arrange and serve.
Kid-Friendly
Children can help place the candy eyeballs and create the red “veins,” turning the recipe into a fun Halloween baking activity.
Easy to Customize
Use different candy-eye sizes or add green and blue decorating gels to create a collection of strange-looking Halloween eyeballs.
Recipe Details
| Detail | Information |
|---|---|
| Prep Time | 15 minutes |
| Cook Time | 30 minutes |
| Total Time | 45 minutes |
| Pan Size | 9×13-inch |
| Difficulty | Easy |
| Best For | Halloween parties, family baking, fall gatherings |
Ingredients
Brownie Mix
Use 1 box of brownie mix, or substitute your favorite homemade brownie batter.
A boxed mix makes this recipe especially convenient because the decorating is where most of the Halloween creativity happens.
If your particular brownie mix requires additional ingredients, prepare it according to the package directions.
Eggs
The recipe uses 2 large eggs with the brownie mixture.
If you are using a boxed mix, follow the preparation instructions on your specific package if they differ from the quantities listed here.
Vegetable Oil or Melted Butter
Use ½ cup vegetable oil or melted butter.
Either option works for preparing the brownie base. Melted butter can add a rich buttery flavor, while vegetable oil can contribute to a soft texture.
Water
Add ¼ cup water as specified in the recipe.
White Chocolate Chips
You will need 1 cup of white chocolate chips for the spooky topping.
Once melted, the white chocolate creates a creamy white background around each candy eyeball.
Red Decorating Gel
Red decorating gel is used to create thin lines that resemble bloodshot veins around the eyeballs.
You do not need very much. A small amount is enough to create the creepy effect.
Candy Eyeballs
Use medium or large candy eyeballs.
Larger eyeballs create a dramatic appearance, while medium ones are useful if you want smaller brownie portions.
How to Make Gooey Eyeball Brownies
Step 1: Prepare the Brownie Batter
Preheat your oven to 350°F (175°C).
Prepare your brownie batter according to the instructions on the box or use your preferred homemade brownie recipe.
If using the ingredient quantities provided here, combine the brownie mix with the required eggs, vegetable oil or melted butter, and water according to the preparation method of your chosen mix.
Mix until the batter is evenly combined.
Avoid overmixing, as excessive mixing can affect the final brownie texture.
Step 2: Prepare the Baking Pan
Grease a 9×13-inch baking pan.
You can also line the pan with parchment paper to make it easier to remove the cooled brownies later.
Pour the prepared brownie batter into the pan.
Use a spatula to spread it evenly into the corners so the brownies bake at a consistent thickness.
Step 3: Bake the Brownies
Place the pan in the preheated oven.
Bake for approximately 25–30 minutes, or until the brownies are set.
The exact baking time can vary depending on the brownie mix and your oven.
For a fudgier texture, avoid overbaking. The brownies should be set enough to cut while remaining soft and rich inside.
Once baked, remove the pan from the oven and place it on a cooling rack.
Step 4: Cool Completely
Allow the brownies to cool completely before decorating.
This step is particularly important because the white chocolate topping needs a stable brownie surface.
Warm brownies can cause the melted chocolate to spread too much and make the candy eyeballs difficult to position.
Once completely cool, cut the brownies into squares.
You can also use a round cutter if you want to create more eye-like portions.
For the easiest preparation, simple squares work perfectly.
Step 5: Melt the White Chocolate
Place 1 cup of white chocolate chips into a microwave-safe bowl.
Microwave the chocolate in 15–20 second intervals, stirring thoroughly between each interval.
Continue until the chocolate is smooth.
White chocolate can be sensitive to heat, so short intervals are preferable to one long heating cycle.
Stirring frequently helps distribute the heat and encourages the chocolate to melt evenly.
Step 6: Add the Eyeball Topping
Spoon a small dollop of melted white chocolate onto the center of each brownie.
You do not necessarily need to cover the entire brownie. The goal is to create a white area that resembles the surface of an eyeball.
While the white chocolate is still soft, immediately place a candy eyeball in the center.
Gently press it down just enough for it to settle into the chocolate.
Avoid pressing too firmly, as you want the white chocolate to remain visible around the candy.
Repeat with the remaining brownies.
Step 7: Create the Bloodshot Effect
Now add the spooky finishing touch.
Using red decorating gel, draw thin lines around the white chocolate area.
Make the lines slightly curved and irregular rather than perfectly straight. This creates a more natural bloodshot appearance.
You can start close to the eyeball and extend the lines outward.
Do not worry about making every brownie identical. Different patterns make the finished platter look more creepy and interesting.
Step 8: Let the Decorations Set
Allow the decorated brownies to sit for approximately 10 minutes before serving.
This gives the white chocolate time to firm up and helps the candy eyeballs stay securely in place.
Once set, transfer the brownies to a serving platter.
Tips for the Best Eyeball Brownies
Let the Brownies Cool Completely
Decorating warm brownies can cause the white chocolate to spread or soften too quickly.
Always allow the brownies to cool completely before adding the topping.
Melt Chocolate in Short Intervals
White chocolate can overheat easily. Microwave it in short bursts and stir frequently.
Add the Candy Eyes Immediately
The candy eyeballs should be placed while the white chocolate is still soft.
If the chocolate sets before you add them, they may not stick properly.
Keep the Veins Thin
A small amount of red decorating gel goes a long way.
Thin lines generally create a more convincing bloodshot appearance than thick streaks.
Make Every Eyeball Different
Try varying the direction and shape of the red lines.
You can also use different candy-eye sizes to create a platter of mismatched creepy eyes.
Alternative Topping: Vanilla Frosting
If you prefer a softer topping, you can replace the melted white chocolate with vanilla frosting.
Spread a small amount of frosting on each brownie, add the candy eyeball, and finish with red decorating gel.
The frosting creates a softer, creamier topping and is particularly easy to work with when baking with children.
Create a Colorful Eyeball Brownie Platter
Red decorating gel creates the classic bloodshot effect, but Halloween is a great opportunity to experiment with other colors.
Green Eyeballs
Use green decorating gel around some of the eyes for a monster-inspired appearance.
Blue Eyeballs
Blue gel can create a strange supernatural effect and adds another color to the dessert platter.
Mixed Colors
Use red, green, and blue gel on different brownies.
The result is a colorful collection of creepy eyeballs that looks especially fun on a Halloween dessert table.
Make-Ahead Instructions
These brownies are easy to prepare ahead of a Halloween event.
Bake the brownies earlier in the day or the day before. Allow them to cool completely and store them covered until you are ready to decorate.
Prepare the white chocolate and decorations closer to serving time if you want the toppings to look especially fresh.
You can also decorate the brownies ahead and keep them in an airtight container until needed.
This makes the recipe convenient when you are preparing several Halloween dishes at the same time.
How to Store Eyeball Brownies
Store the brownies in an airtight container for up to 3 days.
Keep them in a cool, dry place so the chocolate topping remains firm.
If your kitchen is particularly warm, refrigeration can help the topping stay set, although chilled brownies may have a firmer texture.
When storing decorated brownies, avoid stacking them directly on top of one another because the candy eyeballs and white chocolate decorations may be disturbed.
How to Serve Halloween Eyeball Brownies
Halloween Dessert Table
Arrange the brownies on a large platter with the candy eyeballs facing upward.
For a dramatic presentation, place different-sized brownies together and alternate red, green, and blue decorating details.
Halloween Party
Cut the brownies into smaller squares for bite-sized party treats.
Family Halloween Movie Night
Serve them alongside other spooky snacks while watching a Halloween movie.
Kids’ Halloween Baking Activity
Let children decorate the cooled brownies with candy eyeballs and different colored gels.
This turns a simple recipe into an entertaining Halloween craft.
Frequently Asked Questions
Can I use homemade brownies?
Yes. The recipe works with either a boxed brownie mix or homemade brownie batter.
Can I use frosting instead of white chocolate?
Yes. Vanilla frosting can replace the melted white chocolate if you prefer a softer topping.
What size candy eyeballs should I use?
Medium or large candy eyeballs both work. Larger eyes create a more dramatic appearance, while medium eyes work well for smaller brownies.
Can I use dark chocolate instead of white chocolate?
The white topping provides the strongest eyeball effect because it resembles the white of an eye. If you use another chocolate, the visual result will be different.
How do I keep the candy eyeball from moving?
Place it directly into the melted white chocolate while the chocolate is still soft. Allow the topping to set before moving the brownies.
Can I make these brownies ahead of time?
Yes. The brownies can be baked ahead and decorated later, or the finished brownies can be stored in an airtight container for up to 3 days.
Can children help make this recipe?
Absolutely. Children can help place the candy eyeballs and decorate the brownies once the brownies and melted chocolate have cooled to a safe handling temperature.
Nutrition Information
The estimated nutrition per brownie is:
| Serving Size | Calories | Protein | Carbs | Fat | Fiber | Sugar |
|---|---|---|---|---|---|---|
| 1 brownie | 310 | 4g | 42g | 15g | 2g | 28g |
Nutrition disclaimer: Nutrition information is estimated and may vary depending on the brownie mix, chocolate, candy eyeballs, decorating gel, and other ingredients used. Portion size and preparation methods can also affect the final values. For precise dietary information, calculate nutrition using the exact products and quantities.
Why These Eyeball Brownies Are Perfect for Halloween
A good Halloween dessert does not have to be complicated. These brownies demonstrate how a few simple decorations can completely transform a familiar chocolate dessert.
The dark brownie base provides the perfect contrast for the bright white chocolate topping. The candy eyeball immediately creates the focal point, while the red gel adds the creepy bloodshot effect.
They are also highly customizable. You can make every brownie look slightly different, use different sizes of candy eyes, or experiment with colorful decorating gels.
The recipe is particularly useful for parties because the decorations can be prepared quickly. Once the brownies are cooled, each piece takes only a small amount of chocolate, one candy eyeball, and a few lines of gel.
A Fun Halloween Decorating Activity
If you are baking with children, consider turning the decorating stage into a creative activity.
Prepare the brownies and white chocolate yourself, then give each child a few cooled brownie pieces.
Provide bowls of candy eyeballs and different decorating gels.
They can decide whether their eyeballs should look surprised, angry, silly, or extra creepy.
Because the design does not need to be perfect, children can enjoy the process without worrying about making professional-looking decorations.
The finished brownies can then become part of the Halloween dessert table.
Final Thoughts
These Gooey Eyeball Brownies are an easy way to turn classic chocolate brownies into a creepy Halloween treat.
The combination of rich brownies, creamy white chocolate, candy eyeballs, and red decorating gel creates an eye-catching dessert with very little decorating effort.
They are ideal for Halloween parties, family baking nights, school gatherings, or simply a fun October dessert.
Whether you choose classic red bloodshot veins or experiment with green and blue decorating gels, these brownies are guaranteed to bring some spooky personality to your dessert table.
Bake the brownies, add the eyeballs, draw a few creepy veins, and let these spooky treats stare back at everyone who reaches for one.