

Frankenstein Brownies
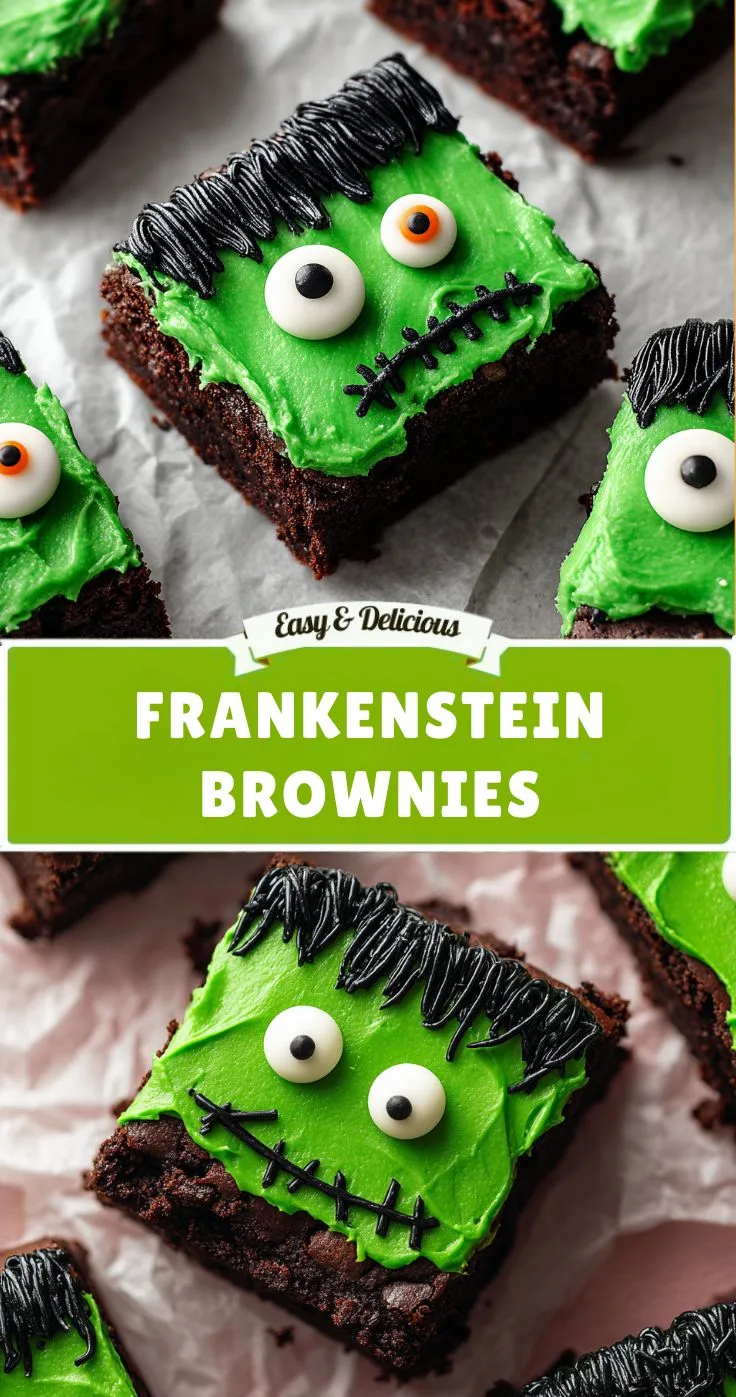
Halloween desserts are always more memorable when they have a little personality, and these Frankenstein Brownies are a perfect example. Rich, fudgy chocolate brownies are transformed into adorable little Frankenstein faces with bright green candy coating, candy eyes, chocolate hair, stitched scars, and tiny pretzel bolts.
They look like elaborate Halloween treats, but the decorating process is surprisingly simple. You do not need advanced cake-decorating skills or complicated equipment. Once the brownies are baked and cooled, the main job is simply dipping, decorating, and letting the coating set.
The combination of a rich chocolate brownie with a sweet green candy coating makes these treats both delicious and visually striking. The contrast between the dark chocolate and bright green topping immediately creates the classic Frankenstein-inspired look.
These brownies are ideal for Halloween parties, bake sales, school celebrations, family gatherings, or a cozy movie night at home. They are also easy enough to make ahead, which can be especially helpful when you are preparing several Halloween dishes at once.
Why You’ll Love These Frankenstein Brownies
They are easy to decorate
The green coating does most of the visual work. Once the brownies are dipped, a few simple lines and decorations turn them into recognizable Frankenstein faces.
Perfect for Halloween
The bright green color, dark hair, scars, and bolts make these brownies instantly recognizable as a Halloween treat.
Rich and chocolatey
The base is a classic brownie, so you get the familiar fudgy chocolate flavor underneath all the festive decorations.
Great for parties
Each brownie becomes an individual Frankenstein character, making them easy to arrange on a dessert table.
Fun for kids
Children can help add the candy eyes and watch the simple decorations transform each brownie into a little monster.
Recipe Details
| Detail | Information |
|---|---|
| Prep Time | 15 minutes |
| Cook Time | 25 minutes |
| Total Time | 40 minutes |
| Servings | 12 brownies |
| Difficulty | Easy |
| Method | Baking and decorating |
| Best For | Halloween parties, bake sales, movie nights |
Ingredients
1 Box Brownie Mix
Use your favorite brownie mix and prepare it according to the package directions.
You can also use homemade brownies if you prefer to bake from scratch.
Because the brownies will be cut into rectangles, choose a pan size that produces brownies with enough surface area for the Frankenstein decorations.
1 Cup Green Candy Melts
Green candy melts create the Frankenstein’s signature green face.
They are convenient because they melt smoothly and provide a bright, even coating.
If you do not have green candy melts, you can use white chocolate combined with green food coloring.
12 Large Brownies
Cut the baked brownies into approximately 12 rectangular pieces.
Rectangular shapes work particularly well because they naturally resemble little faces.
24 Candy Eyes
Each Frankenstein needs two eyes.
Bright candy eyeballs stand out against the green coating and make the brownies look playful rather than frightening.
12 Mini Pretzel Sticks
The pretzel pieces become Frankenstein’s famous bolts.
Break each stick in half so that you have small pieces to insert into the sides of the brownies.
½ Cup Melted Chocolate or Black Decorating Gel
Use melted chocolate or black decorating gel to draw the hair, scars, mouth, and other facial details.
Chocolate gives the brownies a rich appearance, while decorating gel can make the details easier to draw.
How to Make Frankenstein Brownies
Step 1: Bake the Brownies
Prepare the brownie batter according to the instructions on your brownie mix or your favorite homemade brownie recipe.
Bake according to the recipe instructions.
The source recipe uses approximately 25 minutes of cooking time, but the exact baking time can vary depending on your brownie mix, pan size, and oven.
Once baked, remove the brownies from the oven.
Allow them to cool completely before cutting.
This is important because warm brownies are softer and more difficult to dip and decorate.
Step 2: Cut the Brownies
Once the brownies have completely cooled, carefully cut them into approximately 12 even rectangles.
A sharp knife will help create cleaner edges.
If you want especially neat brownies, wipe the knife clean between cuts.
Do not worry if the brownies are not perfectly identical. Once they are decorated, the individual Frankenstein faces will become the main focus.
Place the brownie rectangles on a parchment-lined surface while you prepare the green coating.
Step 3: Melt the Green Candy Coating
Place the green candy melts into a microwave-safe bowl.
Microwave according to the package instructions, stirring every 30 seconds until the coating is smooth.
Be careful not to overheat the candy melts.
Stirring frequently helps distribute the heat and prevents the coating from becoming unnecessarily thick.
Once smooth, the green candy coating should be fluid enough to dip the brownie tops.
If using white chocolate and green food coloring instead, melt the white chocolate carefully and then add the coloring according to the product instructions.
Step 4: Dip the Brownies
Take one cooled brownie rectangle and carefully dip the top into the melted green candy coating.
You only need to coat the upper surface where the Frankenstein face will be decorated.
Allow any excess coating to drip back into the bowl.
Place the coated brownie on parchment paper.
Repeat with the remaining brownies.
Try to keep the green layer relatively even, but do not worry if some pieces have slightly different amounts of coating.
Once the candy coating begins to set, it will provide a smooth surface for decorating.
Step 5: Add the Frankenstein Eyes
While the green coating is still soft, gently press two candy eyes onto each brownie.
Position them near the upper portion of the brownie.
Try to keep enough room underneath for the mouth and scar.
The eyes do not need to be perfectly aligned. Slightly different expressions can make the Frankenstein brownies look even more fun.
Step 6: Create the Hair
Melt the chocolate or prepare your black decorating gel.
Use it to draw a jagged hairline across the top of each Frankenstein face.
Frankenstein’s hair is typically dark and uneven, so a simple zigzag pattern works perfectly.
You do not need to cover the entire top of the brownie. A dark jagged line is enough to suggest the character’s hairstyle.
Step 7: Add the Scar and Smile
Use the melted chocolate or black decorating gel to draw a stitched scar across the face.
A simple horizontal line with small perpendicular marks can create the classic Frankenstein scar effect.
Then add a small smile beneath the eyes.
The facial expression is completely customizable.
You can make the Frankensteins look happy, serious, surprised, or slightly silly.
Step 8: Attach the Bolts
Break the mini pretzel sticks in half.
Carefully insert one piece into each side of the brownie.
These become Frankenstein’s signature neck bolts.
Do this while the green coating is still soft enough to help hold the pretzel pieces in place.
Avoid pushing the pretzels too far into the brownie because they only need to be partially inserted.
Step 9: Let the Brownies Set
Allow the decorated brownies to sit for approximately 10 minutes, or until the green candy coating and chocolate decorations have firmed.
Once everything is set, the Frankenstein brownies are ready to serve.
Tips for Perfect Frankenstein Brownies
Cool the brownies completely
This is one of the most important steps.
Warm brownies can be difficult to dip and may cause the green coating to soften.
Keep the green coating smooth
Stir the candy melts regularly while melting.
If the coating becomes too thick, work with it promptly and avoid overheating it.
Decorate while the coating is soft
The candy eyes and pretzel bolts need to be attached before the green coating becomes completely firm.
Have all of your decorations ready before you begin dipping.
Use parchment paper
Parchment makes cleanup easier and prevents the coated brownies from sticking to the work surface.
Make the faces different
There is no need for every Frankenstein to look identical.
Different eye positions, smiles, scars, and hairlines can give each brownie its own personality.
Easy Decoration Variations
The classic green Frankenstein design is easy to customize.
Black Licorice Bolts
Instead of pretzel pieces, use small black licorice pieces for the bolts.
This creates a darker Halloween appearance.
Different Expressions
Give some Frankensteins big smiles and others serious expressions.
You can also place the eyes at slightly different angles.
Extra Halloween Details
Add small sprinkles or other edible decorations to the green coating before it sets.
Keep the additions relatively simple so the face remains recognizable.
Make-Ahead Instructions
These Frankenstein brownies are easy to prepare ahead of time.
You can bake and cut the brownies one day before your Halloween event.
Store the plain brownies in an airtight container.
The following day, prepare the green coating and decorate them.
This makes the recipe especially useful when you are preparing a large Halloween meal and want to divide the work across different days.
How to Store Frankenstein Brownies
Store the finished brownies in an airtight container at room temperature for up to 3 days.
Keep them in a cool, dry location away from direct heat or sunlight.
If your kitchen is particularly warm, refrigeration can help keep the candy coating firm.
When storing multiple layers, place parchment paper between them to help protect the decorations.
How to Serve
Arrange the Frankenstein brownies on a Halloween-themed platter.
You can place them in rows so that all of the faces are visible.
For a more playful presentation, slightly rotate some brownies so the Frankensteins appear to be looking in different directions.
These brownies pair nicely with other Halloween desserts such as mummy brownies, spider cookies, ghost treats, and Halloween cupcakes.
They also make a fun addition to bake sales because their bright green faces immediately catch attention.
A Fun Halloween Activity for Kids
The decorating process makes these brownies an excellent family activity.
Adults can handle the baking and melting of the candy coating, while children can help with the eyes, scars, hair, and bolts.
Give everyone a brownie and let them create their own Frankenstein.
You can even have a friendly competition to see who can make the funniest or silliest monster.
The designs do not need to be perfect.
The charm of these brownies comes from their handmade appearance.
Frequently Asked Questions
Can I use homemade brownies?
Yes. Homemade brownies work perfectly. Simply make sure they are fully cooled before cutting and decorating.
Can I use white chocolate instead of green candy melts?
Yes. Melt white chocolate and add green food coloring to achieve the Frankenstein color.
Why is my candy coating too thick?
Candy melts can become thick if they are overheated or if they cool too much while you are working.
Stir thoroughly and follow the melting instructions on the package.
Can I use black licorice instead of pretzels?
Yes. The original recipe suggests black licorice pieces as an alternative for the bolts.
How long do the brownies need to set?
Approximately 10 minutes should be enough for the decorations to firm, although the exact time depends on room temperature and the thickness of the coating.
Can I make these a day ahead?
Yes. You can bake and cut the brownies a day ahead and decorate them the next day.
How long do they stay fresh?
Store them in an airtight container at room temperature for up to 3 days.
Can I freeze them?
The brownie base can generally be frozen, but the finished candy coating and decorations may not retain the same appearance after freezing and thawing. For the best presentation, decorate closer to serving time.
Nutrition Information
The estimated nutrition per one Frankenstein brownie is:
| Serving Size | Calories | Protein | Carbs | Fat | Fiber | Sugar |
|---|---|---|---|---|---|---|
| 1 brownie | 310 | 4g | 42g | 15g | 2g | 29g |
These nutrition values are estimates and may vary depending on the brownie mix or homemade recipe, candy melts, chocolate, candy eyes, and other decorations used.
For specific dietary or medical concerns, check the nutrition labels of your ingredients and consult a qualified nutrition professional.
Why These Frankenstein Brownies Are Perfect for Halloween
Frankenstein is one of the most recognizable Halloween characters, and turning him into a brownie makes an already familiar dessert instantly festive.
The bright green face provides a dramatic contrast against the dark chocolate brownie. The candy eyes make the treats playful, while the jagged hair, scar, smile, and bolts complete the character.
Another advantage is that the design is very forgiving.
You do not need perfectly straight lines or professional decorating skills. A slightly crooked scar or uneven hairline can actually make the Frankenstein look more handmade and fun.
That makes this recipe ideal for families, beginner bakers, and anyone who wants a Halloween dessert that looks impressive without requiring complicated techniques.
Perfect for Halloween Parties and Bake Sales
These brownies are particularly useful for events where presentation matters.
Arrange 12 Frankenstein faces together on a large platter and they immediately become a Halloween centerpiece.
For bake sales, individually wrap the brownies once the coating has completely set.
For parties, arrange them alongside other Halloween desserts for a colorful dessert table.
Their individual size also makes them easy for guests to grab and enjoy without needing plates or utensils.
Final Thoughts
These Frankenstein Brownies are a simple and creative way to transform ordinary brownies into a Halloween dessert everyone will recognize.
With fudgy chocolate brownies, bright green candy coating, candy eyes, dark chocolate details, and little pretzel bolts, each brownie becomes its own adorable Frankenstein character.
The recipe takes approximately 40 minutes from start to finish, and the decorating process is simple enough for beginners and fun enough for the whole family.
Whether you are preparing a Halloween party, bake sale, family gathering, or spooky movie night, these brownies are sure to make your dessert table more memorable.
Fudgy, chocolatey, bright green, and wonderfully spooky, these Frankenstein Brownies are a Halloween treat that is just as fun to make as it is to eat.