
Ghostly Banana Pops
Halloween treats do not always have to be loaded with candy to be fun. These Ghostly Banana Pops are a simple, colorful, and playful way to bring a little spooky spirit to snack time while still using fruit as the main ingredient.
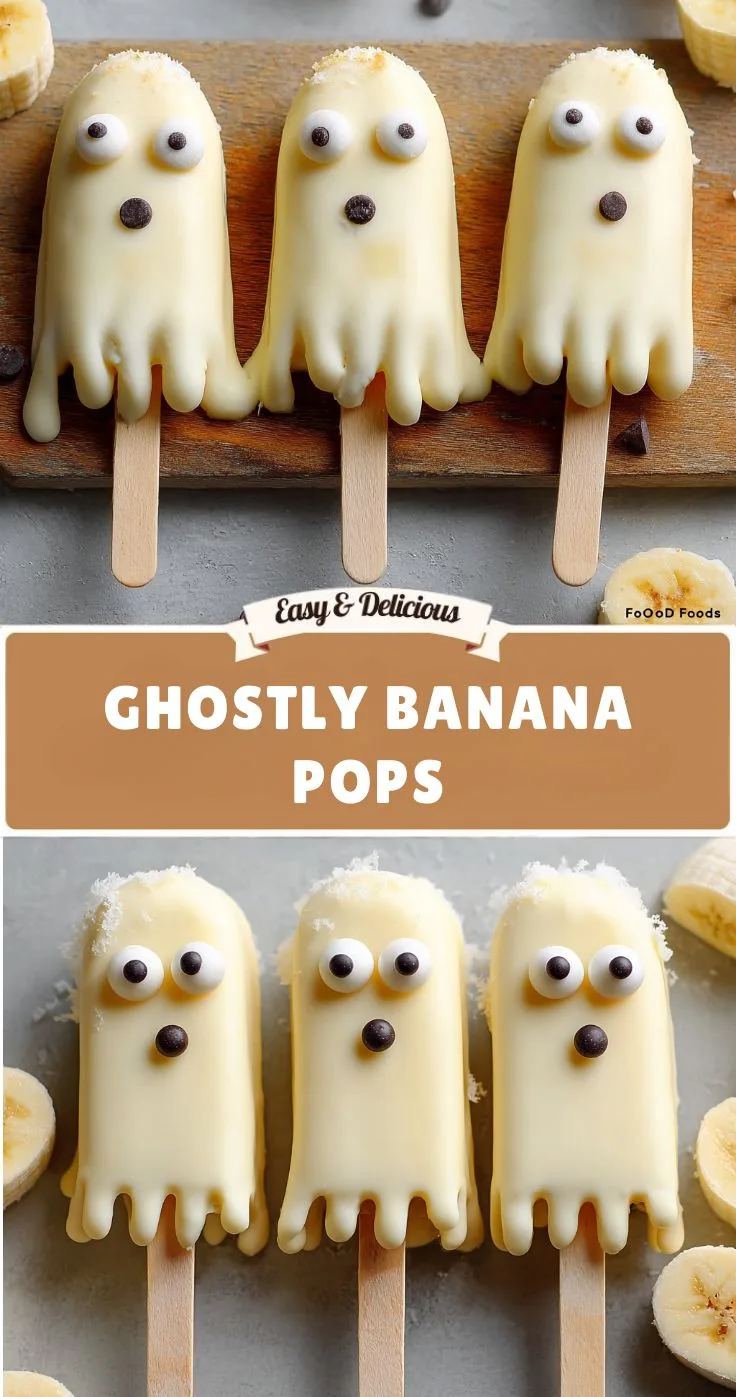
Made with ripe bananas, creamy white chocolate, and simple chocolate-chip faces, these frozen banana pops look like tiny friendly ghosts. They are easy enough for children to help decorate and festive enough to deserve a place on a Halloween dessert table.
The banana halves are placed on popsicle sticks, briefly frozen, dipped in melted white chocolate, and decorated with little eyes and mouths. After another short freezing period, the chocolate becomes firm while the banana develops a cool, ice-cream-like texture.
With only a few basic ingredients and about 15 minutes of hands-on preparation, these treats are an excellent option for Halloween parties, classroom celebrations, family movie nights, or an afternoon snack.
They can also be prepared ahead of time and kept in the freezer, making them especially convenient when you are getting ready for a busy Halloween gathering.
Why You’ll Love These Ghostly Banana Pops
They are easy to make
There is no complicated baking involved. Once the bananas are prepared, the main steps are simply melting, dipping, decorating, and freezing.
Kids can decorate them
The ghost faces are simple enough for children to create themselves. Give them the chocolate chips and let them decide whether their ghosts should look happy, surprised, silly, or spooky.
They are made with fruit
Bananas provide natural sweetness, fiber, and potassium, making these a fruit-based alternative to many traditional Halloween sweets.
The white chocolate coating does add sugar and fat, so these are still a dessert-style treat, but the banana remains the main ingredient.
They are budget-friendly
You only need a few inexpensive ingredients to make six ghost pops.
They look adorable
The white coating and chocolate faces create an instantly recognizable ghost shape. They can be served as individual treats or incorporated into a larger Halloween dessert display.
Recipe Details
| Detail | Information |
|---|---|
| Prep Time | 15 minutes |
| Initial Chill Time | 30 minutes |
| Final Chill Time | 30–45 minutes |
| Total Time | About 1 hour 15 minutes |
| Servings | 6 pops |
| Difficulty | Easy |
| Method | Frozen / No-Bake |
| Best For | Halloween parties, kids’ snacks, family treats |
Ingredients
3 Large Ripe Bananas
Choose bananas that are ripe but still firm enough to handle.
Very soft or heavily overripe bananas can be difficult to place on sticks and may break apart when dipped.
Each banana is cut in half crosswise, giving you six banana pops.
1½ Cups White Chocolate Chips
White chocolate provides the ghostly coating.
You can also use white candy melts, which are convenient for dipping and tend to create a smooth coating.
2 Teaspoons Coconut Oil
Coconut oil is optional.
Adding a small amount can help make the melted white chocolate smoother and easier to work with.
Mini Chocolate Chips
These become the ghost’s eyes.
Two small chocolate chips are enough to create the classic ghost face on each pop.
Regular Chocolate Chips or Mini M&M’s
Use these for the ghostly mouths.
A regular chocolate chip can create a simple mouth, while a small candy can provide a more colorful or playful expression.
6 Popsicle or Lollipop Sticks
The sticks make the banana halves easy to hold and turn them into individual frozen pops.
Wax Paper or Parchment Paper
Use parchment or wax paper to line the tray.
This helps prevent the chocolate-coated bananas from sticking to the surface while they freeze.
How to Make Ghostly Banana Pops
Step 1: Prepare the Bananas
Begin by peeling the bananas.
Place each banana on a cutting board and slice it in half crosswise.
You should now have six banana pieces.
Carefully insert one popsicle or lollipop stick into the cut end of each banana half.
Push the stick in far enough to make it secure, but avoid pushing it completely through the banana.
Line a baking sheet or tray with parchment paper and place the banana pops on it.
Transfer the tray to the freezer for approximately 30 minutes.
This initial freezing step is important because it helps the chocolate coating adhere to the bananas more effectively.
It also gives the finished pops a cool, firm texture that resembles a frozen dessert.
Step 2: Melt the White Chocolate
Place the white chocolate chips in a microwave-safe bowl.
If you are using coconut oil, add the 2 teaspoons to the bowl.
Microwave in 20-second intervals, stirring thoroughly after each interval.
Continue until the chocolate is smooth and completely melted.
White chocolate can be sensitive to overheating, so avoid heating it continuously.
If you prefer more control, you can melt the chocolate using a double boiler.
The finished chocolate should be smooth enough to coat the bananas easily.
If it appears too thick, a small amount of additional melted coating can help make dipping easier, but avoid adding too much liquid.
Step 3: Dip the Frozen Bananas
Remove the partially frozen banana pops from the freezer.
Take one banana at a time and dip it into the melted white chocolate.
Depending on the shape and depth of your bowl, you may need to use a spoon to pour or spread chocolate over areas that are difficult to submerge.
Try to coat the banana generously so the fruit underneath is mostly covered.
Allow excess chocolate to drip back into the bowl before placing the banana back on the parchment-lined tray.
Work relatively quickly during this step.
Because the bananas are cold, the chocolate can begin to firm up almost immediately.
That is useful for creating the coating, but you want enough time to add the ghost face before it becomes completely hard.
Step 4: Create the Ghost Faces
While the white chocolate is still soft, add the eyes.
Gently press two mini chocolate chips into the coating to create the ghost’s eyes.
Next, use a regular chocolate chip or a mini M&M to create the mouth.
You can place the mouth vertically or horizontally depending on the expression you want.
For a classic ghost appearance, an “O” shape creates the impression that the ghost is surprised or saying “Boo!”
There is no need to make every face identical.
In fact, creating different expressions makes the finished tray much more playful.
Step 5: Freeze Until Set
Once all the banana pops have been dipped and decorated, return the tray to the freezer.
Freeze for approximately 30–45 minutes, or until the chocolate coating has completely set.
The exact time can vary depending on the temperature of your freezer and the thickness of the chocolate coating.
Once firm, the Ghostly Banana Pops are ready to serve.
Tips for Perfect Ghostly Banana Pops
Use firm ripe bananas
Ripe bananas provide sweetness, but extremely soft bananas can be difficult to handle.
Look for bananas that are ripe enough to taste sweet while still holding their shape.
Freeze before dipping
Do not skip the initial freezing period.
Cold banana helps the white chocolate coating set quickly and makes the dipping process easier.
Melt white chocolate carefully
White chocolate can scorch more easily than some other types of chocolate.
Use short microwave intervals and stir thoroughly after every interval.
Work quickly when decorating
Because the banana is frozen, the coating can become firm quickly.
Have your chocolate chips and other decorations ready before you start dipping.
That way, you can add the eyes and mouths while the coating is still soft.
Do not overload the faces
Two small chocolate chips and one mouth are enough.
Keeping the decorations simple makes the ghost shapes easy to recognize and prevents the pops from becoming overly heavy.
Creative Ghost Face Ideas
The simple face in the original recipe is just the beginning.
You can create different personalities using the same ingredients.
Happy Ghosts
Place the eyes slightly higher and use a small curved chocolate decoration for a smiling expression.
Surprised Ghosts
Use two chocolate-chip eyes and a round candy for a large “O” mouth.
Sleepy Ghosts
Use smaller chocolate pieces or slightly tilted eyes to give the impression that the ghost is sleepy.
Spooky Ghosts
Place the eyes at slightly different angles and use a larger mouth for a more dramatic expression.
The best part is that imperfect faces can make the pops even more charming.
Optional Decorations
If you want to make the pops even more festive, there are several easy additions.
You can sprinkle a small amount of edible decoration over the still-soft white chocolate.
Edible glitter can add sparkle, while Halloween sprinkles can introduce orange, black, or purple accents.
For a more dramatic appearance, a small amount of red gel icing can create spooky expressions.
Just remember that the white chocolate coating itself is enough to make the bananas look like ghosts, so additional decoration is completely optional.
Make-Ahead Instructions
These Ghostly Banana Pops are excellent for preparing ahead of time.
Once completely frozen, store them in the freezer until you are ready to serve.
The original recipe recommends keeping them frozen for up to one week.
For best quality, place them in a freezer-safe airtight container or wrap them carefully to help protect them from freezer odors and ice buildup.
If storing multiple pops together, parchment paper can be placed between layers if needed.
How to Serve Ghostly Banana Pops
These pops can be served directly from the freezer as a chilled Halloween dessert.
For a party, arrange them upright in a decorative jar or container.
The original idea of filling the bottom of a serving jar with candy corn creates a festive display, although you can also use Halloween-themed paper, decorative filler, or another food-safe serving arrangement.
If you prefer a simpler presentation, place the frozen pops on a parchment-lined platter.
Arrange the ghost faces so they are all visible.
For a children’s Halloween gathering, you can place several pops in a row and give each ghost a different expression.
A Fun Halloween Party Activity
Ghostly Banana Pops are more than just a snack—they can also become part of the party activity.
Prepare and freeze the banana pieces before guests arrive.
Then set out the melted chocolate and decorations and let children help create the faces.
Because the decoration only requires placing chocolate chips onto the coating, it is easy for children to participate.
You can even challenge everyone to create the funniest ghost face.
For younger children, adults should handle the melted chocolate and freezer while the children focus on decorating.
Serving Ideas for a Halloween Dessert Table
These banana pops can be paired with other Halloween-themed foods to create a balanced dessert table.
Serve them alongside chocolate brownies, Halloween cupcakes, cookies, or other seasonal treats.
Because the pops are white and visually simple, they also provide a nice contrast against darker chocolate desserts.
For a Halloween movie night, place them in a chilled container and serve them alongside other finger foods.
Their individual stick format makes them especially convenient because guests do not need plates or forks.
Frequently Asked Questions
Can I use white candy melts instead of white chocolate?
Yes. White candy melts are a convenient alternative and can produce a smooth, bright coating.
Do I have to use coconut oil?
No. Coconut oil is optional. It can help create a smoother melted coating, but the white chocolate can be melted without it.
How long should I freeze the bananas before dipping?
About 30 minutes is recommended for the initial freezing period. The goal is to make the bananas cold and firm enough for the coating to set quickly.
How long do the finished pops need to freeze?
After dipping and decorating, freeze the pops for approximately 30–45 minutes, or until the chocolate has fully hardened.
Can I make these the day before Halloween?
Yes. These are particularly convenient make-ahead treats. Keep the finished pops frozen until you are ready to serve them.
How long can they stay in the freezer?
The original recipe recommends up to one week when properly stored.
Can I use dark chocolate instead?
You can, although the classic ghost appearance comes from the white coating. Dark chocolate would create a completely different visual effect.
What can I use instead of chocolate chips for the eyes?
You can use other small edible decorations that contrast with the white coating. Mini chocolate pieces are particularly convenient because they are easy to place and provide a strong contrast.
Nutrition Information
The estimated nutrition per one Ghostly Banana Pop is:
| Serving Size | Calories | Protein | Carbs | Fat | Fiber | Sugar |
|---|---|---|---|---|---|---|
| 1 pop | 180 | 2g | 29g | 7g | 3g | 21g |
These nutrition values are estimates and can vary depending on the exact brands and quantities of bananas, white chocolate, candy melts, chocolate chips, and other decorations used.
For specific dietary or medical concerns, check the labels of the products you use and consult a qualified nutrition professional.
Why These Banana Pops Make a Great Halloween Treat
Halloween food is often associated with candy, cookies, and rich desserts. While there is nothing wrong with enjoying those foods as part of a celebration, it can also be fun to include a fruit-based option.
These Ghostly Banana Pops offer exactly that.
Bananas naturally provide sweetness along with fiber and potassium, while the white chocolate coating gives them the festive dessert quality expected from a Halloween treat.
The frozen texture also makes them feel different from ordinary fruit snacks.
Perhaps most importantly, they look fun.
A plain banana becomes an adorable ghost simply by adding a white coating and two chocolate eyes.
That makes this recipe a great reminder that Halloween food does not need to be complicated to be memorable.
Budget-Friendly Halloween Fun
Another advantage of these banana pops is that they do not require a long ingredient list.
The basic recipe uses bananas, white chocolate, chocolate chips, sticks, and parchment paper.
That makes it easy to prepare a larger batch if you are hosting a Halloween gathering.
You can also adjust the decorations according to what you already have in your pantry.
There is no need to buy specialized Halloween molds or expensive decorating equipment.
Final Thoughts
These Ghostly Banana Pops are a simple, spooky, and playful Halloween treat that both kids and adults can enjoy.
With frozen bananas, smooth white chocolate, and simple chocolate-chip faces, you can turn everyday fruit into adorable little ghosts with very little effort.
They require only about 15 minutes of active preparation, followed by freezing time, making them especially convenient for busy Halloween celebrations.
They are also easy to prepare ahead, simple enough for children to decorate, and eye-catching enough to become part of your Halloween table display.
Whether you are preparing treats for a classroom party, Halloween dinner, family movie night, or a larger spooky celebration, these banana pops are a fun addition.
A little white chocolate, a couple of chocolate-chip eyes, and a few bananas are all it takes to create a whole army of delicious little ghosts.