
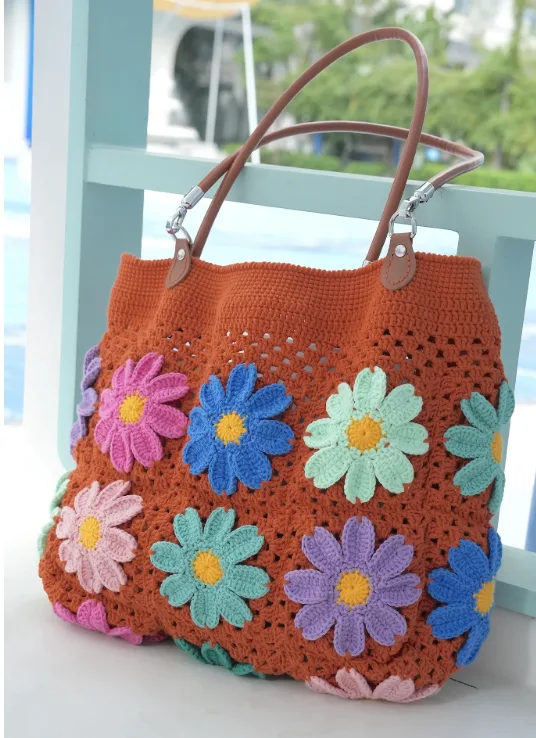

If you love crochet bags with a cheerful handmade look, this Large Daisy Granny Square Bag is a wonderful project to add to your collection. The design combines colorful daisy granny squares with a terracotta mesh-style background, creating a floral tote that feels both playful and practical. Pink, sky blue, mint green, and lavender flowers stand out against the warm terracotta base, while yellow centers and mint green leaf details give the bag its garden-inspired character.
This tutorial walks through the project from the first daisy center all the way to joining the squares, shaping the bag, finishing the opening, and attaching the leather D buckles and shoulder straps. The finished bag is approximately 15 inches (38 cm) wide and 13 inches (33 cm) high, with each daisy granny square measuring approximately 4 inches (10 cm).
The pattern uses US crochet terminology and combines a 2.3mm hook for the daisy granny squares with a 3.0mm hook for joining and finishing the bag. The source materials list a 3.0mm hook, while the yarn guide specifies the smaller 2.3mm hook specifically for the daisy squares. Keeping these details in mind is important because the two hook sizes are part of the original construction method.
What Makes This Daisy Granny Square Bag Special?
The beauty of this tote comes from the way individual floral motifs become part of one larger bag structure. Instead of making a traditional collection of plain granny squares, each square begins with a daisy flower. The colorful centers and petals create small garden-like motifs, while the later granny-square rounds connect those flowers into a larger geometric fabric.
The project requires 19 daisy squares arranged in a T-shape formation. The layout is particularly important because the squares are not simply joined in a basic rectangular grid. The green lines in the original layout indicate the fold lines that help create the final bag shape.

The warm terracotta background helps the flower colors stand out. The suggested flower palette includes soft pink, sky blue, mint green, and lavender, with yellow flower centers and mint green leaves. Brown leather handles provide a contrasting finishing detail.
Finished Size and Project Details
- Finished bag width: approximately 15 inches (38 cm)
- Finished bag height: approximately 13 inches (33 cm)
- Daisy granny square size: approximately 4 inches (10 cm)
- Number of daisy squares: 19
- Primary background color: terracotta
- Suggested flower colors: pink, blue, mint green, and lavender
- Flower center: yellow
- Leaf color: mint green
- Yarn: Loopara 4 ply milk cotton yarn / Loopara 4ply combed cotton
- Daisy square hook: 2.3mm
- Joining and finishing hook: 3.0mm
The color palette can be changed to suit your personal style. The original design suggests pastel colors, bright colors, or even a monochromatic approach as alternatives, while maintaining the cheerful garden-inspired character of the bag.
Materials You Will Need
Gather the materials before beginning so that the crocheting and assembly stages can move smoothly from one step to the next.
- Loopara 4ply combed cotton yarn
- 3.0mm crochet hook
- 2.3mm crochet hook for the daisy granny squares
- Scissors
- Yarn needle
- Leather D buckles
- Leather shoulder straps

US Crochet Abbreviations
This pattern uses US crochet terms. Keep the following abbreviations nearby while working through the rounds.
- ch: chain
- sc: single crochet
- dc: double crochet
- hdc: half double crochet
- sl: slip stitch
- bpsc: back post single crochet
- inc: increase
- st: stitch
Before You Start: Tension and Color Planning
The original pattern emphasizes consistent tension because the bag needs both attractive floral motifs and a stable finished shape. If your tension is tight, you may want to size up slightly, while loose crocheters may prefer to go down a size. The important point is to keep your tension consistent throughout the project.
Before making all 19 squares, take a moment to become comfortable with the daisy construction. The first rounds create the flower itself, while later rounds transform the flower into a granny square. Counting carefully is especially useful during the center and petal stages.
If you decide to use a different color palette, the original tutorial notes that the crocheting and assembly sections may show different yarn colors. This does not change the construction instructions. You can select colors that fit your preferred look while following the same stitch sequence.
How to Crochet the Daisy Granny Square
Each square develops through nine rounds. The first three rounds establish the flower, and Round 4 begins the granny-square structure. Rounds 5 through 9 gradually expand the motif into the square used for the bag.
Round 1 – Create the Flower Center


Start with a magic ring. Chain 3, which counts as the first double crochet, and work 16 double crochet stitches into the ring. Join with a slip stitch. Fasten off and weave in the ends.
A tight magic ring is particularly important here. The original pattern recommends making sure the center is secure before moving into the petal round. A firm center helps keep the flower shape even.
Round 2 – Build the Daisy Petals

Join yarn with a chain stitch. Work the following sequence eight times around: 2 single crochet, chain 7, then work 6 single crochet in the second chain from the hook. Join with a slip stitch to the beginning stitch.
This round establishes the long petal loops that will become the recognizable daisy shape. Keep your tension consistent as you form each chain section so that the petals remain similar in size.
Round 3 – Shape the Petals

Join with slip stitch and chain 1. Work the following sequence eight times around: single crochet, single crochet, half double crochet, 2 double crochet, double crochet increase, 3 double crochet in one stitch, 3 double crochet in one stitch, double crochet increase, 2 double crochet, half double crochet, single crochet.
Join with a slip stitch. Fasten off and weave in the ends.
At this point, the daisy should have a clearly defined floral appearance. The stitch sequence creates the curves and fullness of each petal, so counting and maintaining the sequence is important.
Round 4 – Begin the Granny Square


Working in the back of the single crochet from Round 3, work back post single crochet, chain 5, repeating this sequence eight times around. Join with a slip stitch.
This is an important transition point. The flower is no longer being treated simply as a round floral motif; it is now becoming the center of the square.
Round 5 – Establish the Granny-Square Corners

Slip stitch. Work chain 3, 2 double crochet, chain, then 3 double crochet in one stitch, chain. Next work the following sequence three times: 3 double crochet, chain 2, 3 double crochet, chain, followed by 3 double crochet in one stitch, chain. Finish with 3 double crochet and join with half double crochet.
As the square begins to emerge, pay close attention to the corner spaces. The chain-2 sections are part of the square construction and should be kept clear and easy to identify for later rounds.
Round 6 – Continue the Square Expansion

Work chain 3, 2 double crochet, chain, then 3 double crochet in one stitch, chain, twice. Work the following sequence three times: 3 double crochet, chain 2, 3 double crochet, chain, followed by 3 double crochet in one stitch, chain, twice. Finish with 3 double crochet and join with half double crochet.
Round 7 – Join the Petal Sections


Work chain 3, double crochet joining petal, double crochet, chain, followed by 3 double crochet in one stitch and chain, three times.
Then work the following sequence three times: double crochet, double crochet joining petal, double crochet, chain 2, double crochet, double crochet joining petal, double crochet, chain, followed by 3 double crochet in one stitch, chain, three times.
Finish with double crochet, double crochet joining petal, double crochet, and join with half double crochet.
Round 8 – Continue Building the Outer Structure


Work chain 3, 2 double crochet, chain, then 3 double crochet in one stitch, chain, 3 double crochet in one stitch, double crochet joining petal, followed by 3 double crochet in one stitch, chain, twice.
Repeat the following sequence three times: 3 double crochet, chain 2, 3 double crochet, chain, 3 double crochet in one stitch, chain, 3 double crochet in one stitch, double crochet joining petal, followed by 3 double crochet in one stitch, chain, twice.
Finish with 3 double crochet and join with half double crochet.
Round 9 – Complete the Granny Square

Chain 3, double crochet, then work 23 double crochet. Work the following sequence three times: 2 double crochet, chain 3, 2 double crochet, followed by 23 double crochet. Finish with 2 double crochet and chain 3. Join with a slip stitch. Fasten off and weave in the ends.
Before moving on to the assembly stage, check your finished square. The original pattern recommends making sure the magic ring is tight, maintaining consistent tension, and counting stitches carefully. These simple checks are especially useful because 19 squares will eventually need to fit together in one layout.
Make All 19 Daisy Squares
Repeat the nine-round square instructions until you have 19 completed daisy granny squares. The flowers can be made in the suggested pink, blue, mint green, and lavender palette, with yellow centers and mint green leaves, while the terracotta background provides the main connecting color.
It is helpful to keep the completed squares organized according to the layout before beginning to seam them. The original design uses a T-shaped formation. Use the layout image as your reference rather than arranging the squares randomly.
How to Seam the Bag
The assembly stage transforms the individual squares into the body of the tote. The original method uses single crochet with 3 chain stitches, although other joining methods can also be explored. For this pattern, follow the illustrated seaming order carefully.
Seaming Step 1 – Arrange and Secure the Squares

Place the granny squares according to the layout and secure them with stitch markers. Follow the seaming order shown in the image. The original technique uses single crochet with 3 chain stitches.
Seaming Step 2 – Join the Squares

Place two granny squares face-to-face, starting from the diagonal braid position. Insert the hook, pull up a loop, and begin matching stitches with single crochet and 3 chains.
Keep the working yarn loose so the bag can maintain its intended shape. At crossing points, work 2 single crochets directly. Continue until all sections are complete. Work the horizontal and vertical lines with single crochet seams. After completing two long vertical seams, check the shape and progress before continuing.
Seaming Step 3 – Fold and Shape the Bag


Fold at the center point and use stitch markers to shape the bag. Single crochet along each edge. Fasten off, leaving the ends for later weaving. Finally, seam the horizontal line using the same method. Weave all loose ends into the back.
Finish the Bag Opening
The opening is built in several stages to create the finished upper edge of the tote. Maintain consistent tension throughout these rounds so that the opening remains even and sturdy.
Opening Step 1

Start in any chain space with 3 chains, then 2 double crochets. Repeat 1 chain and 3 double crochets around.
Opening Step 2

Chain 4, then work 3 double crochets and 1 chain around.
Opening Step 3

Repeat the previous round.
Opening Step 4

Start with 3 chains as your first stitch. Match double crochets to the previous stitches and work one double crochet in each chain space. Repeat for three rounds.
Opening Step 5 – Create the Finished Edge

Work single crochet in each stitch for seven rounds. Then work one round of reverse single crochet. Fasten off and weave in the ends.
Attach the Leather D Buckles
The leather D buckles and shoulder straps give the finished crochet tote its practical carrying structure. Take care with their placement because the original instructions specify a reference distance while also allowing the spacing to be adjusted.
Buckle Step 1


Split the main-color yarn into two strands. Thread your needle and secure the tail. Place the leather D buckle at a distance of 16 single crochets from both sides. This distance is for reference only and can be adjusted as needed. Adjust the spacing and sew the buttons securely. Weave in the ends thoroughly.
Buckle Step 2 – Attach the Remaining Straps

Repeat the process for the remaining buckles. Once all the buckles are securely attached, install the two leather shoulder straps onto the D buckles. The Large Daisy Granny Square Bag is now complete.
Beginner Tips for a Better Result
- Secure the magic ring: The original instructions specifically recommend making sure the magic ring is tight.
- Keep petal tension consistent: Even tension helps the eight daisy petals look uniform.
- Count carefully: The flower and granny-square rounds contain specific repeated sequences, so counting helps prevent mistakes.
- Use stitch markers: They are especially useful when arranging the 19 squares and shaping the bag during assembly.
- Keep seam tension loose: Tight seams can interfere with the bag’s intended shape.
- Check the bag after the long vertical seams: The original assembly instructions recommend checking your progress at this stage.
- Maintain consistent opening tension: The upper edge should be worked evenly across its rounds.
- Secure the buckles carefully: They are important to the bag’s functionality, so sew them firmly and check the spacing.
- Weave in loose ends thoroughly: This gives the finished bag a cleaner appearance and helps secure the construction.
Quick Assembly Checklist
- Complete 19 daisy granny squares.
- Confirm the squares are approximately 4 inches (10 cm).
- Arrange the squares in the T-shaped layout.
- Secure the arrangement with stitch markers.
- Seam the squares using the specified single crochet and 3-chain method.
- Keep the working yarn loose during seaming.
- Fold at the center point.
- Single crochet along the required edges.
- Complete the horizontal seam.
- Weave in all loose ends.
- Finish the bag opening according to the five opening steps.
- Complete seven rounds of single crochet at the opening.
- Work one round of reverse single crochet.
- Fasten off and weave in ends.
- Attach the leather D buckles.
- Use 16 single crochets from both sides as the reference buckle distance.
- Adjust buckle spacing if necessary.
- Attach the two leather shoulder straps.
Care and Cleaning
Daily Care
Lightly brush the surface with a soft cloth after use to remove dust and debris, especially around the textured flower motifs. Check the seams and handles periodically for loose threads. Avoid overloading the bag so that the granny squares and overall structure can retain their shape.
Washing
For light soiling, spot clean with a white cloth dampened with cool water and mild wool detergent. For deeper cleaning, hand wash in cool water with gentle detergent. Do not twist or wring the bag. Instead, press excess water out between clean towels.
Reshape the bag while damp and dry it flat away from direct sunlight. Allow it to dry completely before using it again.
Storage
Make sure the bag is completely clean and dry before storage. Gently stuff it with acid-free tissue paper to help maintain its shape and reduce creasing. Store it flat or standing upright in a clean, dry location away from direct sunlight.
A cotton storage bag is recommended instead of plastic because it allows the fibers to breathe. For long-term storage, avoid hanging the bag by its handles because this can cause stretching.
Final Thoughts
The Large Daisy Granny Square Bag is a satisfying project because every stage contributes something different to the final result. The first three rounds create the recognizable daisy, Round 4 begins the granny-square transformation, and Rounds 5 through 9 build the square outward. Once 19 individual motifs are complete, the layout and seaming process turns them into the structure of a practical tote.
The finished bag measures approximately 15 inches (38 cm) wide and 13 inches (33 cm) high, while each floral square measures approximately 4 inches (10 cm). The combination of colorful flowers, terracotta framing, and leather shoulder straps gives the project a distinctive spring-inspired appearance.
For the best result, take your time with stitch counting, keep your tension consistent, use plenty of stitch markers during assembly, and pay particular attention to the buckle placement. With the original nine-round square sequence followed carefully and the 19 motifs arranged according to the provided layout, the separate floral pieces come together into one complete garden-inspired crochet bag.