
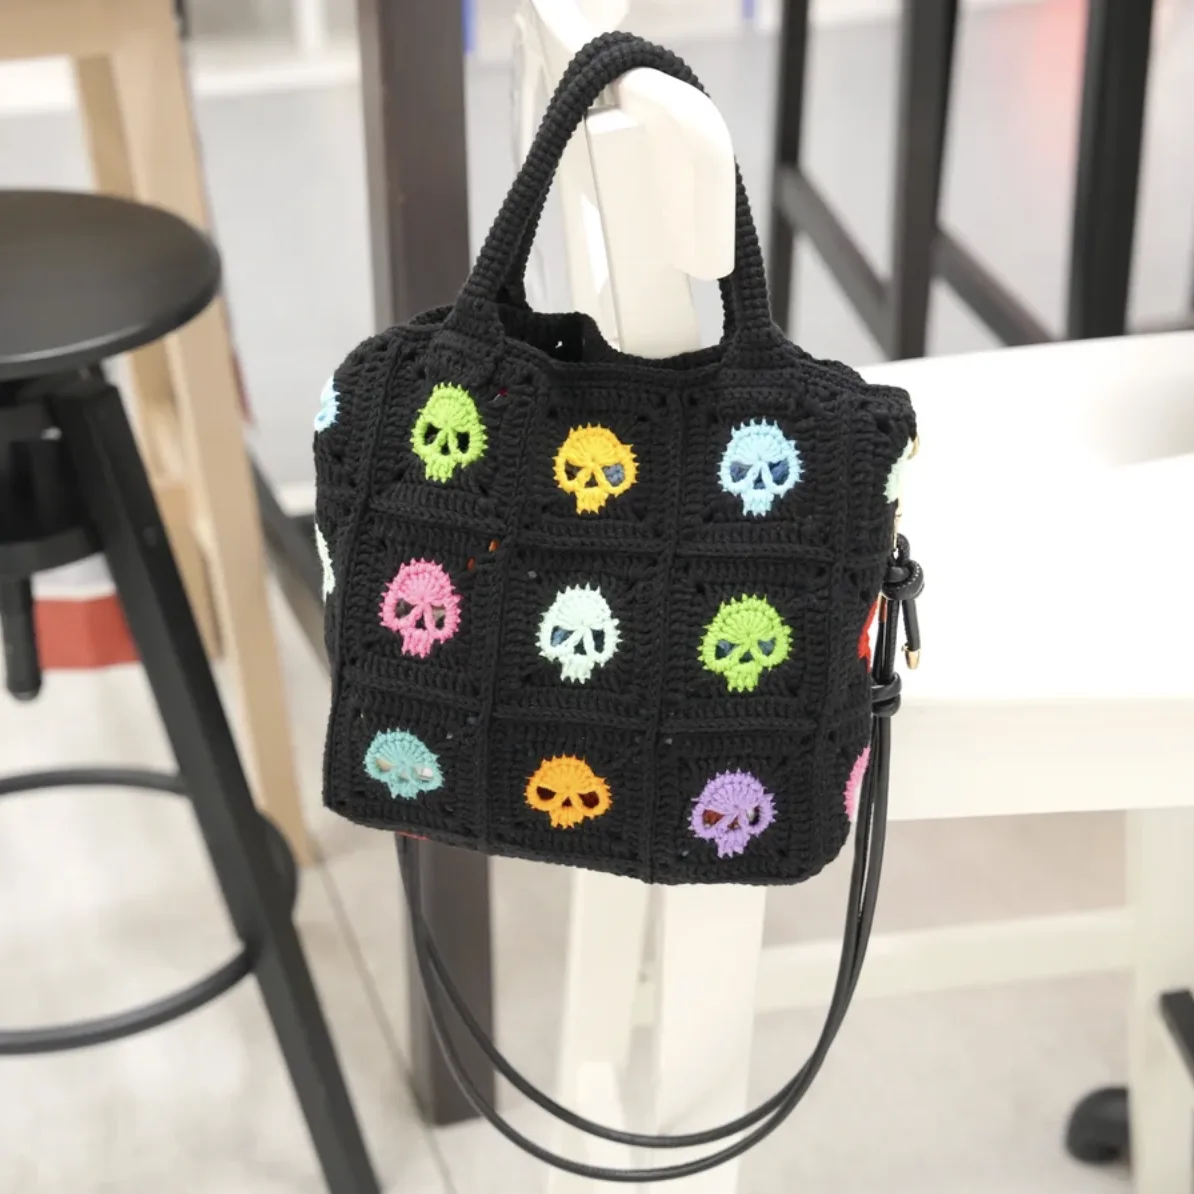

If you love crochet accessories with a little personality, the Skull Granny Square Bag is a project worth adding to your handmade collection. It takes the familiar granny square concept and gives it an edgy skull-inspired design, creating a bag that can work beautifully for Halloween while still being distinctive enough to carry throughout the year.
This project is built from individual skull granny squares that are crocheted separately and then joined into the bag body. The finished construction is completed with two crocheted straps, D-ring attachments, and two rounds of single crochet around the opening. Because the project is assembled from multiple small motifs, it also gives you plenty of opportunities to concentrate on one section at a time rather than trying to construct the entire bag in one continuous piece.
The original design uses a classic black-and-white color combination, allowing the skull shapes to stand out clearly against their background. However, the pattern also leaves room for personal color choices. Orange and purple can create a Halloween-inspired palette, while gray and black can give the project a darker, misty appearance. The important point is to keep the technical construction unchanged while choosing colors that suit your own style.
Project Overview
The individual skull granny squares measure approximately 3 inches each. You will make 27 squares in total before assembling them into the bag. Once the squares have been joined and the bag body has been formed, the finished bag measures approximately 11.2 inches wide and 9.8 inches tall, not including the strap.
The project uses a 3.0mm crochet hook with Loopara 5 ply combed cotton yarn. A stitch marker, scissors, strap, and D-ring are also required. The source pattern uses US crochet terminology throughout, so the abbreviations below follow that system.
- Square size: approximately 3 inches
- Number of skull granny squares: 27
- Finished bag width: approximately 11.2 inches
- Finished bag height: approximately 9.8 inches, excluding the strap
- Crochet hook: 3.0mm
- Recommended yarn: Loopara 5ply combed cotton
- Straps: make 2
Materials You Will Need
Gather everything before beginning so that the crocheting and assembly stages can move smoothly from one step to the next.
- Yarn: Loopara 5ply combed cotton
- Hook: 3.0mm
- Stitch marker
- Scissors
- Strap
- D-ring

Choosing Yarn and Colors
The recommended yarn for this project is Loopara 5ply combed cotton. The source pattern highlights this yarn as a suitable choice for granny squares because it is soft, durable, holds its shape well, and is available in a broad selection of colors.
The original color concept uses crisp white for the skull design and deep black for the surrounding background. This high contrast helps the skull motif remain clearly visible in every square. You can also experiment with other combinations while retaining exactly the same crochet instructions.
For a Halloween version, orange and purple can provide a more colorful seasonal appearance. A gray-to-black palette can create a darker effect, while brighter colors can give the same skull construction a more playful or alternative look.
US Crochet Abbreviations
Before starting the first square, become familiar with the terminology used throughout the pattern.
- ch: chain
- dc: double crochet
- sc: single crochet
- sl: slip stitch
- hdc: half double crochet
- Magic ring: magic ring
Before You Crochet the First Skull Square
The project begins with the skull granny squares, and you will make 27 identical squares. Since every square contributes to the final layout, consistency is especially useful during this stage. Try to maintain the same general tension from one square to another so that their dimensions remain compatible during assembly.
The first two rounds are particularly important for the skull shape. The source pattern recommends maintaining tight tension during these rounds to help create a crisp outline. The magic ring also plays an important role in producing a neat center.
If the magic ring is unfamiliar, it is worth practicing before beginning all 27 motifs. It is much easier to establish a comfortable starting technique on a small practice section than to struggle with the center of a finished square.
Step-by-Step: Crochet the Skull Granny Square
Make 27 skull granny squares. The following four rounds form each individual square.

Round 1: Establish the Center
Start with a magic ring. Chain 2, which counts as the first double crochet. Work 9 double crochet into the ring. Then chain 5, double crochet, chain 3, double crochet, and chain 5. Tighten the magic ring and join with a slip stitch.
This opening round creates the foundation from which the skull outline and square will develop. Take care when tightening the magic ring so the center closes neatly without disturbing the stitches you have just made.
Round 1: Start with a magic ring. Chain 2 (counts as first double crochet). Work 9 double crochet into the ring. Chain 5, double crochet, chain 3, double crochet, chain 5. Tighten the magic ring, then slip stitch to join.

Round 2: Shape the Skull Motif
Chain 1, which does not count as a stitch. Work 9 single crochet. Then work 6 more single crochet. At the corner, work a slip stitch, chain 2, 2 double crochet, chain 2, and slip stitch. Work 6 more single crochet, then slip stitch to join. Fasten off and weave in the ends.
Pay particular attention to this round because the source pattern specifically identifies stitch count in Round 2 as important to forming the skull outline accurately. Keeping your tension controlled here helps the motif remain clean and recognizable.
Round 2: Chain 1 (doesn’t count as a stitch). Work 9 single crochet. Work 6 more single crochet. For the corner: slip stitch, chain 2, 2 double crochet, chain 2, slip stitch. Work 6 more single crochet. Slip stitch to join. Fasten off and weave in ends.

Round 3: Introduce the New Color
Join the new color yarn. Begin with double crochet, chain 3, and 2 double crochet. Continue through the specified sequence around the motif, paying close attention to the changes between double crochet, half double crochet, and single crochet.
This is the round where the contrast between the skull and the surrounding square can become especially visible. If you are changing colors, keep your joins neat and avoid pulling the yarn too tightly, as excessive tension can affect the shape of the square.
Round 3: Join new color yarn. Work (double crochet, chain 3, 2 double crochet). [Work double crochet, 3 half double crochet, double crochet, (2 double crochet, chain 3, 2 double crochet)] twice. Work double crochet, 3 single crochet, double crochet. Work (2 double crochet, chain 3, 2 double crochet). Work double crochet, 3 half double crochet, double crochet, double crochet. Slip stitch to join.
If you want to make the color transitions particularly tidy, leave longer yarn tails when changing colors. The source pattern notes that these longer tails can also be useful later if you want to embroider eye sockets.

Round 4: Complete the Square
The final round turns the developing motif into the completed granny square. Work 9 double crochet followed by the corner sequence of 2 double crochet, chain 3, 2 double crochet. Repeat that complete sequence four times.
When the fourth repeat is finished, fasten off and weave in the ends. Before moving on, check that the square lies reasonably flat and that its corners are clearly formed.
Round 4: [9 double crochet, (2 double crochet, chain 3, 2 double crochet)] 4 times. Fasten off and weave in ends.
Square-Making Checkpoint
At this stage you should have 27 completed skull granny squares, each approximately 3 inches. This is a useful point to pause before beginning the bag assembly. Lay the squares out and compare their size and general shape.
- Confirm that you have made 27 squares.
- Check that the squares are approximately 3 inches.
- Keep the colors consistent with the intended layout.
- Make sure loose ends have been woven in where appropriate.
- Keep the layout diagram available for the assembly stage.
How to Crochet the Two Straps
The bag requires two straps. Each strap begins with a long tail for sewing, and both ends should retain long tails so the straps can be attached securely later.
Strap Round 1
Start by leaving a long tail for sewing. Chain 9. Work in the 2nd chain from the hook: 8 single crochets, chain 1, turn. Repeat 8 times.
Strap Round 2
Slip stitch, chain 1. Then work 8 single crochets, slip stitch, chain 1, repeating the sequence 59 times.
Strap Round 3
Work 8 single crochets, chain 1, turn, repeating 9 times. At the end of the strap, leave a long tail for sewing.
Repeat the complete strap instructions so that you have 2 straps.

Assembling the Skull Granny Square Bag Body
The assembly stage is where the 27 individual motifs become one recognizable bag. The source pattern uses a slip stitch joining method and relies on the provided layout figures to determine how the squares should be arranged.

Step 1: Position the Squares
Follow the layout shown in Figure 1 and begin attaching the squares with stitch markers. Take time at this point to make sure the motifs are oriented correctly before joining them.
Step 2: Begin the Slip Stitch Join
Following the arrows in Figure 1, use the slip stitch method to join the squares. Insert your hook through the center of the corner motif.
Step 3: Align the Wrong Sides
Align the stitches carefully with the wrong sides of the squares facing each other. Pick up half of each stitch on the inside edge for the slip stitch join. Keep the working yarn below your hook with your left hand.

Step 4: Match the Stitches
Continue matching the stitches one by one as you work along the join. Consistent alignment is important because uneven joins can affect how the finished bag lies.
Step 5: Join the Remaining Horizontal Rows
Use the slip stitch method to join the remaining two rows of squares.
Step 6: Secure the Horizontal Assembly
Once the horizontal rows are joined, secure the work with a slip stitch, fasten off, and weave in the ends.
Step 7: Join the Vertical Rows
Sew the vertical rows of squares following the layout in Figure 2, again using the slip stitch method.
Step 8: Handle the Junctions Carefully
Work a slip stitch at the junction where the vertical squares meet so the transition remains smooth. Secure with a slip stitch, fasten off, and weave in the ends.
Step 9: Check the Flat Bag Body
At this point, the flat assembly of the bag body is complete. Before folding it, inspect the joins and make sure the motifs are aligned according to the layout.

Step 10: Fold the Bag Body
Turn the bag inside out. Fold the body in half and align the stitch markers. Also align the stitch markers for the bag bottom.
Step 11: Join the Sides and Bottom
Follow the sewing lines shown in Figures 3 and 4 to join the sides and bottom using the slip stitch method. Work carefully along these seams so the folded bag body stays aligned while the opening remains in the correct position.
Step 12: Finish the Bag Opening
Add the edge detail by working two rounds of single crochet around the bag opening. These rounds provide the specified finished edge detail around the top of the bag.
Step 13: Confirm the Bag Body
The bag body assembly is now complete. At this point, the individual motifs should form the finished bag shape, with the opening neatly edged by the two rounds of single crochet.

Attaching the Straps and D-Ring
Once the bag body is complete, the crocheted straps can be sewn into place. The original instructions emphasize using multiple stitches when securing the strap, which is especially useful because the strap will carry the weight of the bag and its contents.
Secure the Strap
Sew the strap together, securing it with multiple stitches. Use the long sewing tails created during the strap construction for this finishing work.

Attach the D-Ring
Sew the D-ring to the middle of the bag’s side. Position it 1 cm below the bag’s opening. Use multiple stitches to secure it firmly in place.

Assembly Tips for a Cleaner Finish
Joining a large collection of granny squares can be more challenging than crocheting the motifs themselves. The most useful approach is to slow down during alignment rather than trying to make up for uneven positioning later.
- Align the patterns: Check the skull motifs before beginning each major join.
- Use stitch markers: The source pattern specifically uses them to establish the correct layout and bottom alignment.
- Keep joins consistent: Match the stitches one by one during the slip stitch joining process.
- Reinforce important areas: Pay particular attention to the handles and bottom for durability.
- Finish loose ends: Fasten off and weave in ends at the specified stages.
- Consider blocking: The source pattern recommends blocking the finished bag to improve its shape and appearance.
Common Troubleshooting Checkpoints
The Skull Shape Looks Uneven
Review the first two rounds. The original instructions emphasize tight tension in these rounds and careful attention to the stitch count in Round 2. If the center or outline looks distorted, check your execution of the magic ring and the Round 2 sequence before making all 27 squares.
The Squares Do Not Match in Size
Compare your completed motifs before assembly. Differences in tension can make joining more difficult. Maintaining consistent tension throughout the square-making process is therefore especially useful.
The Joins Look Uneven
Return to the assembly instructions and make sure the wrong sides are facing each other as specified. Pick up half of each stitch on the inside edge and match the stitches one by one.
The Bag Bottom Does Not Align
Before joining the bottom, turn the bag inside out, fold the body in half, and align the stitch markers for the bag bottom. The markers are intended to help establish the correct sewing position.
The Strap Feels Loose
Check the sewing attachment rather than changing the crochet instructions. The source pattern recommends securing the strap with multiple stitches.
Finishing Advice
The final appearance of this project depends not only on the skull motifs but also on the finishing details. Once the seams and attachments are complete, inspect the bag from different angles. Look for loose tails, uneven edges, or areas where the squares have shifted during assembly.
The source pattern also recommends adding a zipper or button closure last if you want to customize the finished accessory. This is presented as an optional finishing consideration rather than part of the core construction instructions, so the main pattern remains unchanged.
Blocking the finished bag can also help improve its shape and appearance. Allow the completed piece to settle into its intended form before judging the final silhouette.
Care and Cleaning
Daily Care
Give the bag a gentle shake after use to remove loose debris. For a small stain, gently dab the affected area with a damp cloth. Avoid rough surfaces that could catch or damage the crochet fabric.
Washing
When deeper cleaning is needed, fill a sink with cool water and add a small amount of mild detergent. Gently submerge the bag and softly massage it. Rinse thoroughly until the water runs clear and no soap residue remains.
Do not wring the bag. Instead, roll it in a clean towel to remove excess water. Allow it to air dry flat and reshape it as needed while it dries.
Storage
Always make sure the bag is completely dry before storing it. The source pattern recommends lightly stuffing it with acid-free tissue paper to help maintain its shape. Store it in a cool, dry location away from direct sunlight, since UV exposure can fade the colors over time.

Quick Pattern Reference
For convenient checking while crocheting, use this condensed reference after reading the full instructions above.
Skull Granny Square — Make 27
- Round 1: Magic ring, ch 2, 9 dc, ch 5, dc, ch 3, dc, ch 5, tighten ring, sl.
- Round 2: Ch 1, 9 sc, 6 sc, corner: sl, ch 2, 2 dc, ch 2, sl, 6 sc, sl. Fasten off and weave in ends.
- Round 3: Join new color and follow the complete specified dc, hdc, sc, and corner sequence. Sl to join.
- Round 4: [9 dc, (2 dc, ch 3, 2 dc)] 4 times. Fasten off and weave in ends.
Strap — Make 2
- Round 1: Leave a long sewing tail. Ch 9. In 2nd chain from hook, work 8 sc, ch 1, turn, repeat 8 times.
- Round 2: Sl, ch 1. (8 sc, sl, ch 1) repeat 59 times.
- Round 3: (8 sc, ch 1, turn) repeat 9 times. Leave a long sewing tail.
Final Assembly
- Arrange the 27 squares according to Figure 1.
- Join the horizontal sections using slip stitches.
- Join the vertical rows according to Figure 2.
- Turn the body inside out and fold it in half.
- Align the stitch markers for the bottom.
- Join the sides and bottom according to Figures 3 and 4.
- Work two rounds of single crochet around the bag opening.
- Secure the straps with multiple stitches.
- Attach the D-ring to the middle of the bag’s side, 1 cm below the opening.
Frequently Asked Questions
How many skull granny squares are needed?
The pattern requires 27 skull granny squares.
How large is each square?
Each completed skull square measures approximately 3 inches.
What size hook does the pattern use?
The pattern uses a 3.0mm crochet hook.
What yarn is recommended?
The recommended yarn is Loopara 5ply combed cotton. The original color combination uses white for the skulls and black for the background, although alternative colors can be used without changing the construction instructions.
How large is the finished bag?
The finished bag is approximately 11.2 inches wide and 9.8 inches tall, excluding the strap.
How many straps should be made?
The strap instructions specify making 2 straps.
Where is the D-ring positioned?
The D-ring is sewn to the middle of the bag’s side, positioned 1 cm below the bag’s opening.
What joining method is used?
The bag body is assembled using the slip stitch method, following the provided layout and sewing-line figures.
Final Project Check
Before calling the bag finished, take a final moment to inspect the entire project. You should have 27 skull granny squares joined according to the layout, a completed bag body with two rounds of single crochet around the opening, two completed straps, and the D-ring securely attached in its specified position.
- 27 skull granny squares completed
- Each square approximately 3 inches
- Finished body approximately 11.2 inches wide
- Finished body approximately 9.8 inches tall, excluding the strap
- 2 crocheted straps completed
- Two rounds of single crochet around the opening
- D-ring positioned 1 cm below the opening
- Loose ends secured
- Strap attachments reinforced with multiple stitches
- Finished bag checked for shape and alignment
Enjoy Your Finished Skull Granny Square Bag
The Skull Granny Square Bag is a great example of how a traditional crochet technique can be transformed into a distinctive accessory simply by changing the motif and overall arrangement. The project begins with small, manageable skull squares and gradually turns them into a practical bag through careful joining and finishing.
The most important part of the process is consistency. Take care with the magic ring and the first two rounds of every skull, keep your tension steady, and use the layout when assembling the squares. During the joining stage, match stitches carefully and use the stitch markers to maintain the intended shape.
Once the body is assembled, the two straps and D-ring provide the final structural details. Reinforced attachments, neat woven-in ends, and attention to the bag opening can make the completed project look much more polished.
Whether you choose the original black-and-white palette or create your own combination of colors, the finished bag keeps the distinctive skull motif at the center of the design. It can make a fun Halloween accessory, a year-round statement bag, or simply a memorable handmade crochet project for anyone who enjoys unusual granny square patterns.