
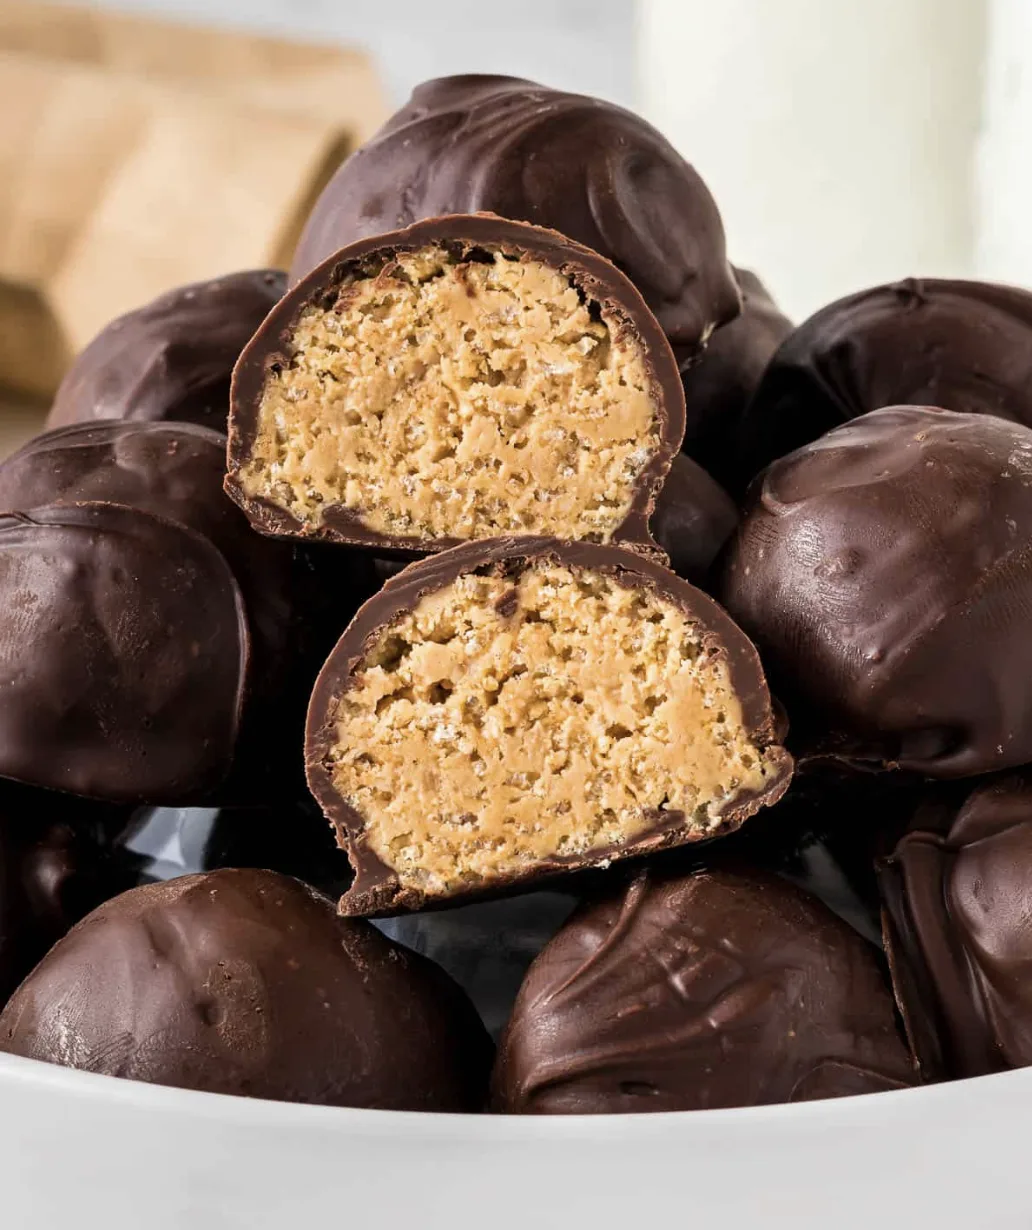
Peanut Butter Balls with Rice Krispies are a delicious no-bake treat that combines creamy peanut butter, crispy cereal, sweet powdered sugar, and a rich chocolate coating. With only five ingredients, these bite-sized desserts are easy to prepare and perfect for anyone who loves the classic combination of peanut butter and chocolate.
The secret to their irresistible texture is the addition of Rice Krispies cereal. While traditional peanut butter balls have a smooth, dense filling, the crispy cereal adds a light crunch to every bite. Once dipped in melted semisweet chocolate, the peanut butter mixture becomes a sweet, crunchy center surrounded by a rich chocolate shell.
These homemade treats are especially popular during the Christmas season, when simple desserts that can be prepared ahead of time are always welcome. They look beautiful on holiday dessert platters, make thoughtful homemade gifts, and are convenient for parties, family gatherings, and cookie exchanges.
One of the best things about this recipe is that you do not need an oven. The peanut butter mixture is prepared in a bowl, shaped into balls, chilled until firm, and dipped in melted chocolate. After another short chilling period, the chocolate coating hardens and the treats are ready to serve.
This recipe follows the ingredient amounts and method provided by Joy Shull. It makes approximately 18 peanut butter balls and takes about 30 minutes of preparation time, with additional chilling time as needed.
Why You’ll Love These Peanut Butter Balls with Rice Krispies
There are plenty of reasons to make these chocolate-covered peanut butter treats. Their simple ingredients, crunchy texture, and easy preparation make them a reliable choice for both everyday desserts and special occasions.
1. Only Five Ingredients
You need just five ingredients to make this recipe: creamy peanut butter, salted butter, powdered sugar, Rice Krispies cereal, and semisweet chocolate chips.
Each ingredient serves a specific purpose. Peanut butter creates the rich filling, butter helps bring the mixture together, powdered sugar adds sweetness, and Rice Krispies provide the signature crunch. The chocolate coating finishes everything with a smooth, chocolatey layer.
Because the ingredient list is short, preparation is straightforward and shopping is simple.
2. No Baking Required
These peanut butter balls are completely no-bake. You do not need to preheat the oven, prepare cake pans, or worry about baking times.
Instead, the filling is mixed, shaped, and chilled before being dipped in melted chocolate. This makes the recipe especially useful during busy holiday periods when oven space may already be occupied by cookies, cakes, and other desserts.
The refrigerator does most of the work while the mixture firms up and the chocolate coating sets.
3. A Delicious Crunchy Center
Rice Krispies make these treats different from traditional smooth peanut butter truffles.
The cereal adds a crisp texture that contrasts with the creamy peanut butter filling and the firm chocolate exterior. The result is a satisfying combination of creamy, crunchy, sweet, and rich flavors.
For the best texture, fold the cereal into the peanut butter mixture until it is distributed throughout.
4. Rich Peanut Butter and Chocolate Flavor
Peanut butter and chocolate are a classic dessert combination. The nutty, slightly salty peanut butter filling balances the sweetness of the powdered sugar and chocolate coating.
Semisweet chocolate provides a rich finish that complements the sweet center without relying entirely on milk chocolate.
If you enjoy peanut butter cups, chocolate truffles, or other chocolate-covered peanut butter treats, these homemade balls are a delicious alternative.
5. Perfect for Christmas and Holiday Parties
These treats are a natural addition to holiday dessert tables. Their round shape and chocolate coating make them attractive on a platter alongside cookies, brownies, fudge, and other homemade sweets.
They are also convenient for cookie exchanges and family gatherings because you can prepare them ahead of time and store them in the refrigerator until serving.
For homemade gifts, arrange the chilled balls in a food-safe box with parchment paper between layers to help protect the chocolate coating.
6. Easy to Prepare Ahead
Since the recipe requires chilling rather than baking, it is easy to fit into a meal-preparation or holiday-baking schedule.
You can prepare the peanut butter filling, shape the balls, and chill them before dipping. Once the chocolate has hardened, store the finished treats in an airtight container.
The source recipe also states that the treats freeze well, making it possible to prepare a batch in advance and save some for later.
Ingredients for Peanut Butter Balls with Rice Krispies
This recipe uses five everyday ingredients. For the closest match to Joy Shull’s version, follow the amounts below.
1. Creamy Peanut Butter
Amount: 1 cup
Creamy peanut butter forms the base of the filling. It provides the signature nutty flavor and helps bind the cereal and powdered sugar together.
The source recipe specifically calls for creamy, no-stir peanut butter. A consistent product is convenient because it mixes more evenly than peanut butter with a substantial layer of separated oil.
If you use natural peanut butter, stir it thoroughly before measuring. Its texture and oil content may differ, which can affect how firmly the mixture holds together.
2. Salted Butter
Amount: 3 tablespoons, melted
Melted salted butter helps combine the peanut butter with the dry ingredients and contributes richness to the filling.
The recipe specifies salted butter, which also provides a little saltiness to balance the sweet ingredients.
Allow the butter to cool slightly after melting before mixing it with the peanut butter. It should remain liquid but should not be excessively hot.
3. Powdered Sugar
Amount: 1 cup
Powdered sugar sweetens the filling and helps give the peanut butter mixture a firmer, more workable consistency.
Because powdered sugar is finely ground, it blends more easily into the peanut butter than ordinary granulated sugar.
Add it after incorporating the Rice Krispies, following the original recipe’s method. The mixture may become thick, so a rubber spatula can be useful when it becomes difficult to stir.
4. Rice Krispies Cereal
Amount: 2 1/2 cups
Rice Krispies provide the crunch that makes this recipe distinctive.
Their light texture contrasts with the creamy peanut butter filling and the chocolate coating. The cereal also adds volume to the mixture.
Fold the cereal into the peanut butter and butter until combined, then add the powdered sugar.
Avoid crushing the cereal excessively during mixing. Preserving its crisp texture helps create the characteristic crunch in the finished treats.
5. Semisweet Chocolate Chips
Amount: 12 ounces
Semisweet chocolate chips form the outer coating around each peanut butter ball.
The chocolate adds richness and creates a firm shell once chilled. Semisweet chocolate works particularly well because its flavor balances the sweet peanut butter filling.
The original recipe also allows chocolate melting wafers as a substitute. These are designed for dipping and may provide a convenient alternative when you want a smooth coating.
Kitchen Equipment You’ll Need
You do not need specialized baking equipment to make these no-bake treats.
Gather the following:
- A stand mixer or hand mixer.
- A medium or large mixing bowl.
- A rubber spatula.
- Measuring cups and measuring spoons.
- A cookie scoop.
- A baking sheet.
- Parchment paper.
- A microwave-safe bowl for melting chocolate.
- A fork or dipping tool, if desired.
- An airtight storage container.
A cookie scoop makes it easier to portion the mixture consistently. If you do not have one, use a spoon and shape the portions by hand.
Parchment paper prevents the chocolate-covered balls from sticking to the baking sheet as the coating hardens.
How to Make Peanut Butter Balls with Rice Krispies
Follow these steps to create the crunchy peanut butter centers and coat them in melted chocolate.
Step 1: Combine the Peanut Butter and Melted Butter
Place the creamy peanut butter and melted salted butter in a mixing bowl.
Using a hand mixer or stand mixer, beat the ingredients together until smooth and thoroughly combined.
Scrape down the sides of the bowl as needed to make sure the butter and peanut butter are evenly mixed.
The mixture should look creamy and uniform. If the butter is still extremely hot, allow it to cool slightly before mixing so that it does not unnecessarily warm the peanut butter.
Step 2: Add the Rice Krispies
Add the Rice Krispies cereal to the peanut butter mixture.
Stir until the cereal is distributed throughout the mixture. Use a spatula if necessary to scrape the bottom of the bowl and bring the ingredients together.
The cereal may make the mixture look uneven at first, but continued gentle mixing will help distribute it.
Try not to crush the cereal too much. The crisp pieces are responsible for the crunchy texture of the finished peanut butter balls.
Step 3: Add the Powdered Sugar
Add the powdered sugar and mix until combined.
At first, the mixture may be manageable with a mixer. As the powdered sugar incorporates, however, the filling becomes thicker and more difficult to stir.
When the mixture becomes too stiff for the mixer, finish combining it by hand with a rubber spatula.
Scrape the sides and bottom of the bowl to make sure there are no pockets of dry powdered sugar remaining.
The finished mixture should be thick enough to shape into balls.
Step 4: Prepare the Baking Sheet
Line a baking sheet with parchment paper.
This will provide a clean surface for the shaped peanut butter balls and help prevent them from sticking during chilling.
Make sure the baking sheet fits comfortably inside your refrigerator. If it does not, you can use a smaller tray or another suitable flat container.
Step 5: Portion the Peanut Butter Mixture
Use a cookie scoop to portion the mixture onto the prepared baking sheet.
The source recipe makes approximately 18 peanut butter balls. Try to keep the portions similar in size so they chill evenly and are easy to dip in chocolate.
Once portioned, roll each piece between your hands to form a round ball.
Press gently as you shape each portion so it holds together without becoming overly compacted.
If the mixture sticks to your hands, work with small portions and avoid keeping the mixture warm for too long.
Step 6: Chill the Peanut Butter Balls
Place the shaped balls in the refrigerator for at least 30 minutes.
This chilling period helps the filling firm up and makes the balls easier to dip in melted chocolate.
If the balls are too soft, they may become misshapen when dipped. Chilling helps them retain their round shape and reduces the likelihood of pieces breaking off into the chocolate.
Do not skip this step. It is one of the most important parts of the preparation process.
Step 7: Melt the Chocolate
Place the semisweet chocolate chips in a microwave-safe bowl.
Heat the chocolate in 20- to 30-second intervals, stirring between each interval until the chocolate is smooth.
Short heating intervals help prevent the chocolate from overheating. Continue stirring as the remaining pieces melt so that the chocolate becomes evenly smooth.
If you prefer, you can use chocolate melting wafers instead of chocolate chips, following the product’s melting instructions.
Avoid getting water into the melted chocolate, as this can cause the texture to become thick or grainy.
Step 8: Dip the Peanut Butter Balls
Remove the chilled peanut butter balls from the refrigerator.
Dip each ball into the melted chocolate, turning it as needed to coat the surface.
A fork or dipping tool can help lift each ball from the chocolate. Allow excess chocolate to drip back into the bowl before placing the coated ball on the parchment-lined baking sheet.
Work with a few balls at a time so that the remaining filling stays cool.
Try to cover the balls evenly. A smooth chocolate coating gives the finished treats their classic appearance.
Step 9: Place the Coated Balls on the Baking Sheet
After dipping each ball, transfer it carefully back to the lined baking sheet.
Leave a little space between the balls so they do not touch while the chocolate is setting.
If you notice excess chocolate pooling around the base of a ball, you can gently adjust its position before the coating becomes firm.
Continue until all the peanut butter balls have been coated.
Step 10: Chill Until the Chocolate Is Firm
Return the baking sheet to the refrigerator.
Chill the chocolate-covered balls until the coating has hardened and feels firm to the touch.
The exact setting time depends on the temperature of the chocolate, the thickness of the coating, and your refrigerator.
Once the chocolate has set, the peanut butter balls are ready to serve or store.
Step 11: Serve and Enjoy
Transfer the finished treats to a serving plate or an airtight storage container.
The chocolate shell provides a satisfying contrast to the crunchy peanut butter center. Serve them chilled or keep them refrigerated until you are ready to enjoy them.
For a holiday dessert platter, arrange the balls alongside cookies, brownies, fudge, or other chocolate treats.
Expert Tips for the Best Peanut Butter Balls
A few simple techniques can help make the preparation easier and improve the finished texture.
Use Creamy No-Stir Peanut Butter
The original recipe calls for creamy no-stir peanut butter because its consistency makes the filling easier to mix.
If you use a natural variety, stir it thoroughly and check the consistency before adding the other ingredients. Excess oil can make the filling too loose, while a very thick peanut butter may produce a firmer mixture.
Let the Melted Butter Cool Slightly
The butter should be melted, but it does not need to be extremely hot.
Allowing it to cool slightly before mixing helps avoid unnecessarily warming the peanut butter. This can make the filling easier to handle later.
Mix the Cereal Gently
Rice Krispies are included for their crisp texture, so try to preserve as much of that texture as possible.
Mix until the cereal is evenly distributed rather than crushing it into small crumbs.
Use a Rubber Spatula for the Thick Mixture
Once the powdered sugar is added, the mixture may become too stiff for the mixer.
Finishing the mixing process with a rubber spatula gives you more control and helps bring together the thicker ingredients without overworking the mixture.
Chill for at Least 30 Minutes
The peanut butter balls should be firm before dipping.
A minimum of 30 minutes in the refrigerator helps them hold their shape. If they remain soft, give them additional chilling time before continuing.
Melt the Chocolate Slowly
Chocolate can become thick or grainy if overheated.
Use short microwave intervals, stir frequently, and stop heating when the chocolate is smooth. The remaining warmth will help melt any small pieces as you stir.
Let Excess Chocolate Drip Off
After dipping each ball, pause briefly to allow extra chocolate to fall back into the bowl.
This can help create a neater coating and reduce excess chocolate collecting around the base of each treat.
Keep the Finished Treats Chilled
The recipe is designed to be stored in the refrigerator after the chocolate hardens.
Keeping the treats chilled helps maintain the chocolate coating and the shape of the peanut butter filling, especially in warm conditions.
Common Mistakes to Avoid
Skipping the Initial Chilling Period
Soft peanut butter balls can be difficult to dip and may lose their shape in warm chocolate.
Refrigerate them for at least 30 minutes before dipping.
Adding the Powdered Sugar Too Quickly
The filling becomes thick as the powdered sugar is incorporated. Add it after the Rice Krispies and finish mixing by hand when the mixture becomes too stiff.
Overheating the Chocolate
Excessive heat can damage the texture of the chocolate and make it harder to work with.
Use 20- to 30-second microwave intervals and stir between each one.
Crushing the Rice Krispies
Crushing the cereal too much can reduce the crunchy texture that distinguishes these peanut butter balls from smoother truffles.
Stir gently until the cereal is evenly incorporated.
Handling the Balls Too Much Before Chilling
Warm hands and repeated handling can soften the filling. Shape the balls efficiently and place them in the refrigerator as soon as they are ready.
Storing the Treats Before the Chocolate Sets
If the coating is still soft, the balls can stick together or leave chocolate marks on the container.
Wait until the chocolate is firm before transferring the treats to a storage container.
Delicious Variations to Try
The original recipe uses five ingredients, but a few simple changes can give these treats a different appearance or flavor.
Use Chocolate Melting Wafers
The source recipe specifically allows chocolate melting wafers instead of semisweet chocolate chips.
Melting wafers are designed for coating and can be convenient when preparing a batch of dipped treats.
Follow the package directions for melting and handling the product you choose.
Decorate with a Chocolate Drizzle
For a more decorative finish, allow the initial chocolate coating to set and then add a thin drizzle of contrasting melted chocolate.
This is an optional presentation idea rather than part of the original five-ingredient recipe.
A drizzle can make the treats look especially attractive on holiday platters or in homemade gift boxes.
Make Smaller Peanut Butter Balls
You can divide the mixture into smaller portions if you prefer bite-sized treats.
Smaller portions will increase the total number of balls and may require less chocolate per piece. The original recipe’s yield of 18 applies to its intended portion size, so your final yield will vary.
Prepare a Double Batch
These treats are convenient for holidays and gatherings, and the source notes that they are popular enough to make doubling the recipe worthwhile.
To double the batch, multiply each ingredient by two and use a sufficiently large mixing bowl. Work in batches if necessary when shaping and dipping.
Try Different Chocolate Coatings
Semisweet chocolate is the specified coating, but other chocolate varieties may be used if you prefer a different flavor.
Keep in mind that different chocolates can vary in sweetness and melting behavior. The result will not be identical to the original version.
How to Store Peanut Butter Balls with Rice Krispies
Proper storage helps maintain the crunchy filling and firm chocolate coating.
In the Refrigerator
Once the chocolate has hardened, place the peanut butter balls in an airtight container or bag and store them in the refrigerator.
The source recipe recommends storing leftovers in an airtight container for several days.
Keep the container closed when not in use to help protect the treats from moisture and odors.
Can You Freeze Peanut Butter Balls?
Yes. The original recipe states that these treats freeze well and can be prepared ahead of time for the holidays.
Place the finished balls in a freezer-safe airtight container. If stacking them, use parchment paper between layers to help protect the chocolate coating.
The source does not provide an exact freezer storage duration, so use appropriate freezer-storage practices and label the container with the preparation date.
Can You Make Them Ahead for Christmas?
Absolutely. These no-bake treats are convenient for holiday preparation because they can be made before the day you plan to serve them.
Prepare the balls, allow the chocolate to harden, and store them in the refrigerator or freezer. If frozen, allow enough time for them to thaw appropriately before serving.
Making them ahead can free up time for other holiday dishes and desserts.
How to Serve Peanut Butter Balls with Rice Krispies
These chocolate-covered treats are versatile enough for many occasions.
On a Christmas dessert platter: Arrange them with Christmas cookies, fudge, brownies, and other no-bake desserts. Their round shape and chocolate coating add variety to the display.
As homemade gifts: Place the treats in a food-safe box or tin. Separate layers with parchment paper to reduce sticking and protect the chocolate shell.
At family gatherings: Serve them on a small plate as part of a dessert spread. Their bite-sized shape makes them easy to pick up and enjoy.
At parties and potlucks: Bring a batch of these no-bake treats when you need a dessert that can be prepared in advance.
Alongside coffee or hot chocolate: The peanut butter and chocolate flavors pair well with warm drinks, making these treats a pleasant addition to an afternoon snack.
As a freezer-friendly dessert: Keep a portion stored for another occasion, following suitable storage and thawing practices.
Frequently Asked Questions
What Are Peanut Butter Balls with Rice Krispies?
Peanut Butter Balls with Rice Krispies are no-bake treats made from peanut butter, butter, powdered sugar, and crispy rice cereal. The mixture is rolled into balls, chilled, and dipped in melted chocolate.
The Rice Krispies add crunch to the creamy peanut butter filling.
How Many Ingredients Does This Recipe Need?
The original recipe uses five ingredients:
- 1 cup creamy no-stir peanut butter.
- 3 tablespoons salted butter, melted.
- 1 cup powdered sugar.
- 2 1/2 cups Rice Krispies cereal.
- 12 ounces semisweet chocolate chips or chocolate melting wafers.
Do I Need to Bake These Peanut Butter Balls?
No. This is a no-bake recipe.
The filling is mixed, shaped into balls, chilled, dipped in melted chocolate, and refrigerated again until the coating becomes firm.
Why Do I Need to Chill the Peanut Butter Balls Before Dipping?
Chilling helps the filling firm up, making the balls easier to handle and dip.
The original recipe recommends refrigerating them for at least 30 minutes before coating them in chocolate.
Can I Use Chocolate Melting Wafers Instead of Chocolate Chips?
Yes. The original recipe specifically lists chocolate melting wafers as an alternative to semisweet chocolate chips.
Follow the melting instructions on the product packaging to achieve a smooth coating.
How Do I Melt the Chocolate in the Microwave?
Place the chocolate chips in a microwave-safe bowl and heat them in 20- to 30-second intervals, stirring between intervals until smooth.
Short heating periods help prevent the chocolate from overheating.
How Many Peanut Butter Balls Does This Recipe Make?
The original recipe makes approximately 18 peanut butter balls.
The exact number depends on the size of the portions you shape.
How Long Do Peanut Butter Balls Last in the Refrigerator?
The source recipe recommends storing the finished treats in an airtight container in the refrigerator for several days.
Keep them covered and refrigerated when not serving.
Can I Freeze These Chocolate-Covered Peanut Butter Balls?
Yes. The source states that the recipe freezes well.
Place the finished treats in an airtight freezer-safe container and separate layers with parchment paper if necessary. The source does not specify an exact freezer storage duration.
Can I Make This Recipe Ahead of Time?
Yes. These treats are suitable for making ahead because they need to chill before dipping and again after coating.
Once the chocolate is firm, store them in the refrigerator or freeze them for a later occasion.
Why Is My Peanut Butter Mixture Too Sticky?
The mixture may be difficult to handle if the peanut butter is particularly loose or warm. Make sure the ingredients are thoroughly combined and chill the shaped balls for at least 30 minutes before dipping.
Using the specified no-stir creamy peanut butter can help produce a more consistent result.
Why Is My Chocolate Coating Thick?
Chocolate can become thick if it has not melted evenly or has been overheated. Heat it in short intervals and stir thoroughly between each interval.
You can also choose chocolate melting wafers, which are intended for coating.
Can I Make a Larger Batch?
Yes. The source recipe notes that doubling the batch is a convenient option for holidays and gatherings.
Multiply all five ingredients by two and use a larger bowl. Shape and dip the balls in manageable batches.
Peanut Butter Balls with Rice Krispies Recipe Card
Recipe name: Peanut Butter Balls with Rice Krispies
Category: Dessert, No-Bake Treats, Holiday Candy
Preparation time: 30 minutes
Additional chilling time: At least 30 minutes before dipping, plus time for the chocolate to harden
Total listed preparation time: 30 minutes, excluding additional chilling
Yield: 18 peanut butter balls
Method: No-bake
Ingredients
- 1 cup creamy no-stir peanut butter
- 3 tablespoons salted butter, melted
- 1 cup powdered sugar
- 2 1/2 cups Rice Krispies cereal
- 12 ounces semisweet chocolate chips or chocolate melting wafers
Instructions
- Use a stand mixer or hand mixer to combine the creamy peanut butter and melted salted butter until smooth.
- Add the Rice Krispies cereal and mix until combined.
- Add the powdered sugar and mix until incorporated.
- When the mixture becomes too thick to mix easily, finish combining it by hand with a rubber spatula.
- Line a baking sheet with parchment paper.
- Use a cookie scoop to portion the mixture onto the prepared baking sheet.
- Roll the portions into balls with your hands.
- Refrigerate the peanut butter balls for at least 30 minutes to help them firm up.
- Melt the semisweet chocolate chips in a microwave-safe bowl using 20- to 30-second intervals, stirring until smooth.
- Dip each peanut butter ball into the melted chocolate and place it back on the parchment-lined baking sheet.
- Refrigerate until the chocolate coating is firm.
- Store leftovers in an airtight container in the refrigerator for several days, or freeze them using an airtight freezer-safe container.
Recipe Notes
- Creamy no-stir peanut butter is recommended for a consistent filling.
- Chocolate melting wafers can replace the semisweet chocolate chips.
- Chilling the balls before dipping helps them maintain their shape.
- Allow the chocolate coating to harden completely before storing the treats.
- The recipe is suitable for making ahead for Christmas and other gatherings.
Nutrition Information
The following nutrition estimates are provided with the original recipe for one peanut butter ball.
| Nutrient | Amount per ball |
|---|---|
| Calories | 252 kcal |
| Carbohydrates | 23 g |
| Protein | 5 g |
| Total fat | 17 g |
| Saturated fat | 7 g |
| Polyunsaturated fat | 2 g |
| Monounsaturated fat | 6 g |
| Trans fat | 0.1 g |
| Cholesterol | 6 mg |
| Sodium | 99 mg |
| Potassium | 194 mg |
| Fiber | 2 g |
| Sugar | 15 g |
| Vitamin A | 326 IU |
| Vitamin C | 2 mg |
| Calcium | 20 mg |
| Iron | 3 mg |
Nutrition values are estimates and can vary depending on the brands of peanut butter, chocolate, cereal, and other ingredients used.
Final Thoughts
Peanut Butter Balls with Rice Krispies are an easy, no-bake dessert that brings together creamy peanut butter, crispy cereal, sweet powdered sugar, and a smooth chocolate coating. The combination of crunchy filling and rich chocolate makes these treats especially appealing to anyone who loves peanut butter desserts.
With only five ingredients and a straightforward preparation method, they are simple enough for everyday treats and special enough for Christmas celebrations. Mix the filling, shape the balls, chill them, and dip them in melted chocolate for a homemade dessert that looks attractive and tastes delicious.
Prepare a batch ahead of time for a holiday gathering, package a few as edible gifts, or keep some in the refrigerator for whenever you want a sweet treat. These chocolate-covered peanut butter balls are a convenient addition to any collection of easy no-bake desserts.