

Christmas Pinwheel Cookies
Christmas Pinwheel Cookies are a delightful treat that perfectly embodies the spirit of the holiday season. These cookies are festive and visually stunning, offering a feast for the eyes as well as the palate. They are characterized by their vibrant colors and delicious flavor, created by swirling together different colored doughs. With a rich buttery flavor and a slight sweetness, they’re sure to be a hit whether enjoyed at family gatherings, holiday parties, or as a sweet snack throughout the day.
The appeal of Christmas Pinwheel Cookies lies not only in their striking appearance but also in their satisfying texture. Each bite delivers a tender, melt-in-the-mouth experience enriched by the buttery goodness and slight sweetness. The combination of colors creates an inviting look that draws people in, making them perfect for serving during the holidays. Whether you stack them on a festive platter or place them in decorative tins, they bring a cheerful aspect to any dessert table.
These cookies are versatile enough to suit various occasions. Their cheerful appearance makes them ideal for holiday baking, where they can be shared with friends and family. They can also be made ahead of time, making the holiday rush a bit easier. The ability to store them for later enjoyment means everyone can indulge in these treats even after the holiday festivities are over.
From children to adults, Christmas Pinwheel Cookies are a delightful indulgence. Their delightful appearance, combined with rich buttery flavors, makes them a memorable treat that will certainly become a part of your holiday tradition.
What Makes This Recipe Special
What sets Christmas Pinwheel Cookies apart from other cookies is the unique combination of colors and flavors that they embody. Each log of dough can be tinted with various colors, allowing for creative expression and personalization. The festive swirl creates an eye-catching presentation that is as pleasing to look at as it is to eat. The contrasting colors symbolize the joy of the season, capturing the whimsical essence of the holidays in a treat.
In terms of texture, these cookies balance softness with a slight firmness at the edges, achieved by proper baking techniques and cooling. Each cookie delivers a savory yet sweet flavor profile that can be enhanced by the addition of sprinkles or additional flavorings, such as almond or lemon extract, appealing to a wide range of taste preferences. This flexibility makes them an enjoyable treat for everyone, regardless of their usual dessert preferences.
Moreover, these cookies foster a sense of togetherness. They can be a fun project to engage in with friends or family members, bringing everyone into the kitchen to mix, roll, and slice the dough. This collaborative spirit is what makes these cookies not just a dessert but a shared experience, perfectly capturing the essence of holiday celebrations.
In summary, the distinctiveness of Christmas Pinwheel Cookies lies in their vibrant appearance, delightful texture, versatile flavor, and the sense of joy they bring when created and shared. They stand out on any table and are synonymous with festive gatherings, making them a beloved holiday classic.
Ingredient Overview and Helpful Notes
Understanding the ingredients that compose Christmas Pinwheel Cookies is crucial for achieving the best flavor and texture. The main components include unsalted butter, granulated sugar, egg, flour, baking powder, salt, and food coloring. Each of these plays a pivotal role in the final product.
Unsalted Butter: The primary fat in your cookie dough, unsalted butter contributes rich flavor and helps to create a tender structure. When using unsalted butter instead of salted, you have better control over the saltiness of the cookies since the other ingredients will determine their overall flavor.
Granulated Sugar: This ingredient not only sweetens the cookies but also helps in achieving the desired texture. As sugar melts during baking, it promotes browning, contributing to the cookie’s golden edges. It plays a crucial role in the cookies’ overall structure by interacting with the other ingredients to create a balanced mixture.
Egg: The egg acts as a binding agent, giving the dough its desired consistency. It also adds moisture and richness, thereby enhancing the overall flavor. When using eggs, it’s essential to ensure they are at room temperature to help emulsion and provide better texture to the dough.
All-Purpose Flour: The foundation of most baked goods, all-purpose flour provides structure to the cookies. It contains proteins that develop gluten when mixed, giving the cookies stability while keeping them tender. Too much flour can result in dry cookies, so accurately measuring is crucial for success.
Baking Powder and Salt: Baking powder serves as the leavening agent, helping the cookies rise and stay light. Meanwhile, salt not only enhances the flavors but also balances the sweetness, making each bite more enjoyable.
Food Coloring: While not essential for flavor or texture, food coloring ensures a festive appearance, allowing bakers to be creative. You can use gel colors for more vibrant hues or liquid for softer shades.
When selecting these ingredients, it’s advisable to choose high-quality, fresh items. Softening the butter properly is essential; you can achieve this by letting it sit out at room temperature for about 30–45 minutes before starting the dough. Additionally, measuring flour accurately—by spooning it into the measuring cup rather than scooping directly—can prevent excess flour that might lead to dry cookies.
By understanding and carefully selecting each ingredient, you can create beautiful and flavorful Christmas Pinwheel Cookies that will impress everyone who tastes them.
Nutrition & Recipe Details
Nutritional values can significantly vary depending on ingredient choices, portion sizes, and preparation methods. The table below outlines estimated nutritional information for Christmas Pinwheel Cookies.
| Item | Value |
|---|---|
| Prep time | 30 minutes |
| Cook time | 10-12 minutes |
| Store time | 1 week |
| Calories | 120 per cookie |
| Protein | 1.5g |
| Carbohydrates | 17g |
| Fat | 6g |
Keep in mind that these values are estimates, and if you plan to adhere to certain dietary needs, consider calculating specific nutritional information based on your chosen ingredients.
How to Make Christmas Pinwheel Cookies
Making Christmas Pinwheel Cookies is a joyous endeavor perfect for both seasoned bakers and enthusiastic beginners. The key to success with this recipe is proper preparation and organization. Gather your ingredients ahead of time and ensure that your workspace is clean and ready for mixing.
For this recipe, a mixing bowl, a whisk, a rolling pin, plastic wrap, and a baking sheet lined with parchment paper will be beneficial. It’s also helpful to have some good-quality food coloring at hand for customizing your cookie dough.
When preparing the ingredients, make sure to soften the butter to room temperature for easy blending with sugar and ensure the egg is also at room temperature. This step helps create a smoother dough and can positively impact the final texture of your cookies.
Ingredients
| Ingredient | Quantity |
|---|---|
| Unsalted Butter | 1 cup, softened |
| Granulated Sugar | 1 cup |
| Large Egg | 1 |
| Vanilla Extract | 1 teaspoon |
| All-Purpose Flour | 3 cups |
| Baking Powder | 1 teaspoon |
| Salt | 1/4 teaspoon |
| Food Coloring | Various colors |
| Sprinkles | Optional |
Before starting, blend the softened unsalted butter and sugar in a large mixing bowl. Make sure to cream them until the mixture is light and fluffy, which usually takes about 3 to 5 minutes. This process incorporates air into the dough and contributes to its overall lighter texture.
After creaming the butter and sugar, add the egg and vanilla extract while mixing well. After these wet ingredients are combined, it’s time to incorporate the dry components. In a separate bowl, whisk together the flour, baking powder, and salt before gradually mixing this dry mixture into the wet ingredients until just combined.
Taking care to not overmix will ensure your cookies are tender and not tough. Once the dough is together, divide it into portions that correspond to the number of colors you want to create. Dye each portion with your food coloring of choice, ensuring you mix well for an even distribution of color.
Step-by-Step Instructions
-
In a large bowl, cream together butter and sugar until smooth. Using an electric mixer on medium speed, blend the softened butter with granulated sugar until the mixture is light and fluffy in texture. This process should take around 3-5 minutes. You’ll notice that the color lightens as air is incorporated, which is essential for a delicate cookie.
-
Beat in the egg and vanilla extract. Once your butter and sugar mixture is adequately creamed, add one large egg along with one teaspoon of vanilla extract. Beat these into the mixture until fully incorporated, ensuring there are no streaks of egg visible. The batter will become creamy and slightly thicker after this step, which will help bind the cookie dough.
-
In another bowl, whisk together the flour, baking powder, and salt. This step is important, as it ensures even distribution of the dry ingredients throughout the dough. Pay attention to properly whisking together 3 cups of all-purpose flour, 1 teaspoon of baking powder, and 1/4 teaspoon of salt until well mixed.
-
Gradually mix the dry ingredients into the wet ingredients. Slowly combine the dry mixture with the wet ingredients, stirring gently until just incorporated. Overmixing can lead to toughness, so be attentive to ensure that there are no visible pockets of flour, but some appearances of the mixture coming together is fine.
-
Divide the dough into portions based on how many colors you want to use and dye each portion with food coloring. For vibrant pinwheel colors, segment your dough into equal parts—usually, sections of 2 to 4 work well. Add your food coloring to each portion, incorporating thoroughly until the colors are evenly distributed. This is where creativity truly shines!
-
Roll each colored dough into a log and stack them together, then roll all together into a single log. Once each portion is vividly colored, roll each into a log shape. Place the logs side by side and gently reshape them into one larger log, ensuring that the colors merge slightly at the edges. The pattern will create the signature pinwheel effect.
-
Wrap in plastic wrap and refrigerate for at least 2 hours. This chilling step is crucial; it firms up the dough, which helps maintain shape while baking. After wrapping the dough tightly in plastic wrap, refrigerate the log. This process can also be done a day in advance, making it a wonderful make-ahead option.
-
Preheat the oven to 350°F (175°C). When you’re ready to bake, preheat your oven to the specified temperature. This preheating ensures that the cookies start baking immediately once they’re placed in the oven, promoting even cooking and browning.
-
Slice the chilled dough into 1/4-inch thick slices and place them on a lined baking sheet. Using a sharp knife, carefully slice the chilled log into equal 1/4-inch thick slices. Arrange them on the prepared baking sheet, ensuring about 2 inches of space between each cookie, as they will expand slightly during baking.
-
Optionally, sprinkle with sprinkles. For an extra festive touch, you can sprinkle colorful sprinkles on top of the sliced cookies before baking. This step adds a fun crunch and visual appeal, elevating the cookie’s festive nature.
-
Bake for 10-12 minutes or until edges are lightly golden. Keep an eye on your cookies as they bake; you want to remove them from the oven just as the edges turn lightly golden. While the cookies might initially seem soft, they will firm up as they cool, so don’t be alarmed if they seem undercooked at first.
-
Let cool before enjoying! Once you’ve baked your cookies to perfection, remove them from the oven and let them cool on a wire rack. Allowing them to cool slightly enhances the texture, making them easier to handle and more enjoyable to eat.
Understanding the Flavor and Texture
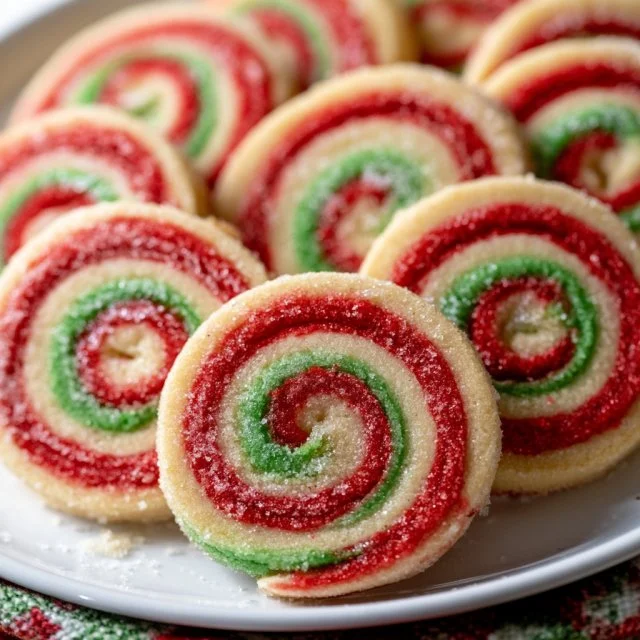
The finished Christmas Pinwheel Cookies delight the senses with their rich buttery flavor, enhanced by the sweetness and inviting aroma of vanilla. The interplay between buttery richness and sweetness makes each bite satisfying. The colorful swirls not only provide a feast for the eyes but also create layers of excitement in terms of taste, as each layer may pick up slightly different flavors or intensities, depending on how they’re mixed.
The cookies typically display a tender yet slightly firm texture, achieved through the careful balance of ingredients and baking techniques. The edges may exhibit a slight crispness, providing a lovely contrast to the softer center. The key to a perfect texture lies in the mixing; overworking the dough before baking can lead to a tougher cookie. Proper baking time also contributes to achieving the ideal texture. A slight golden edge indicates that they are perfectly baked, promoting a delightful crunch upon biting into them.
The beautiful presentation of the swirled colors speaks to the holiday spirit, and the cookies are often made more enticing by the addition of sprinkles. With the right attention to detail throughout the baking process, you can achieve a batch of Christmas Pinwheel Cookies that are not only visually appealing but also delectable, ensuring that they become a cherished part of your holiday traditions.
Pro Tips
A few small techniques can improve your Christmas Pinwheel Cookies and ensure they come out perfectly every time. Below are some tips to enhance your baking experience:
| Tip | Description |
|---|---|
| Use Room Temperature Ingredients | Allow butter and eggs to come to room temperature before mixing, which aids better incorporation and creates a lighter, fluffier texture. |
| Chill Your Dough | Refrigerating the dough helps to firm it up, preventing the cookies from spreading too much during baking and maintaining their pinwheel shape. |
| Don’t Skip the Baking Sheet Lining | Using parchment paper on your baking sheet prevents sticking and ensures even cooking, making clean-up significantly easier. |
| Monitor Baking Closely | Keep a close watch on your cookies as they bake, removing them as soon as the edges turn lightly golden to avoid over-baking. |
In addition, it’s helpful to have all your sprinkles and decorations ready before you start baking. This will streamline your process and ensure that you’re decorating while the cookies are still warm, allowing for better adherence.
Lastly, if you find yourself short on time or needing more colors, consider using store-bought colored dough instead—though homemade will always lend more freshness and flavor.
Why You’ll Love This Recipe
Christmas Pinwheel Cookies blend fun and flavor, creating a delightful treat anyone can enjoy. Their vibrant appearance is sure to elevate any holiday gathering, making them perfect for parties, family gatherings, or as a sweet surprise for guests. Additionally, the ease of the recipe allows it to be accessible for novice bakers, ensuring that even those new to baking can create these festive delights.
These cookies provide flexibility beyond their joyful appearance; they can serve as a delightful canvas for creativity in both color and decorations. The option to include sprinkles or additional flavors allows bakers to customize according to personal tastes, making them perfect for any gathering.
Moreover, their make-ahead capabilities mean you can enjoy holiday baking without the last-minute rush. The cookies can be made days in advance and still taste fresh, with their colors maintaining vibrancy and their textures remaining inviting.
In summary, Christmas Pinwheel Cookies are charming not only because of their beauty but also for their flavor, versatility, and accessibility. They are bound to bring a smile to everyone’s face during the holiday season.
How to Serve Christmas Pinwheel Cookies
Presenting your Christmas Pinwheel Cookies can be as fun as making them. To showcase their vibrant swirls, consider placing them on a festive platter adorned with seasonal decorations like pinecones or holly. They can also be arranged in colorful tins or boxes, which makes them perfect gifts to share with neighbors or loved ones during the holidays.
For an enticing dessert table, pair these cookies with an assortment of other festive treats like gingerbread men, peppermint bark, or spiced nuts. These complementary flavors enhance the holiday experience and give guests various options to indulge in delightful bites.
Consider the setting in which you’re serving these cookies as well. For a casual family gathering, you can stack them in a decorative jar on the counter for guests to help themselves. For more formal occasions, display them alongside a hot chocolate bar with marshmallows, whipped cream, and peppermint sticks as delectable accompaniments.
When it comes to beverages, warm drinks like spiced cider or hot chocolate make delightful pairings with the buttery sweetness of pinwheel cookies. Each sip and bite combines beautifully to create a comforting taste of the holiday season.
How to Store Christmas Pinwheel Cookies
After delighting in your batch of Christmas Pinwheel Cookies, proper storage ensures they remain fresh for days to come. To store your cookies, allow them to cool completely on a wire rack; this step is crucial to prevent the cookies from becoming soggy.
Once cooled, you can package the cookies in an airtight container lined with parchment paper. Storing them this way helps maintain their crisp edges and soft centers. If you’re planning to keep them for more than a few days, consider freezing some. For freezing, place the cookies in a single layer on a baking sheet and freeze until firm before transferring them to a resealable plastic bag or an airtight container.
In the refrigerator, they can stay fresh for up to one week, while in the freezer, they can maintain quality for about three months. When storing, keep them in a cool, dry area to help prevent condensation that could lead to texture changes.
While these cookies are delicious even days after being baked, they are best enjoyed fresh, so plan to share them soon after preparation!
Tips to Make Christmas Pinwheel Cookies
To refine your baking process and elevate your Christmas Pinwheel Cookies, consider focusing on several key areas throughout your preparation. Here are some practical tips that can help improve the final product and ensure success:
-
Weigh Your Ingredients: If you have a kitchen scale, weighing your ingredients can lead to greater accuracy, yielding more consistent results. Baking often relies on precise measurements, so this small step can make a significant difference.
-
Control Dough Temperature: Keeping the dough cool while working with it is crucial. If your kitchen is warm, consider popping the dough back into the refrigerator temporarily to prevent it from becoming too soft and unmanageable.
-
Check Dough Thickness: When rolling each dough layer, ensure consistent thickness. If rolled too thin, the colors may not hold up well during slicing. Aim for a uniform thickness of about 1/4 inch to create well-formed cookies.
-
Experiment with Flavors and Colors: Don’t hesitate to try different types of food coloring or flavor extracts. Flavors such as peppermint, almond, or even citrus zest can add a delightful twist to your pinwheel cookies.
These tips can reinforce your baking process and lead to a batch that looks, feels, and tastes exceptional.
Variations and Substitutions
While Christmas Pinwheel Cookies are perfect as is, variations and substitutions can add excitement to the recipe. Here are some ideas:
-
Gluten-Free Option: For those avoiding gluten, substitute the all-purpose flour with a gluten-free flour blend made for baking. This option can maintain a similar texture while keeping the cookies safe for gluten-sensitive individuals.
-
Dairy-Free Version: Replace the unsalted butter with a plant-based butter alternative or coconut oil. Ensure the alternatives you choose do not contain dairy for a vegan-friendly version.
-
Add Flavors: Enhance the basic flavor by adding spices or extracts. Consider incorporating almond extract, cinnamon, or even fresh citrus zest for added depth in flavor.
-
Adjust Colors: Color your dough to match themes other than Christmas. Pastel shades could work wonders for spring and summer occasions, making this recipe suitable year-round.
These variations allow bakers to personalize their cookie experience, widening the enjoyment and holiday fun beyond the traditional recipe.
Storage and Reheating
Proper storage of your vibrant Christmas Pinwheel Cookies ensures they maintain their delicious flavor and texture for as long as possible. To begin, allow any leftover cookies to cool completely on the counter before packaging them. This step is crucial to avoid moisture build-up, which can lead to soggy cookies.
Once cooled, store the cookies in an airtight container or resealable plastic bag. If stacked, place parchment paper between layers to prevent sticking. When stored this way, the cookies should keep fresh at room temperature for about one week.
If you want to enjoy your cookies later, consider freezing them. Place the cookies in an airtight container, separating layers with parchment paper. They will last in the freezer for up to three months. When you’re ready to eat them, simply remove them from the freezer and let them sit at room temperature for about 15–20 minutes.
Reheating is generally not needed for these cookies, as they can be eaten straight from the container. However, if you prefer them warm, you can put them in a preheated oven at 300°F (150°C) for about 5–7 minutes. Be careful not to overheat them to prevent drying out.
Additionally, microwaving a cookie for 10-15 seconds can provide a warm treat on demand, enhancing the buttery flavor even further.
Customization Ideas
Personifying the Christmas Pinwheel Cookies can add more fun to the baking experience. Here are several ideas for customization:
-
Fun Fillings: Consider adding a filling to the cookies by placing a small dollop of jam, chocolate, or Nutella between the layers before rolling them into a log. This addition can create a delightful surprise when biting into the cookie.
-
Top Coating: Sprinkle the tops of the cookies with powdered sugar or drizzles of melted chocolate for an elegant finish. This caters to flavor while enhancing visual appeal.
-
Shape Variations: Instead of just making pinwheels, you can explore other shapes. Use cookie cutters once the colored logs are rolled together for a festive display with various shapes, such as stars or trees.
-
Seasonal Decorations: Utilize seasonal themes beyond Christmas. Tweak the colors and toppings depending on the holiday or occasion, allowing the recipe to fit year-round celebrations.
These customization ideas enable bakers to tailor their cookies per personal tastes and occasions, ensuring that they can continually create something new and exciting.
Common Mistakes to Avoid
Understanding common pitfalls can prevent frustrations when making your Christmas Pinwheel Cookies. Here are some mistakes to watch for:
-
Overmixing: When combining the wet and dry ingredients, overmixing can develop gluten, leading to a tough cookie. Mix only until ingredients are just combined for a more tender result.
-
Incorrect Temperature of Ingredients: Failing to bring the butter and eggs to room temperature can cause the dough to come together poorly, resulting in inconsistent texture and spreading. Always allow your ingredients to come to room temperature before mixing.
-
Inconsistent Dough Thickness: Rolling your dough to inconsistent thickness can result in uneven baking. Aim for uniform thickness throughout to ensure all cookies bake evenly and properly.
-
Not Chilling the Dough: Skipping the chilling step will cause the cookies to spread too much while baking. Always refrigerate your dough as instructed, ensuring the cookies maintain their shape.
-
Deciding to Skip Parchment Paper: Not lining your baking sheet with parchment paper can lead to disastrous sticking, which may result in half the cookies stuck to the pan. Always use it for clean and easy transferring.
By avoiding these mistakes, bakers can increase their confidence and achieve a successful batch of Christmas Pinwheel Cookies every time.
Serving Occasions
Christmas Pinwheel Cookies are incredibly versatile, fitting right into various serving occasions. They are particularly captivating during holiday gatherings, where their appearance can elevate the dessert table and spice up any festive mood. These cookies also make excellent gifts when packaged in decorative tins, perfect for showing appreciation to friends, neighbors, or colleagues.
Beyond holidays, their colorful presentation accommodates birthdays and celebratory events. The fun aspect of customizing the colors allows these cookies to match any theme, making them suitable for seasonal parties or school events.
During casual gatherings, they can serve as delightful refreshments alongside coffee or tea. Guests will appreciate the opportunity to indulge in a playful yet delectable treat while mingling.
Summed up, the vibrant colors and rich flavors of Christmas Pinwheel Cookies match any occasion, spreading joy whether at family dinners, parties, or intimate gatherings.
Why Make This Recipe?
Christmas Pinwheel Cookies stand out due to their unique blend of appealing flavors and striking visuals. Unlike ordinary cookies, their creative design adds an element of fun to the kitchen, allowing bakers to unleash their creativity while maintaining a deliciously sweet outcome.
Beyond aesthetics, their customizable nature means that everyone can make them uniquely theirs. Mixing and matching color combinations or unique flavor infusions keeps the recipe fresh and exciting, making it worth repeating throughout the year rather than just during holidays.
Furthermore, these cookies are a delightful way to engage family members in the kitchen, fostering a sense of collaboration. This shared experience can lead to cherished memories that last a lifetime, making the preparation of these cookies an event in itself.
In short, Christmas Pinwheel Cookies are not only visually stunning but also add joy and flavor to any occasion, making them a worthy addition to any baker’s recipe collection.
Make-Ahead Preparation
When it comes to holiday baking, make-ahead preparation can save time and reduce stress. Christmas Pinwheel Cookies lend themselves wonderfully to this approach. You can prepare the cookie dough in advance and refrigerate or freeze it until you’re ready to bake.
After mixing the dough, simply shape it into a log, wrap it securely in plastic wrap, and place it in the refrigerator for up to a week or in the freezer for a few months. This flexibility allows you to control your baking schedule while ensuring fresh cookies whenever you desire.
In instances where you’re planning to bake multiple treats, having the dough ready can streamline the process. Just take it out of the refrigerator or freezer, slice it, and pop it into the oven for freshly baked cookies in no time.
By harnessing the power of make-ahead preparation, you can enjoy the pleasure of delicious Christmas Pinwheel Cookies without the last-minute rush during the holiday season.
Equipment and Kitchen Preparation
To execute the Christmas Pinwheel Cookies successfully, having the right equipment and a well-prepared kitchen is essential. Here’s what you’ll need:
-
Mixing Bowls: Essential for combining your ingredients effectively. Use a large bowl for the wet and dry mixtures and a medium bowl for creating colors.
-
Electric Mixer: While a whisk works, using an electric mixer speeds up the creaming of butter and sugar, providing a fluffy texture more efficiently.
-
Spatula: A flexible spatula is invaluable for scraping down the sides of the mixing bowl, ensuring nothing goes unmixed.
-
Measuring Cups and Spoons: Accurate measurements are crucial for baking, so ensure you have dry measuring cups for flour and liquid measuring cups for wet ingredients.
-
Plastic Wrap: This is used to wrap your dough when chilling it in the refrigerator, ensuring it retains moisture and shape.
-
Baking Sheets: Invest in good-quality baking sheets lined with parchment paper to prevent sticking and ensure even baking.
Preparing your workspace includes cleaning surfaces and organizing ingredients for easy access. Having everything in place not only saves time but also makes the baking experience more enjoyable.
FAQs
Q1: Can I use salted butter instead of unsalted butter?
A1: Yes, you can but it’s preferable to stick with unsalted butter. Salted butter can lead to a more salted flavor, which may not be ideal. If you do use salted, consider reducing any additional salt in the recipe for balance.
Q2: How do I know when my cookies are done baking?
A2: Look for lightly golden edges and a soft, slightly puffed center. The cookies should feel set but may have a soft appearance in the center. They will continue to firm up as they cool.
Q3: Can I freeze the dough before baking?
A3: Absolutely! You can wrap the dough tightly in plastic wrap and freeze it for up to three months. When ready to bake, allow it to thaw in the refrigerator before slicing and baking.
Q4: What can I use if I don’t have food coloring?
A4: If food coloring isn’t available, you can use natural alternatives like beet juice or matcha for color. Keep in mind that the colors may not be as vibrant, but they can still provide an interesting look.
Q5: Can I make the cookies smaller or larger?
A5: Yes, you can adjust the size of the cookies to your preference. Keep in mind that baking times may vary, so check for doneness regularly if altering the size.
Q6: How should I store leftover cookies?
A6: Store leftover cookies in an airtight container at room temperature for up to one week, or you can freeze them for longer storage, separated with parchment paper to avoid sticking.
Q7: Can I add nuts to the dough?
A7: Absolutely! Chopped nuts like pecans or walnuts can be incorporated for added texture and flavor. Just be cautious as it may alter the appearance of the pinwheels slightly.
Q8: What do I do if my dough is too sticky?
A8: If the dough is sticky, try chilling it for a little longer before rolling. Alternatively, dust your workspace lightly with flour while rolling to make handling easier.
Disclaimer
Nutritional information is approximate and may vary based on ingredient brands, substitutions, portion sizes, and preparation methods.