

Spiderweb Brownies
Halloween desserts are always more fun when they look as spooky as they taste, and these Spooky Spiderweb Brownies are an easy way to bring a little Halloween magic to your dessert table.
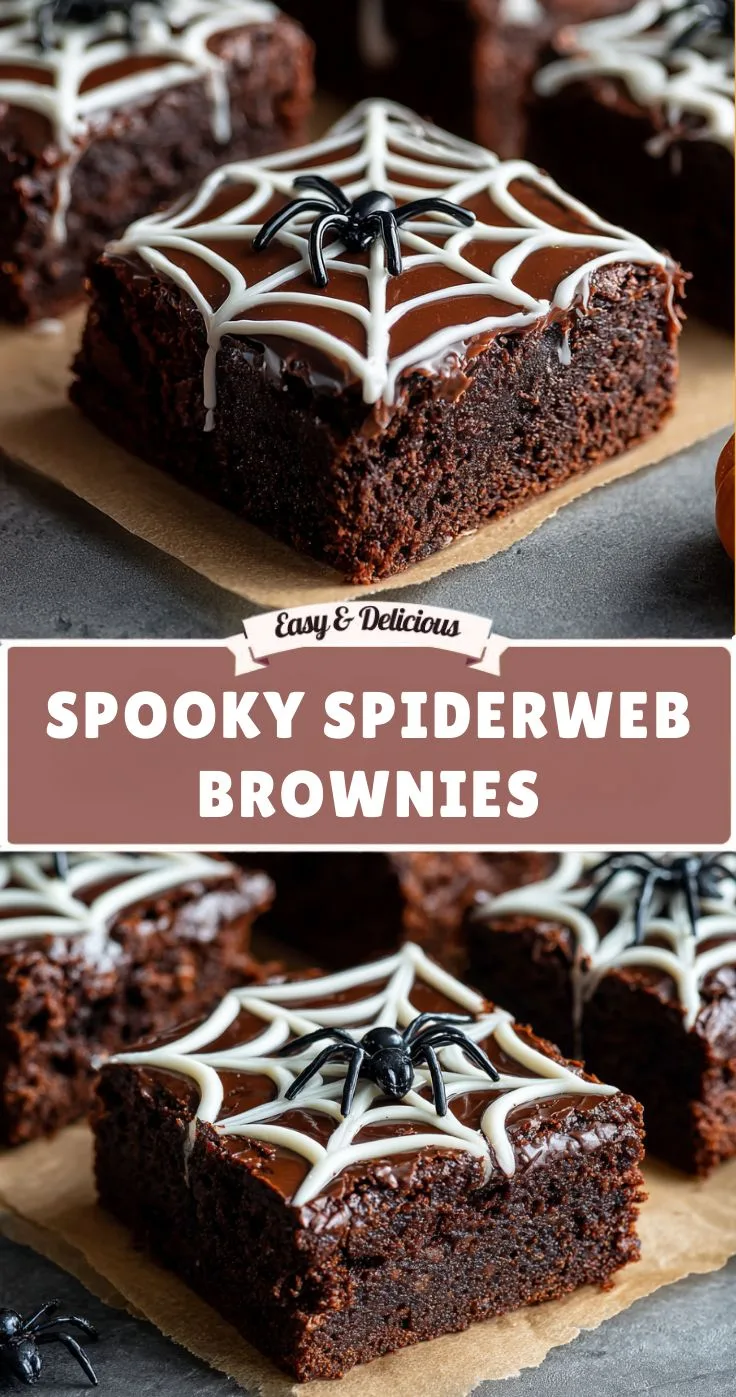
Imagine rich, fudgy chocolate brownies covered with a delicate white chocolate spiderweb. The decoration may look impressive, but it is surprisingly simple to create. All you need is melted white chocolate, a piping bag or zip-top bag, and a toothpick to transform ordinary brownies into a festive Halloween dessert.
The brownie base is wonderfully chocolatey and chewy, while the white chocolate adds a sweet contrast. Optional chocolate chips can make the brownies even more indulgent, and a small chocolate or gummy spider placed on top gives each square an extra spooky touch.
Because the recipe starts with a convenient brownie mix, these treats are especially easy to prepare when you are short on time. You can also use your favorite homemade brownie batter if you prefer to bake from scratch.
With only about 10 minutes of preparation and 25 minutes of baking, these brownies are an excellent choice for Halloween parties, school celebrations, family movie nights, or simply a fun seasonal dessert.
Why You’ll Love These Spiderweb Brownies
They look much harder than they are
The spiderweb decoration is created using a few simple circles and a toothpick. You do not need professional cake-decorating skills.
Rich and fudgy
Chocolate chips can be stirred into the brownie batter to add extra chocolate flavor and pockets of melted chocolate throughout the brownies.
Perfect for Halloween
The black-and-white contrast of dark chocolate brownies and a bright white spiderweb immediately gives these treats a spooky Halloween appearance.
Great for parties
Cut the brownies into individual squares and arrange them on a platter. Each piece becomes its own little spiderweb dessert.
Easy to customize
You can use white chocolate, vanilla candy melts, or even cream cheese frosting for the web. Add candy spiders, gummy spiders, chocolate sprinkles, or other Halloween decorations for a personalized finish.
Recipe Details
| Detail | Information |
|---|---|
| Prep Time | 10 minutes |
| Cook Time | 25 minutes |
| Total Time | 35 minutes |
| Servings | Approximately 12–16 squares |
| Difficulty | Easy |
| Method | Baking |
| Best For | Halloween parties, dessert tables, movie nights |
Ingredients
1 Box Brownie Mix
A boxed brownie mix makes this recipe quick and convenient.
You can use your favorite brownie mix, or substitute your preferred homemade brownie batter if you want to make the brownies from scratch.
2 Large Eggs
Eggs help provide structure and richness to the brownie batter.
Use large eggs for the intended texture and consistency.
½ Cup Vegetable Oil
Vegetable oil contributes moisture and helps produce soft, fudgy brownies.
3 Tablespoons Water
A small amount of water helps bring the brownie batter together according to the boxed-mix method used in this recipe.
If your particular brownie mix specifies different amounts of eggs, oil, or water, follow the package directions for that mix.
½ Cup Semi-Sweet Chocolate Chips
Chocolate chips are optional, but they add extra chocolate flavor and create delicious melted chocolate pockets throughout the brownies.
For an especially chocolate-forward dessert, stir them into the batter before baking.
½ Cup White Chocolate Chips or Vanilla Candy Melts
The white chocolate is used to create the spiderweb decoration.
Vanilla candy melts are another convenient option because they melt smoothly and are easy to pipe.
How to Make Spooky Spiderweb Brownies
Step 1: Prepare the Brownie Batter
Start by preheating your oven to 350°F (175°C).
Prepare a 9×13-inch baking dish by lightly greasing it.
In a large mixing bowl, combine the brownie mix, eggs, vegetable oil, and water.
Stir until the batter is smooth and well combined.
Do not overmix once the ingredients are incorporated. The goal is simply to make sure there are no large pockets of dry brownie mix remaining.
If you want extra chocolate flavor, add the semi-sweet chocolate chips and gently fold them into the batter.
The chocolate chips are optional, but they are a great addition if you prefer brownies with extra fudgy chocolate pockets.
Step 2: Bake the Brownies
Pour the prepared batter into the greased 9×13-inch baking dish.
Use a spatula to spread the batter evenly from corner to corner.
Place the pan in the preheated oven and bake for approximately 25–30 minutes.
Start checking toward the lower end of the baking time.
The brownies are ready when a toothpick inserted into the center comes out with a few moist crumbs attached.
You do not want the toothpick to come out completely wet with raw batter, but a few moist crumbs are ideal if you want a fudgy texture.
Avoid overbaking because brownies continue to firm as they cool.
Once baked, remove the pan from the oven and place it on a cooling surface.
Allow the brownies to cool completely before decorating.
This step is important. If the brownies are still warm, the white chocolate decoration can melt or become difficult to control.
Step 3: Melt the White Chocolate
While the brownies cool, prepare the spiderweb decoration.
Place the white chocolate chips or vanilla candy melts into a microwave-safe bowl.
Microwave in 20-second intervals, stirring thoroughly after each interval.
Continue until the chocolate is completely smooth.
Short heating intervals help prevent the chocolate from overheating.
Once melted, transfer the chocolate to a piping bag.
If you do not have a piping bag, a clean zip-top bag works perfectly well. Spoon the melted chocolate into the bag, seal it, and carefully snip off a very small corner.
The smaller the opening, the more delicate and controlled your lines will be.
Step 4: Create the Spiderweb
Once the brownies are completely cool, it is time for the most fun part.
Pipe 3–4 concentric circles over the surface of the brownies.
The circles do not need to be perfectly round. Slightly irregular circles can actually make the web look more natural.
Start with a larger circle around the outer area and continue inward, leaving enough space between each circle.
Next, take a clean toothpick.
Starting near the center of the web, gently drag the toothpick outward through the circles.
Repeat this around the entire brownie surface, spacing the lines evenly.
As you drag the toothpick from the center toward the outside, the white chocolate lines will pull into the familiar spiderweb pattern.
Wipe the toothpick clean between strokes if necessary.
The key to the web effect
Always pull the toothpick from the center outward rather than randomly moving it across the chocolate.
This creates the characteristic radial web pattern.
You can create one large web covering the entire brownie pan, or make several smaller webs depending on how you plan to cut the brownies.
Step 5: Add a Creepy Touch
For an extra Halloween effect, place a small chocolate candy spider or gummy spider on top of each brownie square.
You can position the spider in the center of the web or slightly off to one side.
If you are serving the brownies to young children, make sure any decorative candies are appropriate for the age group.
The spider is optional, but it can make the finished brownies look especially festive.
Tips for Perfect Spiderweb Brownies
Let the brownies cool completely
This is one of the most important steps.
Decorating warm brownies can cause the white chocolate to soften or spread. Allow the brownies to cool completely before piping the spiderweb.
Do not overbake
For fudgy brownies, look for a toothpick with a few moist crumbs rather than waiting until it comes out completely clean.
Overbaking can result in a drier texture.
Use a small piping tip
Whether you use a piping bag or zip-top bag, cut a small opening.
A thin stream of white chocolate gives you much more control when drawing the circles and web lines.
Work quickly once the chocolate is melted
White chocolate and candy melts become thicker as they cool.
If the chocolate begins to firm up too much for piping, gently warm it again in very short intervals.
Practice the web first
If you are nervous about decorating directly on the brownies, practice making a few circles on parchment paper.
Once you get comfortable with the motion, the actual decoration becomes much easier.
Refrigerate for cleaner slices
If you want sharp, neat brownie squares, place the decorated brownies in the refrigerator for a short time before cutting.
The chilled chocolate becomes firmer, making it easier to slice through the web without smearing it.
How to Get Extra-Fudgy Brownies
The texture of the brownies depends heavily on baking time.
For a fudgier result, avoid leaving the brownies in the oven longer than necessary.
The toothpick test is helpful, but remember that the center should not look like completely raw batter.
Allowing the brownies to cool completely also helps the center finish setting while retaining its rich texture.
Adding semi-sweet chocolate chips to the batter is another easy way to increase the chocolate intensity.
For the best chocolate experience, use a brownie mix you already enjoy because the brownie base is the foundation of the dessert.
Spiderweb Decoration Variations
The classic white chocolate web is simple and effective, but you can change the design in several ways.
Cream Cheese Spiderweb
For a tangier topping, use cream cheese frosting instead of white chocolate.
Pipe thin circles over the cooled brownies and use the same toothpick technique to pull the lines outward.
Purple Spiderweb
Use purple candy melts for a colorful Halloween variation.
Purple looks especially striking against dark chocolate brownies.
Orange Spiderweb
Orange candy melts can give the brownies a traditional Halloween color combination.
Pair orange webs with black candy spiders for a bold presentation.
Mini Spiderweb Brownies
Instead of decorating the entire pan, cut the brownies into squares first and pipe a small web individually onto each piece.
This takes slightly more time but gives every brownie its own unique decoration.
How to Cut Spiderweb Brownies
For clean Halloween brownie squares, allow the brownies to cool completely before slicing.
You can also refrigerate them before cutting.
Use a sharp knife and wipe the blade clean between cuts.
If you decorated the entire surface with one large web, plan your cuts before slicing so the web design remains visible on each piece.
For party presentation, aim for relatively similar-sized squares so the platter looks organized.
Make-Ahead Instructions
These brownies are excellent for preparing ahead of a Halloween gathering.
You can bake the brownie base earlier in the day and allow it to cool completely.
The spiderweb can then be added several hours before serving.
If you prefer to prepare them the day before, store the finished brownies in an airtight container.
Refrigeration can help keep the decorative chocolate firm, especially if your kitchen is warm.
How to Store Spiderweb Brownies
Store leftover brownies in an airtight container for up to 4 days.
Keep them at room temperature if your kitchen is cool and the chocolate decoration remains firm.
If the environment is warm, refrigeration can help prevent the spiderweb from becoming too soft.
The brownies may become even fudgier the next day as they sit.
When refrigerated, allow them to sit briefly at room temperature before serving if you prefer a softer texture.
How to Serve
Arrange the brownie squares on a Halloween-themed platter.
For a simple dessert table, place the brownies in neat rows with the spiderweb designs facing upward.
You can surround the platter with Halloween decorations or pair the brownies with other seasonal desserts.
They are especially fun alongside cupcakes, cookies, chocolate-covered treats, or other spooky desserts.
For a Halloween movie night, serve them as individual squares with a warm drink or alongside a larger selection of sweet snacks.
Frequently Asked Questions
Can I use homemade brownie batter?
Yes. The boxed mix is simply a convenient option. You can use your favorite homemade brownie recipe and decorate it in exactly the same way.
Can I use white candy melts instead of white chocolate?
Absolutely. Vanilla or white candy melts work well for piping the spiderweb and can be easier to handle.
Why does my white chocolate keep getting thick?
White chocolate can thicken as it cools. If it becomes difficult to pipe, gently warm it in very short intervals and stir well.
Be careful not to overheat it.
Can I make the spiderweb without a piping bag?
Yes. A clean zip-top bag with a very small corner cut off works as a simple substitute.
Why does my spiderweb not look right?
Make sure you pipe complete circles first, then pull the toothpick from the center toward the outside.
Keeping the outward strokes relatively evenly spaced will help create a recognizable web.
Can I add real spiders?
No. Use edible chocolate candies, gummy spiders, or other food-safe decorations instead.
Can I freeze these brownies?
The brownie base can generally be frozen, but the decorative spiderweb may not retain the same appearance after freezing and thawing. For the best presentation, decorate them closer to serving time.
Nutrition Information
The estimated nutrition per brownie square is:
| Serving Size | Calories | Protein | Carbs | Fat | Fiber | Sugar |
|---|---|---|---|---|---|---|
| 1 square | 320 | 4g | 45g | 15g | 2g | 32g |
Nutrition values are estimates and may vary depending on the brownie mix, chocolate, oil, and other ingredients used, as well as the final serving size.
For specific dietary or medical concerns, check the nutrition information on the exact products you use and consult an appropriate nutrition professional.
Why Spiderweb Brownies Are Perfect for Halloween
There is something especially appealing about a dessert that looks complicated but is actually incredibly easy to make.
These Spiderweb Brownies are a perfect example.
The brownie itself is familiar and comforting, while the white chocolate spiderweb instantly transforms it into a Halloween dessert.
The design is also easy enough for beginners. You do not need to pipe individual spiders, create complicated frosting decorations, or work with elaborate molds.
A few circles, a toothpick, and a simple outward motion are all it takes.
The finished brownies also photograph beautifully. The dark chocolate base provides a strong contrast against the white web, making them ideal for Halloween dessert tables and seasonal food photography.
A Fun Halloween Baking Activity
These brownies can also become a fun activity for children and families.
Bake and cool the brownies ahead of time, then let everyone help decorate.
Give each person a small section of brownie and allow them to create their own spiderweb design.
Some webs may be perfectly symmetrical, while others may be wonderfully messy. That is part of the fun.
You can also provide edible spiders and other Halloween decorations so everyone can personalize their brownie.
Just make sure younger children are supervised when using knives, hot melted chocolate, and the oven.
Final Thoughts
These Spooky Spiderweb Brownies are proof that Halloween desserts do not have to be complicated to look impressive.
With a rich chocolate brownie base, a simple white chocolate spiderweb, and an optional edible spider, you can create a festive dessert that looks perfect for the season.
They take only about 35 minutes from start to finish, making them ideal for busy Halloween preparations. The brownie mix keeps the recipe simple, while the spiderweb decoration gives it a homemade and creative finish.
Whether you are preparing treats for a Halloween party, a family gathering, or a spooky movie night, these brownies are guaranteed to bring plenty of chocolatey fun to the table.
Fudgy brownies, a simple spiderweb, and a little Halloween creativity are all you need to turn an ordinary brownie into a spooky seasonal treat.