
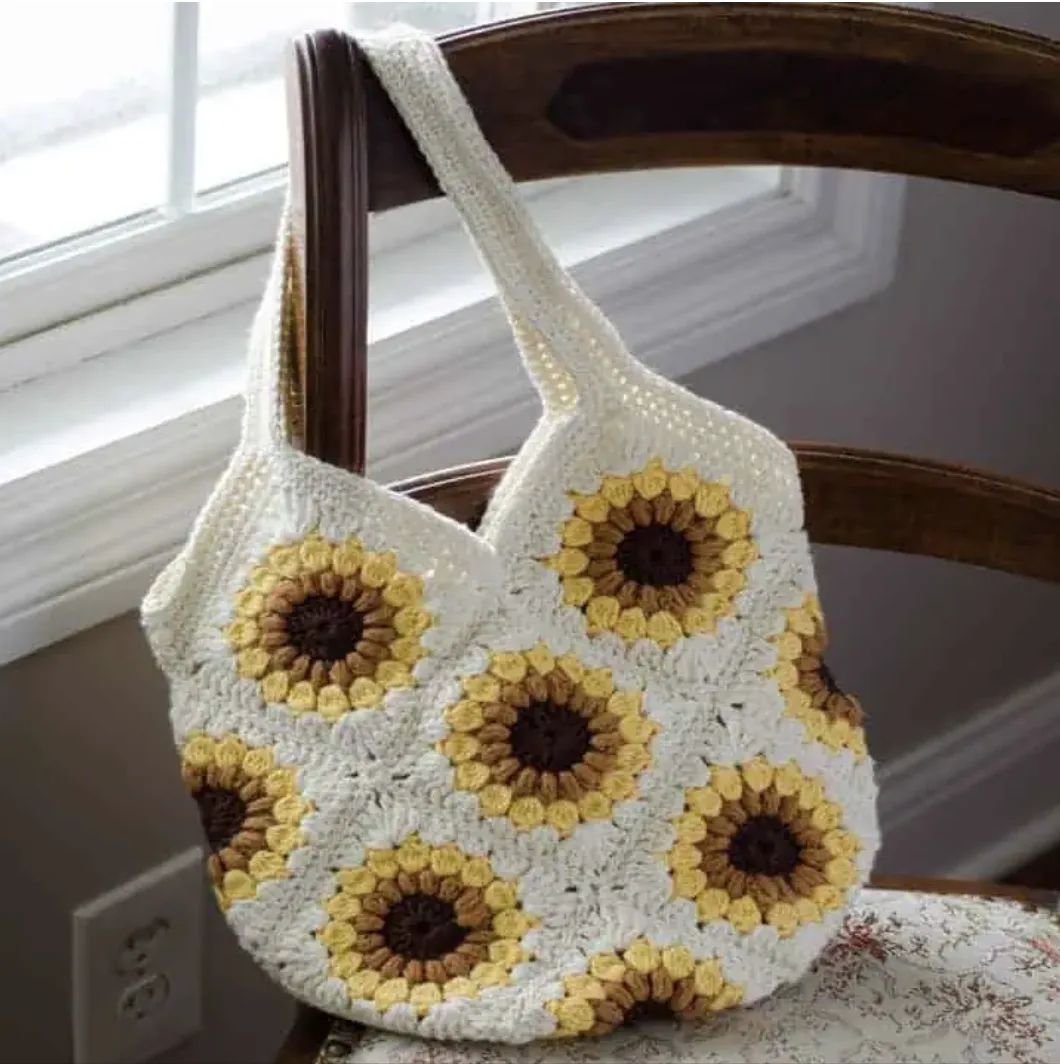
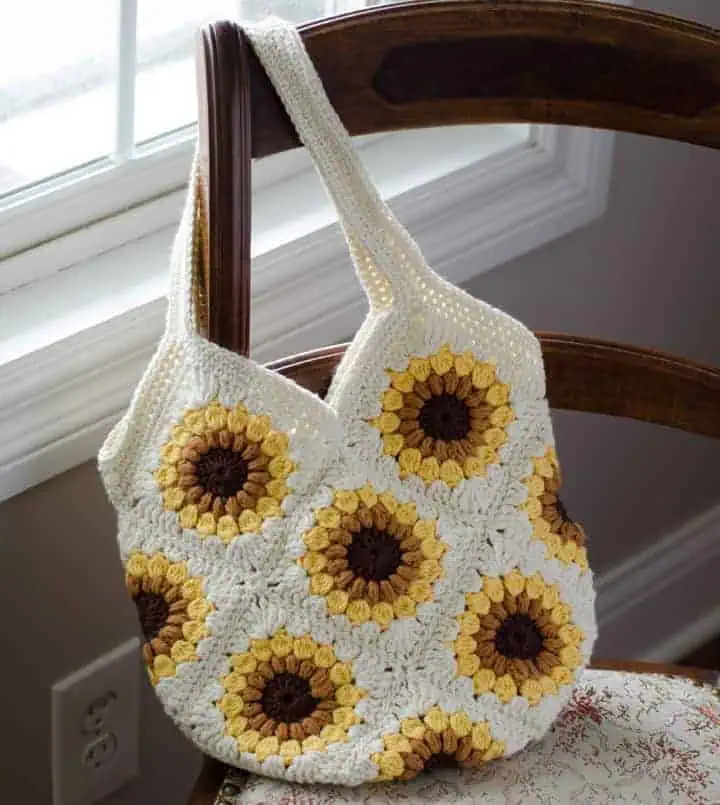
If you are looking for a crochet bag that feels bright, cheerful, practical, and unmistakably summery, the Sweet Summer Sunflower Bag is a wonderful project to settle into. The design takes the familiar charm of granny squares and turns it into a beautiful sunflower-inspired purse using warm ivory, yellow, antique gold, and brown tones.
The beauty of this project is that the sunflower squares do most of the visual work. Once the individual squares are crocheted, they are sewn together into the bag shape, followed by a simple single crochet border and integrated handles. The finished bag is approximately 11 inches wide by 19 inches tall, including the handles, although the original pattern notes that your finished size may vary depending on gauge and individual crochet style.
This is also a particularly enjoyable project for crocheters who like making several small motifs rather than working on one large piece from beginning to end. You will make 13 sunflower squares, assemble them, and then build the top edge and handles around the completed bag.
What Makes This Sunflower Crochet Bag Special?
The sunflower motif is created through several rounds of texture and color. The center begins with double crochet stitches, followed by a round of puff stitches and then a round of bobble stitches. The final round transforms the circular center into a square with corners and straight sides.
That construction gives the bag plenty of visual interest without requiring complicated shaping throughout the entire project. The individual squares are colorful and textured, while the finished bag uses simple single crochet rows for the border and straps.
The sample uses Hobby Lobby I Love This Cotton worsted weight cotton yarn. The yarn works especially well for a purse because it is not too bulky, and the original design is worked with a G6/4mm crochet hook. The fabric is also described as not being too “holey,” making the bag suitable for use without a lining if you prefer a simpler finish.
Project Overview
- Project: Sweet Summer Sunflower Bag
- Finished Size: Approximately 11″ wide by 19″ tall, including handles
- Number of Sunflower Squares: 13
- Hook: US G6/4mm crochet hook
- Yarn: Worsted weight cotton
- Main Sample Yarn: Hobby Lobby I Love This Cotton
- Construction: Crochet sunflower squares sewn together, followed by a crocheted border and handles
- Bag Fabric: The sample is worked without a lining
Keep in mind that the finished dimensions are approximate. If your gauge produces a larger bag, you may need additional ivory yarn. The original instructions also suggest being prepared to change colors in the handle if you run short on the main color.
Materials You Will Need
Gather your supplies before beginning so that the square-making stage can move smoothly from one color to the next.
- US G6/4mm crochet hook
- Worsted weight cotton yarn
- Ivory: 3.5 oz, 1 skein
- Curry/yellow: 1.75 oz
- Antique Gold: 1 oz
- Brown: .75 oz
- Tapestry needle
- Scissors
The sample used almost every bit of the ivory yarn. If your gauge is larger than the sample gauge, or if you want to stripe the handles, the original instructions recommend considering an extra skein of ivory.
Before You Begin: The Two Textured Stitches
Two special stitches create the distinctive sunflower center: the puff stitch and the bobble stitch. Understanding these before beginning the squares makes the first three rounds much easier to follow.
Puff Stitch
Yarn over, insert the hook into the next stitch and pull up a loop to the height of a double crochet, giving you 3 loops on the hook. Yarn over again, insert the hook into the same stitch and pull up another loop, giving you 5 loops on the hook. Yarn over again, insert the hook into the same space and pull up another loop, giving you 7 loops on the hook. Pull the yarn through all loops. Chain 1 to lock in the stitch.
The important point is to keep the loops approximately the height of a double crochet so that the textured round remains even around the sunflower center.
Bobble Stitch
Yarn over, insert the hook into the space between 2 puff stitches and pull up a loop. Yarn over and pull through 2 loops, leaving 2 loops on the hook. Make 3 more incomplete double crochet stitches. You will now have 5 loops on the hook. Yarn over and pull through all 5 loops. Chain 2 to lock in the bobble stitch.
These raised stitches are what give the sunflower center its dimensional appearance, so take care not to work them loosely or unevenly.
Make the 13 Sunflower Granny Squares
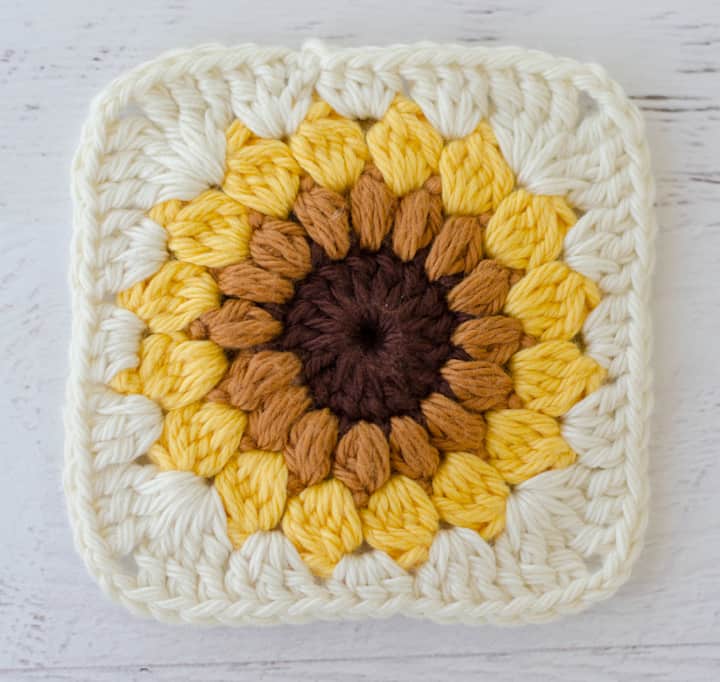
The bag requires 13 crochet sunflower squares. The construction is based on the Starburst Granny Square, with shortened instructions provided below.
Round 1: The Sunflower Center
Using the center color and a G hook, chain 5 and join with a slip stitch to the first chain to form a loop.
Chain 3, which counts as the first double crochet, then make 15 double crochet into the loop. Slip stitch to the top of the first stitch in the round to join. Fasten off the first color.
Stitch count: 16 stitches.
This first round creates the compact center that will support the textured sunflower petals in the following round.
Round 2: Puff Stitch Petals
Attach the second color in any stitch and chain 2.
Work a puff stitch in the same stitch as the joining stitch using the complete puff-stitch method described earlier. Chain 1 to lock the puff stitch.
Continue making puff stitches in all stitches of the previous round. Each puff is made in the next stitch, followed by a chain 1 to secure it.
At the end of the round, slip stitch to the top of the first puff stitch. Fasten off Color 2.
Stitch count: 16 puff stitches.
Round 3: Bobble Texture
This round is worked in bobbles. You may begin by attaching Color 3 between 2 stitches and chaining 3, or you may use a standing stitch.
The original instructions describe beginning with a slip stitch of the new color on the hook, carefully holding a yarn over, and working the first bobble. Continue working bobbles across the round into the spaces of the previous round.
At the end of the round, slip stitch to the top of the first bobble stitch.
Stitch count: 16 bobble stitches.
Fasten off Color 3 before beginning the final square-forming round.
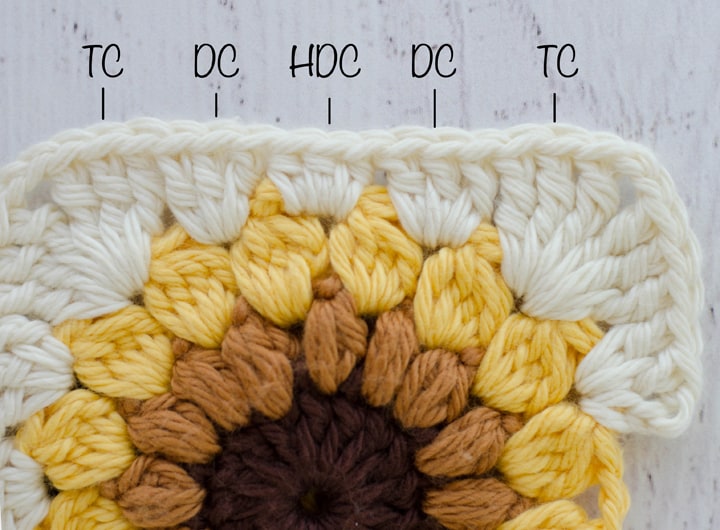
Round 4: Form the Square
Join Color 4 in any space in the previous round. Chain 3, which counts as the first double crochet, then make 2 double crochet in the same space.
In the next space, work the corner sequence: (3 triple crochet, ch 2, 3 triple crochet).
Then work 3 double crochet in the next space, 3 half double crochet in the next space, and 3 double crochet in the next space.
Repeat this sequence from the marked beginning 3 more times.
Then work 3 double crochet in the next space, 3 half double crochet in the last space, and join with a slip stitch to the top of the first double crochet in the round.
An invisible join may be used instead of the slip-stitch join for a neat finish. Fasten off the yarn and weave in the ends.
Repeat the complete square pattern until you have all 13 sunflower squares needed for the bag.
Arrange the Squares Before Sewing
Once all 13 motifs are complete, the next stage is assembly. This is a good point to lay all the squares out according to the sewing diagram before picking up the tapestry needle. Taking a moment to confirm the arrangement helps ensure that the colors and sunflower motifs are facing the intended directions.
The squares are sewn together using whip stitch.
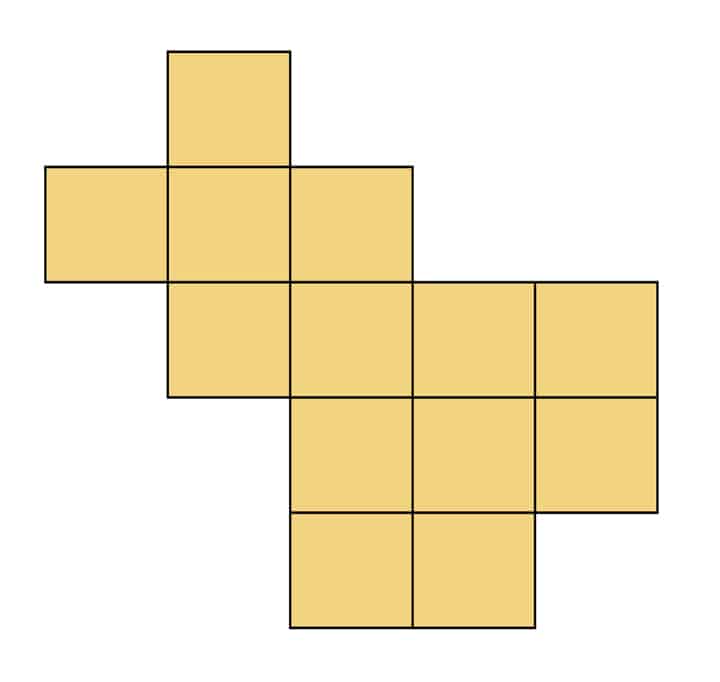
Rotate the work so it matches the second sewing arrangement. Find the center bottom square in the middle of the work and fold it upward so that the two top ends meet.
Fold in the squares that form the sides of the bag and sew those squares to the opposite side, either the front or the back. Continue sewing the squares together that form the lower sides of the bag.
Repeat the same process on the opposite side of the bag.
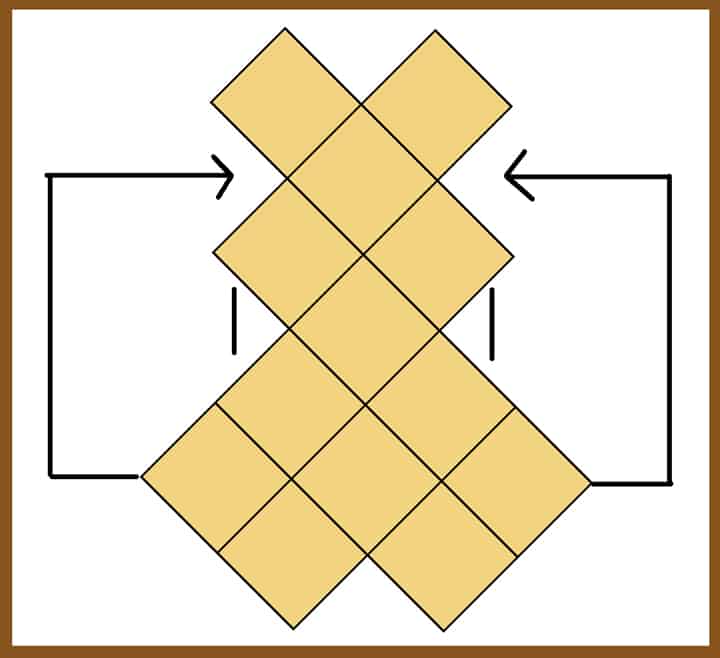
At this stage, the granny square blocks should be attached everywhere except the upper half of the two squares on either side of the bag. This unfinished area becomes the opening of the sunflower bag.
The top edge resembles two mountains, with peaks at the points where the handles will be formed and valleys at the center front, center back, and both sides.
Understanding the Border and Handle Construction
The border and handles require a little observation while you crochet. The valleys can behave differently depending on gauge, sewing tension, and individual crochet style. Even if two crocheters follow the same square arrangement, their valleys may not sit exactly the same way.
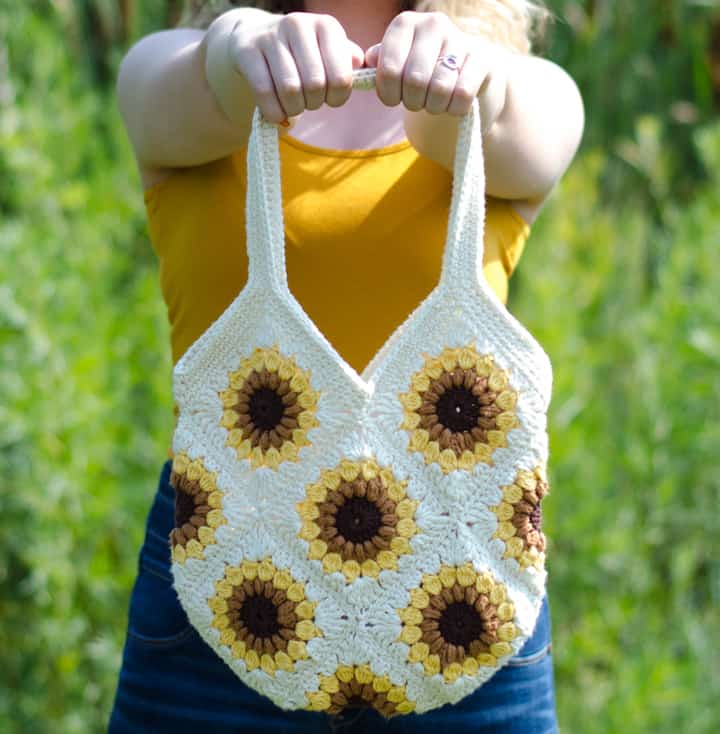
Put your work down occasionally and look at how the fabric is laying. The goal is to avoid holes in the valleys and prevent the top edge from pulling in an unwanted direction.
There are several ways to handle decreases at a valley. You can skip the center stitch, decrease 2 stitches together over the center, or decrease 3 stitches together over the center. There is no single “right” method; the important point is to choose the approach that keeps your particular bag neat.
For symmetry, use the same method on corresponding areas. For example, if you skip the center stitch at the center front valley, also skip the center stitch at the center back valley.
Round 1 of the Bag Border
Attach ivory yarn approximately 4–5 stitches before a side valley.
Work single crochet around the bag. At the top of each peak, work 2 single crochet into the peak stitches that form the corner of the square.
When reaching a valley, single crochet to the last stitch of the square that forms one side of the valley. Do not work any stitch into the point where the two squares join. Continue single crocheting starting with the first stitch of the next square.
If this creates a large hole at the side, work a decrease that includes the point where the two squares join.
At the end of the round, slip stitch to the first single crochet.
Round 2: Begin the Handles
Chain 1 and single crochet in the same stitch. Continue working single crochet around.
When you reach a peak, chain 70. Skip the next valley and join to the opposite peak, taking care not to twist the chain.
Continue single crocheting across the row.
When you reach the side valley, work a single crochet decrease. The decrease may be worked over 2 or 3 stitches. Try one method and continue several stitches beyond the valley to see how the fabric lays. If you do not like the result, go back and try the other method.
Consistency is important. The decreases on both sides of the bag should match, and the decreases at the center front and center back should match for each row.
At the opposite peak, chain 70 again. Skip the next valley and join to the opposite peak, being careful not to twist the chain. Continue single crocheting around and join with a slip stitch to the first stitch.
Rounds 3 and 4: Build the Outside of the Handles
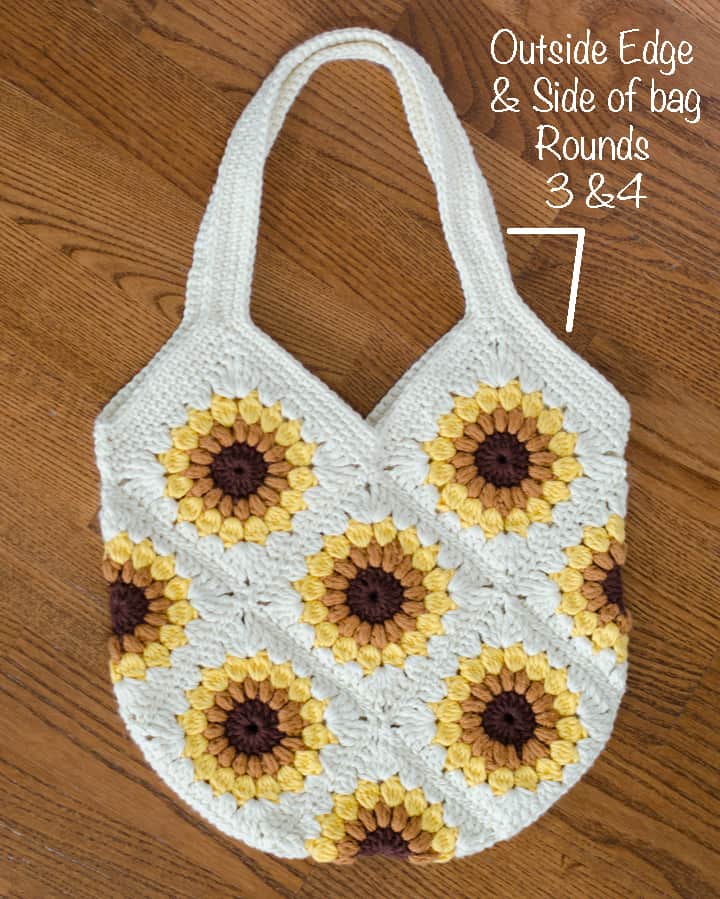
Round 3
Chain 1 and single crochet in the same stitch. Single crochet around.
When you reach the chain forming the handle, single crochet across the chain to the opposite side of the bag, then continue around the bag.
At the side valley, work a single crochet decrease just as in the previous round. You may use a 2-stitch or 3-stitch decrease. You can use the same type of decrease this round or choose a different one, provided the finished shape remains consistent.
Continue around the outside of the handle and outside edge, working the corresponding decrease at the opposite valley. Slip stitch to the top of the first stitch.
Round 4
Chain 1 and single crochet in the same stitch as the joining stitch. Single crochet around.
This time, skip a stitch over the valley at each side of the bag. When reaching the handle, continue working single crochet across the handle stitches without decreases.
At the end of the round, join with a slip stitch to the first stitch. Fasten off the yarn.
After these four rounds, each handle has two single crochet rows on its outside edge, while the handle itself is formed from the chain-70 foundation covered with single crochet.
Rounds 5 and 6: Finish the Inner Handle Edges
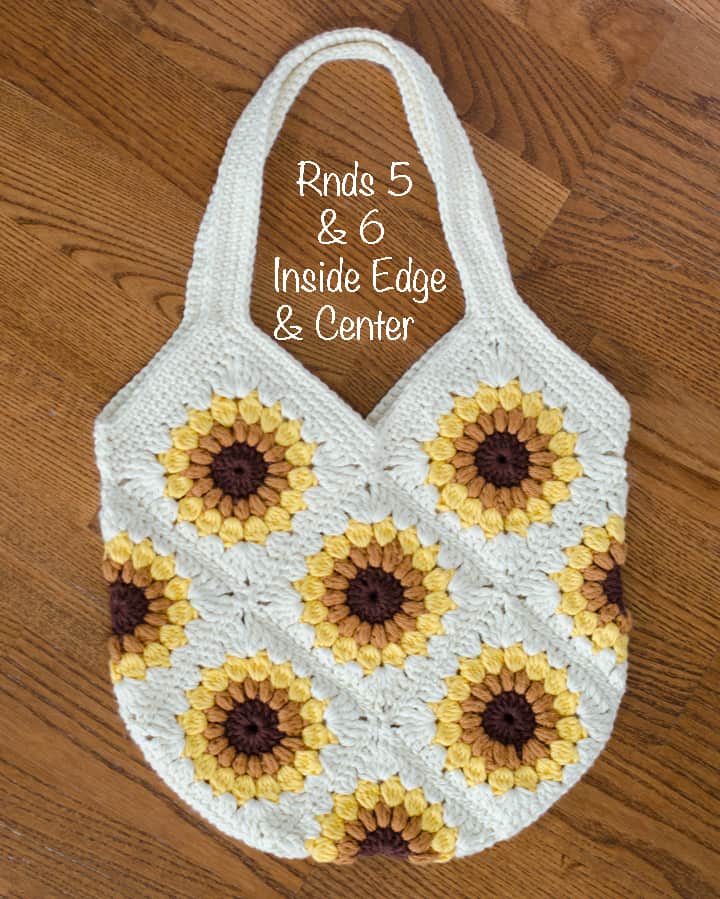
Rounds 5 and 6 are worked along the inner edge of the handle and the center front or back of the bag. Complete these rounds on one side first, then repeat them on the opposite side.
Round 5
Attach ivory yarn to any single crochet on the front of the bag near a handle.
Chain 1 and single crochet in the same stitch as the joining stitch. Single crochet around.
When reaching the center front valley, skip the center stitch and continue single crocheting around.
At the end of the round, slip stitch to the first stitch.
Round 6
Chain 1 and single crochet in the same stitch as the joining stitch. Single crochet around.
When reaching the strap, single crochet into the opposite side of the strap stitches.
At the center front valley, single crochet 2 together and continue single crocheting around.
At the end of the round, slip stitch to the first stitch. Fasten off the yarn.
Repeat Rounds 5 and 6 on the opposite side, working over the center back and the inside edges of the strap on that side.
Fasten off and weave in all remaining ends.
Handle Length and Yarn Considerations
The original design allows some flexibility in the final handle length. If you want longer handles, remember that additional length requires additional yarn. In particular, if you did not purchase a second skein of the main ivory color, there may not be enough ivory yarn for substantially longer handles.
If you are running low on ivory, a contrasting yarn stripe in the border and handles can become a useful design variation rather than a problem. This can also give the finished purse a slightly different personality while retaining the sunflower squares as the central feature.
Stitch and Shape Checkpoints
- Make 13 sunflower squares.
- Round 1 of every square ends with 16 stitches.
- Round 2 contains 16 puff stitches.
- Round 3 contains 16 bobble stitches.
- Round 4 transforms the circular textured center into a square.
- Use whip stitch to sew the squares together.
- Round 2 of the bag border creates each handle with a chain of 70.
- Rounds 3 and 4 build the outside edges of the handles.
- Rounds 5 and 6 finish the inner handle edges and the center front/back sections.
Troubleshooting the Valleys
If the top edge of your bag looks uneven, do not immediately assume that the entire assembly is wrong. The valleys are specifically an area where individual gauge and sewing tension can affect the finished shape.
If you see a hole, consider including the joining point in a decrease. If the fabric pulls too tightly, reconsider how many stitches you are decreasing over the valley. If the center does not look symmetrical, compare the corresponding front and back valleys and make sure you have used the same decrease approach.
The original instructions emphasize that there is flexibility in how these decreases are handled. The key is to observe the fabric while working rather than forcing the stitches into a predetermined shape that does not suit your gauge.
Finishing the Sunflower Bag
Once the sixth round has been completed on both sides, fasten off and weave in the ends carefully. Look over the entire bag before considering it finished. Check the seams, the peaks, the valleys, and both handles.
The completed construction should have four single crochet rows along each handle in total: two rows on the outside edge of each strap and the corresponding rows on the inner edge. The straps are just over an inch wide.
The center front valley and center back valley have 3 rows of single crochet, while the outside and side top edges have 4 rows of single crochet.
Final Project Reference
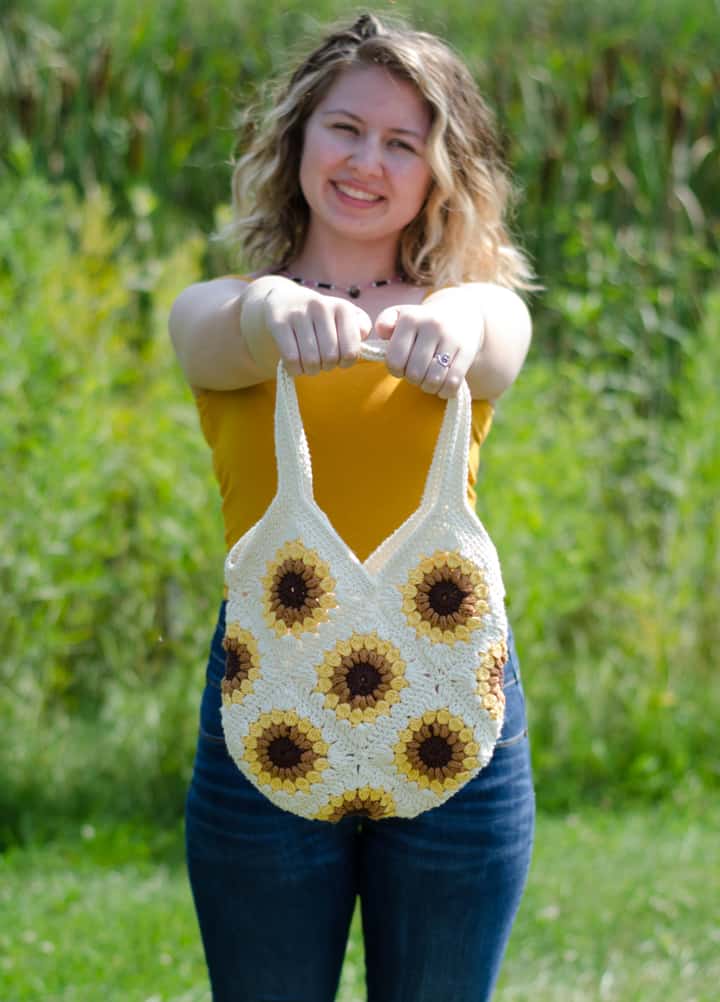
The Sweet Summer Sunflower Bag is approximately 11″ wide by 19″ tall, including handles. Remember that the original pattern considers this an approximate measurement. A bag that turns out somewhat larger or smaller can still be a lovely finished project.
The overall construction is intentionally approachable: make the textured sunflower squares, sew the motifs into the purse shape, and finish the opening with single crochet and chain-70 handles. The result is a cheerful crochet accessory with a strong handmade character.
Frequently Asked Questions
How many sunflower squares are needed?
You need to make 13 crochet sunflower squares for the bag.
What crochet hook size is used?
The pattern uses a US G6/4mm crochet hook.
What yarn weight is recommended?
The sample is made with worsted weight cotton yarn, specifically Hobby Lobby I Love This Cotton.
Does the bag need a lining?
The sample is left unlined. The original instructions note that the fabric is not too “holey,” making it suitable for leaving unlined, although you can certainly line the bag later if you wish.
How long are the handle chains?
In Round 2 of the handle construction, each handle begins with a chain 70.
What if my bag is larger than the stated size?
The stated finished size is approximately 11″ wide by 19″ tall including handles, but individual gauge can change the dimensions. If your bag is larger, you may need more of the main ivory yarn. The original instructions also suggest being prepared to change colors in the handle if necessary.
Ready to Crochet Your Sunflower Bag?
This project is a satisfying combination of small, repeatable motifs and straightforward bag construction. The 13 sunflower squares provide plenty of opportunity to settle into the rhythm of puff stitches, bobbles, and colorful granny-square rounds, while the final border and handles turn those individual motifs into a functional purse.
As you work, pay particular attention to stitch counts in the sunflower squares, the arrangement of the 13 motifs, and the way the valleys behave during the border rounds. Those checkpoints will help keep the finished bag neat and symmetrical without forcing your crochet to behave differently from its natural gauge.
With its warm sunflower colors, textured center, simple construction, and practical handle design, this Sweet Summer Sunflower Bag makes a cheerful handmade accessory for summer and the transition into fall.