
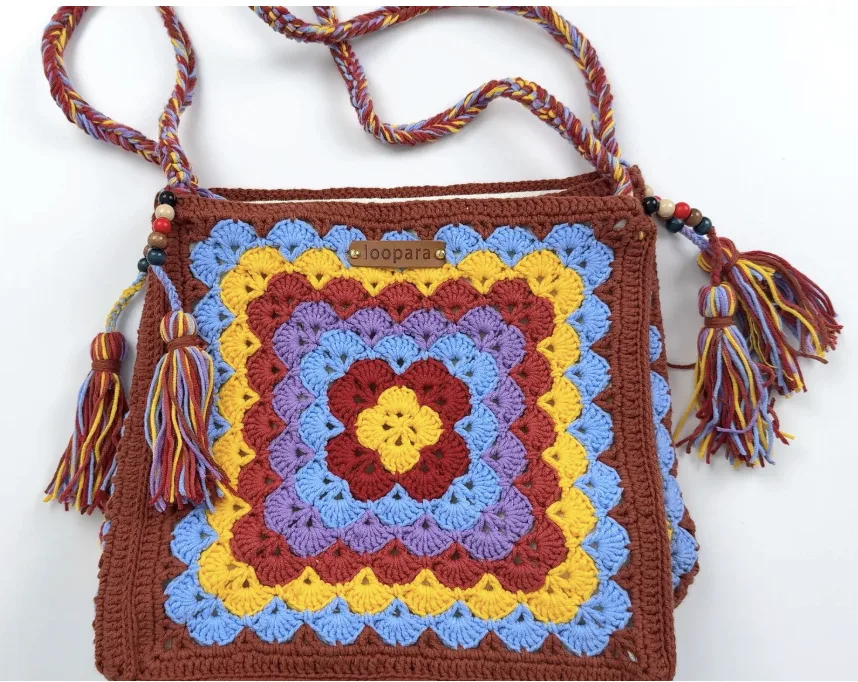

If you love crochet bags that combine practical construction with a bold handmade look, this Big Granny Square Tote Bag is a wonderful project to add to your list. The design takes the familiar granny square and turns it into an oversized, mandala-inspired statement piece with rich color changes, a structured bottom, a braided strap, and playful tassel details.
The finished tote has a distinctive bohemian character while remaining useful for everyday carrying. Four colorful mandala-style granny squares form the main panels, while a fifth solid terracotta square creates the base. Once the squares are joined, the bag measures approximately 18 inches (46 cm) wide and 14 inches (35 cm) tall. The braided strap adds 12 inches (31 cm), giving the finished project a comfortable shoulder-carrying option.
This tutorial follows the original pattern closely, including the stitch instructions, round numbers, materials, measurements, construction details, and finishing process. It is written as a complete project guide so you can work through the crochet, assembly, lining, straps, and tassels in a logical order.
What Makes This Granny Square Tote Special?
The main attraction of this bag is its oversized granny square construction. Instead of using many small traditional granny squares, the project uses five larger squares: four colorful mandala squares for the main body and one solid terracotta square for the base.
Each mandala square begins with a yellow center and develops outward through multiple rounds of contrasting colors. Red, lilac, and sky blue create the colorful inner design, while the terracotta border frames each square and gives the finished bag a cohesive appearance.
The construction also gives the tote a squared bottom. This helps the finished bag stand on its own and makes it particularly suitable for shopping trips, beach days, and other occasions when you want a crochet bag with useful structure.
The original design uses a warm, sunset-inspired palette, but the same construction can be interpreted through many different color combinations. A navy base with aqua, sand, and seafoam can create a beach-inspired appearance. Olive with rose, lilac, and buttercup can produce a summer meadow feeling. Brown with terracotta, mustard, and cream gives the bag a boho-chic character, while rust combined with coral, gold, and blush creates a desert-sunset palette.
Finished Bag Measurements
- Finished width: Approximately 18 inches (46 cm)
- Finished height: Approximately 14 inches (35 cm)
- Braided strap length: 12 inches (31 cm)
- Main panels: Four mandala-style squares measuring 10 inches (26 cm) each
- Base: One solid terracotta square
These measurements are important reference points while you work. The four colorful squares should measure approximately 10 inches (26 cm) each. Checking the dimensions before assembly can help you identify problems before the panels are permanently joined.
Materials for the Big Granny Square Tote Bag
Gather all of your supplies before beginning. Having the materials ready makes it easier to move from the crochet portion into assembly without interrupting your workflow.
- Yarn: Loopara 5ply combed cotton / Loopara 5-ply milk cotton yarn
- Crochet hooks: 3.0mm and 6.0mm
- Scissors
- Yarn needle
- Stitch marker
- Lining cloth
- Decorative beads
- Positioning clip
The original pattern recommends Loopara 5-ply milk cotton yarn because it provides clear stitch definition for the mandala details while giving the fabric enough structure for a bag. The cotton blend is also described as soft to the touch while remaining durable enough for the project.
For the color arrangement, use one main color for the border and base, with four coordinating colors for the mandala pattern. The original example uses terracotta as the main color, with yellow, red, lilac, and sky blue appearing through the mandala design.
Crochet Hook Sizes and Fabric Tension
This project uses two hook sizes for different parts of the construction. The granny squares are made with a 3.0mm hook, while the straps are made with a 6.0mm hook.
The smaller hook helps create a firm fabric that is appropriate for a tote bag. The original guidance emphasizes finding a balance between firmness and flexibility. The fabric should be tight enough that small items do not easily slip through the stitches, but not so tight that the finished bag loses its natural drape.
A test swatch can be useful before committing to all five squares. The important goal is to maintain the character of the fabric described in the pattern rather than simply crocheting as tightly as possible.
US Crochet Abbreviations
- ch: chain
- sl: slip stitch
- sc: single crochet
- dc: double crochet
- sh: shell stitch
The pattern uses US crochet terminology. Keep this terminology consistent throughout the project so the stitch instructions remain easy to follow.
How the Five Granny Squares Are Used
You will make five granny squares in total. Four are vibrant mandala-style squares measuring approximately 10 inches (26 cm) each. These become the main panels of the tote. The fifth square is made in a solid color and serves as the bottom of the bag.
The colorful squares are worked outward from their centers. The solid square provides a visual and structural contrast to the decorative panels. Before joining, arrange all five squares according to the original layout and use positioning clips or stitch markers to keep the pieces organized.

How to Crochet the Regular Granny Square
Make five squares following the original nine-round construction below. The stitch sequence should be followed exactly as written because each round builds the shape and spacing needed for the final square.
Round 1
Round 1: Magic ring. Chain 3 (counts as first dc), chain 1, (dc, chain 1) 7 times in ring. Slip stitch to join in top of chain-3.

Round 2
Round 2: Chain 1, (sc, 7 dc) 4 times. Slip stitch to join in first sc.

Round 3
Round 3: (Chain 3, chain 1, dc, chain 3, dc, chain 1, dc), [chain 5, (dc, chain 1, dc, chain 3, dc, chain 1, dc)] 3 times, chain 5. Slip stitch to join in top of chain-3.

Round 4
Round 4: Chain 1, (sc, 7 dc) 8 times. Slip stitch to join in first sc.

Round 5
Round 5: (Chain 3, chain 1, dc), chain 5, [(dc, chain 1, dc, chain 3, dc, chain 1, dc), chain 5, (dc, chain 1, dc), chain 5] 3 times, (dc, chain 1, dc, chain 3, dc, chain 1, dc), chain 5. Slip stitch to join in top of chain-3.

Round 6
Round 6: Chain 1, (sc, 7 dc) 12 times. Slip stitch to join in first sc.

Round 7
Round 7: (Chain 3, chain 1, dc), chain 2, sc, chain 2, (dc, chain 1, dc), chain 2, sc, chain 2, [(dc, chain 1, dc, chain 3, dc, chain 1, dc), [chain 2, sc, chain 2, (dc, chain 1, dc)] 2 times, chain 2, sc, chain 2] 3 times, (dc, chain 1, dc, chain 3, dc, chain 1, dc), chain 2, sc, chain 2. Slip stitch to join in top of chain-3.

Round 8
Round 8: Chain 1, 8 sc inc, (chain 2, 12 sc inc) 3 times, chain 2, 4 sc inc. Slip stitch to join in first sc.

Round 9
Round 9: Chain 3, 15 dc, [(2 dc, chain 2, 2 dc), 24 dc] 3 times, (2 dc, chain 2, 2 dc), 8 dc. Slip stitch to join in top of chain-3.

Check the Squares Before Assembly
Once all five squares are complete, take a moment to compare them before sewing anything together. The four mandala squares should measure approximately 10 inches (26 cm) each. Arrange the pieces according to the original layout and use stitch markers or positioning clips to hold the intended configuration.
This is an important checkpoint because the final shape depends on accurate positioning. Carefully placing the squares before seaming makes it easier to maintain alignment throughout the assembly process.
How to Assemble the Big Granny Square Tote Bag
Step 1: Arrange the Five Squares
First, prepare the five granny squares. The bottom square is made in a solid color. The petals are infinitely enlarged according to steps 5 and 6. Make these squares using a 3.0mm hook. Place the squares according to the layout picture and attach stitch markers.
Step 2: Join the Squares with Mattress Stitch

Following the arrows in the layout picture, join the squares using the mattress stitch. Insert the hook through the center stitch of the corner motifs and match stitches one-to-one.
Place the wrong sides together and pick up the inside half of each stitch. Keep the working yarn below the hook. Maintain loose tension while joining because overly tight seams can interfere with the shape of the finished bag.
Step 3: Secure Each Row

Step 3: Secure each row with a slip stitch.
Step 4: Finish the Flat Seaming

Step 4: Complete flat seaming, fasten off, and weave in the ends.
Adding the Fabric Lining
The lining gives the crochet tote an additional finished layer and helps create a clean interior. The original instructions use the bag layout to determine the lining dimensions.
Step 5: Measure the Bag Layout

Step 5: Measure the bag layout, adding 2–3cm margins.
Step 6: Cut the Lining Fabric

Step 6: Mark and cut the lining fabric.
Step 7: Fold the Lining

Step 7: Turn the bag and lining wrong sides out. Fold the lining along the marked lines.
Step 8: Attach the Lining

Step 8: Use an invisible seam to attach the lining.
Step 9: Continue Around the Lining

Step 9: Continue until complete.
Step 10: Complete the Final Assembly

Step 10: Follow the arrows in the picture for final assembly using mattress stitch.
Step 11: Weave in All Ends

Step 11: Weave in all ends.
How to Make the Crochet Straps
Make 2 straps. The straps use a larger 6.0mm hook and all six bag colors. The finished strap is part of the bag’s distinctive bohemian appearance and provides the shoulder-carrying function.
Strap Step 1: Start the Strap

Step 1: Using a 6.0mm hook and all six bag colors, leave a long tail and make a knot. Pull the working loop through the knot.
Strap Step 2: Work Through the Front Loop

Step 2: Insert the hook through the front loop. Yarn over and pull through.
Strap Step 3: Repeat to the Desired Length

Step 3: Repeat to the desired length. Leave a long tail and fasten off.
Strap Step 4: Attach the Straps

Step 4: Thread one strap through each side and knot securely.
How to Make the Decorative Tassels
Make 4 tassels to complete the bohemian look of the tote. The tassels combine all six bag colors with a center chain and decorative beads.
Tassel Step 1: Cut the Yarn

Step 1: Cut 12cm lengths of all six colors.
Tassel Step 2: Prepare the Strands

Step 2: Prepare the desired quantity of strands. Using 5-ply yarn, make a chain of 12 slip stitches. Leave long tails.
Tassel Step 3: Place the Center Chain

Step 3: Place the chain in the center of the mixed strands. Split 5-ply yarn into 2-ply.
Tassel Step 4: Wrap and Secure

Step 4: Wrap the right side several times. Secure with a knot and trim ends.
Tassel Step 5: Finish the Upper Portion

Step 5: Flip the tassel and find the center chain. Wrap the upper portion several times. Secure with a knot and trim lower ends.
Tassel Step 6: Add the Beads

Step 6: Thread 5 beads onto the top of the chain.
Tassel Step 7: Attach the Tassels

Step 7: Attach to both sides of the bag.
Important Assembly Tips
The original pattern highlights several details that are especially useful during construction. Place and pin the squares carefully before beginning the seams. This helps maintain proper alignment and makes the final structure more even.
Keep your tension even while joining. The mattress stitch should not be pulled excessively tight because the pattern specifically recommends loose tension to preserve the shape of the bag.
Pay particular attention to the strap attachments and corners. These areas experience additional stress during normal use, so the original pattern recommends reinforcing all strap attachments and corners for durability.
Stitch Checkpoints Before Moving Forward
- Confirm that all five granny squares are complete.
- Check that the four mandala squares measure approximately 10 inches (26 cm) each.
- Make sure the solid square is reserved for the base.
- Arrange the five squares according to the layout before seaming.
- Use stitch markers or positioning clips to hold the pieces in place.
- Keep the mattress-stitch tension loose enough to preserve the bag shape.
- Fasten off and weave in ends after completing the flat seams.
- Measure the bag layout before cutting the lining.
- Add 2–3cm margins when measuring the lining fabric.
- Make 2 straps using the 6.0mm hook.
- Make 4 decorative tassels.
- Use 5 beads on the top of each tassel.
Care and Cleaning for Your Crochet Tote
Daily Care
Give the finished tote a gentle shake after use to help remove dust and debris from the stitches. For quick cleaning, spot clean with a soft brush. Empty the bag regularly so small objects do not remain caught inside the textured crochet areas.
Washing
Because the bag is made with cotton yarn, hand washing is recommended. Use cool water and mild soap. Gently squeeze the bag rather than wringing or twisting it, as excessive handling can affect its shape.
After washing, lay the bag flat to dry in a shaded area. Reshape it while damp so the crochet fabric and shell stitches retain their intended appearance.
Storage
Store the tote flat or gently stuff it with acid-free tissue paper to help maintain its shape. A cotton pillowcase can be used as a storage bag because it protects the crochet from dust while allowing the yarn to breathe.
Avoid plastic containers that can trap moisture. For long-term storage, keep the bag away from direct sunlight to help preserve the colors.
Common Construction Problems to Watch For
The Squares Do Not Line Up
Before seaming, return to the layout and use positioning clips or stitch markers. The original instructions emphasize carefully placing and pinning the squares before joining. Matching the stitches one-to-one during the mattress stitch also helps maintain alignment.
The Seams Feel Too Tight
Check your joining tension. The pattern specifically instructs you to maintain loose tension while working the mattress stitch. Pulling the yarn too tightly can interfere with the shape of the bag.
The Bag Loses Its Shape
Check the construction and lining steps before making additional changes. The pattern uses a five-square layout, a solid base square, a lining, and a structured joining process. During lining, reshape the bag while working so the folded fabric follows the marked lines.
The Straps Need Extra Security
Make sure each strap is knotted securely and reinforce the strap attachments and corners as recommended in the original tips. These areas are important because the straps carry the weight of the finished tote.
A Practical Project Checklist
- Gather Loopara 5-ply combed cotton yarn and all required tools.
- Prepare the 3.0mm and 6.0mm crochet hooks.
- Choose the main border and base color plus four coordinating mandala colors.
- Make five granny squares following Rounds 1–9.
- Use the 3.0mm hook for the squares.
- Check the four mandala squares against the approximately 10-inch (26 cm) target.
- Arrange the five squares according to the layout.
- Secure the pieces with stitch markers or positioning clips.
- Join the squares using mattress stitch.
- Secure each row with slip stitch as instructed.
- Complete the flat seaming and weave in ends.
- Measure the bag layout and add 2–3cm margins.
- Mark and cut the lining.
- Fold the lining along the marked lines.
- Attach the lining with an invisible seam.
- Complete the final assembly using mattress stitch.
- Make two straps with the 6.0mm hook.
- Attach one strap through each side and knot securely.
- Make four tassels.
- Use 12cm yarn lengths for the tassel strands.
- Make the 12-slip-stitch center chain for each tassel.
- Add five beads to the top of each tassel.
- Attach the tassels to both sides of the bag.
- Inspect the corners, seams, strap attachments, and finished shape.
Final Thoughts on the Big Granny Square Tote Bag
This Big Granny Square Tote Bag is a great example of how traditional granny-square crochet can be transformed into a practical modern accessory. The project combines five large squares, a colorful mandala-inspired center, a solid base, a fabric lining, two multicolor straps, and four decorative tassels.
The most important part of the project is careful construction. The individual granny squares are only one stage of the process. Accurate placement, one-to-one stitch matching, loose mattress-stitch tension, neat finishing, and secure strap attachments all contribute to the final result.
The color arrangement is also an opportunity to make the finished tote your own while keeping the original construction intact. The original palette uses warm sunset-inspired colors, but the pattern specifically lends itself to experimenting with different color stories. Whether you prefer beach-inspired blues and aquas, soft meadow colors, earthy boho shades, or warm desert tones, the mandala structure can provide a striking foundation.
Once the squares are complete, the lining, straps, and tassels turn the crochet panels into a functional everyday bag. The approximately 18-inch (46 cm) width and 14-inch (35 cm) height provide a generous tote shape, while the 12-inch (31 cm) braided strap adds a practical shoulder-carrying option.
Take your time with the assembly stage, especially when positioning the squares and attaching the lining. A careful layout before sewing can make the remaining steps much easier. Keep your joining tension loose, reinforce the stress points, and finish by weaving in all ends securely.
With its oversized granny squares, colorful mandala details, terracotta framing, braided straps, and beaded tassels, the finished project has plenty of personality while remaining useful. It is a crochet bag that can work as a summer accessory, a shopping tote, or a statement handmade piece for everyday use.
Quick Reference
- Squares: Make 5
- Mandala squares: 4
- Base square: 1 solid terracotta square
- Square size: Approximately 10 inches (26 cm)
- Finished bag: Approximately 18 inches (46 cm) wide × 14 inches (35 cm) tall
- Straps: Make 2
- Strap length: 12 inches (31 cm)
- Tassels: Make 4
- Beads: 5 per tassel
- Square hook: 3.0mm
- Strap hook: 6.0mm
- Yarn: Loopara 5-ply combed cotton / milk cotton
- Terms: US Crochet Terms
- Square rounds: 1–9
Follow the original round instructions and assembly sequence carefully, use the provided photos as visual checkpoints, and keep the technical details unchanged throughout the project. The result is a colorful, structured granny square tote with a distinctly handmade bohemian finish.