
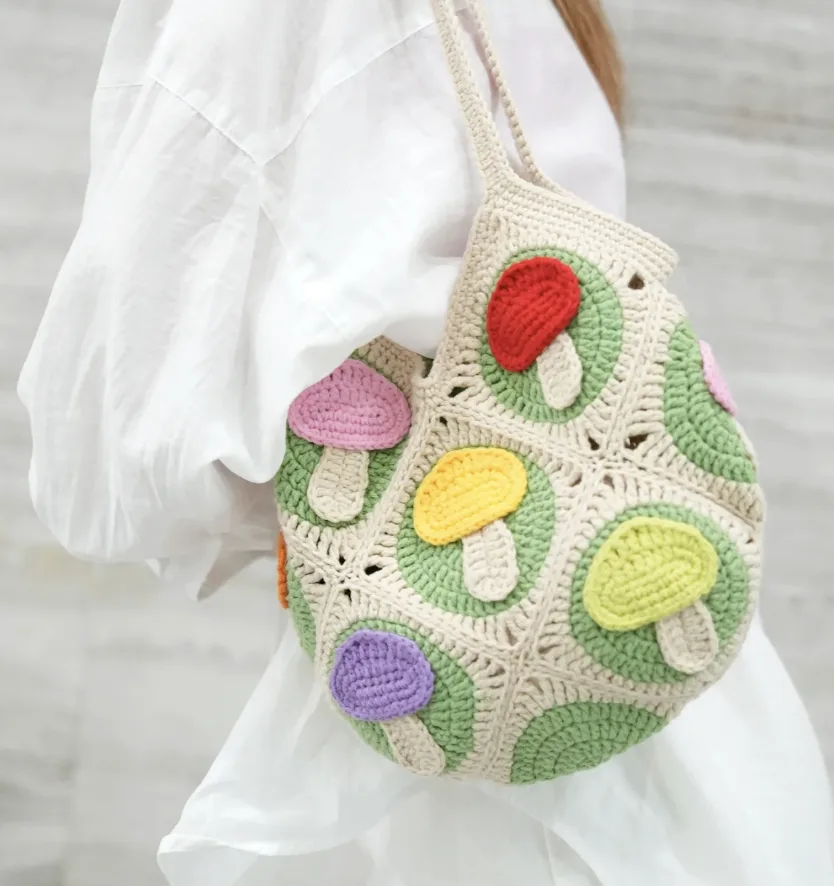

If you love crochet projects that combine classic techniques with playful details, this Mushroom Granny Square Bag is a wonderful project to add to your handmade collection. It brings together colorful mushroom motifs, green backgrounds, cream borders, and a practical bag construction to create an accessory with a charming woodland character.
The design uses 13 individual mushroom granny squares, with each square measuring approximately 4.7 inches. Once the pieces are joined and the handles are completed, the finished bag measures approximately 9.4 inches wide and 10 inches tall, not including the strap. The result is a useful size for carrying daily essentials or even taking along a crochet project.
This tutorial follows the original pattern instructions and keeps the original stitch terminology, measurements, round numbers, construction details, and color information intact. The project uses US crochet terms throughout.
What Makes This Mushroom Granny Square Bag Special?
The appeal of this bag comes from the combination of a familiar granny square structure and colorful mushroom motifs. Instead of creating a conventional square design, the project turns the individual squares into a playful mushroom meadow. The finished layout has an intentionally asymmetrical arrangement, allowing the different mushroom colors to create a lively woodland-inspired appearance.
Each mushroom square measures about 4.7 inches. You will make and join 13 of these squares to create the body of the bag. The finished bag is approximately 9.4 inches wide and 10 inches tall, excluding the strap.
The sample uses an earthy but vibrant palette. Cream is used for the background, light green creates the grass effect, vibrant shades are used for mushroom caps, and beige is used for mushroom stems. The suggested mushroom cap colors include red, yellow, purple, and pink, while the listed yarn colors provide even more possibilities for a colorful finished project.
You can use the same palette as the sample or explore your own color combinations. The original pattern also suggests experimenting with muted vintage pastels, neon mushroom caps, monochrome shades, or other combinations that fit your personal style.
Project Details at a Glance
- Individual mushroom square size: Approximately 4.7 inches.
- Number of squares: 13.
- Finished bag size: Approximately 9.4 inches wide and 10 inches tall, not including the strap.
- Recommended yarn: Loopara 5ply combed cotton.
- Recommended crochet hook: 3.0mm.
- Terms: US crochet terms.
- Bag handles: Chain 110, adjustable as needed.
Materials You Will Need
Before beginning, gather all of the supplies listed in the original pattern. Having your materials prepared in advance makes it easier to move between the mushroom motif, the base, joining, and handle construction without interrupting your workflow.
- Loopara 5ply combed cotton yarn in Green 03.
- Loopara 5ply combed cotton yarn in Green 06.
- Loopara 5ply combed cotton yarn in Pink 19.
- Loopara 5ply combed cotton yarn in Red 24.
- Loopara 5ply combed cotton yarn in Yellow 30.
- Loopara 5ply combed cotton yarn in Orange 35.
- Loopara 5ply combed cotton yarn in Purple 48.
- Loopara 5ply combed cotton yarn in Apricot 50.
- 3.0mm crochet hook.
- Scissors.
- Hot melt adhesive.
- Yarn needle.
- Stitch marker.
The recommended yarn is Loopara 5 ply milk cotton yarn. The original pattern describes it as soft, durable, and suitably stretchy, with strong stitch definition that helps the mushroom details stand out. Cotton yarn also makes the finished bag washable, although the care instructions should still be followed carefully.
US Crochet Abbreviations
The pattern uses US crochet terminology. Keep these abbreviations nearby while working so that you can quickly check unfamiliar stitches.
- ch: chain
- sc: single crochet
- hdc: half double crochet
- dc: double crochet
- tr: treble crochet
- sl: slip stitch
- Magic ring: magic ring
- FLO: front loop only, used for the French knots on the mushroom cap
Understanding the Mushroom Granny Square Layout

The layout is an important visual reference because the finished bag is assembled from multiple individual pieces. The original design places colorful mushroom motifs on green backgrounds and surrounds them with cream borders. The arrangement is playful and asymmetrical rather than strictly repetitive.
Before sewing the squares together, use the layout as your visual guide. Matching the pieces correctly is especially important during assembly because the placement of the individual squares determines the appearance of the finished bag.
Step 1: Crochet the Mushroom Cap
The mushroom is made first. The cap uses three rounds, and the stitch heights gradually change to create the rounded dome shape characteristic of the motif.

Round 1
Round 1: Chain 9. In 2nd chain from hook, work 7 single crochet. In next stitch, work 3 single crochet. Work 6 single crochet. In last stitch, work 2 single crochet. Slip stitch to join.
Take care not to make the initial chain too tight. A relaxed foundation chain makes it easier to work the stitches and helps the shape develop correctly.

Round 2
Round 2: Chain 1 (doesn’t count as a stitch). Work 2 single crochet in first stitch. Work 2 half double crochet, 2 double crochet, 2 half double crochet. Work 3 single crochet increases. Work 6 single crochet. Work 2 single crochet increases. Slip stitch to join.
The combination of single crochet, half double crochet, and double crochet begins to create the rounded mushroom profile. Keep your tension consistent and pay attention to where the increases are placed.

Round 3
Round 3: Chain 1 (doesn’t count as a stitch). Single crochet in first stitch. Half double crochet increase. Work 2 double crochet, 2 treble crochet, 2 double crochet. Half double crochet increase. (Single crochet, single crochet increase) twice. Work 7 single crochet. (Single crochet, single crochet increase) twice. Slip stitch to join.
The increases in specific locations are important because they help create the dome shape. Work the stitches consistently so that the mushroom cap remains symmetrical.
Step 2: Crochet the Mushroom Stem

The stem is worked separately from the mushroom cap. The different stitch heights are responsible for creating its distinctive shape, so consistent tension is helpful here.
Stem: Chain 10. In 3rd chain from hook, work 4 half double crochet. Work 3 double crochet. (Treble crochet, 4 double crochet, treble crochet). Work 3 double crochet. Work 3 half double crochet increases. Slip stitch to join.
As with the mushroom cap, avoid making the foundation chain excessively tight. The changing stitch heights can then form the intended shape more naturally.
Step 3: Crochet the Granny Square Base
The base of the mushroom square begins with a magic ring and grows through five rounds. The first four rounds establish the circular base, while Round 5 introduces the color change and final scalloped edge.

Base Round 1
Round 1: Start with a magic ring. Chain 3 (counts as first double crochet), work 11 double crochet into the ring. Slip stitch to join.
Keep the magic ring tight enough to avoid leaving a large hole in the center. The center of the base should remain secure as the later rounds are worked.

Base Round 2
Round 2: (Chain 3, double crochet), work 11 double crochet increases. Slip stitch to join.

Base Round 3
Round 3: Chain 3 (counts as first double crochet), (double crochet increase, double crochet) 11 times, double crochet increase. Slip stitch to join.

Base Round 4
Round 4: Chain 3 (counts as first double crochet), (double crochet increase, 2 double crochet) 11 times, double crochet increase, double crochet. Slip stitch to join.

Base Round 5
Round 5: Change color. Chain 2 (counts as first half double crochet), [half double crochet, 3 double crochet, treble crochet, (treble crochet, chain 2, treble crochet), 3 double crochet, 2 half double crochet] 3 times, half double crochet, 3 double crochet, treble crochet, (treble crochet, chain 2, treble crochet), 3 double crochet, half double crochet. Slip stitch to join.
Round 5 is especially important visually because the color change creates additional depth and the stitch placement produces the final scalloped edge. Work carefully around the round and make sure the transition between colors is neat.
Assembling the Mushroom Granny Square Bag
Once the mushroom motifs and square pieces are ready, the next stage is joining them according to the original sewing diagram. The assembly process uses matching pieces, half-stitch pickup, and a rolled stitch seam.
Do not rush this stage. The layout determines where each square belongs, and accurate matching will help the finished bag retain the intended asymmetrical mushroom design.

Assembly Step 1
Step 1: Follow the sewing diagram, matching pieces precisely. Place flower pieces back-to-back, picking up half a stitch on the inside of each for a rolled stitch seam.

Step 2: Repeat the first stitch twice. Don’t pull the thread too tight to maintain the bag’s shape.

Step 3: Continue sewing, matching pieces accordingly.

Step 4: At corner holes, only pick up half a stitch from the first lock stitch side.

Step 5: Continue following the sewing diagram.

Step 6: After completing the first line, cut the thread and start anew.

Step 7: Again, repeat the first stitch twice.

Step 8: Finish sewing all corresponding pieces, then cut the thread.

Step 9: Fold the sewn piece at the blank part to form the basic bag shape.

Step 10: Fold and sew the left and right sides of the bag.

Step 11: Use the same method, matching and picking up half stitches.

Step 12: After sewing both sides, secure the thread multiple times.
How to Crochet the Bag Handles
With the main body assembled, the bag opening is finished with four rounds that create the handle structure. The original instructions begin with a round of single crochet around the opening, followed by long chain sections that form the handles.

Handle Round 1
Round 1: Crochet a round of single crochet around the bag opening. Make three single crochets in each corner hole, maintaining stitch count elsewhere.

Handle Round 2
Round 2: After joining to the first stitch, single crochet without increases or decreases. At the first corner, start the handle from the middle of the three corner stitches. Chain 110 (adjust as needed), then connect to the middle stitch of the next corner’s three stitches. Continue single crocheting to the next corner and make the second handle similarly.

Handle Round 3
Round 3: Single crochet without increases or decreases (including over the handle chains).

Handle Round 4
Round 4: Single crochet a round on the inner side of the handles without increases or decreases.
Beginner Tips for a Neater Finished Bag
Although the pattern itself is straightforward when broken into sections, several details have a noticeable effect on the final result. The most important point is consistency. The mushroom cap depends on specific increases and stitch heights, while the base relies on carefully placed double crochet increases.
- Keep the first chains relaxed: The mushroom cap and stem both begin with chains that should not be too tight.
- Watch the mushroom increases: The increases in Round 3 help create the dome shape, so consistent stitch placement is important.
- Maintain tension: Consistent tension helps the individual squares remain visually similar in size.
- Keep the magic ring secure: A tight magic ring helps prevent an unwanted hole in the center of the base.
- Pay attention to Round 5: The color change and stitch arrangement create the final scalloped edge.
- Do not overtighten seams: During assembly, pulling the sewing thread too tightly can affect the shape of the bag.
- Use the layout: Match the pieces according to the original sewing diagram before committing to the seams.
- Check symmetry: When creating the two handles, use the middle stitch of the three corner stitches as instructed.
Important Assembly Checkpoints
Before moving to the next construction stage, take a moment to check the work visually. The individual mushroom squares should be arranged according to the layout, and the seams should not be pulled excessively tight.
- Confirm that the correct pieces are matched together.
- Place the pieces back-to-back as instructed.
- Pick up half a stitch on the inside for the rolled stitch seam.
- Repeat the first stitch twice where instructed.
- At corner holes, pick up only half a stitch from the first lock stitch side.
- Cut the thread after completing the first line and start anew.
- Fold the sewn piece at the blank part to establish the basic bag shape.
- Sew the left and right sides using the same matching method.
- Secure the thread multiple times after both sides are sewn.
Color Changes and Finishing the Granny Squares
Color is one of the defining features of this mushroom bag. The original sample combines cream, green, and colorful mushroom shades to create an enchanted woodland feeling. The listed yarn palette includes Green 03, Green 06, Pink 19, Red 24, Yellow 30, Orange 35, Purple 48, and Apricot 50.
The pattern specifically calls for a color change in Round 5 of the base. This transition helps create depth and separates the final scalloped section visually from the rounds underneath it.
If you decide to explore a different palette, the original design encourages experimentation. Pastels can create a muted vintage effect, while brighter colors can make the mushroom caps more playful. A monochrome version can also be created using different shades of a favorite color, provided the technical instructions remain unchanged.
How to Finish and Weave in Ends
Clean finishing is important when making multiple granny square pieces. The original source recommends learning dedicated techniques for weaving in ends so that the squares look polished and remain secure during use.
When finishing your pieces, avoid leaving loose ends that could become caught during assembly. Take your time with the finishing stage before joining the squares together. A neat finish makes the later sewing process easier and helps the completed bag look more professional.
Care and Cleaning for Your Crochet Mushroom Bag
The original care instructions recommend treating the finished bag gently. Cotton yarn can be practical for an everyday accessory, but the bag should still be protected from excessive stress and rough handling.
Daily Care
Use a soft-bristled brush occasionally to remove dust or lint. Be careful around rough surfaces that could snag the yarn. Avoid overloading the bag with heavy items because excessive weight can stretch the crochet stitches.
Washing
Always check the yarn label first for its specific care instructions. In general, hand washing is recommended. Fill a basin with cool water and add a small amount of mild detergent. Gently submerge the bag and swish it through the water without rough scrubbing.
Rinse thoroughly with cool water until the soap has been removed. Do not wring the bag. Instead, press out excess water by laying the bag flat between clean towels. Reshape the bag while it is damp, then allow it to air dry away from direct sunlight or heat.
Storage
When the bag is not being used, store it in a cool, dry place away from direct sunlight to help prevent fading. For longer storage, the original instructions suggest lightly stuffing it with acid-free tissue paper to help maintain its shape.
Avoid hanging the bag by its straps for extended periods because this can cause stretching. Instead, lay it flat or stand it upright in a drawer or on a shelf. A lavender sachet can also be added to the storage area to help keep the bag smelling fresh.
Common Problems to Watch For
The Mushroom Cap Looks Uneven
Review the stitch placement in the three mushroom cap rounds, especially the increases in Round 3. The original instructions emphasize consistent placement because these increases help perfect the dome shape.
The Foundation Chain Feels Too Tight
Loosen your tension when making the initial chain. Both the mushroom cap and stem instructions specifically advise against making the foundation chain too tight.
The Center of the Base Has a Hole
Check the magic ring in Base Round 1. The original instructions recommend keeping the magic ring tight to avoid a hole in the center.
The Bag Shape Looks Distorted After Sewing
Check the tension of the sewing thread. The assembly instructions specifically say not to pull the thread too tightly because doing so can affect the shape of the bag.
The Handles Do Not Look Even
Use the middle stitch of the three corner stitches when beginning each handle, and follow the same process for the second handle. The handle chains are 110 stitches, with the option to adjust as needed.
Quick Project Checklist
- Prepare the eight listed yarn colors.
- Use a 3.0mm crochet hook.
- Keep the crochet terminology in US terms.
- Make the mushroom cap through Round 3.
- Make the mushroom stem.
- Complete the five base rounds.
- Change color in Base Round 5.
- Prepare the 13 mushroom granny squares.
- Arrange the squares according to the layout.
- Sew the pieces using the original assembly method.
- Fold the sewn piece into the basic bag shape.
- Sew the left and right sides.
- Secure the thread multiple times.
- Work four rounds around the bag opening and handles.
- Use Chain 110 for each handle, adjusting as needed.
- Finish and secure the project.
- Care for and store the finished bag gently.
Frequently Asked Questions
How big is one mushroom granny square?
Each mushroom square measures approximately 4.7 inches.
How many squares are used for the bag?
The design uses 13 whimsical mushroom squares.
What size is the finished bag?
The finished bag measures approximately 9.4 inches wide and 10 inches tall, not including the strap.
What crochet hook size is recommended?
The recommended hook size is 3.0mm.
What yarn is recommended?
The pattern recommends Loopara 5ply combed cotton, using Green 03, Green 06, Pink 19, Red 24, Yellow 30, Orange 35, Purple 48, and Apricot 50.
What crochet terms does the pattern use?
The pattern uses US crochet terms, including chain, single crochet, half double crochet, double crochet, treble crochet, and slip stitch.
How long should each handle be?
Round 2 instructs you to chain 110 for each handle, with the option to adjust as needed.
Can the color palette be changed?
Yes. The original pattern encourages experimentation with different color combinations, including muted pastels, neon mushroom caps, or monochrome shades. The technical construction should remain unchanged.
Final Thoughts
The Mushroom Granny Square Bag is a playful way to turn individual crochet motifs into a practical handmade accessory. Its appeal comes from the combination of colorful mushrooms, green backgrounds, cream borders, and a deliberately playful layout. At approximately 9.4 inches wide and 10 inches tall without the strap, the finished bag is compact while still offering room for everyday essentials or a small crochet project.
The key to a successful result is careful attention to the original stitch instructions. Work the mushroom cap increases consistently, keep the foundation chains relaxed, secure the magic ring, and pay close attention to the color change and stitch placement in Base Round 5. During assembly, use the sewing diagram, match the pieces precisely, and avoid pulling the thread too tightly.
Once the body is assembled, the four handle rounds complete the structure and give the bag its practical finishing touch. The result is a distinctive crochet accessory that combines a classic granny square concept with a whimsical mushroom theme.
Whether you follow the sample colors exactly or create your own woodland-inspired palette, this project offers plenty of room for personality while keeping the original construction intact. With patience, consistent tension, and careful assembly, you can transform the individual mushroom motifs into a charming handmade bag designed to be enjoyed for a long time.