
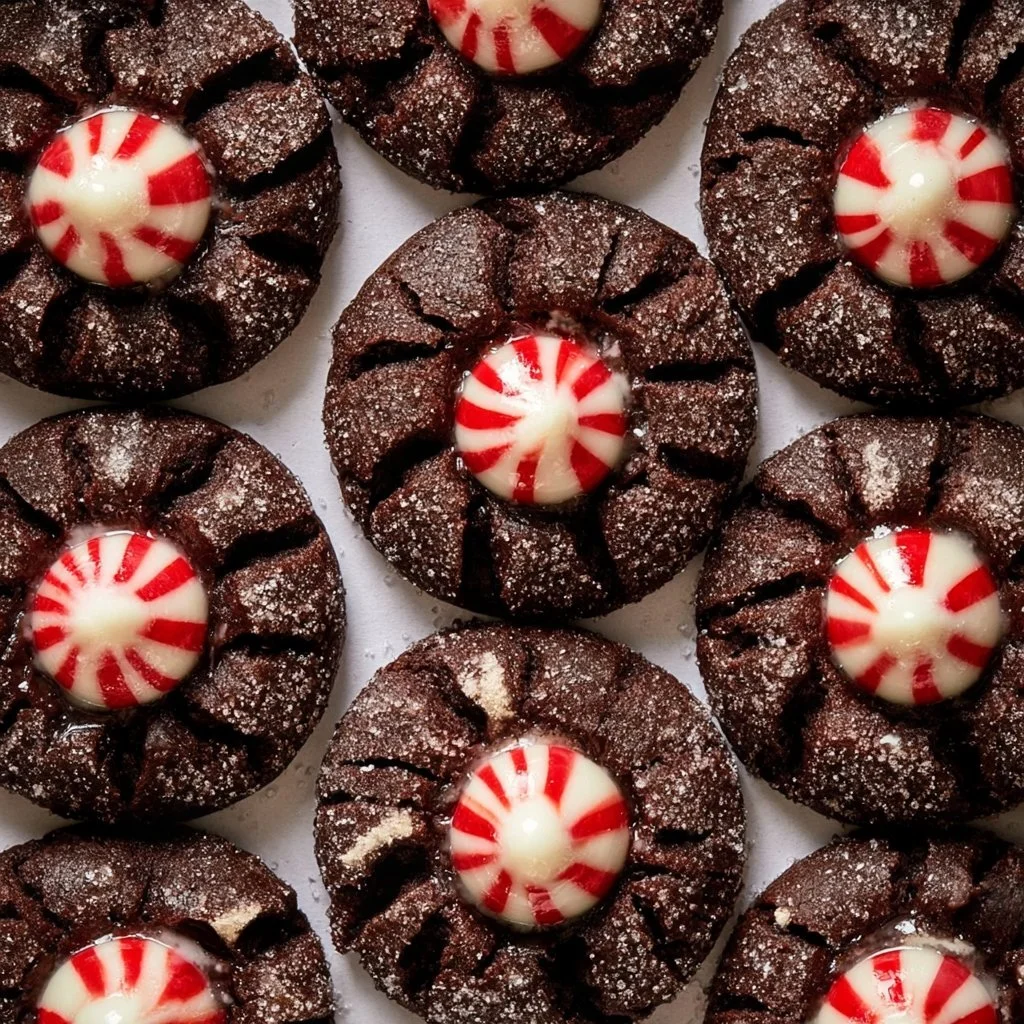
CHOCOLATE PEPPERMINT BLOSSOMS
Chocolate Peppermint Blossoms are a delightful holiday cookie that combines the rich flavor of chocolate with a burst of refreshing peppermint. The process of making these cookies is simple yet rewarding, resulting in treats that are both visually appealing and deliciously satisfying. With their signature Hershey’s White Chocolate Peppermint Kisses nestled in the center, these cookies are perfect for any festive occasion and will surely impress family and friends.
The texture of Chocolate Peppermint Blossoms is a harmonious blend of chewy and fudgy, with just the right amount of crunch from the outer edges. Each bite delivers a delightful combination of intense cocoa flavor and the invigorating essence of peppermint. The creamy white chocolate kiss adds a smooth finish that complements the cookie’s overall taste. As the holiday season approaches, these cookies become an excellent addition to dessert tables, care packages, or as a sweet treat to enjoy by the fireplace.
Not only do they taste wonderful, but Chocolate Peppermint Blossoms also bring a festive charm to any gathering. The vibrant colors from the white chocolate and the dark cookie base create a visually appealing treat that can brighten up any platter. They are suitable for holiday parties, cookie exchanges, or simply as a comforting snack when you’re in the mood for something sweet. Easy to make and even more enjoyable to eat, these cookies capture the essence of the season in every bite.
As we dive into the details of this delightful recipe, you’ll discover not only how to make these sweet confections but also tips for storage, serving suggestions, and variations to cater to different preferences. Whether you’re an experienced baker or just starting out in the kitchen, Chocolate Peppermint Blossoms offer a fun and festive baking adventure that you can enjoy all season long.
What Makes This Recipe Special
The uniqueness of Chocolate Peppermint Blossoms lies in their delightful blend of flavors and textures. The cookie dough itself is rich and chocolatey, thanks to the cocoa powder and chocolate chips, which provide a wonderful depth of flavor. When you bite into one of these cookies, you’ll first experience the slightly crisp edge, followed by a soft and chewy interior that melts in your mouth. The addition of white chocolate peppermint kisses adds an exciting twist, introducing a smooth and creamy sweetness that perfectly balances the rich chocolate cookie base.
This recipe stands out from other chocolate cookies due to its festive peppermint note. While many cookie recipes focus solely on chocolate or vanilla, the refreshing peppermint enhances the overall experience, making them ideal for holiday celebrations. The combination of flavors is reminiscent of traditional holiday treats, evoking memories of winter festivities, cozy gatherings, and joyful celebrations.
Another distinctive feature of these cookies is how simple they are to prepare. With straightforward ingredients that are often pantry staples, anyone can whip up a batch of these delicious treats without needing to hunt for specialty items. Additionally, the use of pre-packaged chocolate kisses makes the recipe not only accessible but also fun, especially for families looking to involve kids in the holiday baking tradition. This ease of preparation, paired with a fabulous end result, makes Chocolate Peppermint Blossoms a recipe you’ll return to year after year.
In comparison to other holiday cookies, such as gingerbread or sugar cookies, Chocolate Peppermint Blossoms combine the cherished flavors of chocolate and peppermint in a uniquely effortless way. This recipe is perfect for those who enjoy chocolate-based desserts and want to add a festive twist. Whether you’re treating yourself to a warm cookie fresh out of the oven or delighting guests at your holiday parties, these cookies offer a memorable taste experience that will have everyone coming back for more.
Ingredient Overview and Helpful Notes
To create perfect Chocolate Peppermint Blossoms, it’s important to understand the roles of the main ingredients and how they contribute to the cookie’s overall flavor and texture. Here’s an overview of the essential components you’ll need and some helpful tips on selecting the best ingredients.
-
Unsalted Butter: The foundation of the cookie, this provides richness and moisture. Choose high-quality butter for the best flavor. Make sure it’s at room temperature for easier mixing, which helps to achieve a light and fluffy texture.
-
Brown Sugar and Granulated Sugar: This combination of sugars adds depth to the sweetness while brown sugar contributes moisture and a slight chewiness to the cookie. Look for light brown sugar for a milder flavor, or dark brown sugar if you prefer a more pronounced molasses taste.
-
Eggs: Essential for binding the ingredients, eggs also add moisture and richness. Use large eggs as the standard size; make sure they are at room temperature to blend seamlessly into the mixture.
-
All-Purpose Flour: This is the primary structure-building ingredient. Sift it with the cocoa powder and leavening agents to ensure there are no lumps and to incorporate air, leading to a lighter cookie texture.
-
Unsweetened Cocoa Powder: Key for that rich chocolate flavor, choose high-quality cocoa powder for the best results. Dutch-processed cocoa can give a smoother, more mellow chocolate taste, while natural cocoa powder offers a bolder flavor.
-
Baking Soda and Salt: These elements are critical for leavening and enhancing flavor. Ensure your baking soda is fresh, as expired leavening agents can lead to dense cookies.
-
Dark Chocolate Chips: These provide pockets of melted chocolate within the cookie, heightening the chocolate experience. Use semi-sweet or dark chocolate chips based on your sweet preference.
-
White Chocolate Peppermint Hershey Kisses: This unique component is what sets these cookies apart. The peppermint flavor complements the chocolate and adds an attractive visual appeal. Ensure the kisses are stored cool to avoid melting before placing them in the cookies.
When gathering ingredients, remember that their quality can significantly impact the outcome. For example, using high-quality chocolate and fresh eggs will yield more delicious results. Stay attentive to measurements; precise amounts will help ensure the cookies bake perfectly without unexpected results.
Nutrition & Recipe Details
Nutritional values for baked goods can vary significantly based on factors such as ingredient brands, portion sizes, and preparation methods. The estimates below are a general guide.
| Item | Value |
|---|---|
| Prep time | 15 minutes |
| Cook time | 12 minutes |
| Store time | Up to 1 week |
| Calories | 150 per cookie |
| Protein | 2 grams |
| Carbohydrates | 22 grams |
| Fat | 7 grams |
How to Make Chocolate Peppermint Blossoms
Preparing Chocolate Peppermint Blossoms is a straightforward process involving mixing, baking, and decorating, making it perfect for bakers of all skill levels. Start by gathering your ingredients and ensuring you have the necessary equipment on hand. You’ll need mixing bowls, a whisk or electric mixer, a spatula, baking sheets, and parchment paper.
Ingredients
| Ingredient | Quantity |
|---|---|
| Unsalted butter, melted | 1 cup |
| Brown sugar | 1 cup |
| Granulated sugar | 1/2 cup |
| Large eggs | 2 |
| Vanilla extract | 2 teaspoons |
| All-purpose flour | 1 3/4 cups |
| Unsweetened cocoa powder | 3/4 cup |
| Baking soda | 1 teaspoon |
| Salt | 1/2 teaspoon |
| Dark chocolate chips | 1 cup |
| White Chocolate Peppermint Hershey Kisses | 12-15 |
Before beginning, ensure all ingredients are at room temperature. This helps the butter cream more easily with the sugars and makes for a smoother batter.
Step-by-Step Instructions
Creating Chocolate Peppermint Blossoms involves a few simple steps:
-
Preheat the Oven: Begin by preheating your oven to 350°F (175°C). A properly heated oven ensures even baking, contributing to the cookies’ texture and doneness.
-
Mix the Wet Ingredients: In a large mixing bowl, combine the melted butter, brown sugar, and granulated sugar. Use a whisk or electric mixer to blend until the mixture is smooth and well combined. Look for a light and creamy consistency, which indicates that the sugars are properly dissolved and incorporated with the butter.
-
Add Eggs and Vanilla: Beat in the eggs, one at a time, and then add the vanilla extract. Ensure each egg is well combined before adding the next. The mixture should become lighter in color and slightly airy.
-
Combine the Dry Ingredients: In another bowl, whisk together the all-purpose flour, unsweetened cocoa powder, baking soda, and salt. This step helps to combine and aerate the dry ingredients, ensuring even distribution throughout the dough.
-
Incorporate the Dry into the Wet: Gradually add the dry ingredients to the wet ingredients, mixing until just combined. It’s essential not to overmix at this stage; a few flour streaks are fine. The dough will be thick and chocolatey.
-
Fold in Chocolate Chips: Carefully fold in the dark chocolate chips using a spatula, ensuring they are evenly distributed throughout the dough without overworking it.
-
Shape the Cookies: Using a cookie scoop or tablespoon, drop rounded portions of dough onto a baking sheet lined with parchment paper, spacing them about 2 inches apart. This space allows the cookies to spread while baking.
-
Add the Peppermint Kisses: Once the cookies have been dropped onto the baking sheet, gently press a White Chocolate Peppermint Hershey Kiss into the center of each cookie. This step not only enhances flavor but also makes for a festive presentation.
-
Bake: Place the baking sheet in the preheated oven. Bake for 10-12 minutes or until the edges are set and the centers look slightly soft. Monitor closely to prevent overbaking, ensuring a chewy texture.
-
Cool: Once baked, allow the cookies to cool on the baking sheet for a few minutes before transferring them to a wire rack to cool completely. This cooling process helps the cookies firm up while retaining a soft center.

Understanding the Flavor and Texture
The blend of flavors and textures in Chocolate Peppermint Blossoms is what truly makes them irresistible. The initial taste is dominated by the deep chocolate flavor from the cocoa powder, balanced perfectly by the sweetness of both sugars. As you chew, the peppermint kisses melt into the warm cookie, releasing their refreshing mint flavor that complements the chocolate beautifully.
Visually, the cookies have a dark, rich color accented by the bright white kiss in the center, creating an inviting contrast that pulls you in. The texture is a balance of chewy and fudgy, with a slightly crisp exterior that offers a satisfying bite. This delightful combination of softness against a hint of crunch is what keeps you reaching for another cookie.
When baked correctly, these cookies maintain a chewy center while still being firm enough to hold their shape. The presence of dark chocolate chips adds bursts of chocolate flavor throughout, while the white chocolate kiss provides a creamy finish, enhancing the overall experience. Each cookie embodies the essence of a cozy winter evening, evoking warmth and cheer with every bite.
Pro Tips
Utilizing a few key techniques can significantly enhance the final product when making Chocolate Peppermint Blossoms.
| Tip | Description |
|---|---|
| Use Fresh Ingredients | Ensure all ingredients, especially the baking soda and cocoa powder, are fresh. Expired ingredients can lead to poor texture and flavor. |
| Don’t Overmix the Dough | Mix until just combined for the best texture. Overmixing can lead to tough cookies, which is not the desired outcome. |
| Chill the Dough | If the dough feels too sticky or soft, chilling it for 30 minutes can help make it easier to scoop and shape. |
| Watch the Baking Time | Keep a close eye on the cookies while baking. Every oven behaves differently; aim for slightly underbaked for optimal chewiness. |
In addition to the tips provided in the table, consider the temperature of your baking sheets. If using multiple sheets, allow them to cool between batches to prevent premature spreading of the cookies. This ensures that each batch bakes evenly and maintains its intended shape.
Moreover, trying different types of chocolate chips can also enhance the flavor profile of your cookies. Milk chocolate, for instance, adds a sweetness that contrasts nicely with the peppermint. Lastly, feel free to adjust the amount of peppermint by adding a drop of extract to the dough for those who prefer a stronger flavor.
Why You’ll Love This Recipe
Chocolate Peppermint Blossoms bring together a delightful mix of flavors that make them irresistible to cookie lovers. The combination of rich chocolate with refreshing peppermint is not only delicious but also visually appealing, making them perfect for sharing during the holiday season. Their easy preparation process ensures that both novice and experienced bakers can enjoy making them without any stress.
A major advantage of this recipe is its simplicity; the ingredients are commonly found in most kitchens, making it easy to whip up a delicious batch at a moment’s notice. This accessibility allows for spontaneous baking sessions, whether you’re preparing for a holiday party or simply craving something sweet.
Additionally, Chocolate Peppermint Blossoms are versatile in their serving options. They can be enjoyed as a standalone treat, or you could pair them with hot cocoa or coffee for a cozy snack. The cookies hold up well for several days, making them also suitable for packaging as gifts or treats for gatherings—an impressive yet straightforward way to spread some holiday cheer.
How to Serve Chocolate Peppermint Blossoms
Presenting Chocolate Peppermint Blossoms beautifully can enhance the overall experience for you and your guests. Consider using festive platters or trays to showcase these cookies. Arrange them in a circular pattern on a large tray, layering them with parchment paper to keep them fresh and visually appealing.
For an extra touch, you could sprinkle some crushed candy canes on top of the cookies or around the serving area. This not only adds a pop of color but also enhances the peppermint theme and entices your guests as they approach the dessert table. Serve them alongside a warm beverage like hot chocolate, tea, or coffee to complement the rich chocolate flavors and provide a cozy atmosphere.
When hosting a holiday gathering, consider placing a few cookies in a clear cellophane bag tied with a festive ribbon as party favors. This small touch can transform a simple cookie into a delightful gift, allowing guests to indulge later. Additionally, if you’re serving a larger crowd, set up a cookie decorating station where people can personalize their blossoms—perhaps adding frosting or extra chocolate chips for those who desire more!
How to Store Chocolate Peppermint Blossoms
Proper storage of Chocolate Peppermint Blossoms is essential to maintain their freshness. After the cookies have fully cooled on a wire rack, place them in an airtight container. This will help to lock in moisture and prevent them from becoming stale. If stored this way, the cookies can last up to one week at room temperature.
If you need to keep them for a longer period, consider freezing them. Arrange the cookies in a single layer on a baking sheet and freeze until solid. Once frozen, transfer them to a freezer-safe airtight bag or container. Properly stored, they can last up to three months in the freezer. When you’re ready to enjoy them, simply take the desired amount out and let them thaw at room temperature or heat briefly in the microwave for a warm treat.
Avoid leaving the cookies exposed on a plate or in a non-airtight container, as this can lead to drying out or hardening. If you’re concerned about the white chocolate kisses, you may want to put them in the refrigerator if you suspect it could be warm in your house. However, be mindful that chilling can alter the texture slightly, making them less soft or chewy.
Tips to Make Chocolate Peppermint Blossoms
For consistent results every time you make Chocolate Peppermint Blossoms, here are some practical tips to consider:
-
Pay Attention to Mixing Time: Achieving the perfect dough consistency is crucial. Overmixing can lead to denser cookies. Mix until just combined, and be gentle when folding in chocolate chips.
-
Measure Ingredients Accurately: Using a kitchen scale can help achieve the correct measurements, especially if baking multiple batches. Accurate measurements ensure a consistent texture and flavor across all cookies.
-
Adjust Baking Times: Since oven temperatures can vary, it’s important to check for doneness just before the timer goes off. The edges should be firm, but the centers may still look soft; they will firm up as they cool.
-
Test for Freshness: Prior to baking, taste a tiny bit of the dough to ensure the sweetness is to your liking. Each ingredient contributes uniquely, and adjusting slightly can suit individual preferences.
By following these tips, you’re more likely to produce delightful cookies that will impress family and friends. Small adjustments can make a big difference in your baking pursuit!
Variations and Substitutions
Versatility is the delightful nature of Chocolate Peppermint Blossoms. Here are several ideas for variations and substitutions that can change their flavor and appeal:
-
Dairy-Free Version: Substitute margarine or a dairy-free butter alternative for the unsalted butter. Use dairy-free chocolate chips and the plant-based eggs equivalent to ensure a fully dairy-free treat.
-
Gluten-Free Cookies: Replace all-purpose flour with a 1:1 gluten-free flour blend. This adjustment allows those with gluten sensitivities to enjoy the cookies without compromising taste or texture.
-
Peppermint Variations: You can experiment by using peppermint extract instead of relying solely on the Hershey kisses. Start with a small amount and adjust to taste for those who prefer a stronger peppermint punch.
-
Nutty Texture: Incorporate nuts such as chopped pecans or walnuts into the dough for an interesting texture and taste. This addition would contribute crunchiness while complementing the chocolate flavor.
Each of these variations can result in a slightly different cookie, but the core essence of a peppermint chocolate delight remains intact. Feel free to get creative and make this recipe your own!
Storage and Reheating
When it comes to storage, appropriate procedures can prolong the life of your Chocolate Peppermint Blossoms. Start by letting the cookies cool completely before packaging them. Once cooled, place them in an airtight container lined with parchment paper to help absorb excess moisture.
For long-term storage, consider freezing your cookies. Place individual cookies in a single layer on a tray to freeze. Once solid, transfer them to a freezer-safe bag or container, separating layers with parchment paper. They can be stored this way for up to three months.
If you find you have leftovers and want to enjoy them later, reheating can be done with care. The best way to reheat is to place them in a preheated oven at 350°F (175°C) for about 5 minutes, which will revive their soft texture. Alternatively, for a quicker option, use a microwave on low power for 10-15 seconds. This ensures they are heated without becoming tough or dry. Monitor closely to avoid overheating.
As a general note, avoid reheating cookies that have already been previously frozen and thawed multiple times to ensure the best eating quality.
Customization Ideas
When it comes to customizing Chocolate Peppermint Blossoms, there are numerous options to consider. You can adjust the sweetness level based on personal preferences by modifying the amount of granulated sugar. Reducing gin will still keep the cookies deliciously rich.
Add seasonal spices for a unique twist; a pinch of cinnamon or nutmeg can enhance the flavors during the holiday season. Additionally, consider using flavored cocoa powder, such as mint or white chocolate, to incorporate an additional depth of flavor.
Toppings are another fun area for customization. Consider drizzling melted chocolate over the cooled cookies, adding a delightful visual element and additional chocolate flavor. You could also dust them with powdered sugar for a wintery touch.
Each customization idea allows you to put a personal spin on the recipe, making it more memorable for you and your guests. It’s all about combining tastes and textures to create unique experiences!
Common Mistakes to Avoid
When making Chocolate Peppermint Blossoms, avoiding typical pitfalls can ensure great results. Here are five common mistakes and how to prevent them:
-
Using Cold Ingredients: Cold butter or eggs can lead to uneven mixing and affect the dough’s texture. Always bring your butter and eggs to room temperature before starting.
-
Not Measuring Flour Correctly: Scooping flour directly from the bag can lead to excess flour, resulting in dry, crumbly cookies. Use the spoon-and-level method to accurately measure flour.
-
Overbaking the Cookies: Cookies that are left in the oven too long can become hard. Monitor the baking time closely and remove them when the edges are set while the centers remain soft.
-
Forgetting to Let the Dough Rest: If the dough feels too soft or sticky, it’s often beneficial to pop it in the fridge for 30 minutes. This helps the cookies maintain their shape during baking.
-
Neglecting Flavor Balance: Adjustments to the sweetness of the sugars or the amount of peppermint can greatly impact the final taste. Taste test the dough and remember that flavors tend to mellow once baked.
By steering clear of these common mistakes, you’ll enhance both the flavor and texture of your Chocolate Peppermint Blossoms, leading to delightful baked goods around the holiday table.
Serving Occasions
Chocolate Peppermint Blossoms shine at various occasions. They are perfect for holiday gatherings, cookie exchanges, or festive parties. These cookies are often a favorite for holiday dessert tables, adding a festive touch alongside other seasonal treats.
Their visual appeal makes them a great choice for family gatherings, allowing children and adults alike to enjoy a fun and festive treat. You can serve them during cozy winter evenings with hot chocolate or coffee for a balance of warmth and sweetness.
Moreover, these cookies can be packaged as gifts or care packages, making them a thoughtful gesture for friends, family, or coworkers during the busy holiday season. Their delightful combination of flavors and textures makes them a memorable addition to any occasion, encouraging a sense of joy and celebration.
Why Make This Recipe?
There is something truly special about Chocolate Peppermint Blossoms that makes them worth preparing. The delightful combination of rich chocolate and vibrant peppermint creates a unique flavor that isn’t commonly found in many other recipes. This dual flavor profile keeps your taste buds excited and satisfied while evoking the warmth of the holiday season.
Additionally, this recipe’s simplicity allows cooks of all skill levels to experience the joy of creating beautiful and delicious cookies. Whether you’re making them for a family gathering or as a treat for yourself, the satisfaction of producing a perfectly baked cookie is hard to beat.
In the competitive landscape of holiday baking, Chocolate Peppermint Blossoms stand out not just for their ease of preparation but also for their extraordinary taste and festive appearance. This delightful recipe deserves a place in your baking repertoire, and it will likely become a holiday staple for years to come.
Make-Ahead Preparation
One of the best features of Chocolate Peppermint Blossoms is their make-ahead capability. You can prepare the dough in advance, as it stores well in the refrigerator for up to three days. Forming the dough into balls can make things even easier; simply place the dough balls in an airtight container or wrap them in plastic wrap.
If you prefer to keep them for longer, freeze the formed dough balls in a single layer on a baking sheet for about an hour, then transfer them to a freezer-safe bag or container. When you’re ready to bake, you can bake them directly from frozen; just add a minute or two to the baking time.
Another make-ahead option is to bake the cookies, allowing them to cool completely, and store them in an airtight container. Cookies will stay fresh for about a week at room temperature, and you can also freeze the baked cookies for longer storage.
Through these make-ahead options, you’ll be ready to enjoy these festive cookies any time or share them when holiday occasions arise without the last-minute stress of baking.
Equipment and Kitchen Preparation
To ensure a successful baking experience, it’s important to have the appropriate equipment ready. Basic baking tools you’ll need include mixing bowls, measuring cups and spoons, a whisk or hand mixer for creaming the butter and sugars, and baking sheets lined with parchment paper for easy cookie transfer.
Choose high-quality baking sheets as the type you use can affect how the cookies bake. Darker sheets tend to bake cookies faster and can produce a crispier texture, while lighter sheets might result in softer cookies. If possible, have two sets of baking sheets available to allow for continuous baking when preparing larger batches.
Prepare your workspace by ensuring all ingredients are measured and organized before you start. This “mise en place” approach will streamline the process and keep everything in order, making it easier to follow the steps without scrambling around for forgotten components.
Having your kitchen set up in this way will help you focus on the fun of baking and reduce any stress associated with last-minute preparation.
FAQs
-
Can I use regular chocolate kisses instead of peppermint ones?
Yes, you can replace the White Chocolate Peppermint Hershey Kisses with regular milk chocolate or dark chocolate kisses if you prefer a less peppermint-forward cookie. -
How do I know when my cookies are done?
The cookies are done when the edges are set, and the centers have a slight softness. They will continue to cook while cooling on the baking sheet, leading to a fudgy texture. -
Can I freeze the dough?
Absolutely! You can freeze the dough before baking. Form the cookie dough into balls, freeze them on a baking sheet until solid, then store them in a freezer-safe bag or container. -
How long can I store these cookies?
These cookies can be stored in an airtight container at room temperature for about a week. If you want to keep them longer, they can be frozen for up to three months. -
Can I add nuts to the dough?
Yes, adding chopped nuts like pecans or walnuts can enhance the flavor and texture. Just fold them in along with the chocolate chips. -
What’s the best way to reheat frozen cookies?
For frozen cookies, reheat them in a preheated oven at 350°F (175°C) for about 5 minutes, or microwave them for 10-15 seconds until warmed through. -
Will this recipe work with gluten-free flour?
Yes, you can substitute all-purpose flour with a 1:1 gluten-free flour blend for gluten-free Chocolate Peppermint Blossoms. -
How can I make these cookies less sweet?
You can reduce the granulated sugar slightly or use dark chocolate chips instead of semi-sweet ones to lessen the sweetness.
Disclaimer
Nutritional information is approximate and may vary based on ingredient brands, substitutions, portion sizes, and preparation methods.