
Christmas Kitchen Sink Cookies – In Bloom Bakery
There’s something incredibly festive about Christmas Kitchen Sink Cookies. These delightful treats embody the spirit of the holiday season with every bite. Rich, chewy, and packed full of an assortment of flavors and textures, these cookies are a glorious amalgamation of your favorite baking staples combined with unexpected ingredients to create a truly unique experience. The name "kitchen sink" reflects the idea that you can throw in everything but the kitchen sink, making each batch a personal signature of sorts. Expect flavor notes from chocolate, nuts, fruits, and even a touch of saltiness, ensuring that each mouthful surprises you just a little bit more than the previous one.
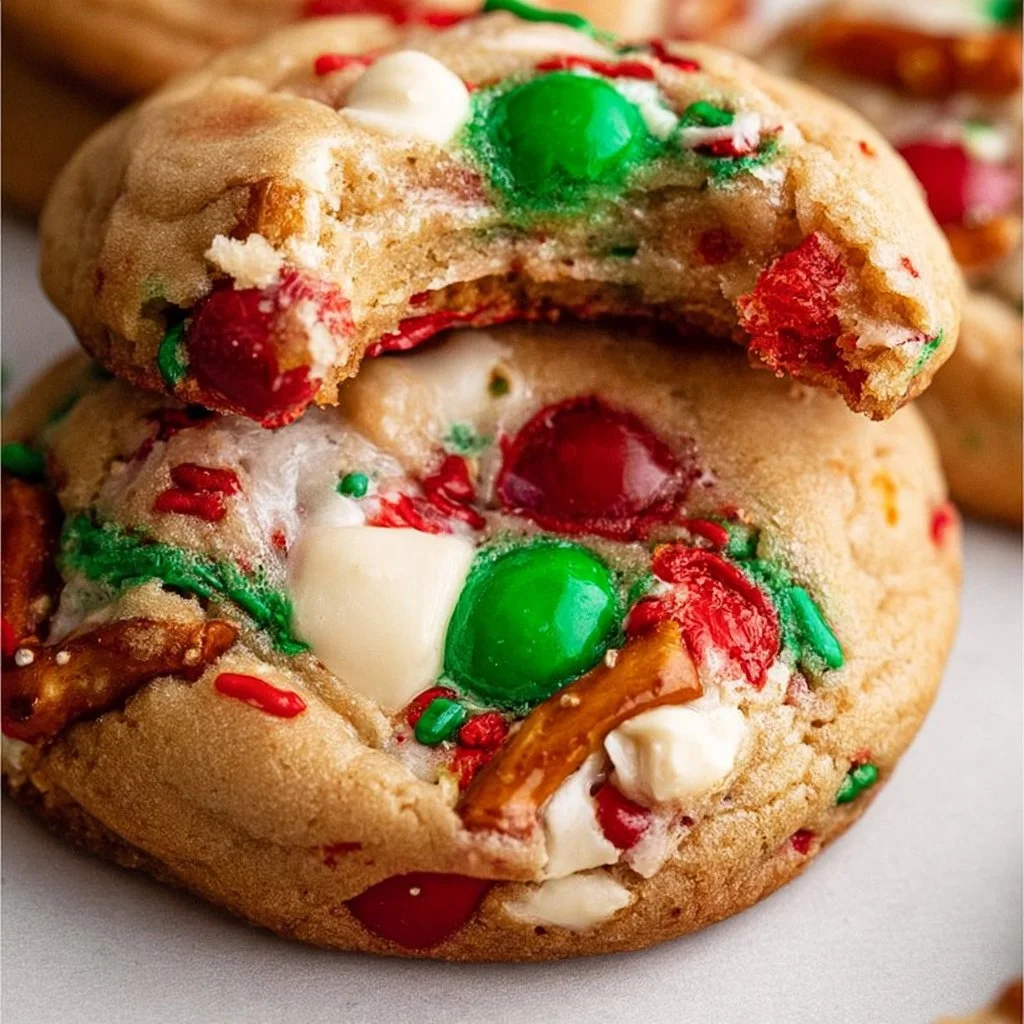
Visually, these cookies can be quite appealing, often showcasing a beautiful golden-brown color punctuated by colorful bits of chocolate and other mix-ins. You may encounter cookies with crispy edges that give way to a soft and chewy center, creating a delightful contrast in every bite. Their irregular shapes and variety of ingredients also showcase the homey, handmade feel that everyone loves around the holidays, inviting you to indulge in the warm, nostalgic comforts they bring.
Kitchen Sink Cookies are perfect for nearly any occasion during the holiday season. They make wonderful gifts when packed in decorative tins, are ideal for school or office parties, and serve beautifully at family gatherings. Plus, they can easily serve as a scrumptious snack to enjoy by the fireplace as you cozy up with loved ones or simply as a delightful pick-me-up on a chilly afternoon. The possibilities are virtually endless when it comes to enjoying these cookies, making them the ideal addition to your seasonal recipe lineup.
What Makes This Recipe Special
What truly sets these Christmas Kitchen Sink Cookies apart is their delightful versatility. Each recipe iteration can differ according to personal preferences and available ingredients. You might find variations that include dried fruits like cranberries or cherries, nuts such as pecans or walnuts, and an assortment of chocolate chips in various flavors to suit your tastes. The fun lies in not only the baked outcome but also in the creative process itself — you really can let your imagination run wild and use what you have on hand, hence the ‘kitchen sink’ metaphor.
Moreover, the balance of flavors and textures in these cookies is designed to delight. The chewiness of the cookies creates a satisfying bite, while the added components — whether they be crunchy nuts or sweet dried fruits — elevate the experience to something exceptional. The combination of rich chocolate and perhaps a sprinkle of sea salt on top adds depth, resulting in a cookie that’s far more exciting than a plain chocolate chip cookie.
Another captivating aspect of these cookies is their nostalgic charm. They transport you back to childhood memories of baking, whether you were the one wielding the spatula or simply enjoying the aromas wafting through the house. This recipe evokes traditions while leaving room for family members to weave in their own stories with each batch, making the experience uniquely personal.
Ingredient Overview and Helpful Notes
The main ingredients in Christmas Kitchen Sink Cookies come together to not only provide flavor but also crucial structural elements. Flour, sugars, and eggs form the backbone of the cookie dough, while additional mix-ins elevate the complexity and enjoyment of the finished cookies. Here’s a brief overview of how each ingredient plays its part:
-
Flour: All-purpose flour is the foundation of any cookie recipe, impacting the texture and structure. It provides stability that allows the cookies to hold their shape while baking. Look for a good quality flour, ideally unbleached, for the best results.
-
Sugars: Granulated sugar contributes sweetness and helps achieve that beautiful golden hue while providing a crisp texture. In contrast, brown sugar adds moisture and a slight chewiness, along with a hint of caramel flavor due to its molasses content.
-
Eggs: Eggs act as a binding agent in cookie dough and are essential for leavening. You want your eggs to be at room temperature for better mixing, which helps to achieve a more homogenous dough.
-
Butter: Using unsalted butter helps control the overall salt content of your cookies, allowing for greater flavor balance. The butter should be softened at room temperature to prevent lumps in the dough and to ensure uniform mixing.
-
Mix-ins: The beauty of Kitchen Sink Cookies is the inclusion of various mix-ins. Whether you choose chocolate chips — semi-sweet or dark are popular options — or add in shredded coconut, chopped nuts, or dried fruit, each addition plays a role in flavor and texture, making the final product well-rounded and delightful.
-
Spices and Flavorings: Vanilla extract, cinnamon, or even a hint of nutmeg can elevate the cookie’s flavor profile. Adding a pinch of salt can also help to enhance sweetness, creating a more balanced overall flavor.
When preparing your ingredients, be sure to measure accurately. Use the scoop-and-level method for flour and pack brown sugar gently into the measuring cup to get correct results. Also, don’t skip on letting your butter soften — this step is crucial for achieving the ideal texture in your dough.
Nutrition & Recipe Details
Nutritional values may vary depending on specific ingredients used, brands chosen, and portion sizes. Below is a table that gives a general overview of the nutrition details for the cookies.
| Item | Value |
|---|---|
| Prep time | 20 minutes |
| Cook time | 12-15 minutes |
| Store time | 1 week at room temperature |
| Calories | 150 (per cookie, approx.) |
| Protein | 2g |
| Carbohydrates | 20g |
| Fat | 7g |
How to Make Christmas Kitchen Sink Cookies
Making Christmas Kitchen Sink Cookies is an enjoyable process, perfect for involving family or friends in the fun of baking. Start by gathering all your ingredients and tools, such as mixing bowls and baking sheets, to help streamline your baking. It often pays to have everything ready to go, which makes for a smoother preparation. You’ll be mixing wet ingredients separately from dry ingredients before bringing them together.
Ingredients
| Ingredient | Quantity |
|---|---|
| All-purpose flour | 2 cups |
| Granulated sugar | 1 1/2 cups |
| Baking powder | 1 teaspoon |
| Baking soda | 1 teaspoon |
| Ground cinnamon | 1 teaspoon |
| Ground nutmeg | 1/2 teaspoon |
| Ground ginger | 1/2 teaspoon |
| Salt | 1/2 teaspoon |
| Vegetable oil | 1 cup |
| Large eggs | 4 |
| Buttermilk | 1 cup |
| Salted caramel sauce | 1/2 cup |
| Cream cheese, softened | 8 oz |
| Unsalted butter, softened | 1/2 cup |
| Powdered sugar | 4 cups |
| Vanilla extract | 1 teaspoon |
Preparing the ingredients is straightforward: start by measuring everything out precisely. For the butter, it helps to let it soften up so that it can cream well with the sugars. You may also want to crack your eggs into a separate bowl to ensure there are no stray shells before adding them to the mix. Additionally, have your baking sheets prepped with parchment paper or silicone mats for easy cleanup and to prevent sticking.
Step-by-Step Instructions
-
Preheat Oven: Start by preheating your oven to 350°F (175°C). This ensures a steady baking temperature, promoting even cooking.
-
Prepare Baking Sheets: Line your baking sheets with parchment paper. This prevents the cookies from sticking and ensures easy removal once they’re baked.
-
Mix Dry Ingredients: In a large mixing bowl, whisk together 2 cups of all-purpose flour, 1 1/2 cups granulated sugar, 1 teaspoon of baking powder, 1 teaspoon of baking soda, along with the ground cinnamon, ground nutmeg, ground ginger, and salt. Mixing the dry ingredients thoroughly at this step ensures an even distribution of leavening agents and spices throughout the cookies.
-
Mix Wet Ingredients: In another bowl, combine 1 cup of vegetable oil, 4 large eggs, and 1 cup of buttermilk. Whisk these ingredients until they are well combined. The oil gives moisture while the eggs provide structure.
-
Combine Wet and Dry Mixtures: Gradually add the wet mixture to the dry ingredients. Mix until just combined and avoid over-mixing as this could lead to tough cookies.
-
Add Mix-ins: Stir in your choice of mix-ins, such as chocolate chips, nuts, and dried fruits. This is where you personalize your cookies, so have fun with it!
-
Scoop Dough: Use a cookie scoop or spoon to drop spoonfuls of the dough onto the prepared baking sheets. Make sure to space them out, as they will spread while baking.
-
Bake: Place the cookies in the oven and bake for 12-15 minutes until the edges are slightly golden and the centers look just set. Keep an eye on them toward the end of the baking time to avoid over-baking.
-
Cool: Allow cookies to cool on the baking sheet for a few minutes before transferring them to wire racks to cool completely. This step allows the cookies to firm up and makes transferring them easier.
-
Enjoy: Once cooled, enjoy these delightful cookies as they are or, for an extra touch, drizzle some salted caramel sauce over the top or serve them with a scoop of ice cream.

Understanding the Flavor and Texture
The flavor profile of Christmas Kitchen Sink Cookies is as layered and complex as the assortment of ingredients you choose. Each bite melds together hints of sweetness from the sugar with a round richness from the buttermilk and spices like cinnamon and nutmeg, which are reminiscent of holiday baking. The various mix-ins provide bursts of additional flavors, ensuring that no two bites are quite alike. Chocolate chunks add a decadent touch; nuts contribute to a delightful crispness, while dried fruits offer a chewy contrast that is wholly satisfying.
The texture of these cookies is equally intriguing. The combination of soft centers with slightly crispy edges creates an appealing contrast. You might experience a tender chewiness that keeps you coming back for more, especially when made with well-balanced, high-quality ingredients. Similarly, the sprinkle of sea salt atop the cookies enhances the overall flavor, creating a lovely sweet-and-salty balance that many find irresistible. The colorful morsels of chocolate, nuts, and fruits also lend visual interest and embed a plethora of textures throughout each cookie.
Overall, the beauty of these cookies is that the unique combination of flavors and textures generates a homemade richness that raises them above store-bought alternatives. Recognizing a successful batch means looking for that delicious golden-brown exterior, coupled with a soft center that does not fall apart when bitten into. They should be inviting, fragrant, and edible works of art that make every effort well worth it.
Pro Tips
When baking, simple techniques can elevate your cookie game to new heights. Here are some essentials to ensure that your Christmas Kitchen Sink Cookies turn out perfect every time:
| Tip | Description |
|---|---|
| Use Room Temperature Ingredients | Having eggs and butter at room temperature helps them incorporate more easily into the dough. This leads to a smoother batter and more evenly baked cookies. |
| Don’t Over-Mix | When combining your wet and dry ingredients, mix just until incorporated. Over-mixing can develop gluten, leading to tough cookies. |
| Chill the Dough | If you have the time, chilling the dough for about 30 minutes before baking helps the cookies maintain their shape while baking, resulting in thicker, chewier cookies. |
| Add Sea Salt on Top | A sprinkle of sea salt just before baking enhances the flavor and balances the sweetness, making the cookies even more delicious. |
In addition to these tips, consider using different flavored extracts in place of vanilla, such as almond or peppermint, to introduce new flavor profiles. Experimenting with types of chocolate, such as white or dark chocolate, can also add a unique element to your cookies. Lastly, ensure you rotate your baking sheets halfway through baking for even cooking; this small adjustment can prevent uneven browning or baking times.
Why You’ll Love This Recipe
You’ll fall in love with Christmas Kitchen Sink Cookies for their incredible versatility. With an endless array of possible mix-ins, you can tailor each batch to suit your taste preferences or utilize what’s on hand in your pantry. The recipe welcomes creativity and experimentation, making it a joy to whip up in the kitchen.
Moreover, these cookies offer an excellent balance between flavor and texture that caters to varying tastes. Whether you prefer something sweet, salty, chewy, or crunchy, there’s a combination out there just for you. This flexibility can make them a standout treat at any gathering, sure to delight friends and family alike, while also being a favorite among picky eaters.
The ease of preparation adds to their appeal. You don’t need advanced baking skills to make Christmas Kitchen Sink Cookies—just a few bowls and measuring cups, along with a general understanding of cookie baking. They also store well, so you can make them ahead of time and have delightful treats ready for any occasion, ridding your busy days of extra stress. As a bonus, the clean-up is easy, allowing you to indulge without the fatigue of complicated baking procedures.
How to Serve Christmas Kitchen Sink Cookies
Presenting your Christmas Kitchen Sink Cookies can be as simple or creative as you choose. A beautiful platter lined with festive colors can make these cookies the centerpiece of your holiday dessert table. Consider adding a few tags with different flavor highlights, encouraging guests to try various types with each bite. If you have children, let them be hands-on in decorating the platter, perhaps adding some holiday-themed sprinkles for an extra festive touch.
For a more personalized touch, consider wrapping individual cookies up in clear cellophane bags tied with ribbons as gifts. This transforms your delicious treats into charming gifts for teachers, neighbors, or friends, showcasing your thoughtfulness and care.
Additionally, these cookies pair wonderfully with a variety of beverages. A warm mug of hot cocoa topped with whipped cream complements the sweetness, while a cup of tea could balance the rich flavors. Milk, of course, is the classic go-to, and some might also enjoy them with coffee or even a flavored latte for a delightful pairing during brunch or afternoon tea.
How to Store Christmas Kitchen Sink Cookies
Storing your cookies properly ensures that they remain fresh and delicious. After baking, allow the cookies to cool completely on a wire rack. Once cooled, transfer them into a sealed container for short-term storage; keep them at room temperature to maintain their delightful chewy texture. Under proper conditions, they can typically last about a week.
If you’re hoping to save some for later, consider freezing them. You can freeze the cookies by placing them in a single layer on a baking sheet and leaving them in the freezer until they are solid. Just transfer the frozen cookies into an airtight freezer bag or container for a longer shelf life, where they can be stored for up to three months. When you’re ready to enjoy, thaw them at room temperature or pop them in the microwave for a few seconds to regain their lovely texture.
Avoid storing cookies in the refrigerator, as this can cause them to dry out. If you’ve added toppings or delicate ingredients that spoil more quickly, check for appropriate storage times. For the best results, do a quick quality check before consuming any leftover cookies after a few days; texture and moisture retention are best after just a few days in a sealed container.
Tips to Make Christmas Kitchen Sink Cookies
Enhancing your cookie-making experience can result in even more delightful Christmas Kitchen Sink Cookies. Here are some practical tips to focus on as you bake:
-
Monitor Baking Time: Each oven is different, so the suggested baking time may need minor adjustments. Start checking your cookies a minute or two before the recommended time to ensure you don’t overbake them. They should be firm around the edges but soft in the center when you take them out; they will continue to firm as they cool.
-
Embrace Mix-in Variety: Don’t be afraid to get adventurous with your mix-ins. Play with different types of nuts and chocolates or even try unexpected fruit options like banana chips or cherries to create an entirely new flavor experience. This approach can turn a basic cookie into a gourmet treat.
-
Homemade Chocolate Chips: If you’re feeling ambitious, make your own chocolate chips by melting chocolate, spreading it out thinly, and letting it set before breaking it into little chunks. This adds a fun personal touch and improves your cookie’s gooey factor.
-
Upgrade with Spreads: Stuffing some of your cookies with nut butter, chocolate, or caramel before baking can take them to another level of indulgence. Simply create a small divot in the center of the dough before adding a dollop of your chosen spread and covering it up with more dough.
Variations and Substitutions
The flexibility of Christmas Kitchen Sink Cookies allows for myriad variations and substitutions to suit your preferences or dietary needs. Here are some delicious ideas you might consider:
-
Gluten-Free Adaptation: To create a gluten-free version, substitute all-purpose flour with a blend of gluten-free flour, ensuring one with xanthan gum is included for stability. This adjustment ensures your cookies still have the proper texture and structure without the gluten.
-
Nut-Free Option: For those with nut allergies, simply omit any nuts from the recipe and consider using seeds, such as pumpkin or sunflower seeds, to maintain a crunchy texture without compromising flavor. You can also add to the chocolate chips to make these cookies equally satisfying.
-
Vegan Version: Mimic a traditional cookie while keeping it vegan by swapping the eggs for flax eggs (mix one tablespoon of ground flaxseed with three tablespoons of water) and replacing the butter with a vegan alternative. Choose plant-based chocolate chips and ensure the other ingredients are free from animal products.
-
Holiday Spice Twist: Embrace the festive spirit by incorporating more seasonal spices like cardamom or allspice into your cookie dough. Adding seasonal spices can heighten the overall flavor profile, invoking even deeper connections to holiday traditions.
You can also vary the mixings to include crushed candy canes or peppermint chips for a minty twist, especially great during the holidays but equally delightful anytime of the year. Feel free to experiment with unexpected flavors for personalization that resonates with your unique taste.
Storage and Reheating
If you find yourself with leftover cookies or choose to make a batch ahead of time, proper storage and reheating methods are crucial. Once baked and cooled, cookies should be placed in an airtight container and consumed fresh within about a week for the best texture. For longer storage, freezing is recommended; ensure they are placed in a freezer-safe bag with as little air as possible to prevent freezer burn.
When you’re ready to enjoy some frozen cookies, simply remove them from the freezer and allow them to thaw at room temperature. For a warmer experience, pop the cookies in the microwave for just a few seconds until they are warmed through. If you are concerned with preserving their moisture, place a slice of bread in the container to help absorb moisture and prevent excess drying as it sits.
In some cases, you may find that cookies lose their crispiness when stored for too long. If you’d like to restore some of that texture, placing the cookies in a preheated oven at 350°F for five minutes can help re-crisp them. Just keep an eye on them to avoid overdoing it and drying them out.
Customization Ideas
While the core recipe is delicious on its own, personalization can make these Christmas Kitchen Sink Cookies even more suited to your tastes or occasion. Here are some ideas to consider:
-
Flavor Enhancements: Add a splash of different flavor extracts such as almond or maple in place of vanilla to provide a distinctive twist that offers new flavor dimensions to each bite. You can also experiment with adding citrus zest, such as orange or lemon, for a refreshing note.
-
Textures and Crunch: Incorporate ingredients with varied textural profiles; for example, crushed pretzels or potato chips for unexpected crunch and saltiness, or even small bits of graham crackers for a nod to the s’mores experience.
-
Frosted Cookie Delight: After your cookies have completely cooled, you might consider topping them with a light glaze of icing or a generous smear of frosting to add an extra layer of sweetness. Different sprinkles can also add fun pops of color, especially for festive occasions.
-
Stuffed Variations: Experiment with stuffing some cookies with chocolate ganache, peanut butter, or a caramel center. Just shape a small piece of dough around your filling and bake as per the regular instructions. This technique ensures a gooey surprise with each bite and takes your cookies to an indulgent new level.
Creating a signature cookie that reflects your style through these customization ideas can be a source of pride, making your holiday baking not just a task but a joyful part of your traditions. Each variant may present a different flavor profile, bringing unique experiences to your gatherings throughout the holiday season.
Common Mistakes to Avoid
Baking cookies can seem straightforward, but there are a few common mistakes that can adversely affect the end result. By being aware of these pitfalls, you can improve your cookie outcomes significantly:
-
Not Measuring Ingredients Accurately: Baking is a science, and even minor discrepancies in measurement can lead to poor textures and flavors. Use proper measuring cups and technique to ensure your ingredients are accurate; always level off your flour at the top of the measuring cup.
-
Baking at the Wrong Temperature: If your oven is too hot, cookies can brown too quickly on the outside while remaining raw in the center. Conversely, baking at a lower temperature may lead to flat cookies. Always preheat the oven and consider using an oven thermometer to verify its accuracy.
-
Using Cold Ingredients: When your butter or eggs are cold, it can be tricky to achieve a smooth dough. This matters because cold butter does not cream well with sugar, which may affect the cookie’s texture. Allow butter to soften at room temperature and use eggs from the pantry for best results.
-
Ignoring Time: Each cookie should cool before transferring to ensure their shape stays intact. Moving them too soon can lead to breakage. Let them set on the baking sheet for a few moments before transferring to a cooling rack.
-
Overmixing the Dough: Mixing too vigorously after introducing the dry ingredients can cause gluten development, leading to tough cookies rather than cherished chewy ones. Mix just until no dry flour remains visible.
By being mindful of these common pitfalls, you can significantly improve your baking success and enjoy top-notch cookies every time.
Serving Occasions
Christmas Kitchen Sink Cookies shine in various settings, but they truly come into their own during the holiday season. These cookies are the perfect treat for festive gatherings, office parties, or family celebrations, offering everyone a bit of warmth and sweetness to share with each other. They create a sense of unity among guests as they dig into a tray of colorful and inviting cookies that make sharing moments more enjoyable.
Beyond the holiday season, these cookies can serve as a weekly treat for busy weeknights or school lunches, providing a simple yet delicious energy boost. With options to personalize them with your family’s favorite mix-ins, you can adapt them according to what each person loves, making these cookies a versatile option that pleases every palate. Their cheerful presentation adds joy to any plate they adorn, bringing delight to those of all ages.
Additionally, these cookies can be perfect for celebrations like birthdays or anniversaries, especially when decorated or presented as gifts. Their homemade charm allows you to show you care, making those receiving them feel appreciated. The possibilities for occasions to enjoy Christmas Kitchen Sink Cookies are virtually endless.
Why Make This Recipe?
Christmas Kitchen Sink Cookies are not only delicious but offer practicality that makes them worth adding to your baking repertoire. The ability to customize them ensures you can tailor each batch to fit any occasion, catering to a wide range of tastes and dietary preferences. This flexible recipe empowers home cooks to express their creativity while keeping cherished traditions alive during the festive season.
Moreover, the ease of these cookies sets them apart from more complicated desserts. The minimal fuss involved in preparation makes them suitable for even beginner bakers seeking to impress loved ones without the stress of an intricate recipe. Additionally, the option to prepare them in large batches ensures that you will have plenty for gatherings, and the adaptability allows you to make them in a way that suits your available ingredients and tools.
Keeping this recipe handy means that you possess a reliable go-to cookie for all occasions, able to stand the test of time and create happy memories. Their unique combination of textures and flavors ensures they won’t just disappear from the cookie jar — they’ll become a cherished family favorite, enhancing any gathering or celebration with warmth and love.
Make-Ahead Preparation
When planning for those busy holiday times, the flexibility to make Christmas Kitchen Sink Cookies ahead of time can save you valuable hours in the kitchen. Thankfully, this recipe allows certain components to be prepared in advance without sacrificing quality.
First, you can prepare the cookie dough and store it in the refrigerator for up to 72 hours, making it easy to bake fresh cookies on demand. It’s often a good idea to chill the dough as well, as this helps improve both flavor and texture while making them easier to scoop.
Additionally, if you’re short on time or preparing for an event, consider shaping the cookie dough into balls and freezing them. Once frozen solid, you can transfer them to an airtight container or freezer bag to keep them protected. When you’re ready to bake, just pull them out of the freezer and bake straight from frozen, adding an additional minute or two to their bake time.
Lastly, baked cookies can also be frozen for later enjoyment. As mentioned earlier, follow proper storage methods to ensure they stay fresh. Allowing them to cool completely before carefully storing helps maintain their texture, allowing for a quick and satisfying treat whenever the craving strikes.
Equipment and Kitchen Preparation
When it’s time to whip up these festive treats, having the right tools in your kitchen will streamline the process and make it more enjoyable. Here are some essentials for your baking toolkit:
-
Mixing Bowls: A good set of mixing bowls in various sizes will allow you to separate wet and dry ingredients effectively, helping in both efficiency and organization. Glass or metal bowls are recommended since they are easy to clean and resist staining.
-
Measuring Cups and Spoons: Accurate measurement is key in cookie baking. Invest in a quality set of measuring cups including both dry and liquid measuring cups to help you achieve perfect ratios.
-
Baking Sheets: Non-stick, heavy-duty baking sheets work best for even baking. A few sheets handy will allow you to bake multiple trays in one burst. Consider using parchment paper for easier cleanup and to prevent sticking.
-
Whisk and Spatula: A whisk is useful for combining dry ingredients and aerating the mixture before mixing with wet ingredients. A sturdy rubber spatula will help in folding and scraping the sides of your bowl for thorough mixing.
-
Cooling Rack: A wire cooling rack allows cookies to cool evenly, preventing sogginess from being trapped beneath while still warm.
You can also prepare your workspace ahead of time by clearing off counters and washing any equipment you’ll need. Gather your ingredients so that everything you need is nearby, and set a baking station that avoids clutter, which will keep you focused and in the moment as holiday baking is a time for joy!
FAQs
-
Can I use other types of flour?
- Yes! While all-purpose flour is standard, you can experiment with almond flour or gluten-free flour blends. It’s important to note that substitution may slightly change texture and moisture, so some adjustments in liquid may be necessary.
-
How do I keep my cookies from spreading too much?
- If your dough seems soft, you can chill it before baking to help prevent spreading. Also, ensure all ingredients, particularly butter, are at proper temperatures as over-softening can lead to flat cookies.
-
What if I don’t have buttermilk?
- If buttermilk isn’t available, you can easily create a substitute by mixing 1 cup of milk with 1 tablespoon of vinegar or lemon juice and letting it sit for a few minutes before using.
-
Can I freeze the cookie dough?
- Absolutely! Form the dough into balls, place them on a baking sheet to freeze them solid, then transfer to a freezer bag. You can bake directly from frozen, simply adding a couple of extra minutes to the baking time.
-
How should I store leftover cookies?
- Store your baked cookies in an airtight container at room temperature for up to a week. You can freeze them by placing cookie layers separated by parchment paper in a durable container or freezer bag.
-
Can these cookies be shipped?
- Yes! Once packed properly in a sturdy box with cushioning (like bubble wrap), these cookies can stand up to a trip. That’s why they make great gifts for loved ones far away during the holidays.
-
Are there vegan substitutions for this recipe?
- Certainly! Replace eggs with flaxseed meal mixed with water, and substitute butter with vegan butter or coconut oil. Make sure to use dairy-free chocolate chips and ensure the other ingredients are free from animal products.
-
What is the best way to reheat frozen cookies?
- For the best results, thaw frozen cookies at room temperature before gently reheating them in the microwave for about 10-15 seconds. This will restore their softness without drying them out.
Disclaimer
Nutritional information is approximate and may vary based on ingredient brands, substitutions, portion sizes, and preparation methods.