
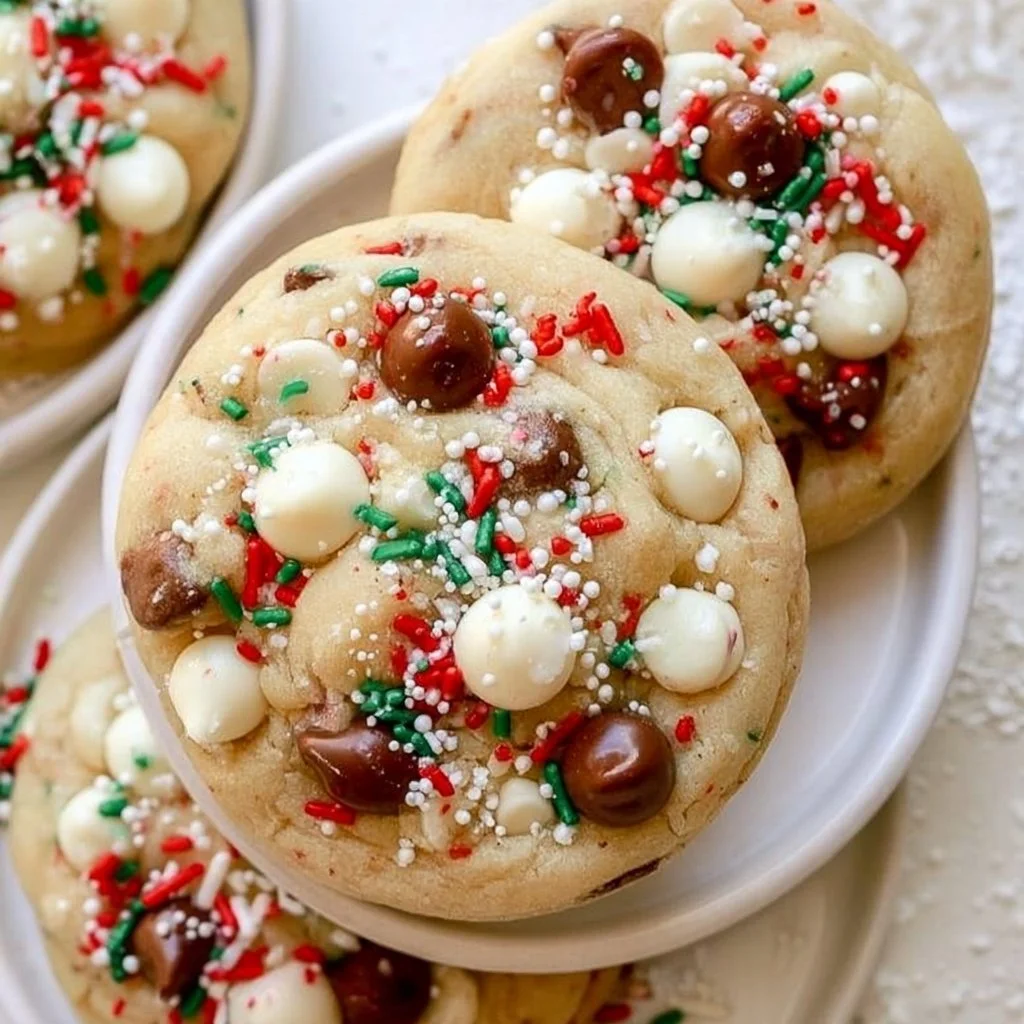
Christmas cokies
The holiday season is synonymous with warmth, family gatherings, and an assortment of sweet treats, and among the most cherished of these treats are Christmas cookies. These delightful confections not only decorate our tables but also fill our homes with nostalgic aromas of spices, sugar, and buttery goodness. The beauty of Christmas cookies lies in their variety—each batch can differ in flavor and texture, reflecting the baker’s unique touch and holiday spirit. With every bite, one experiences a perfect blend of warmth and sweetness that encapsulates the essence of the season.
Imagine opening a tin of fresh-baked cookies, their golden edges slightly crisp while the centers remain soft and tender. As you take a bite, the flavors burst forth with hints of vanilla, cinnamon, and nutmeg, combined with chocolate chips or dried fruits. Each cookie is a celebration unto itself, presenting a delectable harmony that can please any palate. Whether you prefer classic sugar cookies adorned with colorful sprinkles or spiced gingerbread men decorated with icing, Christmas cookies offer something for everyone.
These festive delights are perfect for holiday celebrations, casual family dinners, or simple afternoon snacks shared with loved ones over hot cocoa. Baking Christmas cookies can also be a beautiful tradition for families, uniting generations and creating lasting memories. Imagine the laughter, stories, and love shared in the kitchen while measuring flour, rolling dough, and decorating sugary masterpieces. No matter when or where they are enjoyed, these cookies evoke the magic of the holiday season, inviting us to indulge in joy and togetherness.
In this article, we will explore the delightful realm of Christmas cookies. We will break down the essential components, provide you with insightful tips and techniques to elevate your baking experience, and inspire you with ideas for variations and creative presentations. Join us on this culinary adventure to discover what makes these cookies so special and how you can create your own perfect batch to share with family and friends.
What Makes This Recipe Special
Christmas cookies stand out from other baked goods due to their rich tradition and vibrant variety. They are crafted not only for their taste but also for the joy they bring during the festive season. The combination of spices, such as ginger, cinnamon, and cloves, when paired with sweetness, creates a distinctive aroma that is tantalizing and reminiscent of holiday celebrations. What makes this particular recipe remarkable is its ability to encompass both traditional elements and personal flair, allowing bakers to add their unique twist while still paying homage to the classics.
These cookies are not only about flavor; they also bring a delightful texture that can be customized to each baker’s preference. Whether you prefer a chewy and soft cookie or a crunchy and crisp one, this versatile recipe allows for endless adjustments. Furthermore, incorporating different mix-ins, such as nuts, dried fruits, or chocolate, can completely transform the final cookie, making each batch a new escape into flavor and texture. The result is a cookie that can be enjoyed not just during the holidays but year-round.
The preparation process can also be a heartwarming experience. Measuring, mixing, and rolling dough can be a delightful family activity, providing time to bond and create lasting memories. The use of colorful decorations and icing transforms these cookies into edible art, highlighting the playful aspect of baking. By combining tradition with creativity, each cookie tells a story, whether it’s a cherished family recipe passed down through generations or a new creation born from an experimental spirit.
In essence, Christmas cookies are more than just treats; they are a canvas for culinary creativity and a source of shared joy. This recipe embraces that spirit while offering a delicious outcome that will surely impress family and friends alike. By blending flavors, textures, and personal touches, one can create a collection of cookies that not only looks delightful but tastes fantastic as well.
Ingredient Overview and Helpful Notes
To create the perfect Christmas cookies, understanding the role of each ingredient is paramount. Every element contributes to the flavor, texture, and overall success of the final product. Here’s a detailed overview of the key ingredients involved in the recipe.
-
Flour: The foundation of any cookie, flour provides structure and stability. All-purpose flour is the most common choice, as it allows for a balance of soft and crispy textures. For a denser cookie, consider using bread flour, but be cautious not to overwork the dough, as this can lead to tougher cookies.
-
Sugar: Sugar impacts not only sweetness but also texture. Granulated sugar contributes to a crisp edge, while brown sugar adds moisture and a deeper flavor profile due to its molasses content. For the best results, a combination of both sugars is often recommended, providing an ideal balance of sweetness and richness.
-
Butter: Butter plays a vital role in flavor and texture, offering a rich taste while ensuring a tender crumb. It’s essential to use unsalted butter for baking, as this allows you to control the amount of salt in the recipe. Be sure to soften the butter to room temperature for easy creaming with sugar.
-
Eggs: Eggs are integral for binding the ingredients together while adding moisture. They also help leaven the cookies, making them rise slightly during baking. Using room-temperature eggs enables better incorporation into the batter.
-
Baking Soda/Baking Powder: These leavening agents are crucial for achieving the desired height and texture. Baking soda requires an acidic component (like brown sugar) to activate, while baking powder is double-acting, providing lift during both mixing and baking.
-
Salt: A pinch of salt enhances the flavors of the sweet ingredients, balancing the overall taste and ensuring the cookies are not overly sweet. Do not overlook this critical component, as it can significantly elevate the flavor profile.
-
Flavorings: Vanilla extract and spices like cinnamon or nutmeg are often used to create a warm, inviting aroma and flavor. High-quality extracts make a noticeable difference, so opt for pure vanilla extract over imitation whenever possible.
-
Mix-ins (Optional): Chocolate chips, nuts, or dried fruits can be added for extra flavor and texture. The choice of mix-ins is entirely personal, making it a fun opportunity to customize your cookies according to your preferences.
When selecting your ingredients, prioritize freshness and quality. For instance, using organic or high-quality butter can substantially enhance the flavor. Fresh spices will offer a more vibrant taste compared to those that have been sitting in the pantry for months. By being mindful of ingredient selection and preparation, you’re setting the stage for the perfect batch of Christmas cookies.
Nutrition & Recipe Details
Nutritional values can vary based on the specific brands of ingredients used, portion sizes, and preparation methods. The following table provides a general overview of the nutritional content associated with this recipe.
| Item | Value |
|---|---|
| Prep time | 30 minutes |
| Cook time | 10-12 minutes |
| Store time | Up to 1 week (at room temperature) |
| Calories | Approximately 150 per cookie |
| Protein | 2g |
| Carbohydrates | 20g |
| Fat | 7g |
How to Make Christmas cokies
Creating Christmas cookies is a straightforward but enjoyable process that can be easily followed by both novice and experienced bakers. Before you start baking, it’s essential to organize your workspace and gather all necessary ingredients and tools to streamline the process and avoid any last-minute searches for key items.
Begin by preheating your oven to the ideal baking temperature, typically around 350°F (175°C). This ensures that your cookies will bake evenly and achieve the perfect golden color. While the oven preheats, prepare your baking sheets by lining them with parchment paper for easy transfer and cleanup.
Ingredients
| Ingredient | Quantity |
|---|---|
| All-purpose flour | 2 ½ cups |
| Granulated sugar | 1 cup |
| Brown sugar | 1 cup, packed |
| Unsalted butter | 1 cup, softened |
| Eggs | 2 large |
| Baking soda | 1 teaspoon |
| Baking powder | 1 teaspoon |
| Salt | ½ teaspoon |
| Vanilla extract | 2 teaspoons |
| Cinnamon | 1 teaspoon |
| Optional mix-ins (chocolate chips, nuts, etc.) | 1 cup |
Before starting, ensure the butter is at room temperature. This makes it easier to cream with the sugars, resulting in a fluffy and well-mixed dough. If you forgot to leave it out in advance, you can microwave it for a few seconds, but be careful not to melt it completely.
Step-by-Step Instructions
-
Creaming the Butter and Sugars: In a large mixing bowl, combine the softened butter, granulated sugar, and brown sugar. Using an electric mixer or a wooden spoon, cream the mixture together until it becomes light and fluffy. This process incorporates air into the dough, contributing to a lighter texture.
-
Adding Eggs and Vanilla: Crack the eggs into a separate bowl to ensure they are fresh before adding them to the butter-sugar mixture. Mix in the eggs one at a time, allowing each to fully incorporate before adding the next. Finally, add the vanilla extract and mix until well combined.
-
Combining Dry Ingredients: In another bowl, whisk together the all-purpose flour, baking soda, baking powder, salt, and cinnamon. This ensures that the leavening agents are evenly distributed throughout the flour. Gradually add the dry ingredients to the wet mixture, mixing on low speed or with a spatula to prevent flour from flying everywhere.
-
Incorporating Optional Mix-ins: If you’re using chocolate chips, nuts, or dried fruits, gently fold them into the dough until evenly distributed. The dough should be somewhat thick, with a cohesive texture.
-
Chilling the Dough (Optional): For a firmer cookie that holds its shape better during baking, you can chill the dough for about 30 minutes to an hour. However, this step is optional.
-
Scoop and Shape: Using a tablespoon or cookie scoop, portion out the dough onto the prepared baking sheets. Leave enough space between each cookie to allow for spreading. You can also roll the dough into balls for a more uniform shape.
-
Baking: Place the baking sheets in the preheated oven and bake for 10 to 12 minutes, or until the edges are a light golden brown, and the centers look set but slightly underbaked. Remove from the oven and allow the cookies to cool on the baking sheet for a few minutes before transferring them to wire racks to cool completely.
-
Decorating (Optional): Once the cookies are completely cool, you can decorate them with icing, sprinkles, or melted chocolate, adding a seasonal touch that enhances their festive appeal.
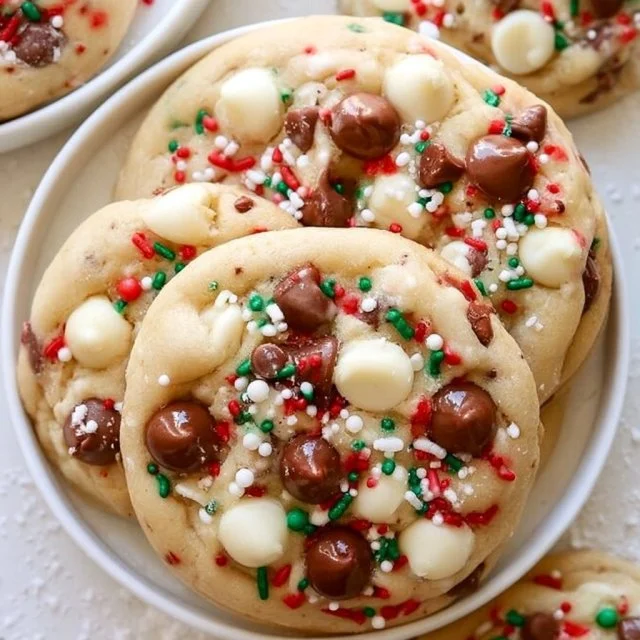
Understanding the Flavor and Texture
Upon taking a bite of your freshly baked Christmas cookies, you’re immediately greeted with a burst of flavor that is both comforting and delightful. The cookies typically possess a subtly sweet base layered with warm spices, creating a foundational taste that is reminiscent of the holidays. The sweetness is balanced perfectly by the warming touch of cinnamon and, depending on the mix-ins, additional textures of chocolate or nuts may interlace throughout each bite.
Texturally, the ideal Christmas cookie strikes a harmonious balance between crisp edges and a soft, chewy center. Achieving this chewy consistency is often due to the combination of sugars used—brown sugar adds moisture while also lending its deeper caramelized flavor, while granulated sugar ensures proper structure and a satisfying crunch. The cookies should offer a slight resistance when bitten into before yielding to a tender, melt-in-your-mouth finish.
The aroma is just as vital in the overall experience. As they bake, the scent of butter and sugar melds with the spices, inviting everyone nearby to gather in anticipation. This olfactory sensation enhances the enjoyment, priming taste buds before the first bite. A successful batch of cookies will not only look visually appealing but also guarantee that your guests will be enticed by the scents wafting from the kitchen, creating an atmosphere of warmth and happiness.
In summary, the combination of flavors—including sweet, spicy, and buttery—along with the contrasting textures of crisp edges and soft centers, makes ideal Christmas cookies a memorable choice for any holiday gathering. They embody the essence of the season and make every moment spent enjoying these treats even more special.
Pro Tips
Perfecting your Christmas cookies can often come down to a few simple yet effective techniques. By following these tried-and-true tips, you can elevate your baking game and ensure that each cookie is a delightful experience.
| Tip | Description |
|---|---|
| Measure Accurately | Using the correct measurements for flour, sugar, and other ingredients is crucial. Too much flour can lead to dry cookies, while too little may result in spreading. Use a kitchen scale for the best accuracy. |
| Chill the Dough | Chilling the dough for at least 30 minutes can prevent spreading and yield thicker cookies with a chewy texture. It’s especially helpful if you’re in a warm environment. |
| Use Parchment Paper | Line your baking sheets with parchment paper to prevent sticking and ensure even baking. This promotes efficient cleanup and helps to keep the bottoms from becoming overly brown. |
| Don’t Overbake | Cookies will continue to cook on the baking sheet even after being removed from the oven due to residual heat. For chewy centers, pull them out just before they appear fully set. |
Remember, experimentation is key; don’t be afraid to play with flavors, textures, and decorations. Small adjustments to baking time or ingredient quantities can lead to delightful surprises, and perfecting this cookie recipe will become a joyful journey in itself. Whether you’re a seasoned pro or a novice baker, these tips will guide you toward consistently excellent results.
To further enhance your baking experience, consider practicing mindfulness in the kitchen. Pay attention to textures, fragrances, and the visual appeal of your dough as it progresses. This awareness will not only help you hone your skills but also make the baking process even more enjoyable.
Why You’ll Love This Recipe
Christmas cookies are an enduring holiday favorite for good reason. They embody the spirit of celebration, bringing together family and friends through their delightful flavors and interactive baking experiences. This particular recipe emphasizes the joy of baking with accessible ingredients and simple techniques, making it perfect for both beginners and experienced bakers.
The versatility of Christmas cookies is a significant draw. You can easily customize them to suit different palates and preferences by incorporating various mix-ins, flavorings, or icing decorations. This adaptability allows for the creation of cookies that cater to everyone, making them ideal for gatherings or thoughtful homemade gifts. They can also be made in large batches, enabling you to share them with neighbors, coworkers, or friends.
Additionally, the baking process itself provides an opportunity for connection—sharing stories, laughter, and the joy of creating something delightful with loved ones. Whether you host a decorating party, bake as a family activity, or simply enjoy the process on your own, the experience is one to cherish. When the cookies are finally placed on the table, they serve as a conversation starter and a sweet centerpiece that brings joy to any gathering.
Ultimately, the aromatic, delicious results—all against the backdrop of seasonal festivities—make this cookie recipe a must-try. The pleasure of enjoying freshly baked Christmas cookies with a warm beverage or gift-wrapping them for loved ones is a fulfilling experience that binds us during the holiday season.
How to Serve Christmas cokies
Serving Christmas cookies can be as delightful as baking them. Presentation is key to making these festive treats even more special. Start by arranging the cookies on a beautifully decorated platter or in a festive tin to create an inviting display. Depending on the occasion, you may choose to stack them neatly, layer them with parchment paper, or even garnish the platter with seasonal decorations like holly, pinecones, or colorful ribbons for a personal touch.
When serving, consider pairing the cookies with beverages that complement their flavors. A glass of cold milk, a hot cup of cocoa, or a spiced tea can enhance the overall experience. For more festive occasions, serving cookies alongside mulled cider or warm spiced wine (non-alcoholic) can evoke holiday cheer and create a cozy atmosphere.
If you’re preparing for a gathering, think about offering a variety of Christmas cookies. Mixing different types creates an appealing platter that encourages guests to sample various flavors. Incorporating some classic favorites, such as gingerbread, sugar cookies, and biscotti, allows for a range of tastes and textures, satisfying different cravings.
Furthermore, you can take it a step further by providing decorative toppings or dips for interactive enjoyment. Serve melted chocolate or white chocolate alongside sprinkles and edible glitter for guests to dip their cookies. This not only elevates the visual appeal but also adds a fun element to the serving process, inviting guests to participate and create their personalized cookies.
Ultimately, whether you’re hosting a large holiday gathering or a cozy family evening, setting up an appealing cookie display and pairing these treats with complementary beverages will undeniably enhance the enjoyment of your Christmas cookies.
How to Store Christmas cokies
Storing Christmas cookies properly ensures they maintain their delightful taste and texture for as long as possible. After your cookies have cooled completely, it’s time to package them for storage. Make sure to avoid placing warm cookies in airtight containers, as this can create moisture and lead to a soggy texture.
To store cookies at room temperature, arrange them in a single layer in an airtight container, separating different types with parchment paper to prevent sticking. Keep your container in a cool, dry place away from sunlight. Most Christmas cookies can be stored like this for up to a week, maintaining both flavor and freshness.
For longer storage, consider freezing your cookies. When freezing, place them in a single layer on a baking sheet to freeze them individually before transferring them to a freezer-safe bag or container. Label the container with the date and type of cookies so you can easily identify them later. Frozen cookies maintain their quality for a few months, allowing you to enjoy your holiday baking long after the festivities have ended.
When ready to enjoy, simply remove the desired number of cookies from the freezer and allow them to thaw at room temperature. You may also choose to warm them slightly in the oven or microwave, rejuvenating their softness and enhancing the flavors. However, be cautious not to overheat, as this can lead to a dry texture. Storing and reheating cookies with care ensures they’re enjoyed at their best.
It’s essential to recognize that not all cookies store equally well. Cookies decorated with icing or frosting may lose their crispness over time. If using an icing or frosting, consider storing these cookies in a separate container and adding fresh decorations just before serving for optimal appearance and taste.
Tips to Make Christmas cokies
Creating the perfect Christmas cookies requires attention to detail and a few essential techniques to ensure consistent results. Here are some practical suggestions to help you achieve cookie perfection every time:
-
Room Temperature Ingredients: Always start with room temperature butter and eggs. Using cold ingredients can affect how well they incorporate, impacting the cookies’ texture. Softened butter cream more easily with the sugars, resulting in a fluffier texture.
-
Don’t Skip the Baking Soda/Powder: Ensure that your baking soda and baking powder are fresh and not expired, as this can affect the leavening of your cookies. Additionally, being mindful of the correct proportions between these ingredients is crucial to achieving the desired rise.
-
Mixing Technique: When combining wet and dry ingredients, avoid over-mixing. Stir until just combined; this will prevent gluten development, which can lead to a tough cookie. A gentle hand will keep your cookies tender and chewy.
-
Cooling Time: Allow the cookies to cool slightly before transferring them to a wire rack. If you try to move them too soon, they may crumble or lose shape. A brief cooling period on the baking sheet allows them to set so they can be easily relocated.
-
Experiment with Flavors: While traditional flavors are delicious, don’t hesitate to experiment with other spices or extracts. Substituting almond extract for vanilla or adding a pinch of cardamom can create exciting new cookie flavors while still staying true to the spirit of the season.
Incorporating these strategies into your baking process will not only help you make delicious Christmas cookies but can also build your confidence in the kitchen. As you practice and refine your technique, baking will become an enjoyable and rewarding experience.
Variations and Substitutions
To make your Christmas cookies truly unique, consider experimenting with various variations and substitutions that can impact flavor, texture, and presentation. Here are several ideas to inspire your creativity:
-
Gluten-Free Option: To make gluten-free Christmas cookies, substitute the all-purpose flour with a gluten-free blend that includes xanthan gum. This will help achieve similar texture and consistency without sacrificing taste.
-
Dairy-Free Version: Swap out the butter for a dairy-free alternative such as coconut oil or a plant-based butter substitute. Ensure that any chocolate chips used are also dairy-free to keep the recipe entirely dairy-free.
-
Spice Variations: Experiment with different spices beyond cinnamon, such as ginger, nutmeg, or even cardamom. Each will impart a distinct flavor profile that can completely revamp the classic Christmas cookie.
-
Different Mix-ins: Rather than traditional chocolate chips, consider adding chopped dried fruits like cranberries or apricots, nuts such as pecans or walnuts, or even butterscotch chips. Each will bring a different texture and flavor element to the cookies and create a more diverse cookie platter.
-
Frosting and Decoration: Instead of simply sprinkling sugar on top, frost your cookies with royal icing or cream cheese frosting for a decadent finish. Alternatively, dust with powdered sugar or drizzle with melted chocolate for an elegant touch.
By embracing these variations and substitutions, you can create a diverse range of Christmas cookies that cater to different tastes and dietary preferences. Not only does this allow for creativity in the kitchen, but it also ensures that your treats can please everyone at your holiday gatherings.
Storage and Reheating
Properly storing and reheating your Christmas cookies is key to preserving their delightful flavor and texture. To maintain optimal freshness, it’s essential to follow a few guidelines.
When storing your cookies, begin by allowing them to cool completely to room temperature. This step prevents moisture buildup in your storage containers. Then, carefully arrange the cookies in an airtight container, separating different types with layers of parchment paper to prevent them from sticking together. At room temperature, most cookies can last for about a week while still remaining soft and delicious.
For those cookies you won’t consume right away, freeze them for longer storage. Place the cooled cookies in a single layer on a baking sheet and freeze until firm. Afterward, transfer them to a freezer-safe bag or airtight container. Label them with the date and type to keep track of what’s stored. Frozen cookies can maintain their quality for several months, allowing you to enjoy your holiday baking beyond the festive season.
When it comes time to enjoy your frozen treats, the best method for reheating depends on your preferences. For soft, gooey cookies, simply allow them to thaw at room temperature, which can take about 20-30 minutes. For added warmth, you can reheat them briefly in the microwave—about 10-15 seconds will do, but monitor closely to avoid overcooking.
For those who prefer a slightly crisp edge, opt for the oven. Preheat it to around 300°F (150°C) and place the cookies on a baking sheet. Heat for about 5-10 minutes, watching closely until they’re warmed through. This method helps restore freshness and ensures your cookies retain their delightful texture.
Customization Ideas
One of the best aspects of Christmas cookies is their adaptability. You can easily customize the recipe by making thoughtful adjustments that cater to your personal taste and creativity. Here are some ideas to inspire your next batch:
-
Flavor Adjustments: If you’re a fan of citrus, consider incorporating lemon or orange zest into your cookie dough for a fresh, seasonal twist. The bright flavors pair well with traditional spices, adding complexity to the overall taste.
-
Topped or Filled: Go beyond plain cookies by stuffing them with a surprise filling. Cream cheese, chocolate ganache, or fruit preserves can add an unexpected burst of flavor and make them extra special. Alternatively, you can top your cookies with a dollop of frosting or a sprinkle of sea salt to elevate their appearance and taste.
-
Themed Decorations: Use colored sprinkles or themed edible decorations to tailor your cookies for specific holiday themes or occasions. For instance, use red and green sprinkles for Christmas, pastels for Easter, or golden accents for a New Year’s celebration.
-
Different Shapes and Sizes: Play with cookie cutters to create various shapes such as stars, tree ornaments, or traditional gingerbread men. Adjust the baking time slightly for thinner cookies to ensure they don’t overbake while thicker cookies may require a bit longer.
-
Eco-Friendly Options: Consider substituting conventional sugar with organic or unrefined varieties, and use fair-trade chocolate chips. This not only makes your cookies a bit healthier but also aligns with a more sustainable approach to baking.
By incorporating these customization ideas, you can ensure each batch of Christmas cookies reflects your personal touch and creates delightful surprises for everyone who tastes them. Baking is a wonderful way to express your culinary creativity while sharing the joy of the season with others.
Common Mistakes to Avoid
Baking can be a precise process, and even small missteps can affect the outcome of your Christmas cookies. Below are some common mistakes to steer clear of:
-
Incorrect Measurements: One of the biggest pitfalls is mismeasuring ingredients, especially flour, which can lead to dry or overly dense cookies. Always use the correct measuring tools and techniques, such as spooning flour into the measuring cup and leveling off for accuracy.
-
Overmixing the Dough: While it’s essential to combine your ingredients thoroughly, overmixing can lead to tough cookies due to gluten development. Once the flour is just combined, stop mixing and allow other ingredients to integrate naturally.
-
Not Preheating the Oven: Skipping the preheating step could result in unevenly baked cookies. Always allow your oven to fully preheat to the specified temperature to achieve uniform baking and consistent results.
-
Baking on an Unlined Sheet: Directly baking on a bare sheet can cause cookies to stick and burn. Use parchment paper to prevent sticking and ensure even cooking, which makes both transfer and cleanup a breeze.
-
Ignoring Storage Guidelines: Many bakers forget that cookies can become stale if stored improperly. Always allow cookies to cool completely before storing in airtight containers. Also, separate cookies with different textures or icings to maintain the integrity of each.
By avoiding these common pitfalls, you can enhance your baking skills and create deliciously perfect Christmas cookies every time. Learning from mistakes is part of the journey, which only makes the end result more satisfying.
Serving Occasions
Christmas cookies are not just a seasonal treat; they shine during special occasions that bring friends and family together. Their festive appearance and delightful flavors make them suitable for various gatherings, including:
-
Holiday Parties: Cookies are a staple at holiday parties, where cookie platters can be both an easy and impressive contribution. Creating a variety of cookies allows for diverse tastes, leaving guests excited to sample different flavors throughout the evening.
-
Gift Giving: Presenting homemade Christmas cookies in decorative tins or festive boxes makes for a heartfelt gift. Sharing baked goods serves as a tangible expression of love, warmth, and gratitude during the holiday season.
-
Family Get-Togethers: Whether it’s a cozy family gathering or a large reunion, cookies add a sense of togetherness. Baking together can become a delightful family tradition, engaging younger generations in the kitchen while creating memories to cherish year after year.
-
Office Celebrations: Bringing Christmas cookies to work can foster a cheerful atmosphere among colleagues. They make for simple sharing and are an excellent way to spread holiday spirit and camaraderie in a professional setting.
-
Charitable Events: Many organizations hold cookie sales or competitions as fundraisers during the holiday season. Enriching your community through baking and sharing for a good cause creates joy for all involved, making your cookies not just a treat, but a force for good.
By embracing these occasions, you can truly celebrate the warmth and joy Christmas cookies bring to our lives, creating meaningful connections and lasting memories in the process.
Why Make This Recipe?
Choosing to bake Christmas cookies using this particular recipe is a worthwhile endeavor for several reasons. Firstly, the fusion of classic flavors and textures embodies the spirit of the holiday season. The recipe balances simplicity with versatility, allowing bakers to customize their cookies according to preference or dietary requirements without compromising on taste. This adaptability makes it suitable for anyone looking to create a delightful treat from scratch.
Moreover, the ease of preparation makes it approachable for all skill levels. By following straightforward instructions, beginners can quickly gain confidence in their baking abilities, while seasoned pastry enthusiasts can still find joy in the basics. This combination of accessibility and potential for creativity captures the essence of holiday baking—a blend of nostalgia and innovation.
Another practical reason to keep this recipe in your rotation is its capacity for batch baking. The ability to prepare cookies ahead, freeze portions, or create multiple variations encourages a fun baking experience while ensuring treats are available whenever needed. You can bake them on a chilly winter night to enjoy with family or prepare them ahead of a big gathering, saving time and stress.
Ultimately, this cookie recipe serves as a foundation for your creativity, personal expression, and connection with loved ones. By making it a part of your culinary repertoire, you’ll create cherished memories that will be enjoyed during holidays for years to come.
Make-Ahead Preparation
To simplify your holiday baking experience, you can embrace make-ahead preparation. Several aspects of the Christmas cookie recipe can be prepped ahead of time, saving you precious hours during the holiday season.
-
Prepare the Dough: You can easily make the cookie dough in advance and refrigerate it for up to 3 days before baking. Ensure it’s wrapped tightly in plastic wrap or stored in an airtight container to prevent it from drying out. This allows you to bake fresh cookies whenever you’d like without the extra prep work.
-
Freeze the Dough: If you prefer to bake the cookies later, consider freezing the dough instead. Portion it out into balls and freeze them on a baking sheet before transferring them to an airtight container or freezer bag. This way, you have pre-portioned cookie dough ready to pop in the oven whenever cravings strike.
-
Pre-Made Icing: If you’re planning to decorate your cookies, you can prepare the icing in advance. Most icing recipes store well in the fridge for a week, so you can whip up your decorating materials ahead of time. Just remember to bring it back to room temperature before using.
-
Crush or Chop Mix-ins: Dried fruits, nuts, or candy pieces can be chopped and stored ahead of time. This ensures that everything is ready to go when it’s time to assemble and bake your cookies, streamlining the process even further.
By incorporating these make-ahead strategies, you can enjoy a stress-free baking experience during the busy holiday season, allowing for spontaneous baking sessions without the hassle of extensive preparation. This foresight provides more enjoyable moments to spend with family and friends during this special time of year.
Equipment and Kitchen Preparation
The right equipment and kitchen preparation can significantly enhance your Christmas cookie baking experience. Below is a list of essential tools that can streamline your process and help you achieve optimal results.
-
Mixing Bowls: Use a variety of mixing bowls, including large ones for batter and smaller ones for whisking dry ingredients. Ensure they are made from materials that won’t conduct heat, like glass or stainless steel.
-
Electric Mixer: A stand mixer or hand mixer makes the creaming process easier and more efficient, helping achieve that perfect light and fluffy texture. If a mixer isn’t available, a sturdy whisk and a bit of elbow grease will work as well.
-
Baking Sheets: A set of heavy-duty baking sheets ensures even heat distribution and minimizes the risk of burning. Opt for ones with a non-stick surface or use parchment paper to prevent cookies from sticking.
-
Cookie Scoops: A cookie scoop or ice cream scoop helps in portioning consistent-sized cookies that bake evenly. This is especially helpful for achieving uniformity in appearance.
-
Cooling Rack: A wire cooling rack allows cookies to cool properly, preventing sogginess on the bottoms. This equipment should be well-ventilated to permit proper airflow around your fresh-baked treats.
-
Spatula: A broad, flexible spatula is essential for transferring cookies from the baking sheet to the cooling rack. It makes the process quick and gentle, saving your cookies from breaking apart.
Preparing your kitchen is just as important as gathering the right tools. Before you start, ensure your workspace is clean and organized. Measure and pre-sift your dry ingredients to minimize mess and streamline the mixing process. Having ingredients laid out makes it easier to follow the recipe without interruptions.
By equipping yourself with the right tools and maintaining an organized kitchen, you’ll foster a positive and efficient baking environment, ensuring that your Christmas cookies turn out perfectly every time.
FAQs
-
Can I use whole wheat flour instead of all-purpose flour?
- Yes, you can substitute whole wheat flour for all-purpose flour; however, it may result in denser cookies. You can also blend them for a healthier option while maintaining a lighter texture.
-
How do I know when the cookies are done baking?
- Cookies are typically done when the edges appear firm and are lightly golden, while the centers still look slightly underbaked. They will continue to cook after being removed from the oven as they cool.
-
Can I freeze baked cookies?
- Yes, baked cookies freeze well. Place them in an airtight container with parchment paper between layers and store them in the freezer for a few months. Thaw them at room temperature before serving for best results.
-
What’s the best way to decorate Christmas cookies?
- The best way to decorate is to let the cookies cool completely before frosting. Use royal icing or buttercream for a beautiful finish—don’t hesitate to get creative with edible glitter, sprinkles, or colored sugars for festive designs.
-
Can I use a sugar substitute in this recipe?
- You can use sugar substitutes, but they may result in different textures and flavors. If you choose to substitute, ensure it’s a one-to-one replacement that can provide similar sweetness.
-
What types of mixers work best for this recipe?
- Either a stand mixer or a handheld electric mixer will work well, but be sure to cream the butter and sugars properly until light and fluffy, ensuring a good texture for your cookies.
-
How should I store leftover cookies?
- Store cookies in an airtight container at room temperature for up to a week. For longer storage, freeze them, layering them with parchment paper to prevent sticking.
-
Can I adapt this recipe for other holidays or occasions?
- Absolutely! You can change decorations, flavors, or shapes to suit different holidays or events. Use themed cookie cutters or adapt the spices for seasonal flair.
Disclaimer
Nutritional information is approximate and may vary based on ingredient brands, substitutions, portion sizes, and preparation methods.