
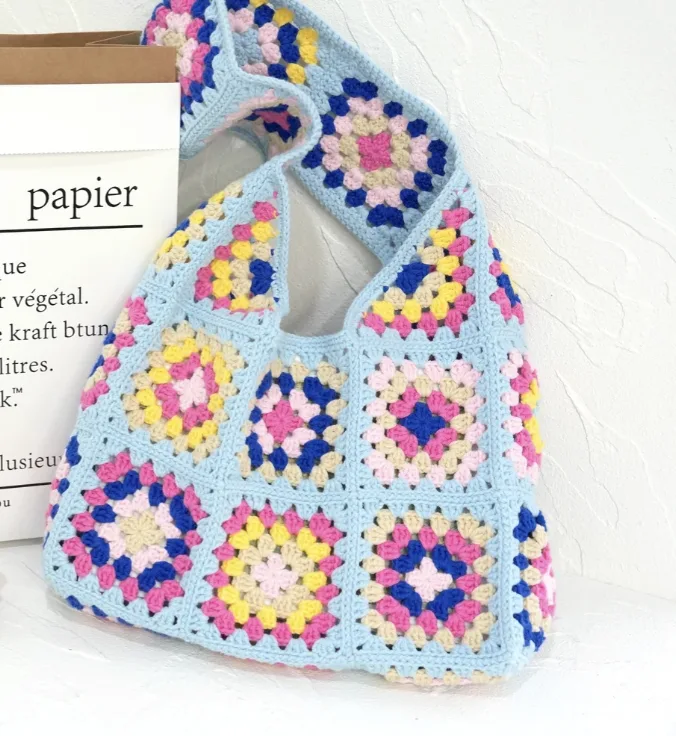
If you love classic crochet motifs, colorful patchwork, and practical handmade projects, this Granny Square Shopping Bag is a wonderful project to add to your crochet list. It combines the familiar look of traditional granny squares with the usefulness of a roomy reusable shopping tote. The finished bag has a cheerful summer palette of sky blue, navy blue, pink, yellow, and cream, giving it a playful retro character while keeping the overall design practical.
This project is especially appealing because the bag folds flat when it is not being used. That makes it a convenient reusable alternative to plastic shopping bags and a lovely companion for farmers’ markets, everyday errands, or carrying daily essentials. At the same time, the granny-square construction gives you plenty of opportunities to enjoy color changes and create your own visual arrangement.
The original pattern uses 29 squares in total: 25 regular squares and 4 triangle squares. The regular granny squares measure 4 inches each. Once assembled, the finished bag measures approximately 5.5 inches x 17.7 inches, with a comfortable 9-inch depth.

Why This Granny Square Bag Is a Great Crochet Project
There is something particularly satisfying about making a bag from individual crochet squares. Each square is small enough to work on separately, so the project can be divided into manageable sessions. Instead of constructing the entire bag in one continuous piece, you create the components first and then bring them together during assembly.
The color palette is one of the most charming parts of the original design. Sky blue creates a fresh border and joining color, while navy blue provides contrast and structure. Pink and yellow add bright accents, and cream helps soften the combination. Because every square can become its own small color composition, you can enjoy arranging the colors in different ways while still keeping the recognizable granny-square appearance.
The source also notes that the color palette can be adapted. Lavender can be used instead of pink, for example, or mint green instead of sky blue. These are color suggestions rather than changes to the original technical instructions, so the construction itself remains based on the stated pattern.
Project Details at a Glance
- Regular square size: 4 inches
- Regular squares: Make 25
- Triangle squares: Make 4
- Total squares: 29
- Finished bag size: Approximately 5.5 inches x 17.7 inches
- Depth: Approximately 9 inches
- Hook: 3.0mm crochet hook
- Terms: US crochet terms
Materials for the Granny Square Shopping Bag
The recommended yarn for this project is Loopara 5ply combed cotton. The pattern specifies the following colors: Pink 18, Pink 20, Yellow 30, Blue 39, Blue 44, and Apricot 50.
- Yarn: Loopara 5ply combed cotton — Pink 18, Pink 20, Yellow 30, Blue 39, Blue 44, and Apricot 50
- Crochet hook: 3.0mm
- Scissors
- Yarn needle
The recommended 3.0mm hook is paired with the Loopara 5 ply milk cotton yarn to create tight, neat stitches. The source describes this yarn as having good stitch definition, a natural sheen, durability, machine-washable qualities, and color retention through multiple washes.
For a market bag, maintaining an even tension is particularly useful because the individual squares need to remain consistent enough to assemble neatly. The source specifically recommends keeping tension even for straight edges and paying attention to stitch counts on each side.
US Crochet Abbreviations Used in This Pattern
The pattern uses US crochet terminology. Keeping these abbreviations familiar before you begin can make the rounds easier to follow.
- ch: chain
- dc: double crochet
- sc: single crochet
- sl: slip stitch
- picot: decorative picot edging
- Magic ring: magic ring technique
- dec: decrease
- cl: cluster stitch for corners
- puff st: puff stitch

Understanding the Bag Layout Before You Crochet
Before starting the assembly, it helps to understand that the bag is not simply a stack of squares sewn together randomly. The original layout diagram shows how the pieces are positioned and how the seams connect.

The layout uses 12 regular squares for the main body, 4 triangle squares for the corners, and 13 squares for the edging. The red arrows in the diagram indicate the seaming directions. Understanding this arrangement before sewing can make the assembly stage much easier because you can refer to the intended placement instead of trying to determine the structure as you go.
How to Crochet the 25 Regular Granny Squares
The first major stage is making the 25 regular squares. Each regular square is worked through six rounds and then fastened off. The repeated construction makes these pieces ideal for working in batches.
Round 1: Create the Ring

Round 1: Chain 4, slip stitch in first chain to form ring.
This short opening round establishes the center ring for the granny square. Make sure the ring is joined securely before moving into the next round.
Round 2: Build the First Clusters

Round 2: Chain 3, 2 double crochet, chain 2. (3 double crochet, chain 2) repeat 3 times. Join with slip stitch to top of beginning chain-3.
At this stage, the central ring begins to develop the familiar four-cornered granny-square structure. Keep the chain-2 spaces easy to identify because they become important working spaces in the following rounds.
Round 3: Establish the Four Corners

Round 3: Slip stitch to chain-2 space. In same space, chain 3, 2 double crochet, chain 2, 3 double crochet. In each chain-2 space, (3 double crochet, chain 2, 3 double crochet). Join with slip stitch to top of beginning chain-3.
This round clearly develops the corner clusters. As the square grows, the chain-2 spaces remain important visual checkpoints. If your corners are not forming evenly, pause and compare the placement with the round instructions before continuing.
Round 4: Add the Side Clusters

Round 4: Slip stitch to chain-2 space. In same space, chain 3, 2 double crochet, chain 2, 3 double crochet. Work 3 double crochet in next space between clusters. [(3 double crochet, chain 2, 3 double crochet) in chain-2 space, 3 double crochet in next space] repeat 3 times. Join with slip stitch to top of beginning chain-3.
Notice the progression: the corners continue to receive the larger corner cluster, while the spaces between them begin filling with three-double-crochet groups.
Round 5: Continue Expanding

Round 5: Slip stitch to chain-2 space. In same space, chain 3, 2 double crochet, chain 2, 3 double crochet. Work 3 double crochet in next 2 spaces between clusters. [(3 double crochet, chain 2, 3 double crochet) in chain-2 space, 3 double crochet in next 2 spaces] repeat 3 times. Join with slip stitch to top of beginning chain-3.
The number of spaces between the corner clusters increases as the square grows. This is an important checkpoint because the pattern is deliberately expanding one round at a time.
Round 6: Complete the Regular Square

Round 6: Slip stitch to chain-2 space. In same space, chain 3, 2 double crochet, chain 2, 3 double crochet. Work 3 double crochet in next 3 spaces between clusters. [(3 double crochet, chain 2, 3 double crochet) in chain-2 space, 3 double crochet in next 3 spaces] repeat 3 times. Join with slip stitch to top of beginning chain-3.
After completing Round 6, fasten off and weave in ends.

How to Crochet the 4 Triangle Squares
The four triangle squares are an important part of the bag layout. They are made separately through five rounds, with a new color joined at the beginning of each round after the first.
Triangle Square Round 1

Round 1: Create magic ring. Chain 3 (counts as double crochet), chain 3, work 3 double crochet into ring, chain 3, double crochet. Fasten off.
Triangle Square Round 2

Round 2: Join new color to first double crochet of previous round. Chain 3 (counts as double crochet), chain 3, 3 double crochet, chain 1. (3 double crochet, chain 3, 3 double crochet), chain 1. (3 double crochet, chain 3, double crochet). Fasten off.
Triangle Square Round 3

Round 3: Join new color to first double crochet of previous round. Chain 3 (counts as double crochet), chain 3, 3 double crochet, chain 1. Work 3 double crochet, chain 1. (3 double crochet, chain 3, 3 double crochet), chain 1. Work 3 double crochet, chain 1. (3 double crochet, chain 3, double crochet). Fasten off.
Triangle Square Round 4

Round 4: Join new color to first double crochet of previous round. Chain 3 (counts as double crochet), chain 3, 3 double crochet, chain 1. (3 double crochet, chain 1) repeat twice. (3 double crochet, chain 3, 3 double crochet), chain 1. (3 double crochet, chain 1) repeat twice. (3 double crochet, chain 3, double crochet). Fasten off.
Triangle Square Round 5

Round 5: Join new color to first double crochet of previous round. Chain 3 (counts as double crochet), chain 3, 3 double crochet, chain 1. (3 double crochet, chain 1) repeat 3 times. (3 double crochet, chain 3, 3 double crochet), chain 1. (3 double crochet, chain 1) repeat 3 times. (3 double crochet, chain 3, double crochet). Fasten off.
A useful source-provided tip is to mark the beginning of each round for easier counting. Even tension also helps keep the edges straight, and you should pay attention to the stitch counts on each side.
Assembling the Granny Square Shopping Bag
Once all of the crochet components are finished, the project changes from individual motifs into a functional bag. The source specifies using an inside roll stitch for sewing. Follow the layout diagram as your main guide for positioning the pieces.
Step 1: Sew the Main Pieces

Step 1: First, sew the three pieces according to the flat diagram, then assemble them together. Use the inside roll stitch for sewing.
Step 2: Complete the Main Body

Step 2: Now the three pieces are sewn together. You’ve completed the main body of the bag.
Steps 3–6: Begin Sewing the Strap and Side

Step 3: Take out one piece of the bag body and the strap.

Step 4: Align the left sides, with the back sides facing each other, and use the inside roll stitch to sew.

Step 5: Repeat the first stitch once more.

Step 6: Continue sewing, matching each part until you reach the end of the three granny squares.
Steps 7–10: Finish the Body and Connect the Strap

Step 7: Sew the three granny squares at the bottom of the bag.

Step 8: Sew the three granny squares on the other side of the bag body.

Step 9: Use the same method to sew the other side of the bag.

Step 10: After completing both sides of the bag, finally connect the strap.

Adding the Edging
The edging gives the assembled crochet piece its finishing structure. The original instructions use three edging rounds and focus on how the corners are handled.
Edging Round 1

Round 1: Work 3 single crochets in each chain space around the granny square. At the corners, work a single crochet decrease. For all other spaces, work single crochets without increasing or decreasing.
Edging Round 2

Round 2: At each corner, work a cluster of three single crochets together in one stitch. For all other spaces, work single crochets without increasing or decreasing.
Edging Rounds 3–4

Rounds 3–4: Repeat the same process on the other side of the piece.
Finishing the Granny Squares Neatly
Weaving in the ends is an important finishing step, especially when a project contains many individual squares and multiple color changes. The source emphasizes that neat ends contribute to a professional-looking result and recommends secure finishing techniques for granny squares.
After completing the regular squares and triangle squares, take time to weave in the loose ends rather than leaving them until the entire bag is assembled. Working through the ends as you finish each component can make the final assembly more organized.
Helpful Assembly Checkpoints
- Confirm that you have made 25 regular squares.
- Confirm that you have made 4 triangle squares.
- Remember that the regular squares measure 4 inches.
- Use the original layout diagram to position the pieces.
- Use the inside roll stitch for the specified sewing steps.
- Match the parts carefully while sewing.
- Keep the back sides facing each other where the instructions specify.
- Complete both sides of the bag before connecting the strap.
- Follow the corner instructions carefully during edging.
Color Changes and Personalizing Your Bag
The tutorial uses different yarn colors during crocheting and assembly, and the source notes that you can choose whichever colors you prefer. The original palette remains a useful reference: sky blue, navy blue, pink, yellow, and cream create the cheerful summer appearance shown in the design.
The granny-square format also makes this project particularly suitable for experimenting with color arrangements. You can create different color stories across individual squares while maintaining the same six-round regular-square construction. The important distinction is that changing colors for your own version should not alter the written construction sequence.
If you prefer a softer appearance, the source suggests lavender as an alternative to pink or mint green instead of sky blue. These options can help you adapt the visual style while keeping the bag’s basic construction recognizable.
Care and Cleaning for the Finished Cotton Bag
Daily Care
After using the bag, give it a gentle shake to help remove dust and crumbs that may settle into the stitches. If you notice a loose thread, avoid pulling it. Instead, use a small crochet hook to carefully work it back into the stitches. Rotating the handles occasionally can also help distribute wear and maintain the bag’s shape.
Washing
For washing, the source recommends gentle handwashing with lukewarm water and mild wool detergent. Do not wring or twist the bag. Instead, gently squeeze out excess water. A splash of white vinegar in the final rinse is suggested as a way to help keep the colors vibrant.
Allow the bag to air dry flat and reshape the squares while they are damp. This approach helps preserve the appearance of the individual motifs.
Storage
When the bag is not being used, store it flat rather than hanging it. This helps prevent the granny squares from stretching out of shape. For longer storage, the source suggests lightly stuffing the bag with acid-free tissue paper to maintain its structure.
Keep the finished bag in a cool, dry place away from direct sunlight to help prevent fading. A cotton pillowcase can also be used as a storage bag because it allows the yarn to breathe while protecting the crochet from dust.
Common Points to Watch While Crocheting
Because this project contains many repeated squares, consistency is more useful than rushing. The regular-square instructions become progressively larger from Round 1 through Round 6, so the number of spaces between corner clusters changes as the square grows.
Marking the beginning of each round is specifically recommended in the source. This is especially helpful for the triangle squares, where each new round begins by joining a new color to the first double crochet of the previous round.
Even tension is another important checkpoint. Straight edges make the later sewing process easier, while inconsistent tension between individual squares can make matching the pieces more difficult. Take a moment to compare your finished squares before beginning assembly.
Quick Project Checklist
- ☐ Loopara 5ply combed cotton in Pink 18, Pink 20, Yellow 30, Blue 39, Blue 44, and Apricot 50
- ☐ 3.0mm crochet hook
- ☐ Scissors
- ☐ Yarn needle
- ☐ 25 regular granny squares completed through Round 6
- ☐ 4 triangle squares completed through Round 5
- ☐ Ends woven in
- ☐ Layout checked before sewing
- ☐ Main body assembled
- ☐ Strap connected
- ☐ Edging completed according to the specified rounds
Frequently Asked Questions
How many regular granny squares does the bag require?
The pattern specifies making 25 regular squares.
How many triangle squares are needed?
You need 4 triangle squares. Together with the 25 regular squares, the project uses 29 squares in total.
What size are the regular granny squares?
Each regular granny square measures 4 inches.
What crochet hook size does the pattern use?
The specified crochet hook is 3.0mm.
Which crochet terminology does the pattern use?
The abbreviations are given in US crochet terms.
What is the approximate finished size?
The finished bag measures approximately 5.5 inches x 17.7 inches, with a 9-inch depth.
What sewing method is used?
The assembly instructions specify using the inside roll stitch for sewing the pieces together.
How should the finished bag be washed?
The source recommends gentle handwashing with lukewarm water and mild wool detergent. Avoid wringing or twisting, gently squeeze out excess water, and air dry flat while reshaping the squares while damp.
Final Thoughts
This Granny Square Shopping Bag brings together everything that makes crochet patchwork so enjoyable: recognizable motifs, colorful yarn combinations, repeated construction, and a practical finished object. The project is substantial enough to be satisfying while still being divided into individual components that can be completed one at a time.
The key to a smooth experience is organization. Make the 25 regular squares and 4 triangle squares, keep your color combinations consistent with your chosen design, weave in the ends, and refer to the layout diagram before beginning the sewing stage. During assembly, match the pieces carefully and follow the inside roll stitch instructions step by step.
Once the bag is assembled and edged, you have a reusable crochet tote that combines a cheerful vintage-inspired appearance with everyday practicality. Whether you keep the original sky blue, navy, pink, yellow, and cream palette or explore the suggested color variations, the granny-square construction gives the finished project plenty of handmade character.
With its approximately 9-inch depth, fold-flat construction, and roomy design, this crochet bag is well suited to farmers’ market trips and daily errands. And because every square is a small canvas for color, the finished piece can feel distinctly personal even while following the original pattern structure.