
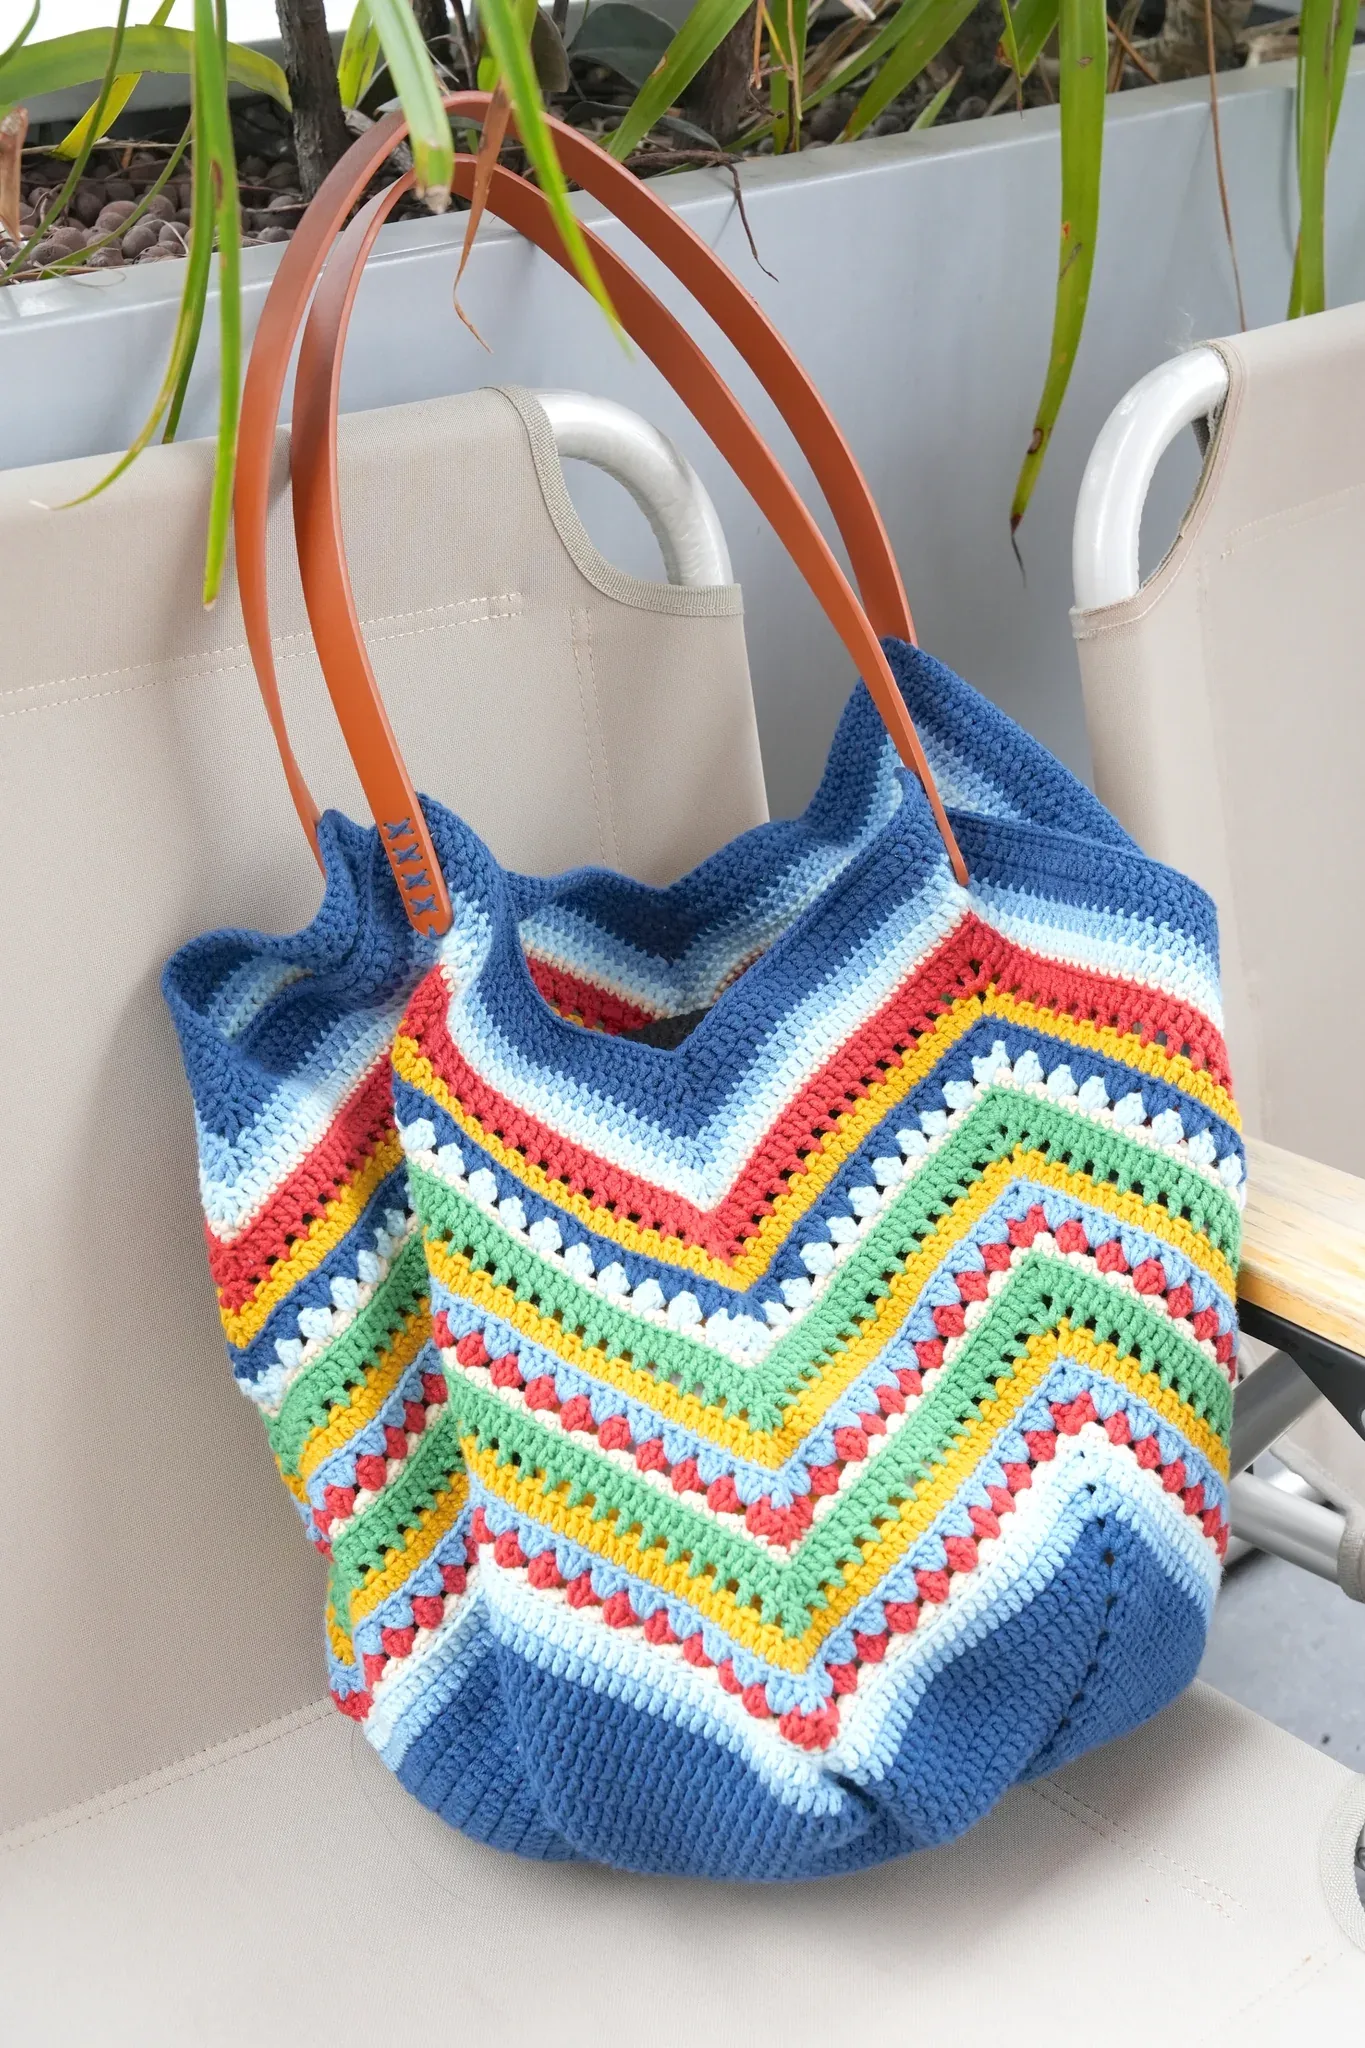
If you love crochet bags with a colorful handmade character, this Granny Square Bottom Bag is a wonderful project to add to your collection. It combines the familiar look of a traditional granny square with a structured bag body that develops into colorful chevron-inspired stripes. The result is a practical, cheerful accessory with a retro feel and plenty of personality.

This project measures approximately 15.7 inches (40 cm) wide and 18 inches (46 cm) tall when finished. That makes it a useful grab-and-go size for everyday essentials without making the bag unnecessarily bulky.
The construction is particularly interesting because the project begins with a granny square bottom. After the square is built through Round 16, the crochet work changes direction into the bag body. Color changes, back-loop-only stitches, decreases, increases, and repeating stitch patterns gradually create the distinctive striped and chevron effect.
Although the finished bag has an eye-catching appearance, the project can be approached one section at a time. The most important thing is to work through the rounds carefully, pay attention to the color changes, and keep your stitch placement consistent.
What Makes This Granny Square Bag Special?
The charm of this bag comes from the combination of two recognizable crochet ideas. The bottom is worked as a traditional square that expands round by round. Once the square reaches Round 16, the body uses a different construction approach to create height and shape.
The sample uses navy blue as the main shade, with coral red, sunshine yellow, sage green, and sky blue used for the colorful chevron stripes. The darker main color can also be practical because it can help hide everyday wear and tear, while the accent colors give you plenty of room to personalize the finished design.
You can use the same general color inspiration in different combinations. Coastal-inspired colors can include navy, aqua, white, and sandy beige. A sunset-inspired palette can use purple, peach, pink, and cream. Earth tones can be created with olive green, rust, brown, and cream. You can also create a monochrome version by choosing several shades of the same favorite color.
The important point is to keep the pattern’s construction unchanged while allowing the color arrangement to reflect your own style.
Finished Size and Project Details
- Finished width: approximately 15.7 inches (40 cm)
- Finished height: approximately 18 inches (46 cm)
- Hook: 3.0mm
- Recommended yarn: Loopara 5-ply milk cotton yarn
- Material listing: Loopara 5ply combed cotton
- Sample main color: navy blue
- Sample accent colors: coral red, sunshine yellow, sage green, and sky blue
- Additional materials: scissors, yarn needle, and strap
- Crochet terminology: US Terms
The recommended 3.0mm hook works with the 5-ply yarn to create a relatively tight fabric. This is useful for a bag because the finished fabric needs to maintain its shape and securely carry belongings.
The source notes that crocheters who naturally work tightly may consider a 3.5mm hook, but a quick tension square should be made first to check the result. The original pattern itself uses a 3.0mm hook.
Materials You Will Need
- Yarn: Loopara 5ply combed cotton
- Hook: 3.0mm crochet hook
- Scissors
- Yarn needle
- Strap
The yarn recommendation is based on the qualities of Loopara 5-ply milk cotton yarn. The source describes it as a good choice for maintaining shape, producing clear stitch definition, and creating a sturdy fabric without becoming excessively heavy. It also notes that the yarn has a subtle sheen and is comfortable to work with.
US Crochet Abbreviations
This pattern uses US crochet terminology. Before beginning, familiarize yourself with the abbreviations below so that the written instructions are easier to follow.
- ch: chain
- dc: double crochet
- sl: slip stitch
- dc3tog: double crochet 3 together
- sc: single crochet
- sc3tog: single crochet 3 together
- dc2tog: double crochet 2 together
- inc: increase
- BLO: back loop only
- sk: skip

Part One: Building the Granny Square Bottom
The first major section of the project is the granny square bottom. The square grows gradually from the center, with four corners formed by the chain-2 spaces. Each round increases the number of double crochet stitches along the sides while maintaining the square shape.
For the beginning, work a magic ring. The source specifically recommends pulling the magic ring tight, but not so tight that it becomes difficult to work the first round into it.
Round 1

Round 1: Start with a magic ring, chain 5, make (3 double crochet in 1 stitch, chain 2) 3 times, then 2 double crochet, finish with 2 slip stitches.
Round 2

Round 2: (Chain 5, 2 double crochet), then [3 double crochet, (2 double crochet, chain 2, 2 double crochet)] repeated 3 times, work 4 double crochet, finish with 2 slip stitches.
Round 3

Round 3: (Chain 5, 2 double crochet), then [7 double crochet, (2 double crochet, chain 2, 2 double crochet)] repeated 3 times, work 8 double crochet, finish with 2 slip stitches.
Rounds 4–8
Continue expanding the square while keeping the four corners clearly defined. The written pattern increases the side stitch count by four double crochet stitches on each successive round.

Round 4: (Chain 5, 2 double crochet), then [11 double crochet, (2 double crochet, chain 2, 2 double crochet)] repeated 3 times, work 12 double crochet, finish with 2 slip stitches.

Round 5: (Chain 5, 2 double crochet), then [15 double crochet, (2 double crochet, chain 2, 2 double crochet)] repeated 3 times, work 16 double crochet, finish with 2 slip stitches.

Round 6: (Chain 5, 2 double crochet), then [19 double crochet, (2 double crochet, chain 2, 2 double crochet)] repeated 3 times, work 20 double crochet, finish with 2 slip stitches.

Round 7: (Chain 5, 2 double crochet), then [23 double crochet, (2 double crochet, chain 2, 2 double crochet)] repeated 3 times, work 24 double crochet, finish with 2 slip stitches.

Round 8: (Chain 5, 2 double crochet), then [27 double crochet, (2 double crochet, chain 2, 2 double crochet)] repeated 3 times, work 28 double crochet, finish with 2 slip stitches.
Rounds 9–16: Completing the Square
The same square-building rhythm continues through Round 16. This is a useful checkpoint in the project because the base becomes substantially larger while maintaining the same four-corner structure.

Round 9: (Chain 5, 2 double crochet), then [31 double crochet, (2 double crochet, chain 2, 2 double crochet)] repeated 3 times, work 32 double crochet, finish with 2 slip stitches.

Round 10: (Chain 5, 2 double crochet), then [35 double crochet, (2 double crochet, chain 2, 2 double crochet)] repeated 3 times, work 36 double crochet, finish with 2 slip stitches.

Round 11: (Chain 5, 2 double crochet), then [39 double crochet, (2 double crochet, chain 2, 2 double crochet)] repeated 3 times, work 40 double crochet, finish with 2 slip stitches.

Round 12: (Chain 5, 2 double crochet), then [43 double crochet, (2 double crochet, chain 2, 2 double crochet)] repeated 3 times, work 44 double crochet, finish with 2 slip stitches.

Round 13: (Chain 5, 2 double crochet), then [47 double crochet, (2 double crochet, chain 2, 2 double crochet)] repeated 3 times, work 48 double crochet, finish with 2 slip stitches.

Round 14: (Chain 5, 2 double crochet), then [51 double crochet, (2 double crochet, chain 2, 2 double crochet)] repeated 3 times, work 52 double crochet, finish with 2 slip stitches.

Round 15: (Chain 5, 2 double crochet), then [55 double crochet, (2 double crochet, chain 2, 2 double crochet)] repeated 3 times, work 56 double crochet, finish with 2 slip stitches.

Round 16: (Chain 5, 2 double crochet), then [59 double crochet, (2 double crochet, chain 2, 2 double crochet)] repeated 3 times, work 60 double crochet, finish with slip stitch.
Granny Square Bottom Checkpoint
At the end of Round 16, pause before moving on to the body. This is a useful moment to check the overall shape of your work. The four corners should remain clearly recognizable, and the square should look balanced rather than pulled strongly toward one side.
The original instructions emphasize the importance of the slip stitches at the end of the rounds. These help keep the corners aligned properly. When working a bag bottom, consistent alignment is particularly helpful because the square forms the foundation for the rest of the project.
Part Two: Turning the Square into the Bag Body
The construction changes significantly once the granny square bottom is complete. The body introduces decreases at the central points of the sides and continues using the corner structure. Color changes become an important visual element, while later rounds introduce back-loop-only stitches and repeating stitch patterns.
Body Round 1

Round 1: (Color change) (Chain 5, 2 double crochet), [29 double crochet, double crochet 3 together, 29 double crochet, (2 double crochet, chain 2, 2 double crochet)] 3 times, 29 double crochet, double crochet 3 together, 30 double crochet, slip stitch.
Body Round 2

Round 2: (Color change) (Chain 5, 2 double crochet), [29 double crochet, double crochet 3 together, 29 double crochet, (2 double crochet, chain 2, 2 double crochet)] 3 times, 29 double crochet, double crochet 3 together, 30 double crochet, slip stitch.
Body Round 3: Back Loops Only

Round 3: (Color change) (Back loops only), chain, [(single crochet, chain, single crochet), 30 single crochet, single crochet 3 together, 30 single crochet] 4 times, slip stitch.
Working in the back loops only creates ridges that add structure and make the color changes stand out. Keep your tension consistent in this section so the texture remains even around the bag.
Body Rounds 4 and 5

Round 4: (Color change) (Chain 5, 2 double crochet), [(skip 2, 3 double crochet in 1 stitch) 10 times, double crochet 3 together, (3 double crochet in 1 stitch, skip 2) 10 times, (2 double crochet, chain 2, 2 double crochet)] 3 times, (skip 2, 3 double crochet in 1 stitch) 10 times, double crochet 3 together, (3 double crochet in 1 stitch, skip 2) 10 times, double crochet, slip stitch.

Round 5: (Color change) (Chain 5, 2 double crochet), [(skip 2, 3 double crochet in 1 stitch) 10 times, double crochet 3 together, (3 double crochet in 1 stitch, skip 2) 10 times, (2 double crochet, chain 2, 2 double crochet)] 3 times, (skip 2, 3 double crochet in 1 stitch) 10 times, double crochet 3 together, (3 double crochet in 1 stitch, skip 2) 10 times, double crochet, slip stitch, slip stitch.
Body Round 6

Round 6: (Back loops only) Chain 5, double crochet increase, (30 double crochet, double crochet 3 together, 30 double crochet, double crochet increase, chain 2, double crochet increase) 3 times, 30 double crochet, double crochet 3 together, 30 double crochet, double crochet, slip stitch.
Body Round 7

Round 7: (Color change) (Chain 5, double crochet), [chain, (double crochet, chain, skip 1) 15 times, double crochet 3 together, (chain, skip 1, double crochet) 15 times, chain, (double crochet, chain 2, double crochet)] 3 times, chain, (double crochet, chain, skip 1) 15 times, double crochet 3 together, (chain, skip 1, double crochet) 15 times, chain, 2 slip stitches.
Body Round 8

Round 8: (Chain 5, 2 double crochet), [30 double crochet, double crochet 3 together, 30 double crochet, (2 double crochet, chain 2, 2 double crochet)] 3 times, 30 double crochet, double crochet 3 together, 31 double crochet, slip stitch.
Rounds 9–20: Repeat the Main Body Sequence

Rounds 9–20: Repeat Rounds 3–8 twice more, alternating colors as desired.
This is one of the most important sections for maintaining the visual rhythm of the bag. Rather than introducing a completely new stitch sequence, the pattern asks you to repeat Rounds 3–8 twice more. Follow the established sequence carefully and maintain consistent color changes.
Because these rounds contain several different techniques, it can be helpful to treat each six-round group as one complete section. Finish the first round of the sequence, continue through the sixth round, and then begin the next repetition. This approach makes the longer body section easier to track without changing any of the original instructions.
Completing the Upper Body
Round 21

Round 21: (Color change) (Back loops only), chain, [(single crochet, chain, single crochet), 31 single crochet, single crochet 3 together, 31 single crochet] 4 times, slip stitch.
Round 22

Round 22: (Color change) (Chain 5, 2 double crochet), [30 double crochet, double crochet 3 together, 30 double crochet, (2 double crochet, chain 2, 2 double crochet)] 3 times, 30 double crochet, double crochet 3 together, 31 double crochet, slip stitch.
Rounds 23–25

Rounds 23–25: Repeat Round 22 for Rounds 23–25, and change the color according to your preference.
Round 26: Final Crochet Round

Round 26: Chain, [single crochet, (single crochet, chain, single crochet), 31 single crochet, double crochet 2 together, 30 single crochet,] 4 times, slip stitch.
Attaching the Straps
Once the crochet body is complete, the next step is to sew the straps onto the bag. The original pattern specifies simply to sew the straps on the bag, so this stage should be approached according to the strap you are using and the desired placement.

Before finishing the attachment, check that the straps are positioned evenly on both sides. Keeping the placement symmetrical will help the finished bag hang naturally when carried.
Important Tension Tips for the Bag Body
Back-loop-only rounds deserve special attention because they contribute to the ridged texture and structure of the bag. The source recommends maintaining consistent tension when working BLO. Consistent tension also helps the color changes appear more uniform throughout the project.

- Keep your tension consistent when working back loops only.
- Pay attention to the color changes at the beginning of the specified rounds.
- Keep the four corner sections aligned throughout the body.
- When repeating Rounds 3–8, follow the complete sequence before starting the next repetition.
- Do not skip the specified slip stitches at the end of the rounds.
Color Planning for a Personalized Bag
The sample’s combination of navy blue, coral red, sunshine yellow, sage green, and sky blue gives the bag a bright, playful character. However, the source encourages color experimentation. The construction can remain the same while the palette changes.
If you prefer a coastal look, consider navy, aqua, white, and sandy beige. For a warmer sunset-inspired effect, purple, peach, pink, and cream can create a softer combination. Earth tones such as olive green, rust, brown, and cream can give the bag a more natural appearance.
Another option is monochrome styling. Instead of using several contrasting colors, choose different shades of one favorite color. This allows the stitch texture and changing patterns to become the main visual feature.
The source recommends choosing a darker shade for the base and body because it can help hide wear and tear. The accent colors can then be used to make the stripes and chevron sections more noticeable.
How to Handle Color Changes
Color changes are an important visual part of this design. Several rounds explicitly begin with a color change, while other rounds continue the sequence. When the pattern says to change color, follow that instruction as written. When the pattern says to alternate colors as desired, you have more freedom to decide the sequence.
Try to keep your color changes consistent from one repeated section to the next if you want a rhythmic appearance. If you prefer a more spontaneous handmade effect, the rounds that allow color choice give you an opportunity to experiment.
Joining, Color Changes, and Weaving in Ends
The original source also provides additional guidance related to granny square techniques, including different ways to join granny squares, methods for changing colors, and techniques for weaving in ends. These supporting techniques can be useful if you want to improve your finishing skills while working on crochet projects.
For this particular bag, the most important finishing principle is to secure your yarn ends neatly and avoid leaving loose threads that can interfere with the finished appearance or everyday use of the bag.
Common Beginner Checkpoints
Checkpoint 1: After Round 8
Look at the granny square and make sure the four corners are still clearly defined. The square should continue expanding evenly.
Checkpoint 2: After Round 16
This is the completed granny square bottom. Before moving to the body, inspect the overall square and confirm that the corners and sides appear balanced.
Checkpoint 3: After Round 8 of the Body
The first main body sequence should now be recognizable. Check the shaping, the color changes, and the chevron-style texture before moving into Rounds 9–20.
Checkpoint 4: After Round 20
The repeated Rounds 3–8 sequence should have established much of the bag’s colorful body. This is a useful point to check that your color arrangement is developing as intended.
Checkpoint 5: After Round 26
The crochet body is complete. Check the upper edge and strap placement before sewing the straps securely to the bag.
Care and Cleaning
Because the bag is made with cotton yarn, it can be durable, but careful handling will help maintain its appearance. Avoid placing the finished bag on rough surfaces that could snag the yarn, and try not to overfill it because the granny square construction can stretch.
Daily Care
If you notice a loose thread, do not pull it. Instead, weave it back into the work with a crochet hook. A quick brushing with a soft clothes brush can also help maintain the texture of the crochet surface.
Washing
The source recommends hand washing the milk cotton yarn gently. Use cool water and mild detergent, and gently squeeze the bag rather than wringing or twisting it. Avoid long soaking periods, bleach, and harsh chemicals.
After washing, reshape the bag while it is damp. Pay particular attention to the granny square bottom and allow the bag to dry flat away from direct sunlight.
Storage
For storage, the source recommends using acid-free tissue paper to help the bag maintain its shape and avoid creasing. Store the bag in a cool, dry location away from direct sunlight to help protect the colors.
For longer storage, a breathable cotton bag is preferable to plastic. Avoid hanging the crochet bag by its straps while it is being stored because this can cause stretching. Instead, lay it flat or stand it upright.
Final Beginner Checklist
- Use the specified 3.0mm hook.
- Work with the recommended Loopara 5-ply cotton yarn.
- Follow US crochet terminology.
- Keep the four granny square corners aligned.
- Complete the bottom through Round 16.
- Follow the body rounds exactly as written.
- Pay close attention to rounds marked as color changes.
- Work BLO where specifically instructed.
- Keep tension consistent throughout the textured sections.
- Repeat Rounds 3–8 twice more for Rounds 9–20.
- Complete the upper section through Round 26.
- Sew the straps onto the completed bag.
- Secure and weave in loose yarn ends.
- Wash gently by hand when necessary.
- Reshape the bag while damp and dry it flat.
- Store the finished bag away from direct sunlight and avoid hanging it by the straps.
Final Thoughts
The Granny Square Bottom Bag is a satisfying project because its construction develops in clear stages. You begin with a familiar granny square, gradually enlarge it through Round 16, and then transform that square into a taller bag body through a combination of double crochet, single crochet, decreases, increases, back-loop-only stitches, chain spaces, and color changes.
The colorful design gives the finished accessory a playful retro character, while the structured crochet fabric makes it suitable for carrying everyday essentials. The sample palette of navy blue, coral red, sunshine yellow, sage green, and sky blue is only one possibility. You can use the same pattern with coastal shades, sunset colors, earth tones, or several shades of one color.
For beginners, the best approach is to focus on one section at a time. First complete the granny square bottom. Then work through the first eight body rounds carefully. Once the sequence becomes familiar, the repeated Rounds 3–8 make the remaining body easier to track. Finally, complete Rounds 21–26 and sew on the straps.
Most importantly, keep your tension consistent and pay attention to the written round instructions. The slip stitches, corner spaces, decreases, increases, BLO sections, and color changes all contribute to the final shape and appearance. By following those details carefully, you can create a colorful handmade bag with a distinctive granny square foundation and a beautifully patterned body.
With its generous grab-and-go size, colorful stripes, and distinctive square bottom, this crochet bag makes a cheerful handmade accessory for a summer wardrobe or an everyday crochet collection.