
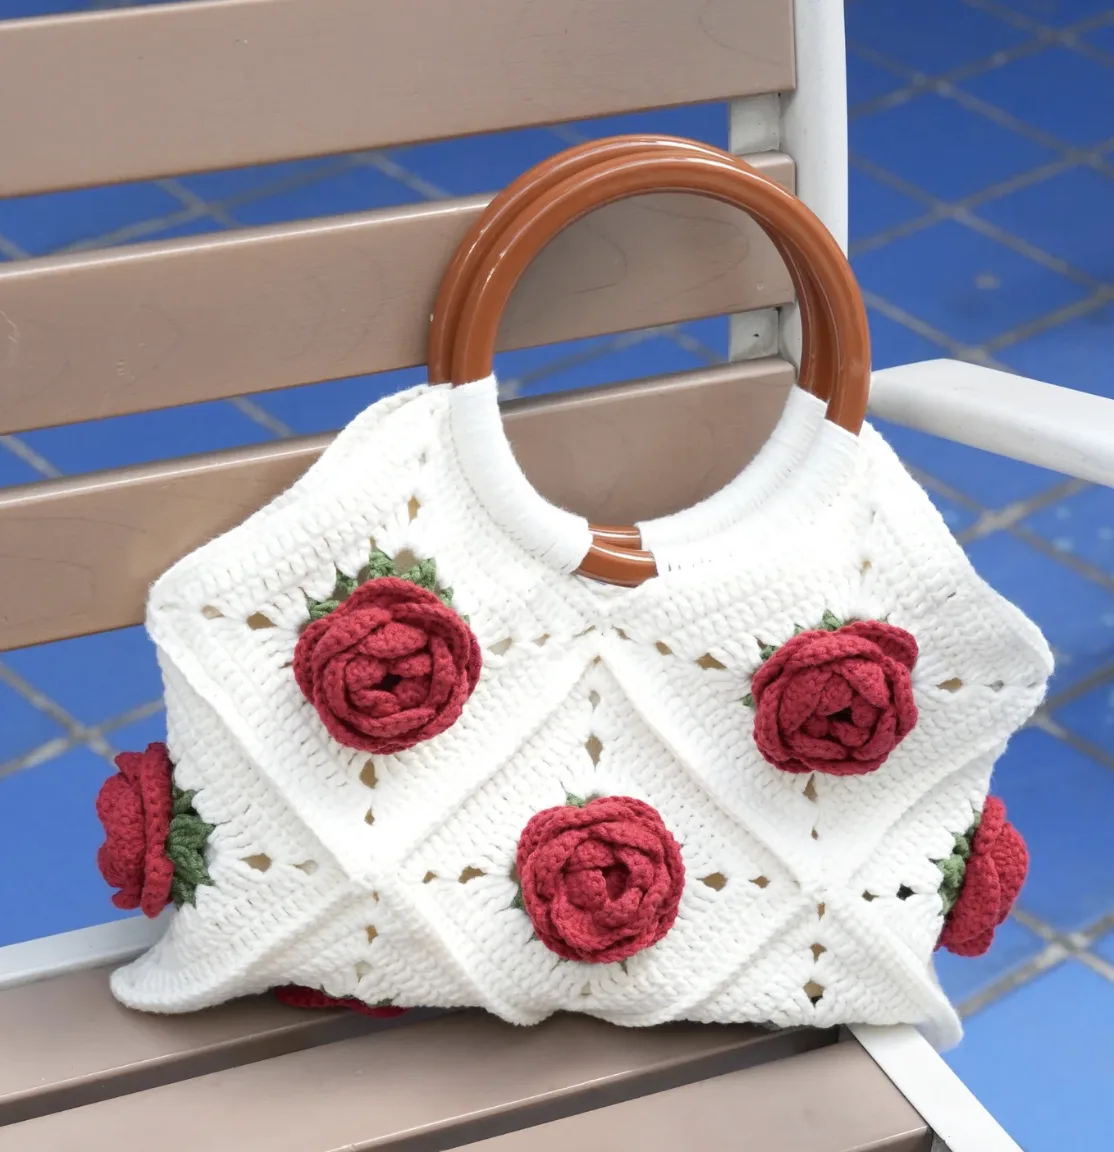
If you love crochet accessories with a romantic, vintage-inspired feel, this Rose Flower Granny Square Bag is a beautiful project to add to your handmade collection. The design combines delicate red roses, green leaves, and crisp cream-colored granny squares to create a bag that feels both classic and fresh. Each square becomes a small floral centerpiece, and when the pieces are assembled, they form a practical everyday bag with plenty of character.
This tutorial walks through the complete project from the first magic ring to the final strap attachment. The original pattern uses Loopara 5ply combed cotton yarn, a 3.0mm crochet hook, and a three-color palette of cream, deep red, and forest green. The finished bag measures approximately 12 inches (30 cm) wide and 8 inches (20 cm) high, while each granny square measures approximately 4 x 4 inches (10 x 10 cm).
There are 10 granny squares in total: 6 squares form the main body and 4 squares form the sides. The floral centers are built gradually through the first 10 rounds, while Rounds 11 through 14 transform the flower into a square background. Once the squares are complete, they are joined with single crochet seaming, lined with cloth, fitted with a metal magnetic buckle, and finished with a strap.

Project Overview
This crochet bag is built around a repeating rose motif. Instead of making a traditional granny square with simple clusters from the beginning, the pattern develops a layered flower through alternating front-facing and back-side rounds. The back-side rounds use back post stitches and chain spaces to create the structure needed for the expanding petals.
The finished design is approximately 12 inches (30 cm) in width and 8 inches (20 cm) in height. Each individual square measures approximately 4 x 4 inches (10 x 10 cm). The 10-square construction consists of 6 squares for the main body and 4 squares for the sides.
The suggested color combination is cream for the background, deep red for the roses, and forest green for the leaves. The pattern also notes that alternative combinations can be used, such as soft pink with sage green on white, purple with emerald on ecru, or sunny yellow with olive on cream. These alternatives are color suggestions only; the original construction and stitch instructions remain unchanged.
Materials You Will Need
- Loopara 5ply combed cotton yarn
- 3.0mm crochet hook
- Stitch marker
- Scissors
- Yarn needle
- Ring resin accessories
- Lining cloth
- Metal magnetic buckle
The recommended yarn is Loopara 5ply combed cotton. The source specifically highlights milk cotton for its smooth texture, subtle sheen, structure, and ability to maintain crisp stitch definition. For this project, three coordinating colors are used: a main background color, a rose color, and a green color for the leaves.
The 3.0mm crochet hook is recommended for producing tight, sturdy squares with clear stitch definition. Since the finished piece is intended to function as a bag, maintaining a firm fabric is particularly useful for helping the granny squares hold their shape.
Understanding the Pattern Before You Begin
This pattern uses US crochet terms. If you normally work with another terminology system, take a moment to check the abbreviations before beginning so that the stitches remain consistent throughout the project.
US Crochet Abbreviations
- ch – chain
- sc – single crochet
- dc – double crochet
- tr – treble crochet
- sl – slip stitch
- BPsl – back post slip stitch
- BPsc – back post single crochet
- tr bo – treble bobble stitch
- inc – increase
- dec – decrease
The pattern also uses color changes. The tutorial notes that different yarn colors may be shown during crocheting and assembly, and you can select your preferred palette. When changing colors, keep your joins neat so that the floral center and square border remain visually clean.
How the Rose Granny Square Is Constructed
The granny square is worked in 14 rounds. Rounds 1 through 10 build the flower structure. Several of these rounds are specifically worked on the back side of the work, where back post stitches create chain spaces that allow the next layer of petals to develop.
Rounds 11 through 14 change the yarn color and build the square around the floral center. The final round establishes the finished square shape and should be worked evenly because these outer edges will later be joined to other squares.

Step-by-Step Rose Granny Square Pattern
Round 1: Create the Center

Start with a magic ring. Chain 3, then work 15 double crochet into the ring. Tighten the magic ring and slip stitch to join.
This first round establishes the circular center from which the rose will develop. Make sure the magic ring is tightened securely so that the center remains closed and stable.
Round 2: Form the First Chain Spaces

Work chain 2, skip one stitch, and make a single crochet. Repeat this sequence 8 times to form 8 chains.
These spaces become the foundation for the first layer of petals. Keep the spacing consistent so that the next round can be distributed evenly around the center.
Round 3: Build the First Petal Layer

Slip stitch into the first space from the previous round. Chain 1, then work a single crochet followed by 5 double crochet in the space. Repeat this sequence 4 times, then slip stitch to join.
At this stage, the floral shape begins to become recognizable. The grouped double crochet stitches create the fuller portions of the first petal layer.
Round 4: Work on the Back Side

Turn to the back side of the work. Work a back post slip stitch followed by chain 3. Repeat this sequence 8 times, then slip stitch to join, forming 8 chains.
Pay particular attention to the placement of the back post slip stitches. These stitches help establish the rose’s layered structure.
Round 5: Expand the Petals

Slip stitch into the first chain, chain 1, then work a single crochet and 7 double crochet in the next chain. Repeat this sequence 4 times, then slip stitch to join.
The increased number of double crochet stitches makes this petal layer broader than the previous one. Keep your tension even while working the groups so the flower does not become distorted.
Round 6: Create Another Back-Side Foundation

Work on the back side. Repeat back post slip stitch and chain 4 eight times, then slip stitch to join, forming 8 chains.
These larger chain spaces prepare the work for the next petal expansion.
Round 7: Continue the Floral Expansion

Slip stitch into the first chain, chain 1, then work a single crochet followed by 9 double crochet in the next chain. Repeat 4 times and slip stitch to join.
The repeated groups create four larger sections around the flower. This is another useful point to pause and check that your petal groups are evenly distributed.
Round 8: Prepare the Next Layer

Working on the back side, repeat back post slip stitch and chain 4 eight times. Slip stitch to join, forming 8 chains.
Round 9: Repeat the Larger Petal Formation

Slip stitch into the first chain, chain 1, then work a single crochet and 9 double crochet in the next chain. Repeat 4 times and slip stitch to join.
Round 10: Establish the Final Flower Foundation

Working on the back side, repeat back post single crochet and chain 4 eight times. Slip stitch to join, forming 8 chains. Fasten off and weave in the ends.
Take a moment here to inspect the flower. The back-side rounds should be evenly spaced, because they provide the framework for the floral structure. Clean finishing at this point also makes the following color change easier to manage.
Building the Granny Square Border
Round 11: Change Color and Create the Corner Structure

Change yarn color. Chain 6. Work 3 treble bobble stitches, chain 4, and 3 treble bobble stitches, followed by chain 2 and treble crochet and chain 1. Repeat this sequence 3 times. Then work 3 treble bobble stitches, chain 4, and 3 treble bobble stitches, followed by chain 2. Slip stitch into the 5th chain of the beginning chain-6.
Round 12: Define the Four Corners

Enter the right space of the corner, which is the chain-4 space. Chain 3 and work 2 double crochet. Then work 3 treble crochet, chain 3, and 3 treble crochet in the corner, followed by 3 double crochet twice. Repeat this sequence 3 times. Finish with another corner group of 3 treble crochet, chain 3, and 3 treble crochet, followed by 3 double crochet. Slip stitch to join.
Round 13: Expand the Square

Chain 3 and work 5 double crochet. Then repeat the following sequence 3 times: work 3 double crochet, chain 3, work 3 double crochet, followed by 12 double crochet. Complete another corner of 3 double crochet, chain 3, and 3 double crochet, then work 6 double crochet and slip stitch to join.
Round 14: Finish the Square

Chain 3 and work 8 double crochet. Repeat the following sequence 3 times: work 3 double crochet, chain 3, work 3 double crochet, followed by 18 double crochet. Complete the final corner with 3 double crochet, chain 3, and 3 double crochet, then work 9 double crochet. Slip stitch to join and weave in the ends.
At the end of Round 14, your completed piece should have the square structure required for assembly. The source recommends keeping the final rounds neat and even because these edges will become important when the squares are joined.
Stitch Checkpoints Before Making All 10 Squares
Before repeating the complete 14-round sequence for the remaining squares, inspect your first finished square carefully. The back-side rounds should be evenly spaced, and the petal groups should sit consistently around the center.
- Check that the first magic ring is securely tightened.
- Make sure Round 2 creates 8 chains.
- Confirm the back-side rounds are worked on the correct side.
- Keep the 8 chain spaces evenly distributed in the applicable rounds.
- Maintain the stated repeats of 4 petal groups where specified.
- Keep the corner spaces clear and recognizable from Rounds 11 through 14.
- Make sure the outer edges remain even before assembly.
Repeat the granny square pattern until you have 10 completed squares. The final arrangement uses 6 squares for the main body and 4 squares for the sides.
Preparing the Squares for Assembly

Arrange the completed granny squares according to the layout and secure them with stitch markers. Taking time to position every square correctly before joining is important because the rose motifs should appear in the intended arrangement once the bag is assembled.

Next, cut the lining cloth slightly larger than the bag’s flat pattern. Having a little extra cloth makes it easier to position and secure the lining during the later steps.
Joining the Granny Squares Into the Bag Body

Fold along the center line shown in the layout and use stitch markers to hold the pieces in position. Begin the first seam using single crochet.

Align the stitches of the two granny squares and join them one by one using single crochet.

Pay particular attention to corner crossings. After completing the first section, fasten off and follow the marked seaming path for the next section. Begin joining the middle section, taking care with the corner transitions. In the middle section, no crossing is needed at the indicated transition.
Repeat the joining process until the main bag body is complete. Check all corner crossings before moving on.

Once the body is complete, begin working around the bag opening with a round of single crochet. At the crossing points, decrease with a single crochet. Repeat the single crochet and make decreases at the opposite crossing point. When the round is complete, join the first stitch.

Fasten off and weave in the ends. Keep your seaming tension consistent but avoid making it too tight. This helps the finished bag maintain its intended shape.
Adding the Lining
The lining provides additional structure and gives the finished bag a clean interior. Place the cut lining cloth underneath the bag body, fold it, and confirm that the size is appropriate.

Mark the sewing points on both sides. Thread your needle with a double strand for durability. Leave extra yarn length before sewing, then tie off and secure the end and trim the yarn. Repeat the process on the other side.

Position the bag on the lining cloth and mark the opening placement. Cut the excess cloth along the marked lines. Iron the lining flat if needed, then position it inside the bag.

Secure the lining with clips and begin sewing. Use the invisible stitch technique and repeat the pattern around the entire opening. To finish, secure the thread with a knot, weave it through nearby stitches, and trim it.
For the best result, press the lining cloth before starting. The source also recommends leaving a little ease in the lining so it does not pull on the crochet fabric.
Attaching the Metal Magnetic Buckle
Position both pieces of the metal magnetic buckle at the bag opening. Before sewing, check the placement several times so that the two pieces align correctly when the bag closes.
Sew the buckle pieces into position, then repeat the process for the back piece. Because the buckle experiences stress during use, reinforce the stitching with multiple passes for durability.

Adding the Strap
The strap is the final structural component of the bag. Begin with the wrong side facing you and create loops for pulling through the stitches.

At the middle section, work 10 slip stitches in sequence. Continue the loop pattern, then cut the yarn and fasten off.

Repeat the same process on the other side. Weave the ends through several stitches to secure them firmly.

Keep your tension even throughout the strap construction. The strap bears the weight of the finished bag, so both ends should be secured very well.
Beginner Tips for a Neat Rose Motif
This pattern becomes much easier to manage when you treat each round as a checkpoint rather than rushing through all 14 rounds. The most important detail is consistency. Back-side rounds should be evenly spaced, and the chain spaces need to remain clear enough to receive the next layer.
When you reach the outer square rounds, pay close attention to the corners. The corners determine how the squares will sit beside one another during assembly. Uneven edges can make joining more difficult, while neat and consistent tension helps the final bag look balanced.
- Use stitch markers whenever you need to stabilize pieces during assembly.
- Check your work after each back-side round.
- Keep the repeated petal groups evenly distributed.
- Weave in ends securely after fastening off.
- Keep the outer square rounds neat because they will be joined later.
- Do not pull the seams too tightly during assembly.
- Check buckle alignment before sewing it permanently.
- Secure both strap ends carefully because the strap bears the most weight.
Common Assembly Problems to Watch For
If your bag does not appear balanced during assembly, first check the arrangement of the squares rather than immediately changing your stitching. The pattern specifically recommends arranging the completed squares according to the layout and securing them with stitch markers.
If corners do not meet correctly, inspect the corner crossings and the alignment of the stitches. The bag body depends on the marked seaming path, so following that path carefully helps preserve the intended structure.
If the lining seems to pull against the crochet fabric, check whether enough ease was left in the cloth. The source recommends leaving a bit of ease in the lining rather than making it excessively tight.
If the magnetic buckle does not line up, reposition and test both pieces before completing the sewing. The buckle should be checked several times before it is permanently secured.
Care and Cleaning for Your Finished Bag
Daily Care
After use, gently brush away dust or debris with a soft cloth. If you notice loose threads, do not simply cut them. Instead, carefully weave them back into the work using a crochet hook. Handling the bag with clean hands can also help reduce the accumulation of oils and dirt on the rose details.
Washing
When cleaning is necessary, hand wash the bag with cool water and mild soap. The source specifically recommends avoiding machine washing. Gently squeeze the soapy water through the fabric without wringing or twisting the bag. Be particularly careful around the rose details so their shape is maintained.
Rinse thoroughly with cool water until all soap has been removed. Roll the bag in a clean towel to remove excess water, then reshape it and lay it flat to dry away from direct sunlight.
Storage
When the bag is not being used, stuff it with acid-free tissue paper to help maintain its shape. Store it inside a cotton dust bag or pillowcase to protect it from dust and direct light. Avoid hanging the bag by its straps during storage because this can cause stretching.
Keep the finished bag in a cool, dry place away from direct sunlight to help prevent fading.
Quick Project Checklist
- Gather Loopara 5ply combed cotton yarn.
- Prepare the 3.0mm crochet hook.
- Prepare stitch marker, scissors, and yarn needle.
- Have ring resin accessories, lining cloth, and metal magnetic buckle ready.
- Complete 10 rose granny squares.
- Arrange 6 squares for the main body and 4 for the sides according to the layout.
- Secure the arrangement with stitch markers.
- Join the squares using single crochet seaming.
- Complete the bag opening with single crochet and the specified decreases at crossing points.
- Add and sew the lining using the invisible stitch technique.
- Attach and reinforce the metal magnetic buckle.
- Create and secure the strap.
- Weave in remaining ends carefully.
- Reshape the finished bag and store it properly when not in use.
Final Thoughts on the Rose Flower Granny Square Bag
The Rose Flower Granny Square Bag is a project where the details make the finished accessory special. The design begins with a circular floral center, develops through layered back-side rounds, and finally becomes a structured square through four additional rounds. Repeating that motif 10 times creates the foundation for the complete bag.
The construction is equally important. Careful square placement, consistent single crochet seaming, neat corner transitions, a properly fitted lining, an aligned magnetic buckle, and securely attached strap ends all contribute to the final result.
For crocheters who enjoy floral motifs and handmade accessories, this project offers a satisfying combination of decorative crochet and practical construction. The finished approximately 12-inch (30 cm) wide by 8-inch (20 cm) high bag is compact enough for everyday essentials while still giving the rose motifs plenty of visual impact.
Most importantly, take your time with the checkpoints. Keep the back-side stitches even, preserve the shape of every square, follow the assembly layout carefully, and avoid rushing the finishing stages. With those details under control, the individual rose squares can come together into a polished, romantic crochet bag designed to be enjoyed for a long time.