
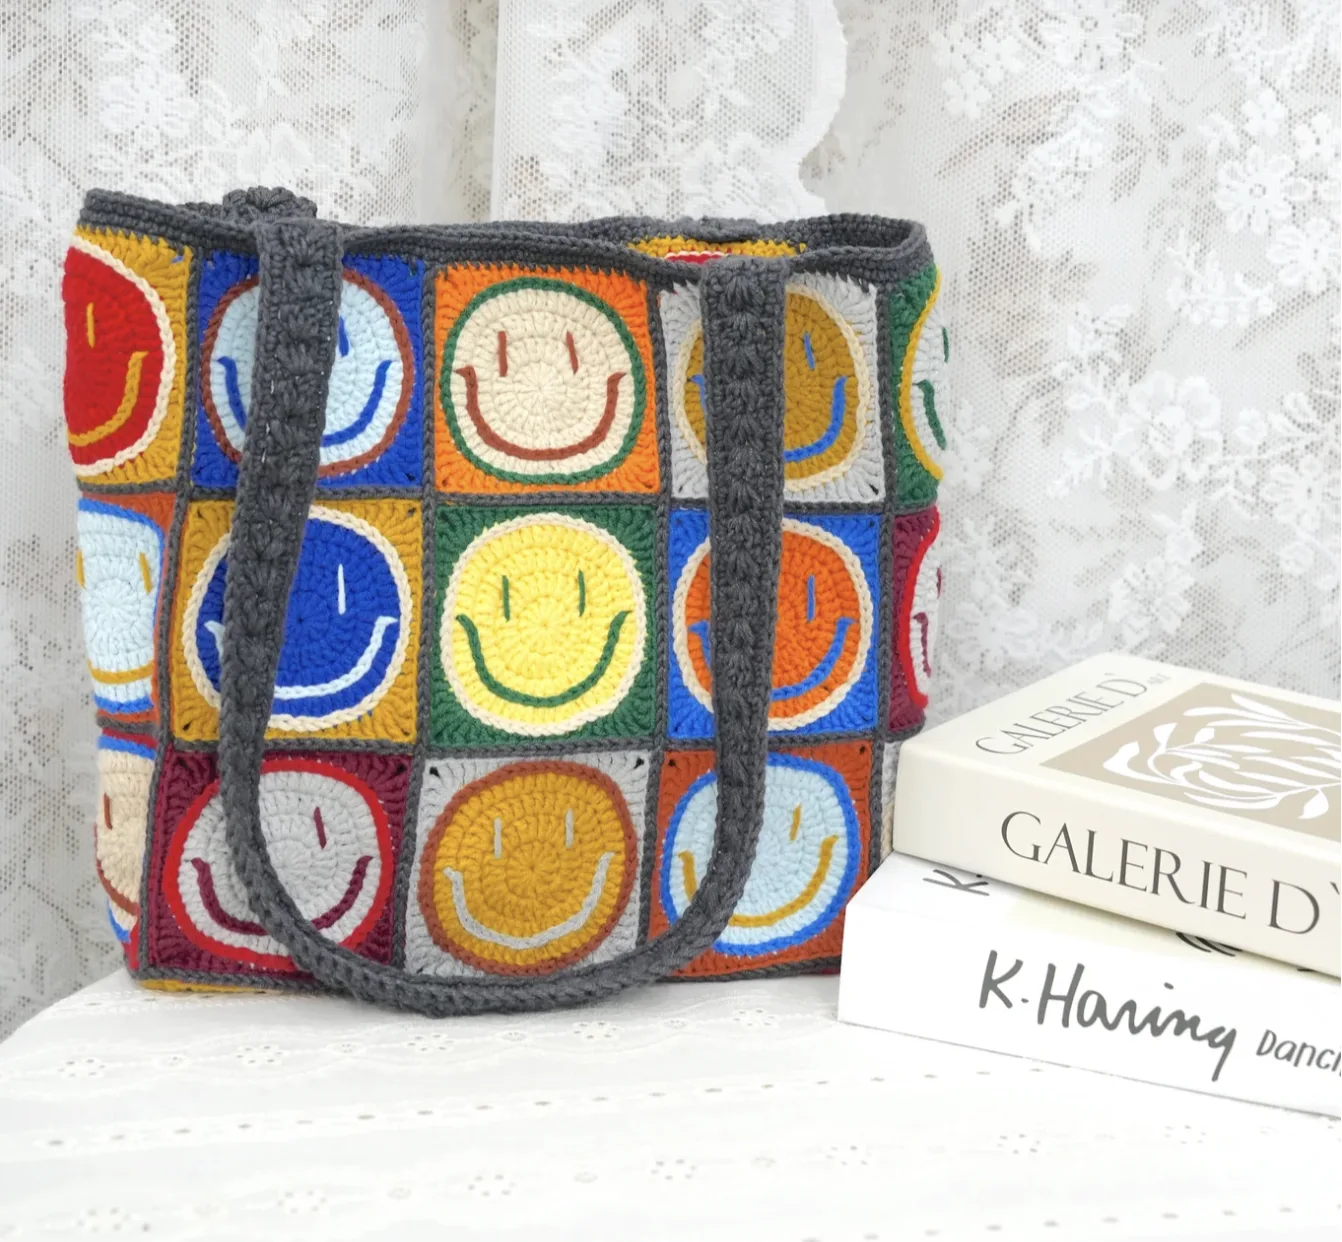

If you love crochet projects that combine classic techniques with a playful modern personality, this Smiley Face Granny Square Tote Bag is a wonderful project to put on your hook. The finished design brings together colorful granny squares, cheerful smiley faces, and a practical tote shape that can become an everyday accessory or a fun project bag.
This pattern is especially enjoyable because the work is divided into small, manageable pieces. Instead of crocheting the entire bag as one large project, you create individual smiley face granny squares and then assemble them into the finished tote. That makes the project easy to organize and gives you plenty of satisfying stopping points along the way.
The finished bag uses 27 granny squares. Each square measures approximately 3.3 inches (8.5 cm) when worked to gauge, while the completed bag measures about 13 inches (33 cm) wide and 12.2 inches (31 cm) tall. The original color palette combines white or cream faces with bright yellow, red, blue, orange, and green backgrounds, while charcoal grey is used for joining the squares and creating the straps.
The pattern is worked using US crochet terms and a 3.0mm crochet hook. The original instructions recommend Loopara 5ply milk cotton yarn, with Loopara 5ply combed cotton listed among the materials. The stitch definition and firm fabric are particularly useful for a bag because the individual squares need to hold their shape during assembly.
Why This Granny Square Tote Bag Is a Great Beginner Project
One of the nicest things about this project is that you can concentrate on one small square at a time. If you are new to granny square construction, working the squares individually lets you become comfortable with the stitches and color changes before moving on to assembly.
There is also less pressure if you make a mistake. Rather than having to unravel a large section of an unfinished tote, you can focus on correcting the individual square. Once all 27 squares are ready, the project changes from repetitive crochet into an arranging and joining exercise.
The smiley face design also makes color placement and visual consistency important. Keeping your tension steady will help the squares remain flat and similar in size. If necessary, the original instructions recommend blocking the squares so they match more closely before assembly.
Finished Measurements and Project Details
- Number of granny squares: 27
- Approximate square size: 3.3 inches (8.5 cm) when worked to gauge
- Finished bag width: approximately 13 inches (33 cm)
- Finished bag height: approximately 12.2 inches (31 cm)
- Crochet hook: 3.0mm
- Recommended yarn: Loopara 5ply milk cotton
- US crochet terminology: Yes
- Straps: Make 2
The pattern does not provide a separate yarn yardage or meterage requirement, so it is best not to substitute an invented quantity. Instead, gather the listed yarn colors and make sure you have enough yarn for the 27 squares, joining, and both straps.
Materials You Will Need
- Yarn: Loopara 5ply combed cotton / Loopara 5ply milk cotton as specified in the source
- Hook: 3.0mm crochet hook
- Stitch marker
- Scissors
- Yarn needle
The original color direction uses white or cream for the smiley faces, assorted bright colors such as yellow, red, blue, orange, and green for the backgrounds, and dark grey or charcoal for joining and straps. The design can be adapted visually, but the important principle is to maintain enough contrast between the face and its background so the smiley expression remains easy to see.
US Crochet Abbreviations
This pattern uses US crochet terminology. Keep these abbreviations nearby while working so you can quickly check the meaning of each instruction.
- ch: chain
- sl: slip stitch
- sc: single crochet
- dc: double crochet
- hdc: half double crochet
- dc2tog: double crochet 2 together
- inc: increase
Before You Start: Keep Your Granny Squares Consistent
Before making all 27 squares, pay attention to your crochet tension. The original pattern notes that consistent tension throughout each round helps the squares remain flat and even. This is particularly important for a bag made from many separate pieces because small differences can become much more noticeable once the squares are joined together.
The target size for each square is approximately 3.3 inches (8.5 cm) when worked to gauge. If your squares are noticeably different from one another, check your tension before continuing with the complete set.
The hook recommended for the pattern is 3.0mm. The source notes that crocheters who tend to work tightly may want to go up to a 3.5mm hook, with the goal of producing squares that are firm but not stiff. The primary pattern hook, however, is 3.0mm.
How to Crochet the Smiley Face Granny Square
You will make 27 granny squares. Each square develops from a central circular motif and gradually becomes a square shape. The first four rounds establish the main center, while the later rounds create the colorful square structure and the smiley face details.
Round 1: Create the Center

Begin with a magic ring. Chain 3, then work 12 double crochet into the ring. Join with a slip stitch into the top of the chain-3.
This first round establishes the central foundation of the smiley face. Keep the magic ring secure and pay attention to your tension so the center remains neat and stable.
Round 2: Build the Circle

Chain 3, counting it as a double crochet. Work a double crochet in the same stitch, followed by 12 double crochet increases. Finish by slip stitching into the top of the chain-3.
At this point, your center should be noticeably larger than it was after Round 1. Check that the fabric is lying flat rather than cupping or pulling excessively.
Round 3: Continue the Increase Pattern

Chain 3, counting it as a double crochet, then work a double crochet in the same stitch. Work one double crochet, followed by the repeat of (double crochet increase, double crochet) 12 times. Join with a slip stitch into the top of the chain-3.
Keep checking the center as you work. Consistent tension at this stage will help the later square shaping develop evenly.
Round 4: Complete the Main Circular Foundation

Chain 3, then work one double crochet. Repeat (double crochet increase, 2 double crochet) 12 times. Work one final double crochet increase, then slip stitch into the top of the chain-3.
This round prepares the piece for the transition into the square shape. Make sure the stitches are not pulled too tightly, as the next rounds introduce the corners and colored background.
Round 5: Change Color and Establish the Corners

Change color. Chain 1, then work [8 single crochet, 2 half double crochet, (double crochet, chain 2, double crochet), 2 half double crochet] 4 times. Finish by slip stitching into the first single crochet to join.
The chain-2 spaces form the corner structure of the square. Take care with these spaces because they are important to the shape of the finished square.
Round 6: Expand the Square

Chain 2, then work 10 half double crochet. In the next stitch, work 3 half double crochet. Continue with [14 half double crochet, (3 half double crochet in the next stitch)] 3 times. Finish with 3 half double crochet, then slip stitch into the first half double crochet.
As the square grows, keep your tension even around both the straight sections and the corner increases. The corners should remain clearly defined without becoming excessively tight.
Round 7: Add the Slip Stitch Round

Work a round of slip stitch in Round 4.
This is a short instruction, so refer carefully to the accompanying image while working this stage. The goal is to follow the original placement rather than changing the construction of the square.
Round 8: Finish the Smile Details

Work 19 slip stitch in Round 3. Then use a yarn needle to embroider the eyes on Rounds 1–3.
Keep the smile curve centered in the square for the best expression. Since all 27 squares will eventually appear together, consistent placement of the facial details will help the finished tote look cohesive.
Smiley Face Square Checkpoint
- Make 27 squares in total.
- Each square should measure approximately 3.3 inches (8.5 cm) when worked to gauge.
- Keep tension consistent so the squares remain flat and even.
- Check that the smile curve is centered.
- Embroidery for the eyes is placed on Rounds 1–3.
- Block the squares if needed so they reach the same size.
Arrange the 27 Squares Before Joining

Before you begin joining, prepare all 27 granny squares and arrange them according to the layout. The original design uses a T-shaped arrangement. This layout is important because it determines how the flat piece will later be folded and seamed into the tote.
Once the arrangement is correct, secure the squares with stitch markers. It is also helpful to take a photograph of your complete layout before joining. If squares become mixed up while you work, the photo gives you a simple visual reference for restoring their positions.
Join the Granny Squares with Slip Stitches
The assembly uses a slip stitch joining method. Follow the arrows in the original assembly images and insert the hook through the corresponding loops of the stitches being joined. Keep the working yarn under the hook while joining.

One of the most important assembly tips is not to pull the joining yarn too tightly. Excessive tension can affect the final shape and drape of the tote. Instead, maintain a consistent joining tension that connects the squares securely while allowing the fabric to remain flexible.


Join the remaining two rows of squares using the same slip stitch method. Secure the end of the horizontal joining with a slip stitch, fasten off, and weave in the ends.
Complete the Vertical Joins

Next, join the vertical rows of squares by following the picture. Use slip stitch to transition between vertical joins.


When these joins are complete, the flat assembly of the bag is finished.

Turn the Flat Panel into the Bag Body
Flip the bag inside out. Secure the sides with stitch markers and secure the bottom of the bag with stitch markers as shown in the original instructions.
Join the sides by following the seam lines and arrows shown in the two assembly pictures. Work carefully so the corresponding sections meet correctly.

Once the side construction is complete, the bag body is assembled.

Finish the Bag Opening

Work 3 rounds of single crochet around the bag opening. This completes the main body of the tote and provides the finished edge to which the straps will be attached.

How to Crochet the Two Bag Straps
The tote requires 2 straps. Work them with the same care and tension so they remain consistent in length and appearance.
Strap Step 1: Leave the Sewing Tail
Before beginning the strap, leave a 30cm tail for sewing.
Strap Step 2: Create the Starting Row
Chain 6, then work 5 single crochet into the second chain from the hook.

Strap Step 3: Begin the Repeating Structure
Chain 3, turn, skip 2, then work (double crochet 2 together, chain, double crochet 2 together), skip 1, double crochet, chain 3, turn.

Strap Step 4: Repeat 54 Times
Repeat [(double crochet 2 together, chain, double crochet 2 together), double crochet, chain 3, turn] 54 times.
This is one of the most important counting points in the strap instructions. Count the repeats carefully because uneven straps can change the way the finished bag hangs.

Strap Step 5: Complete the Main Pattern
Work (double crochet 2 together, chain, double crochet 2 together), double crochet.
Strap Step 6: Return to Single Crochet
Chain, turn, then work 5 single crochet.

Strap Step 7: Crochet Along One Side
Work single crochet along the side, placing 2 single crochet in each chain space. Work loosely.

Strap Step 8: Work the Other Side
Work 5 single crochet along the other side.

Strap Step 9: Finish the Edge
Continue single crochet along the side, working 2 single crochet in each chain space. Slip stitch to join. Leave a 30cm tail, then fasten off.

Strap Step 10: Sew the Straps to the Bag
Sew the straps to the bag using the reserved tails. Reinforce the stitches for strength.

Strap Consistency Checklist
- Make 2 straps.
- Leave a 30cm tail before starting each strap.
- Chain 6 and work 5 single crochet into the second chain from the hook.
- Follow the exact repeating strap sequence.
- Repeat the main sequence 54 times.
- Work 2 single crochet in each chain space along the sides.
- Keep the side work loose.
- Leave another 30cm tail when finishing each strap.
- Reinforce the sewing stitches when attaching the straps.
Common Assembly Problems to Avoid
Pulling the Joining Yarn Too Tightly
A tight joining seam can affect the shape of the tote. The original instructions specifically recommend avoiding excessive tension. Let the slip stitch joining connect the squares without pulling their edges inward.
Mixing Up the Square Layout
Because the bag uses 27 squares, it is easy to move a square accidentally while working. Take a photo of the layout before joining and use stitch markers to keep the arrangement organized.
Uneven Square Sizes
If one square is noticeably larger or smaller than the others, the difference can become more obvious during assembly. Maintain consistent tension throughout the rounds and block the squares if needed so they are the same size.
Inconsistent Strap Tension
The two straps should be made with similar tension. The original tips recommend trying to complete both straps in one sitting to help maintain consistent gauge. Count the repeats carefully because uneven straps will affect how the finished bag hangs.
Finishing and Care for Your Crochet Tote
Once the body and straps are complete, give the bag a careful final inspection. Check the joins, strap attachments, and woven-in ends. The original care instructions emphasize gentle handling so the cotton bag can retain its shape.
Daily Care
Give the bag a gentle shake after use to remove dust and debris. For small marks, spot-clean with a damp cloth rather than allowing stains to set.
Although the cotton yarn is durable, avoid overloading the tote because excessive weight can affect its cheerful shape.
Washing
Hand washing is recommended. Soak the bag in cool water with mild detergent, gently squeeze it, and avoid wringing or twisting. Rinse thoroughly.
Lay the bag flat on a clean towel to dry. While it is damp, reshape the bag so the granny squares maintain their crisp edges and the smiley faces retain their intended appearance.
Storage
Store the bag flat or gently stuff it with tissue paper when it is not being used. An old pillowcase can help protect it from dust. Avoid hanging the bag by its straps for long periods because this can cause stretching. Keep it in a well-ventilated space to help prevent musty smells from developing in the cotton yarn.
Final Project Checklist
- 27 granny squares: completed.
- Square size: approximately 3.3 inches (8.5 cm) when worked to gauge.
- Bag size: approximately 13 inches (33 cm) wide by 12.2 inches (31 cm) tall.
- Hook: 3.0mm.
- Yarn: Loopara 5ply milk cotton / Loopara 5ply combed cotton as listed.
- Square construction: 8 rounds as specified.
- Facial details: embroidered eyes on Rounds 1–3.
- Assembly: slip stitch joining according to the T-shaped layout.
- Bag opening: 3 rounds of single crochet.
- Straps: make 2.
- Strap repeat: 54 times.
- Strap tails: 30cm tails for sewing at the beginning and finishing as instructed.
Final Thoughts on the Smiley Face Granny Square Tote Bag
This Smiley Face Granny Square Tote Bag is a great example of how a collection of small crochet pieces can become a practical finished accessory. The project starts with simple individual squares, develops through a carefully defined layout, and finishes with slip stitch assembly, a structured bag opening, and two crocheted straps.
The real character of the design comes from the combination of cheerful colors and the embroidered smiley faces. At the same time, the construction remains organized enough to make the project approachable for crocheters who are still developing confidence with granny squares and joining techniques.
Take your time with the 27 squares, keep their dimensions consistent, and pay close attention to the layout before beginning the joins. During assembly, remember that joining tension affects the final drape of the bag. When you reach the straps, count the 54 repeats carefully and maintain similar tension for both pieces.
With the squares completed, the body assembled, the opening finished with 3 rounds of single crochet, and both reinforced straps securely sewn in place, you will have a colorful handmade tote measuring approximately 13 inches (33 cm) wide and 12.2 inches (31 cm) tall.
Whether you keep the original bright retro-inspired palette or explore your own color combinations while maintaining clear contrast between the faces and backgrounds, the finished project is designed to bring a little more personality and happiness to everyday crochet.