
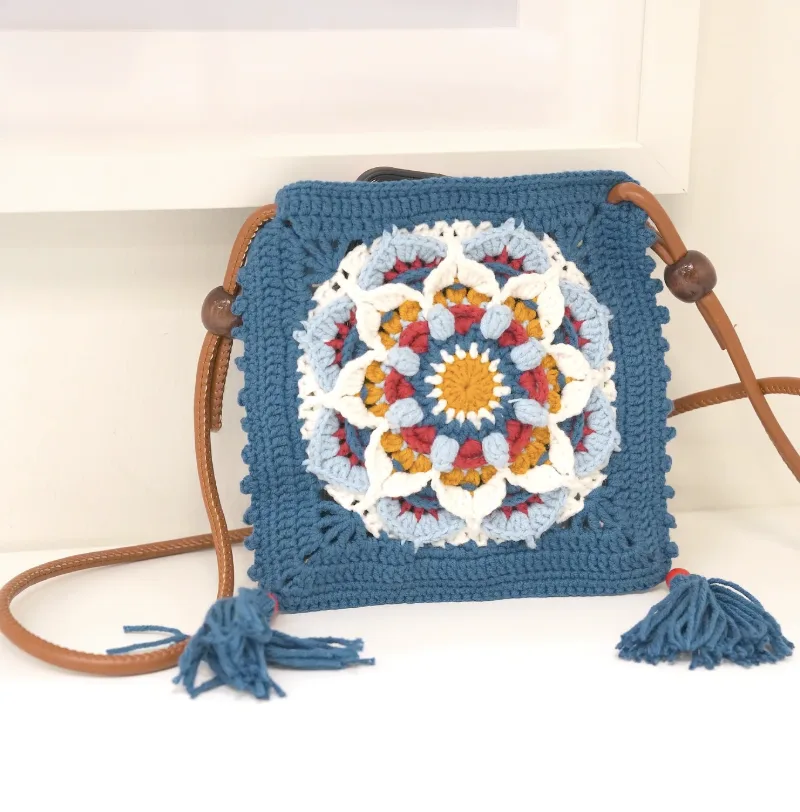
If you love crochet accessories that combine delicate texture, bold color changes, and a touch of vintage charm, this Eirene Flower Granny Square Mini Bag is a beautiful project to add to your handmade collection. The design uses two matching granny squares to create a petite bag measuring approximately 6.5 x 6.5 inches (16.5 x 16.5 cm), with a dimensional flower motif at the center of each square.
The finished accessory has plenty of character without requiring a large amount of material. Rich peacock blue forms the main background, while white, red, yellow, and light blue details build the layered flower design. Wooden beads and handmade tassels complete the bag with a decorative bohemian finish, while the adjustable bag strap makes the finished piece practical for carrying small essentials.
This guide follows the original pattern instructions and keeps the stitch sequence, round numbers, yarn colors, hook size, measurements, and assembly instructions intact. Alongside the pattern itself, you will find helpful checkpoints and practical guidance for working through the textured rounds, maintaining the shape of the square, joining the two panels, and finishing the decorative details.

Project Overview
The construction of this mini bag is based on two identical crochet granny squares. Each square measures approximately 6.5 inches (16.5 cm) on each side. Once the two squares are prepared, they are positioned with their wrong sides facing each other and sewn together along three edges. The remaining opening becomes the top of the bag.
The floral motif develops gradually through sixteen rounds in the detailed pattern instructions. The center begins with yellow treble crochets worked into a magic ring. White stitches create the next layer, followed by blue, red, light blue, yellow, and additional white and blue rounds. Post stitches, popcorn stitches, bobble stitches, picots, treble crochets, and other textured stitches give the flower its dimensional appearance.
Because the motif contains several color changes and post-stitch techniques, consistent tension is particularly important. The original instructions also recommend using stitch markers to keep track of rounds and repeats, especially around the corners. Blocking the completed square is recommended for a polished final shape.
Finished Size and Construction
- Each granny square: approximately 6.5 inches (16.5 cm) on each side.
- Finished bag: approximately 6.5 x 6.5 inches (16.5 x 16.5 cm).
- Number of granny squares required: 2.
- Bag construction: two squares joined along three edges.
- Decorative finish: two tassels with small wooden beads.
- Strap finish: bag strap secured through large wooden beads and the upper corners.
The small finished size makes this project especially suitable when you want a compact handmade accessory rather than a large everyday tote. The original description presents it as a bag for carrying essentials and as an accessory suitable for special occasions.
Materials You Will Need
Gather all materials before beginning. Having the different yarn colors separated and ready will make the frequent color changes much easier to manage.
- Loopara 4ply combed cotton yarn – White 02, Blue 30, Blue 36, Yellow 41, and Red 66.
- 2.5mm crochet hook.
- Scissors.
- Bag strap.
- Large wooden beads.
- Small wooden beads.
- Yarn needle.

Choosing the Hook and Yarn
The original project recommends Loopara cotton yarn and a 2.5mm hook. The smaller hook helps create a firm, neat fabric, which is useful for a bag because the finished panels need enough structure to hold their shape.
The original color arrangement uses yellow for the center, white for delicate flower details, blue for the main structural areas, red for contrasting flower layers, and light blue for additional textured rounds. The materials list identifies the yarn colors specifically as White 02, Blue 30, Blue 36, Yellow 41, and Red 66.
The source also notes that crocheters may adjust the hook slightly according to personal tension. A 2.75mm hook may be suitable for someone who naturally crochets tightly, while a 2.25mm hook may work better for someone who tends to crochet loosely. The important consideration described in the original instructions is achieving a firm fabric that keeps the bag neat and allows the flower details to remain visible.
US Crochet Abbreviations
The pattern uses US crochet terminology. Keep this reference nearby while working through the rounds.
- ch – chain
- sc – single crochet
- dc – double crochet
- tr – treble crochet
- hdc – half double crochet
- sl – slip stitch
- pc – popcorn stitch
- bo – bobble stitch
- picot – picot stitch
- magic ring – magic ring
- fpsc – front post single crochet
- bpsc – back post single crochet
- bpdc – back post double crochet
- sk – skip
- sp – space
Before You Start the Granny Square
Before beginning Round 1, arrange the yarn colors in the order they appear in the pattern. The motif moves through several contrasting colors, so keeping the yarn organized can make the work easier to follow.
It is also helpful to use stitch markers around the working area when you need to identify repeated sections or corners. The original tips specifically recommend stitch markers for tracking rounds and pattern repeats, particularly at the corners.
Pay special attention when the pattern refers to a previous round, a chain space, a bobble, a popcorn, or a picot. These references determine where later stitches are attached. They are not simply decorative details; they are part of how the flower motif develops across the square.
Round-by-Round Eirene Flower Granny Square
Round 1 – Yellow Flower Center

Using yellow yarn, create a magic ring. Chain 4, then work 15 treble crochets into the ring. Tighten the ring and join with a slip stitch.
This first round establishes the compact center of the flower. Make sure the magic ring is tightened neatly before continuing, because the following rounds build directly around this center.
Round 2 – White Petal Foundation

Change to white yarn. Chain 1, then work (single crochet, chain 1) 16 times around. Join with a slip stitch.
The repeated single crochet and chain sequence creates the spaces that will be used for the next decorative layer.
Round 3 – Blue Foundation

Change to blue yarn. Insert the hook in the previous row’s slip stitch. Work (chain 3, chain 1, double crochet), then work (double crochet, chain 1, double crochet) 15 times. Join with a slip stitch.
Round 4 – Red Petal Layer

Change to red yarn. Insert the hook in the previous row’s slip stitch. Work (chain 3, 5 double crochets), then skip 1 chain space and work (chain 1, 6 double crochets) 7 times. Chain 1 and join with a slip stitch.
Round 5 – Light Blue Texture

Change to light blue yarn. Working in the skipped chain spaces, with chain 3 counting as the first double crochet, make a popcorn stitch. Then work [chain 1, (back post single crochet, chain 1) 4 times, popcorn stitch] 7 times. Chain 1, then work (back post single crochet, chain 1) 4 times. Join with a slip stitch.
This is one of the rounds where maintaining consistent tension becomes particularly useful. The textured stitches help create the raised character of the flower, so avoid pulling the surrounding stitches excessively tight.
Round 6 – Yellow Bobble Layer

Change to yellow yarn. Insert the hook in the second chain space left of the bobble, with chain 3 counting as a double crochet. Work [bobble stitch, (chain 2, bobble stitch) 2 times, chain 1] 8 times. Join with a slip stitch.
Round 7 – White Picot Flower Details

Change to white yarn. Insert the hook in the first bobble left of the popcorn, chain on the bobble, and work a front post single crochet. Then work [chain 1, 4 double crochets, picot, 4 double crochets, chain 1, front post single crochet on bobble, chain 1, front post single crochet on popcorn, chain 1, front post single crochet on bobble] 7 times.
Then chain 1, work 4 double crochets, picot, 4 double crochets, chain 1, front post single crochet on bobble, chain 1, front post single crochet on popcorn, chain 1, and join with a slip stitch.
Round 8 – Blue Back-Side Construction

Change to blue yarn. Working on the back of Round 6, work (chain 3, 4 double crochets), then [chain 2, back post single crochet on bobble, chain 2, (5 double crochets)] 7 times. Chain 2, back post single crochet on bobble, chain 2, and join with a slip stitch.
Round 9 – Red Post-Stitch Layer

Change to red yarn. Insert the hook in the first space left of 5 double crochets, chain 1, and work a single crochet. Work [chain 1, single crochet, chain 1, (back post double crochet, chain 1) 5 times, single crochet] 7 times. Chain 1, single crochet, chain 1, (back post double crochet, chain 1) 5 times, then join with a slip stitch.
Round 10 – Light Blue Picot Edges

Change to light blue yarn. Insert the hook between 2 single crochets, chain 1, single crochet. Work [(3 double crochets) 2 times, picot, (3 double crochets) 2 times, single crochet] 7 times, followed by (3 double crochets) 2 times, picot, (3 double crochets) 2 times. Join with a slip stitch.
Round 11 – White Connecting Spaces

Change to white yarn. Chain 3, then work [(chain 2, single crochet) 3 times, chain 2, double crochet, chain 1, double crochet] 7 times. Finish with (chain 2, single crochet) 3 times, chain 2, double crochet, chain 1, then join with a slip stitch.
Round 12 – Half Double Crochet Shaping

Chain 1, then work (chain 2, 2 half double crochets). Next work [(2 half double crochets) 2 times, (3 half double crochets), chain 1, double crochet connecting to Round 7 picot, (3 half double crochets)] 7 times. Work (2 half double crochets) 2 times, (3 half double crochets), chain 1, double crochet connecting to the Round 7 picot, and join with a slip stitch.
Round 13 – Light Blue Outer Pattern

Change to light blue yarn. Chain 1, single crochet, then work [[(treble crochet, chain 1) 4 times, treble crochet], chain 1, skip 2, (single crochet, chain 1, skip 1) 4 times, skip 2, single crochet, (chain 1, skip 1, single crochet) 4 times, chain 1] 3 times.
Then work [(treble crochet, chain 1) 4 times, treble crochet], chain 1, skip 2, (single crochet, chain 1, skip 1) 3 times, chain 1, and join with a slip stitch. Fasten off.
Round 14 – Shaping the Square

Chain 3, counting as a double crochet. Work [(2 double crochets) 3 times, connect to picot and single crochet, half double crochet, (2 single crochets) 3 times, single crochet, (2 single crochets) 3 times, connect to picot and single crochet, half double crochet, (2 double crochets) 3 times, (3 double crochets), chain 2, (3 double crochets)] 4 times.
Join with a slip stitch and fasten off.
Round 15 – Blue Outer Border

Change to blue yarn. Chain 3, counting as a double crochet, then work [33 double crochets, (2 double crochets, chain 2, 2 double crochets)] 4 times. Join with a slip stitch and fasten off.
Round 16 – Final Single Crochet Edge

Chain 1, then work [37 single crochets, (single crochet, chain 2, single crochet)] 4 times. Join with a slip stitch.
The detailed source instructions identify this as Round 16. The compact tutorial section in the source contains a numbering omission around the final rounds, so the detailed round-by-round instructions above are the reference for preserving the complete sequence.
Stitch Checkpoints Before Making the Second Square
Once the first granny square is complete, take a moment to inspect its shape before making the second one. The two panels need to match because they will form the front and back of the mini bag.
- Confirm that the square has a finished dimension of approximately 6.5 inches (16.5 cm) on each side.
- Check that the four corners are clearly defined.
- Make sure the color changes follow the intended sequence.
- Look at the popcorn, bobble, post stitches, and picots to make sure they are properly formed.
- Check that the outer edge lies as evenly as possible.
- Use blocking if needed for a polished square shape, as recommended in the original tips.
Repeat the complete sixteen-round sequence to create the second granny square. Keeping the same tension is especially important because even a small difference between the two squares can make the joining process less comfortable.
Assembling the Mini Bag
With two matching granny squares completed, the project changes from individual motif work to bag construction. Keep the squares aligned carefully throughout this stage.
Step 1 – Prepare Two Granny Squares

Place both finished squares together and make sure their edges correspond.
Step 2 – Position the Squares

Position the two granny squares with their wrong sides facing each other. Align the edges before beginning the joining work.
Step 3 – Sew Three Edges

Sew together three edges of the granny squares, working from left to right. At the corner, insert the hook through both granny squares. This creates the main body of the mini bag while leaving the upper edge open.
Step 4 – Add the Crab Stitch Detail

Chain, then repeat (3 single crochet, crab stitch) along the left side of the bag.
Step 5 – Finish the Bottom Edge

For the bottom edge, insert the hook through both layers and work single crochets evenly. Keep the two layers aligned as you progress.
Step 6 – Finish the Right Side

On the right side of the bag, repeat the (3 single crochet, crab stitch) pattern to the end.
Step 7 – Secure the Sewing

Fasten off and weave in the ends to complete the bag sewing. Take care not to leave loose ends around the seams where they could interfere with the decorative finishing.
Making the Two Tassel Decorations
Step 8 – Create the Yarn Loops

Using yarn matching the bag’s main color, wrap it around your fingers about 25 times, then cut the yarn.
Step 9 – Secure the Loops

Secure the yarn loops tightly with a separate piece of yarn.
Step 10 – Shape the Tassel

Use another piece of yarn to wrap and tighten the loops, then trim them neatly.
Step 11 – Add the Small Wooden Bead

Thread the tassel through a small wooden bead. Make two identical decorations so the finished bag has a matching tassel on each lower corner.
Step 12 – Attach the Tassels

Attach the decorations to the bottom left and right corners of the bag. Check that both tassels hang at a similar position for a balanced appearance.
Adding the Strap and Large Wooden Bead

Take the bag strap and thread it through a large wooden bead. Thread the strap through the top corners of both granny squares. Finally, thread the strap back through the wooden bead to secure it, adjusting the length as desired.
This completes the main construction of the Eirene Flower Granny Square Mini Bag. Before using it, inspect the strap attachment, wooden beads, tassels, and joined edges to make sure everything is secure.
Practical Tips for a Neat Finished Square
The original pattern specifically recommends maintaining consistent tension throughout the project, particularly during color changes and textured stitches. This is especially important because the design combines many different stitch heights and raised techniques.
- Track your rounds: Use stitch markers when needed so repeated sections and corners remain easy to identify.
- Watch post stitches: Front post and back post stitches affect the texture and positioning of the flower.
- Pay attention to picots: Several later instructions connect directly to earlier picots, so their placement matters.
- Keep the corners clear: The outer rounds depend on defined corner spaces to form the square.
- Maintain matching tension: Make the second square with the same general tension as the first.
- Block when necessary: The original tips recommend blocking the completed square for a polished appearance.
Assembly Checkpoints
Before adding the tassels and strap, inspect the bag as a finished fabric structure. The two squares should remain aligned, the three joined edges should be secure, and the upper opening should remain clear for the strap arrangement.
When working the side edging, keep the repeated (3 single crochet, crab stitch) pattern consistent. Along the bottom, the instruction is to work single crochets evenly through both layers. These details contribute to the finished outline of the bag.
Finishing and Care
For everyday care, gently remove surface dust with a clean, dry microfiber cloth. Inspect the wooden beads and tassels regularly and address loose threads promptly. The source also recommends occasional conditioning for the leather strap to help prevent drying and maintain flexibility.
For small spots, clean locally using a damp white cloth with a pH-neutral soap solution. For more thorough cleaning, the original care instructions recommend hand washing in room-temperature water with a gentle wool detergent. Use light pressing motions rather than twisting or wringing the bag, because twisting can distort the crochet pattern.
After cleaning, remove excess water by gently pressing the bag between clean white towels. Reshape it while damp and dry it flat at room temperature. Avoid direct heat and direct sunlight, which may affect the color and fiber integrity.
Storage Tips
When the bag is not being used, store it in a well-ventilated area away from direct sunlight. The original instructions recommend gently stuffing the bag with white acid-free tissue paper to help maintain its structure. Keep the tassels straight to prevent tangling and store the leather strap flat so it does not develop permanent creases.
A breathable cotton storage bag can help protect the crochet from dust while allowing air circulation. Avoid sealing the handmade bag in a non-breathable plastic environment for long-term storage.
Common Troubleshooting Checks
Why Does My Granny Square Look Uneven?
Check your tension and the placement of the corner sections. Because the pattern uses multiple stitch heights, including treble crochet, double crochet, half double crochet, and single crochet, tension can affect the shape. The original pattern recommends consistent tension and blocking the completed square.
Why Are My Textured Stitches Not Standing Out?
Pay attention to the instructions for popcorn stitches, bobble stitches, front post single crochet, back post single crochet, and back post double crochet. These stitches create much of the dimensional appearance of the flower, so their placement and tension are important.
Why Do My Two Squares Not Match?
Compare the two squares round by round. Make sure the same color sequence, stitch sequence, and repeated sections were followed. Matching tension between the two panels is also important because differences in tension can change the final dimensions.
Why Is the Bag Difficult to Align?
Before sewing, place the two granny squares with wrong sides facing each other and align the corners and outer edges. The original assembly instructions specifically recommend using stitch markers for even seams when aligning the squares.
Quick Project Checklist
- Two completed granny squares.
- Each square approximately 6.5 inches (16.5 cm).
- 2.5mm crochet hook used for the main pattern.
- Loopara 4ply combed cotton in White 02, Blue 30, Blue 36, Yellow 41, and Red 66.
- Three edges joined with the two squares aligned.
- Side edging completed with the specified (3 single crochet, crab stitch) repeat.
- Bottom edge worked through both layers with single crochets.
- Two tassels made using approximately 25 wraps each.
- Small wooden beads added to the tassels.
- Tassels attached to the lower left and right corners.
- Bag strap threaded through the large wooden bead and upper corners.
- Ends securely woven in.
- Final seams, beads, tassels, and strap checked before use.
Frequently Asked Questions
How many granny squares are needed for this bag?
The project requires two granny squares: one for the front and one for the back.
What size is the finished mini bag?
The finished bag measures approximately 6.5 x 6.5 inches (16.5 x 16.5 cm).
What crochet hook size is used?
The original pattern uses a 2.5mm crochet hook.
What yarn is recommended?
The materials list specifies Loopara 4ply combed cotton yarn in White 02, Blue 30, Blue 36, Yellow 41, and Red 66.
What colors are used in the flower motif?
The design combines yellow, white, blue, light blue, and red. The yellow begins the center, while the other colors build the layered flower and square structure.
Does the bag include tassels?
Yes. Two tassel decorations are created using yarn matching the bag’s main color, with each tassel threaded through a small wooden bead and attached to a lower corner.
How is the strap attached?
The strap is threaded through a large wooden bead, then through the top corners of both granny squares, and finally back through the wooden bead to secure it. The length can be adjusted as desired.
Final Thoughts on the Eirene Flower Mini Bag
This crochet granny square mini bag is a compact project with a surprisingly detailed visual result. The flower develops from a simple magic-ring center into a richly textured motif using multiple colors, post stitches, popcorn stitches, bobbles, and picots. Once two matching squares are completed, the construction becomes straightforward: align the panels, join three edges, finish the sides and bottom, and add the decorative tassels and strap.
The finished dimensions of approximately 6.5 x 6.5 inches (16.5 x 16.5 cm) make the project small enough to complete without a large yarn commitment while still providing plenty of opportunities to practice textured crochet techniques. The wooden beads and tassels add another handmade detail that complements the floral design.
For the best result, focus on consistency rather than speed. Keep the color changes organized, follow each round in sequence, pay close attention whenever an instruction refers back to a bobble or picot, and compare the first granny square with the second as you work. Once both panels match, careful alignment during assembly will help the finished bag retain its neat square shape.
With the final tassels attached and the strap secured, your Eirene Flower Granny Square Mini Bag is ready to become a charming handmade accessory. The combination of dimensional crochet texture, contrasting colors, wooden bead accents, and a compact silhouette gives this project a distinctive vintage-inspired character while keeping the construction centered around two beautiful granny squares.
