
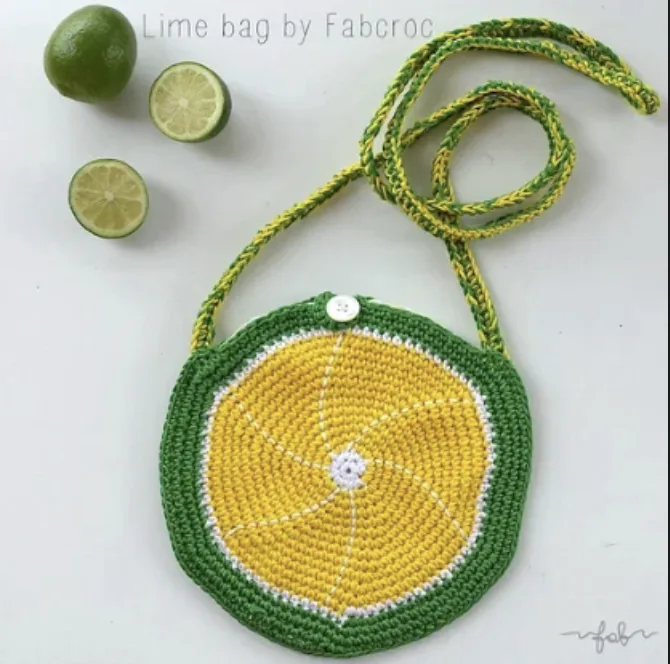
If you love bright summer colors, handmade accessories, and crochet projects with a playful fruit-inspired design, this easy Crochet Lime Bag is a wonderful project to add to your list. The finished bag has the appearance of two fresh lime slices joined together to create a small, cheerful round purse. Its combination of white, yellow, and green cotton yarn gives the design a fresh citrus look that works especially well for summer.
This free crochet guide is based on a simple construction method using single crochet stitches and regular increases. Although the written pattern contains several rounds, the actual technique is straightforward because the bag is built from two matching circular crochet pieces. Once the two lime slices are complete, they are decorated, lined, joined, and finished with a button and a simple crochet shoulder strap.
The original design is worked in single crochet in the round with increases. The finished lime slices have a diameter of approximately 22 cm. The project is rated easy, making it suitable for crocheters who are comfortable with a magic ring, single crochet, increases, slip stitches, chains, and basic sewing.
Project Overview
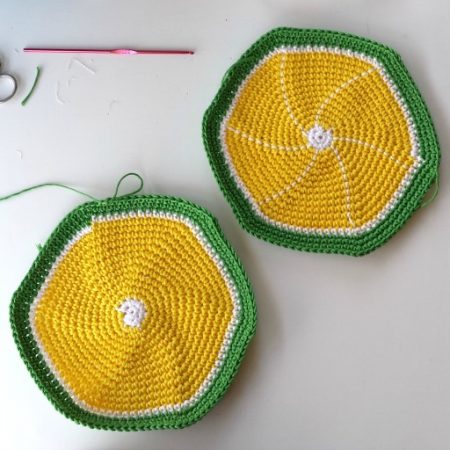
The Lime Bag is made from two large crochet circles. Each circle is worked outward from a magic ring, beginning with six single crochet stitches and increasing evenly around the piece. The color sequence creates the citrus-inspired appearance.
Color A is white, Color B is yellow, and Color C is green. The first two rounds are worked in white. The next section uses yellow from Round 3 through Round 14. White returns for Round 15, and green is used for Rounds 16 through 18.
At the end of the construction, each circle contains 108 stitches. Two circles are required. One circle is completed and decorated, while the second circle remains open after Round 18 so that the crochet hook can later be used to join the two outer pieces together.
The bag also requires a fabric lining. This is an important part of the construction because the crochet fabric alone does not provide enough support for the finished purse. The lining is made from two fabric circles and sewn together while leaving an opening of approximately 17 cm. A button closure is then added to the crochet exterior.
Materials for the Crochet Lime Bag
- White cotton yarn, Color A
- Yellow cotton yarn, Color B
- Green cotton yarn, Color C
- 3 mm crochet hook
- Yarn or embroidery needle
- White thread for decoration and sewing
- Button
- Fabric for the lining
- Sewing supplies for constructing the lining
The original English instructions list one skein of white cotton yarn, one skein of yellow cotton yarn, and one skein of green cotton yarn. A 3 mm crochet hook is used for the crochet portion of the project.
Abbreviations and Basic Crochet Terms
The pattern is worked primarily in single crochet. The English instructions use the abbreviation SC for single crochet, while the original Italian instructions use MB for maglia bassa.
- SC: single crochet
- inc: increase, worked as 2 SC in the same stitch
- sl st: slip stitch
- ch: chain
- rd: round
The increases are the key to creating the flat circular lime slices. In every increase round, two single crochet stitches are worked into the same stitch according to the stated sequence. The stitch count increases by six stitches in each round, beginning with 12 stitches in Round 2 and ending with 108 stitches in Round 18.
Before You Begin
Because the bag is made from circular pieces, consistent tension is useful throughout the project. Try to keep the stitches reasonably even, particularly when working the increases. Uneven tension can make a circular piece appear wavy or cause the finished slice to lose its round shape.
Pay close attention to the stitch count at the end of every round. The numbers in parentheses are important checkpoints. If the count is incorrect early in the project, the shape of the circle may become distorted as more rounds are added.
It is also helpful to keep the three yarn colors organized before beginning. The color changes are part of the visual design, so switching at the correct round is important for maintaining the lime-slice effect.
Creating the First Lime Slice
Rounds 1 and 2: The White Center
Begin with Color A, the white cotton yarn.
Round 1: Create a magic ring and work 6 SC inside the ring. The final stitch count is 6.
The magic ring creates the small center from which the circular slice grows. Make sure the center can be tightened securely so there is no large hole in the middle.
Round 2: Work 6 increases around the entire round. Each increase consists of 2 SC in the same stitch. The final stitch count is 12.
At this point, the small white center begins to form the foundation of the lime design.
Rounds 3–14: Building the Yellow Section
Change to Color B, yellow.
From Round 3 onward, the increase pattern follows a simple progression. Each new round adds one more regular SC between increases. This creates the steadily expanding circular shape.
Round 3: [inc 2, SC in next SC] repeat all around. 18 stitches.
Round 4: [inc 2, 2 SC] repeat all around. 24 stitches.
Round 5: [inc 2, 3 SC] repeat all around. 30 stitches.
Round 6: [inc 2, 4 SC] repeat all around. 36 stitches.
Round 7: [inc 2, 5 SC] repeat all around. 42 stitches.
Round 8: [inc 2, 6 SC] repeat all around. 48 stitches.
Round 9: [inc 2, 7 SC] repeat all around. 54 stitches.
Round 10: [inc 2, 8 SC] repeat all around. 60 stitches.
Round 11: [inc 2, 9 SC] repeat all around. 66 stitches.
Round 12: [inc 2, 10 SC] repeat all around. 72 stitches.
Round 13: [inc 2, 11 SC] repeat all around. 78 stitches.
Round 14: [inc 2, 12 SC] repeat all around. 84 stitches.
These rounds form most of the yellow section of the lime slice. The repeated structure makes the pattern easy to follow, but it is still important to check each stitch count before moving forward.
Round 15: Returning to White
Change back to Color A, white.
Round 15: [inc 2, 13 SC] repeat all around. The final stitch count is 90.
This narrow white round helps separate the yellow section from the green outer section. When changing colors, keep the transition neat so the circular bands remain visually clean.
Rounds 16–18: The Green Outer Edge
Change to Color C, green.
Round 16: [inc 2, 14 SC] repeat all around. 96 stitches.
Round 17: [inc 2, 15 SC] repeat all around. 102 stitches.
Round 18: [inc 2, 16 SC] repeat all around. 108 stitches.
After Round 18, the completed crochet slice has reached the stated finished diameter of approximately 22 cm.
Important Stitch-Count Checkpoints
The following counts provide a quick way to verify your progress:
- Round 1 — 6 stitches
- Round 2 — 12 stitches
- Round 3 — 18 stitches
- Round 4 — 24 stitches
- Round 5 — 30 stitches
- Round 6 — 36 stitches
- Round 7 — 42 stitches
- Round 8 — 48 stitches
- Round 9 — 54 stitches
- Round 10 — 60 stitches
- Round 11 — 66 stitches
- Round 12 — 72 stitches
- Round 13 — 78 stitches
- Round 14 — 84 stitches
- Round 15 — 90 stitches
- Round 16 — 96 stitches
- Round 17 — 102 stitches
- Round 18 — 108 stitches
Checking these numbers as you work can save time later. If a round does not have the expected number of stitches, it is usually easier to correct the issue immediately rather than continuing several rounds and trying to locate the mistake afterward.
Making the Two Crochet Slices
The pattern requires 2 circles made using the same 18-round color and increase sequence.
For the first circle, complete the work and close it. This slice can then be decorated using white thread and a needle to create the visual effect of a lime wedge.
The second circle is slightly different at the finishing stage because it will contain the button loop and later be joined to the first slice. Follow the instructions carefully so that the opening and closure are positioned correctly.
Adding the Button Loop
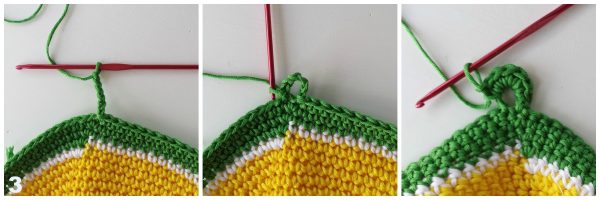
On the circle that will receive the closure, finish Round 18 with a slip stitch.
Then make 8 chains. Close the chain loop with a slip stitch in the next stitch. Work 6 SC inside the chain loop, then close with a slip stitch.
The button loop provides the opening that will fit around the button placed on the opposite side of the bag. The original instructions specify leaving the work open so the two circles can be paired later.
When the closure section is complete, leave the crochet work ready for the assembly stage rather than permanently closing the entire bag.
Decorating the Lime Slice
Once the first crochet circle is finished, use a needle and white thread to add the decorative lines that create the appearance of a citrus wedge. The decoration should emphasize the slice structure without interfering with the construction of the bag.
This is also a good stage to inspect the circular shape. Lay the slice flat and check that it is reasonably round before proceeding. Small variations in handmade crochet are normal, but a clearly distorted shape may indicate an issue with the increase placement or tension.
Why the Fabric Lining Matters
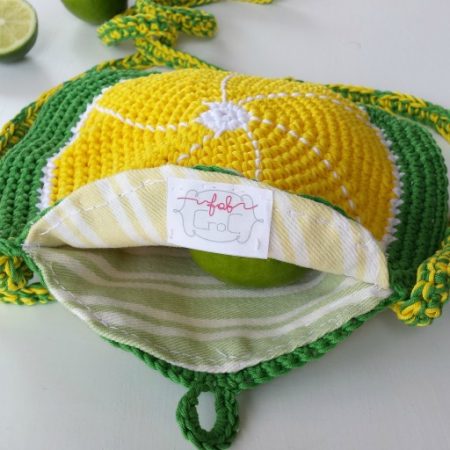
The lining is not simply decorative. The original instructions specifically recommend using a reasonably heavy fabric because the crochet bag needs additional support. Without a suitable lining, the finished purse may not hold its shape or provide the structure expected from a small bag.
For the lining, prepare 2 round pieces of fabric that are approximately 1.5 cm larger than the crochet lime slices. This additional fabric allows room for the hem and sewing.
Preparing the Lining
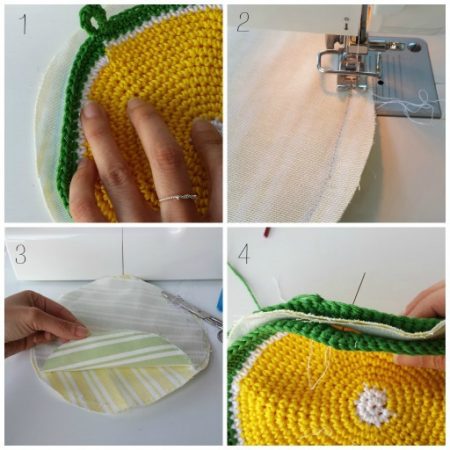
Place the fabric pieces together and sew them from the wrong side. Leave an opening of approximately 17 cm. This opening is important because it creates access for the bag and corresponds with the closure area.
After sewing, turn the lining so that the seams are positioned inside. Finish the open section with a hand-sewn hem.
The lining does not need to look perfect from the outside because it will be inside the finished bag. The important goals are secure seams, a useful opening, and a lining that fits the crochet circles without excessive looseness.
Attaching the Lining to the Crochet Pieces
Before sewing the lining permanently, position it carefully on the crochet slices. Pinning the lining first can help you decide exactly where it should sit and can make the sewing process easier.
Sew the lining pocket to each crochet slice. The original instructions recommend sewing the crocheted lime pieces and lining together with the right side positioned inside so that it will be visible when the bag is opened.
Take your time at this stage. The lining affects the final appearance and structure of the purse, so careful positioning is more useful than rushing through the sewing.
Joining the Two Lime Slices
Once the lining has been attached, it is time to turn the two decorated circles into one bag.
Use relatively thin white thread to sew the two lime slices together on one face and the other side of the lining, following the construction shown in the original project. Keep the right side of the lining positioned appropriately inside the purse.
Next, return to the crochet hook and continue around the unfinished crochet piece. Work 1 SC around the entire round while joining the two external crochet slices.
Do not close the remaining open section. The opening must remain available for the purse construction and button closure.
Adding the Shoulder Strap
The shoulder strap is intentionally simple. Use Color B and Color C and begin by making chains until the strap reaches approximately 1 metre in length.
Skip the first chain from the hook and work tight single crochet stitches all the way to the end. This produces the strap used to carry the finished Lime Bag.
The strap can then be sewn to the sides of the purse. Take care to secure both ends firmly because the strap will carry the weight of the bag and anything placed inside it.
Adding the Button
The final closure uses a simple decorative button. Position the button so that the 8-chain loop created on the opposite side can pass comfortably around it.
Before sewing the button permanently, test the closure. The loop should reach the button without excessive tension, while still holding the bag closed securely.
Beginner Tips for a Cleaner Result
- Count every round: The stitch counts increase by six stitches per round, making the listed totals useful checkpoints.
- Watch your increases: Every increase is 2 SC in the same stitch.
- Keep your tension consistent: Consistent tension helps the circles remain flat and round.
- Make both slices carefully: The two crochet circles should be similar in size before assembly.
- Secure color changes: Neat transitions help preserve the citrus-inspired appearance.
- Check the lining before sewing: Positioning it first can prevent unnecessary adjustments later.
- Do not skip the lining: The original design relies on the fabric lining for additional support.
- Test the button: Make sure the button and loop work together before finishing the sewing.
Troubleshooting the Crochet Circles
Why is my circle becoming wavy?
If the edge begins to wave instead of remaining relatively flat, check the increase pattern and stitch count. The project depends on evenly distributed increases. Compare your current round with the required number in the pattern before continuing.
Why is my circle not round?
Check whether the increases have been placed consistently. Also consider whether your tension changed significantly during the round. Since the bag consists of two large circular pieces, keeping the shape as even as possible will make assembly easier.
What if my two slices are slightly different?
Compare their dimensions before sewing them together. If one slice is noticeably different, check the round counts and increase sequences. Both pieces should follow the same 18-round construction, with the button-loop variation added to the appropriate piece.
Why does the bag need a lining?
The lining provides additional structure and support. The original instructions specifically emphasize that the crochet bag would not have enough support without it and recommend using fairly heavy fabric.
Quick Construction Checklist
- Prepare white, yellow, and green cotton yarn.
- Use a 3 mm crochet hook.
- Make the first lime slice through Round 18.
- Confirm the final count of 108 stitches.
- Decorate the completed slice with white thread.
- Make the second lime slice through Round 18.
- Add the 8-chain button holder and 6 SC inside the loop.
- Prepare two lining circles approximately 1.5 cm larger than the crochet pieces.
- Sew the lining while leaving an opening of approximately 17 cm.
- Attach the lining to the crochet slices.
- Join the two outer crochet slices with SC.
- Leave the required opening rather than closing the entire round.
- Make the shoulder strap with Colors B and C.
- Start with approximately 1 metre of chains.
- Skip the first chain and work SC to the end.
- Sew the strap to the sides.
- Attach and test the button.
Frequently Asked Questions
What skill level is the Lime Bag pattern?
The project is described as easy. The crochet portion uses single crochet and regular increases, while the finishing stages require basic sewing skills for the lining, decorative details, button, and strap.
What size is the finished lime slice?
The finished dimensions are approximately 22 cm in diameter.
What crochet hook size is used?
The pattern uses a 3 mm crochet hook.
How many crochet circles are needed?
You need 2 circles. Both follow the same 18-round increase structure. One is finished normally, while the other receives the button holder and remains available for the final joining process.
How many stitches are in Round 18?
Round 18 ends with 108 stitches.
What yarn colors are required?
The design uses white cotton yarn as Color A, yellow cotton yarn as Color B, and green cotton yarn as Color C.
How long should the shoulder strap be?
The original instructions recommend beginning with chains until the strap reaches approximately 1 metre in length. After skipping the first chain, work tight SC stitches to the end.
Can I use a zipper instead of a button?
The original instructions mention that a zipper can be added during the lining stage. The featured version uses the simpler decorative button closure.
Why should the lining be slightly larger?
The lining pieces are cut approximately 1.5 cm larger than the crochet lime pieces to allow for the hem and sewing.
Final Finishing Advice
Before considering the Lime Bag finished, inspect each part of the construction. Check that the two crochet circles are joined securely, the lining is properly sewn, the button loop is functional, and the shoulder strap is firmly attached at both sides.
Also take a moment to check the decorative white stitching on the lime slice. Since this detail creates the citrus-wedge appearance, neat and evenly positioned stitches can make a noticeable difference in the finished look.
The combination of the green outer rounds, white dividing section, yellow center, and white decorative lines gives this project its distinctive fruit-inspired character. The circular construction is also practical because the same basic crochet technique is repeated throughout the main body of the project.
A Fresh Handmade Accessory for Summer
The Crochet Lime Bag is a cheerful example of how simple crochet techniques can be transformed into a recognizable seasonal accessory. Its construction is based on two straightforward circular pieces, but the carefully planned color changes turn those circles into something much more distinctive.
For beginners, the project provides useful practice with magic rings, single crochet, systematic increases, color changes, slip stitches, chains, and basic crochet assembly. For more experienced crocheters, it is a relatively approachable project with plenty of room to focus on clean finishing, lining, button placement, and strap construction.
The most important point is to keep the technical details consistent throughout the project: use the 3 mm hook, follow the stated increase sequence, check the stitch counts, make both 18-round circles, and retain the approximately 22 cm finished diameter specified by the original pattern. The fabric lining is equally important because it gives the small purse the support it needs.
Once the final button is attached and the approximately 1 metre shoulder strap is sewn securely to the sides, the Lime Bag is ready to become a bright handmade summer accessory. Its citrus-inspired colors make it particularly suited to warm-weather outfits, beach days, casual walks, or simply adding a playful handmade touch to an everyday look.
Enjoy making your own Lime Bag and have a wonderful crochet summer!