
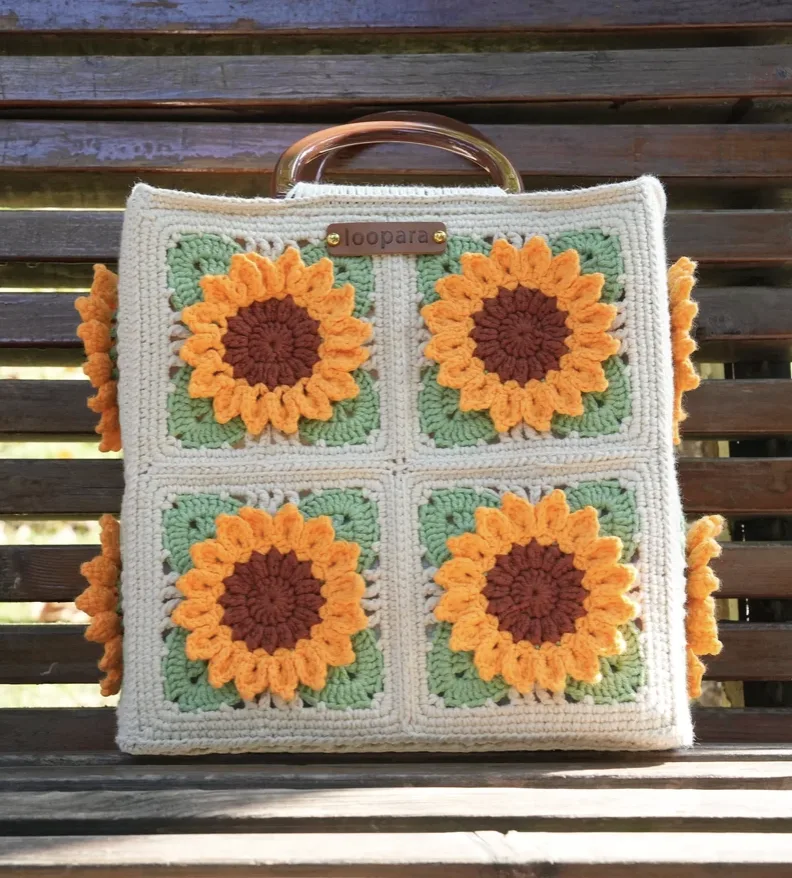

If you love crochet projects that combine traditional motifs with a practical finished piece, this sunflower granny square bag is a beautiful project to add to your handmade collection. The design brings together twelve colorful sunflower granny squares, a structured construction, a lined interior, wooden handles, and a textured floral motif that gives the finished bag plenty of character.
The sunflower design is built around a crisp white background with bright yellow petals, rich brown centers, and green details. The result has the cheerful appearance of a summer sunflower while retaining the classic geometric look of granny-square crochet. Because the individual squares are made separately before being assembled, the project can be approached in manageable sections rather than as one large crochet piece.
Each regular sunflower square measures 12cm x 12cm, approximately 4.7 inches. Twelve of these squares are used for the main bag construction: four for the front, four for the back, and four for the sides. A solid-colored square is also used for the base to provide additional stability. Once assembled, the finished bag measures approximately 14.5cm wide and 15.5cm tall, or about 5.7 x 6.1 inches.
This tutorial walks through the complete construction process, beginning with the materials and abbreviations, then moving through all eleven rounds of the regular square. After the squares are finished, the guide covers panel joining, the plastic grid, lining, the bag bottom, the opening, the drawstring, and the handle attachment.
Project Overview
The sunflower granny square is the visual focus of this bag. The first rounds create the central flower structure, while later rounds transform the circular floral motif into a square with defined corners. Color changes help separate the flower from the surrounding background and make the dimensional petals stand out.
The project uses Loopara 5-ply combed cotton yarn and a 3.0mm crochet hook. The relatively small hook size creates a tighter fabric, which is especially useful for a bag because it helps the crochet maintain its shape and reduces the size of the spaces between stitches.
- Individual square size: 12cm x 12cm, approximately 4.7 inches
- Number of regular sunflower squares: 12
- Finished bag size: approximately 14.5cm wide x 15.5cm tall
- Approximate finished size in inches: 5.7 x 6.1 inches
- Hook size: 3.0mm
- Primary yarn: Loopara 5-ply combed cotton / 5-ply milk cotton
- Main colors described: white, bright yellow, dark brown, and green
- Handle material: wooden handles
- Drawstring length: approximately 70cm
The structured bottom and lining are important parts of the design. Rather than relying only on crocheted fabric, the construction incorporates a grid board and lining cloth to help the finished bag retain its shape.
Materials for the Sunflower Crochet Bag
Gather the following materials before beginning. Having the full set of supplies ready makes the color changes, joining, lining, and finishing stages easier to manage.
- Loopara 5ply combed cotton yarn
- 3.0mm crochet hook
- Scissors
- Yarn needle
- Stitch marker
- Lining cloth
- Sewing thread
- Small wooden beads
- D-shaped portable accessories
- Leather label
- Grid board
The recommended yarn is Loopara 5-ply milk cotton because the source describes it as suitable for structured bags while still providing a soft drape. Its stitch definition also helps display the textured petals and granny-square details clearly.
The suggested palette uses white for the background, bright yellow for the sunflower petals, dark brown for the centers, and green for the leaves. The same construction can visually support other color combinations, but the original project uses this sunflower-inspired palette.
US Crochet Abbreviations
The pattern uses standard US crochet terminology. Keep this list nearby while working through the rounds, especially because several of the later rounds combine basic stitches with post stitches, bobbles, picots, and stitch decreases.
- ch – chain
- sc – single crochet
- dc – double crochet
- hdc – half double crochet
- tr – treble crochet
- FPdc – front post double crochet
- BPdc – back post double crochet
- bo – bobble stitch
- pic – picot stitch
- dc2tog – double crochet 2 together
- dc3tog – double crochet 3 together
- sl st – slip stitch
Before You Start the Granny Squares
The most important preparation step is to understand that you are making twelve regular sunflower squares. Since every square becomes part of a larger structured bag, consistency is more important than speed. Try to maintain similar tension from one square to the next so the pieces remain the same size.
The source recommends weaving in ends as you go when changing colors instead of leaving every loose end until the very end. This is particularly useful in a multi-color project because several rounds involve color changes.
Pay special attention to the bobble stitches in Round 2. Consistent tension helps the raised petals look even. The source also recommends working corner stitches into chain spaces to create crisp square edges.
How to Crochet the Sunflower Granny Square
Make twelve regular squares using the following eleven-round sequence. Keep the rounds in order because each stage builds the structure needed for the next.
Round 1 – Create the Center

Round 1: Create a magic ring. Chain 3, which counts as the first double crochet, then work 15 double crochet into the ring. Slip stitch to join at the top of chain 3.
This first round forms the foundation for the flower center. Make sure the stitches are distributed evenly around the magic ring before joining.
Round 2 – Build the Bobble Flower Center

Round 2: Chain 2, work a 2 double crochet bobble stitch, chain 1, then work a 3 double crochet bobble stitch 15 times, chain 1. Slip stitch to join.
This is one of the defining rounds of the motif. Keep the tension consistent as you make the bobbles so the flower has a balanced, dimensional appearance.
Round 3 – Add the Picot Petal Details

Round 3: Change color, chain 1, then work single crochet, chain 4 picot, single crochet 16 times. Slip stitch to join.
The color change helps define the floral motif. Work each picot carefully so the points remain clear and consistent around the center.
Round 4 – Shape the Textured Petals

Round 4: Chain 1, work single crochet, half double crochet, 2 double crochet, chain 2 picot, 2 double crochet, half double crochet, single crochet, chain 1, slip stitch 16 times.
This round gives the sunflower its more recognizable petal silhouette. Keep the repeated sequence consistent around the entire motif.
Round 5 – Begin the Square Structure

Round 5: Change color, chain 5, then work double crochet, working into one loop of the bobble stitch from Round 2, chain 2, 15 times. Slip stitch to join.
The placement of the double crochet into one loop of the bobble stitch is an important construction detail. Follow the source instruction rather than treating these stitches as ordinary outer-round stitches.
Round 6 – Introduce the Corners

Round 6: Chain 1, single crochet increase, chain 2, single crochet, chain 2, single crochet, chain 4 picot, single crochet, chain 2, single crochet, chain 2, and repeat this sequence 4 times. Slip stitch to join.
At this point, the motif begins moving away from a simple circular flower and toward the square shape needed for assembly. Pay attention to the repeated corner sequence.
Round 7 – Strengthen the Four-Sided Shape

Round 7: Chain 1, then work 2 single crochet, chain 2, single crochet, 5 double crochet, chain 2, 5 double crochet, single crochet, chain 2, 4 times. Slip stitch to join.
The larger groups of double crochet emphasize the four corners while the chain spaces help define the square geometry.
Round 8 – Shape the Outer Corners

Round 8: Work 2 single crochet, chain 2, double crochet 2 together, 3 double crochet increase, 2 double crochet, chain 2, 2 double crochet, 3 double crochet increase, double crochet 3 together, chain 2, 4 times. Slip stitch to join.
The source specifies the internal placement of the double crochet 2 together as 1 double crochet in single crochet, skip 1, 1 double crochet in the next stitch. For the double crochet 3 together section, the source specifies skip 1 and 1 double crochet in single crochet.
Round 9 – Add the Decorative Outer Framework

Round 9: Change color, chain 5, then work the following sequence 3 times: treble crochet, double crochet, chain 2, skipping 2, single crochet, chain 2, skipping 2, slip stitch, chain 2, skipping 2, single crochet, chain, single crochet, chain 2, skipping 2, slip stitch, chain 2, skipping 2, single crochet, chain 2, skipping 2, double crochet, treble crochet, chain.
Then work treble crochet, double crochet, chain 2, skipping 2, single crochet, chain 2, skipping 2, slip stitch, chain 2, skipping 2, single crochet, chain, single crochet, chain 2, skipping 2, slip stitch, chain 2, skipping 2, single crochet, chain 2, skipping 2, double crochet. Slip stitch to join.
This is a detailed round, so it is helpful to read the entire sequence before beginning. The repeated skips and chain spaces create the openwork framework that will be enclosed by the final two rounds.
Round 10 – Form the First Solid Border

Round 10: Chain 1, work 13 single crochet, 3 single crochet in the corner, 10 single crochet, and repeat 4 times. Slip stitch to join.
Work the corner stitches into the appropriate corner spaces for clean, defined square edges. This is also a useful checkpoint for comparing the size and shape of your square with the other squares you will make.
Round 11 – Complete the Square

Round 11: Chain 1, work 14 single crochet, 3 single crochet in the corner, 11 single crochet, and repeat 4 times. Slip stitch to join.
Once Round 11 is complete, the regular sunflower square is finished. Make a total of twelve regular squares following exactly the same eleven-round sequence.
Square-Making Checkpoint
Before moving into assembly, compare the finished squares. Each regular square should measure 12cm x 12cm, approximately 4.7 inches, according to the source. Keeping the squares consistent will make panel joining easier and help the finished bag maintain its intended proportions.
- Make 12 regular sunflower granny squares.
- Keep the same round sequence for every square.
- Maintain consistent tension, especially in bobble stitches.
- Weave in color-change ends as you go.
- Keep the corners clearly defined.
- Block squares before joining if needed to ensure even size.
Understanding the Bag Layout

The layout is an important reference before sewing. The source explains that the red lines indicate horizontal seams while the green lines indicate vertical seams. Together, these lines show how the squares are connected to form the front, back, and sides of the bag.
The bag uses four squares for the front, four for the back, and four for the sides. In addition, a solid-colored square is used for the base. Because the final project is structured, taking time to understand the layout before joining can prevent the panels from being connected in the wrong orientation.
Joining the Main Panels

Step 1 – Whipstitch the Panels
Begin by joining the four main panels using a whipstitch technique. Start with two panels side by side. Thread the yarn through the back loops of both panels twice at the starting point to secure it. Continue whipstitching through the back loops of both panels.
When you reach crossing points, pull the yarn slightly tighter to prevent gaps. Continue joining the remaining panels using the same method until all four panels have been connected according to the layout.
One useful goal at this stage is to keep the seam tension controlled. The source specifically recommends pulling slightly tighter at crossing points, but the panels should still lie naturally rather than becoming puckered.
Step 2 – Add the Plastic Grid

Cut the plastic grid so it matches the size of the joined panels exactly. Place the grid behind the crocheted panels. Work single crochet stitches around the entire perimeter of the grid and panels, making three single crochet stitches in each corner for proper shaping. Repeat this process for all joined panel sections.
Step 3 – Prepare and Sew the Lining

Place the completed panel section on top of the lining fabric. Mark around the panel while leaving a 1-centimeter seam allowance. Cut the lining fabric following those marks.
Position the cut lining behind the panel. Fold the edges and secure them with clips. Thread a sewing needle with matching thread and use a backstitch method, catching four crochet stitches at a time. On the lining side, work back two stitches before moving forward again. Continue this stitching pattern around the entire piece.
Making the Structured Bag Bottom

The bottom is worked in rows using single crochet, double crochet, front post double crochet, and back post double crochet. Follow the row sequence carefully.
Bottom Row 1
Row 1: Chain 28, work 27 single crochet starting in the 2nd chain from hook.
Bottom Row 2
Row 2: Chain 3, which counts as the first double crochet, turn, and work 26 double crochet.
Bottom Row 3
Row 3: Chain 3, counts as the first double crochet, turn, then work front post double crochet, double crochet 13 times.
Bottom Row 4
Row 4: Chain 3, counts as the first double crochet, turn, then work back post double crochet, double crochet 13 times.
Bottom Row 5
Row 5: Repeat Rows 3 and 4 fourteen more times.
Bottom Row 6
Row 6: Chain 3, counts as the first double crochet, turn, and work 26 double crochet.
Bottom Row 7
Row 7: Chain 1, turn, and work 27 single crochet.
The alternating front post and back post work gives the bottom additional texture and structure. Keep your row edges even so the base can be attached cleanly to the assembled panels.
Assembling the Bag Body

Assembly Step 1 – Add Structure
Add the grid board and lining fabric using the same method described for the main panels. This keeps the construction consistent and helps reinforce the bag.
Assembly Step 2 – Join the Sections

Use whip stitch through all loops with wrong sides together, matching the stitches carefully. Double stitch at the beginning and pull slightly tight. At corners, secure with an extra stitch and pull snugly enough to avoid gaps.
Assembly Step 3 – Begin the Opening

Starting at any point, work chain 5 in the back loops. Then repeat 1 double crochet, skip 2 stitches, 1 double crochet around.
Assembly Step 4 – Complete the Opening

Repeat the opening pattern for 10 rounds total. Join with mattress stitch and weave in the ends. Mattress stitch is especially useful here because the source recommends it for creating an invisible-looking seam.
Assembly Step 5 – Add the Drawstring

Make a chain approximately 70cm long. Thread it through the second-to-last row of holes. Add wooden beads to both ends and secure them with tight knots.
Keep the knots secure because the drawstring will be handled whenever the opening is adjusted. The source specifically calls for tight knots after the beads are attached.
Assembly Step 6 – Finish the Opening Edge

Work one round of single crochet in the remaining back loops around the opening.
Assembly Step 7 – Attach the Handles

Mark the center points on the front and back. Count 13 stitches on each side and mark them. Work single crochet to the marked points, attach the handles while working with the right side facing you, and continue with single crochet. Repeat for the other side and secure all ends.
Take care when positioning the handles because symmetry has a strong effect on the appearance of the finished bag. Use the center points and the specified 13-stitch measurement on each side as your placement guide.
Construction Checkpoints Before Finishing
A structured crochet bag benefits from a few deliberate checks before the final ends are secured. Compare the two main sides visually and make sure the seams are sitting correctly. The sunflower squares should remain aligned rather than pulling noticeably in one direction.
- Confirm that all twelve sunflower squares are included in the intended layout.
- Check that the panel seams are secure.
- Make sure the grid board matches the joined panels.
- Confirm that the lining has been secured with the specified 1-centimeter seam allowance.
- Check the bottom before joining it to the bag.
- Confirm that the opening contains 10 rounds.
- Check that the approximately 70cm chain passes through the second-to-last row of holes.
- Use the center points and 13-stitch marks when attaching the handles.
Tips for Cleaner Sunflower Squares
Keep Bobbles Consistent
The bobble stitches are a major visual feature of this design. Try to maintain similar tension throughout Round 2 so that the raised flower details do not vary significantly from square to square.
Weave in Ends During the Project
Color changes create loose yarn ends. The source recommends weaving them in as you change colors instead of leaving all finishing work until the end. This keeps the project easier to manage and reduces the amount of finishing required once the bag is assembled.
Protect the Square Shape
Work the corner stitches into the chain spaces as specified. Crisp corners make the twelve-square layout easier to assemble and help the finished bag retain its geometric appearance.
Block Before Joining
The source recommends blocking the squares before joining to ensure even size. Since every square is intended to measure 12cm x 12cm, approximately 4.7 inches, consistent dimensions are useful during panel assembly.
Troubleshooting Common Construction Problems
My Squares Are Not the Same Size
Check your tension and compare the rounds of each square. The pattern calls for a 3.0mm hook and a finished individual square size of 12cm x 12cm. Blocking can also help ensure the squares are even before they are joined.
The Bobbles Look Uneven
Review your tension in Round 2. The original tips specifically recommend keeping consistent tension for the bobble stitches so the puffy petals remain even.
The Corners Look Loose
Check that the corner stitches are being worked into the chain spaces as instructed. During assembly, the source also recommends pulling the yarn snugly at corners and securing them with an extra stitch where specified.
The Seams Have Gaps
When whipstitching, secure the beginning with two passes and pull slightly tighter at crossing points. At the bag corners, use the extra stitch described in the assembly instructions and pull snugly to avoid gaps.
The Bag Is Stretching
The construction includes both a grid board and lining fabric specifically as structural elements. The source also recommends adding fabric lining to help prevent stretching. Make sure these components are added according to the assembly instructions.
Care and Cleaning for the Finished Bag
Everyday Care
Regular maintenance can help preserve both the crochet surface and the structured shape. Use a lint roller to remove dust and debris. Empty the bag regularly and gently shake it out so dirt does not settle into the stitches. If loose threads appear, trim them promptly to keep the surface neat and prevent further unraveling.
Washing
Hand wash the bag in lukewarm water using a mild wool detergent to protect the fiber integrity. Do not wring or twist the bag because this can distort the crochet stitches and affect the structured construction.
Instead, gently squeeze out excess water and reshape the bag while it is damp. Allow it to dry flat on a clean towel and keep it away from direct sunlight to help prevent color fading and fiber damage.
Storage
When the bag is not being used, maintain its shape by stuffing it with acid-free tissue paper. Store it in a cool, dry location away from direct sunlight. A breathable cotton storage bag is preferable to plastic because it helps prevent moisture buildup.
Avoid hanging the bag by its straps during storage. The source notes that this can cause stretching and distortion of the structure.
Frequently Asked Questions
How many sunflower granny squares are needed?
The pattern calls for 12 regular sunflower granny squares. The source describes four squares for the front, four for the back, and four for the sides. A solid-colored square is also used for the base.
What size are the individual squares?
Each sunflower granny square measures 12cm x 12cm, approximately 4.7 inches.
What size is the finished bag?
The finished bag measures approximately 14.5cm wide and 15.5cm tall, or about 5.7 x 6.1 inches.
What crochet hook size is recommended?
The source recommends a 3.0mm crochet hook throughout the project.
What yarn is recommended?
The recommended yarn is Loopara 5ply combed cotton, also described in the source as Loopara 5-ply milk cotton.
What colors are used in the original design?
The described sunflower palette uses white for the background, bright yellow for the petals, dark brown for the centers, and green for the leaves.
How long should the drawstring be?
The pattern instructs you to make a chain approximately 70cm long and thread it through the second-to-last row of holes.
How many rounds form the bag opening?
The opening pattern is repeated for 10 rounds total before joining with mattress stitch and weaving in the ends.
How are the handles positioned?
Mark the center points on the front and back, then count 13 stitches on each side and mark those positions. Work single crochet to the marked points, attach the handles while the right side is facing you, and continue with single crochet. Repeat for the other side.
Quick Pattern Reference
For convenient checking while crocheting, the core square sequence is summarized below. This reference does not replace the detailed instructions above; it is intended to help you quickly locate the required round.
- R1: Magic ring, ch 3, 15 dc, sl st.
- R2: Ch 2, 2 dc bobble, ch 1, 3 dc bobble 15 times, ch 1, sl st.
- R3: Change color, ch 1, (sc, ch 4 picot, sc) 16 times, sl st.
- R4: Ch 1, (sc, hdc, 2 dc, ch 2 picot, 2 dc, hdc, sc), ch 1, sl st, repeated 16 times.
- R5: Change color, ch 5, dc into one loop of bobble stitch from R2, ch 2, repeated 15 times, sl st.
- R6: Ch 1, specified sc increase and picot sequence, repeated 4 times, sl st.
- R7: Ch 1, corner sequence with 5 dc, ch 2, 5 dc, repeated 4 times, sl st.
- R8: Corner shaping with dc2tog, 3 dc increases, and dc3tog, repeated 4 times, sl st.
- R9: Change color and work the detailed tr/dc/sc openwork sequence, sl st.
- R10: Ch 1, [13 sc, 3 sc in corner, 10 sc] 4 times, sl st.
- R11: Ch 1, [14 sc, 3 sc in corner, 11 sc] 4 times, sl st.
Final Finishing Checklist
- All 12 regular sunflower squares are complete.
- Each regular square measures 12cm x 12cm, approximately 4.7 inches.
- The panel layout has been checked before joining.
- The panels have been joined using whipstitch.
- The plastic grid has been cut to match the joined panels.
- The panel edges have been worked with single crochet, including 3 single crochet in each corner.
- The lining has been cut with a 1-centimeter seam allowance.
- The lining has been attached using the described backstitch method.
- The bag bottom has been completed through Row 7.
- The bottom and panels have been joined securely.
- The opening pattern has been repeated for 10 rounds.
- The opening has been joined with mattress stitch.
- The approximately 70cm chain has been threaded through the second-to-last row of holes.
- Wooden beads have been secured at both ends of the chain.
- One round of single crochet has been worked around the remaining back loops of the opening.
- The handle positions have been marked using the center points and 13-stitch measurements.
- Both handles have been attached securely.
- All ends have been woven in.
A Cheerful Handmade Bag for Everyday Use
This sunflower granny square bag brings together several satisfying crochet techniques in one compact project. The twelve floral squares provide the decorative centerpiece, while the structured grid, lining, shaped bottom, opening, drawstring, beads, and wooden handles turn those individual motifs into a practical finished accessory.
The project is especially appealing if you enjoy making motifs individually and then watching them become part of a larger construction. The dimensional bobbles and picots give the flowers texture, while the later rounds transform each circular center into a defined square ready for joining.
For the cleanest result, focus on consistency throughout the project. Keep your tension steady, make the twelve squares the same size, weave in ends as you go, and check the layout before beginning the seams. During assembly, take your time with the corners, lining, grid board, and handle placement because these structural details contribute significantly to the final shape.
Once completed, the approximately 14.5cm wide by 15.5cm tall bag offers a charming small accessory with a cheerful sunflower theme. The combination of bright petals, contrasting centers, green details, a crisp background, and natural wooden elements gives the finished piece a warm handmade character.
Whether you make it as an everyday accessory or as a handmade gift, the finished sunflower granny square bag is a project where careful crochet technique and thoughtful assembly come together in one distinctive design.