
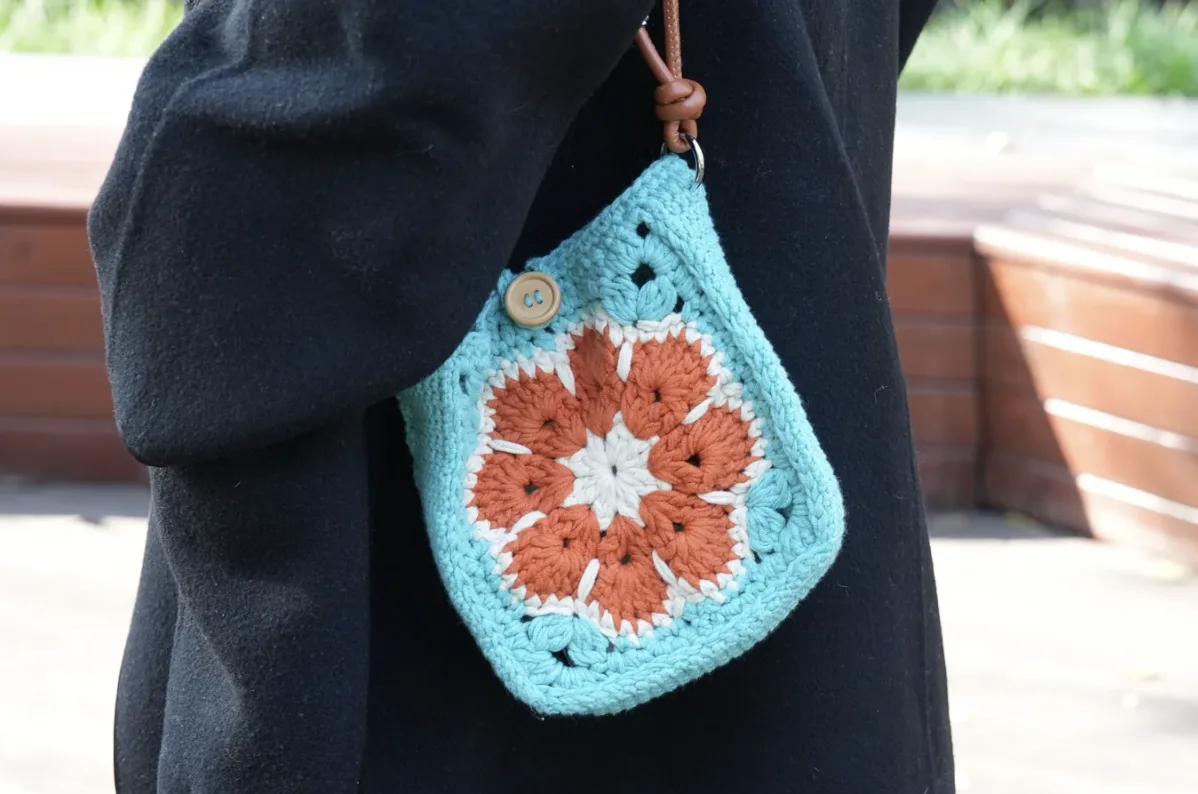

If you are looking for a small crochet project that feels useful, decorative, and satisfying without requiring a complicated construction, this single granny square bag is a wonderful project to try. The design combines two identical African flower granny squares with a crocheted side panel, creating a compact mini bag that is approximately 6 x 6 inches (15 cm) and is suitable for everyday essentials such as a phone, cards, and lipstick.
The finished design has a charming vintage-inspired appearance while still working as a practical modern accessory. The flower motif gives the front and back of the bag plenty of visual interest, while the side panel provides structure and connects the two decorative squares. A button closure completes the construction.
This tutorial follows the original pattern information closely, including the yarn recommendation, hook sizes, stitch abbreviations, six-round flower square construction, side-panel instructions, assembly sequence, and button closure. The flower square is made twice so that the bag has matching front and back panels.
The sample uses turquoise and coral tones for a fresh contrast, but the pattern allows you to choose your own colors. You can use three or four harmonious shades, select a neutral combination, or create a more colorful interpretation while keeping the construction exactly the same.
Project Overview
- Project type: Crochet mini granny square bag
- Motif: African flower granny square
- Number of flower squares: 2 identical squares
- Approximate square size: 6 inches (15 cm)
- Approximate finished bag size: 6 x 6 inches
- Recommended yarn: Loopara 5ply combed cotton / Loopara 5 ply milk cotton yarn
- Hooks: 4.0mm and 3.5mm
- Closure: Button and chain loop
- Construction: Two flower squares joined with a crocheted side panel
The two-square construction is especially approachable because you repeat the same six-round motif twice. Once the first square is complete, the second square follows the same sequence. This gives you an opportunity to become comfortable with the color changes and stitch placement before moving into the joining process.
Materials for the Crochet Bag
- Yarn – Loopara 5ply combed cotton
- Hook – 3.5mm and 4.0mm
- Stitch Marker
- Scissors
- Yarn Needle
- Button
- Binding
The original pattern recommends Loopara 5ply combed cotton, also described in the tutorial as Loopara 5 ply milk cotton yarn. The 4.0mm hook is used for the flower motif squares, while the 3.5mm hook is used for the sides. The smaller hook helps produce slightly tighter stitches for the side construction and contributes to the bag’s structure.
The pattern does not specify a fixed amount of yarn for each color, so no quantity should be assumed. The original guidance suggests having a skein each of the main and contrast colors, with a smaller amount of a third color for the flower centers.
US Crochet Abbreviations
- ch: chain stitch
- dc: double crochet
- sl: slip stitch
- sc: single crochet
- tr: triple/treble crochet
- puff st: puff stitch
- hdc: half double crochet
- sk: skip stitch
- tr puff st: treble puff stitch
Before You Start the Flower Squares
The decorative part of the bag begins with an African flower granny square. You will make 2 identical squares. Each square is built through six rounds, with color changes used to define the flower and surrounding sections.
Because the design relies on repeated groups, stitch counting is important. Keeping your tension consistent also helps the two squares remain the same size. If one square is noticeably tighter or looser than the other, joining the pieces can become more difficult.
The original instructions recommend blocking the granny squares before assembly. Blocking helps the pieces lay flat and makes it easier to match their dimensions when you begin joining them to the side panel.

How to Crochet the African Flower Granny Square
Round 1: Create the Center
Begin with a magic ring. Chain 3, then make 15 double crochet into the ring. Finish the round by making a slip stitch to join in the top of the starting chain-3.
This first round establishes the center of the flower motif. Take care when closing and joining the round so the center remains neat and the stitches are evenly distributed.
Round 1: Begin with a magic ring, chain 3, make 15 double crochet into the ring, slip stitch to join in top of starting chain-3.

Round 2: Add the Next Color
Change color for Round 2. Begin with the specified chain and double crochet group: chain 3, 1 double crochet, chain 1, and 2 double crochet. Skip 1 stitch, then repeat the next group 7 times.
The repeated group is 2 double crochet, chain 1, and 2 double crochet, followed by a skipped stitch. Finish with a slip stitch to the top of the starting chain-3.
Round 2: Change color, [chain 3, 1 double crochet, chain 1, 2 double crochet], skip 1, repeat ([2 double crochet, chain 1, 2 double crochet], skip 1) 7 times, slip stitch to join in top of starting chain-3.
Round 3: Build the Flower Petals

For Round 3, slip stitch to the start. Work chain 3 followed by 6 double crochet. Then repeat 7 double crochet 7 more times. Join with a slip stitch in the top of the starting chain-3.
This is an important visual stage because the repeated double crochet groups begin to create the fuller flower shape. Keep your tension steady so the petal sections remain consistent around the motif.
Round 3: Slip stitch to start, (chain 3, 6 double crochet), repeat (7 double crochet) 7 more times, slip stitch to join in top of starting chain-3.

Round 4: Shape the Outer Section

Change color again for Round 4. Repeat 7 single crochet followed by 1 double crochet, completing this sequence 8 times. Join with a slip stitch to the first single crochet.
The alternating stitch sequence continues shaping the motif and prepares the square for the more decorative puff-stitch work that follows.
Round 4: Change color, repeat (7 single crochet, 1 double crochet) 8 times, slip stitch to join in first single crochet.
Round 5: Add the Treble Puff Details

Change color for Round 5. This round contains several different stitch actions, so it is worth reading the complete repeat before beginning. The repeat is worked 4 times around the motif.
Work 4 single crochet, skip 2, then work the specified decorative group: chain 1, 3-treble puff stitch, chain 3, 3-treble puff stitch, and chain 1. Skip 2, work 4 single crochet, skip 1, make 1 half double crochet, and skip 1. Repeat the entire sequence 4 times.
Round 5: Change color, repeat [4 single crochet, skip 2, (chain 1, 3-treble puff stitch, chain 3, 3-treble puff stitch, chain 1), skip 2, 4 single crochet, skip 1, half double crochet, skip 1] 4 times, slip stitch to join in first single crochet.
The treble puff sections are one of the most recognizable decorative elements in the motif. Work them consistently around the square so that the design remains balanced from one side to the next.
Round 6: Complete the Granny Square

Begin Round 6 with chain 2 and 6 half double crochet. Then work the group of 3 double crochet, chain 2, and 2 half double crochet. Repeat the next sequence 3 times: 13 half double crochet followed by 3 double crochet, chain 2, and 2 half double crochet.
After those repeats, work 7 half double crochet and join with a slip stitch to the top of the starting chain-2. Fasten off and weave in the ends.
Round 6: Chain 2, 6 half double crochet, (3 double crochet, chain 2, 2 half double crochet), repeat [13 half double crochet, (3 double crochet, chain 2, 2 half double crochet)] 3 times, 7 half double crochet, slip stitch to join in top of starting chain-2. Fasten off and weave in ends.
Make a second identical flower square by repeating Rounds 1 through 6 using the same construction.
Flower Square Checkpoint
Before moving on, check both squares side by side. The original instructions emphasize stitch counting, consistent tension, and blocking before assembly. This is the best moment to make sure the two motifs match in size and appearance.
- Confirm that both squares contain all 6 rounds.
- Check that the color changes are consistent with your chosen design.
- Compare the dimensions of the two squares.
- Make sure the motifs lie flat.
- Block the squares before joining if needed.
- Weave in the ends from the completed flower motifs.
How to Crochet the Side Panel
The side panel connects the two flower squares and gives the mini bag its depth. The original instructions use a double-sided single crochet technique and specify eight stitches across the panel. The length is continued until the desired length is reached.
For the side panel, use the 3.5mm hook as recommended for the sides. Avoid pulling the stitches excessively tight because the panel needs enough flexibility to join with the flower squares.

Side Panel Steps 1–5
- Begin with the double-sided single crochet technique, leaving a long tail. Make a standing stitch and create double braid stitches.
- Bring the bottom thread around the hook from the front.
- Pull the hook through both loops.
- Repeat to create eight double braid stitches. Adjust the count for desired width.
- Make one standing stitch to secure.

Side Panel Steps 6–10
- Insert the hook into the back half stitch and braid below. Work one single crochet.
- Repeat for eight single crochet in total.
- Add one chain. Turn your work.
- Pick up back half stitches and braids below. Work single crochet, eight per row.
- Continue until the desired length.


Side Panel Steps 11–13
- Add chain. Turn work.
- Pick up two loops and one braid below, creating three strands total. Work eight single crochet.
- After the final stitch, secure with chain. Fasten off.


The original side-panel tips recommend keeping the stitches flexible rather than overly tight. The turning stitches also deserve attention because they help create the edges of the bag.
Joining the Granny Squares to the Side Panel
Once the two flower squares and side panel are ready, the project moves into assembly. This stage determines how neatly the final bag sits, so take your time aligning the pieces.

- Place stitch markers to mark seaming positions.
- Thread the needle with the main bag color.
- Pick up all stitches from the flower square. Align with the side panel and seam, keeping the tension loose.
- Match stitches as you seam.
- Seam three sides, leaving the top open.
- Repeat the process for the second flower square.
- After the three-sided seaming, work two rounds of single crochet around the opening.

Keeping the seam tension loose is particularly important. A very tight seam can pull the pieces together unevenly, while a relaxed seam allows the decorative squares and side panel to meet naturally.


Finish the Bag Opening

After completing the three-sided seaming, work two rounds of single crochet around the opening. This gives the upper edge a finished crocheted border and prepares the bag for its button closure.
Before attaching the button permanently, the original instructions recommend testing its placement by folding the top closed. This simple check helps ensure that the button and chain loop meet in the intended position.
How to Add the Button Closure

- Sew the button in the center of one side opening.
- Create a chain loop on the opposite side. Secure with slip stitch and weave in the ends.

The original source also includes a second image for this button-loop step. Use the two views as a visual reference when creating the closure.

Assembly Tips for a Neat Finish
- Use removable stitch markers to identify important seaming positions.
- Keep the seam tension loose while joining the flower squares to the side panel.
- Match stitches carefully as you seam.
- Compare both flower squares before assembly so the front and back remain consistent.
- Block the squares before joining to help them lay flat and match in size.
- Block the assembled pieces again after seaming if necessary.
- Test the button position by folding the top closed before sewing the button permanently.
These steps are especially useful for a small bag because even slight differences in alignment can be noticeable on a compact finished project. Taking a little extra time during preparation can make the final assembly much smoother.
Common Project Checkpoints
Checkpoint 1: The Two Flower Squares
Both squares should follow the same six-round construction. If they are not the same size, check your tension before beginning assembly. The original pattern specifically recommends consistent tension across both squares.
Checkpoint 2: The Side Panel Width
The side-panel instructions call for eight double braid stitches at the beginning and eight single crochet stitches across the rows. The foundation count can be adjusted for desired width as stated in the original instructions, while the working rows use eight single crochet.
Checkpoint 3: The Side Panel Length
The panel is continued until the desired length. Since the source does not provide a specific numerical length, do not substitute an invented measurement. Instead, follow the construction and compare the panel against the flower squares during preparation for assembly.
Checkpoint 4: The Bag Opening
After the flower squares have been joined to the side panel, leave the top open and work two rounds of single crochet around the opening. This creates the finished upper edge before the button closure is added.
Color Planning for Your Granny Square Bag
The sample uses turquoise and coral to create a bright flower-inspired contrast. The original tutorial encourages experimenting with color combinations while keeping the construction unchanged. A main color can define the background, a contrasting color can emphasize the flower petals, and a neutral or additional shade can be used as an accent.
Possible color directions include sage green with dusty rose, navy with mustard, or a monochromatic combination using different shades of one favorite color. The important point is that changing colors changes the appearance of the finished bag without requiring changes to the stitch sequence.
If you decide to use different colors, keep track of each color change carefully. The flower square specifically changes color at Rounds 2, 4, and 5. Keeping those transitions consistent on both squares will help the front and back look coordinated.
Care and Cleaning
Daily Care
Give the finished handmade bag gentle everyday care. Brush away dirt or dust after use and avoid overloading the bag. The design is intended for small essentials such as a phone, cards, and lipstick. If a loose thread appears, trim it carefully rather than pulling on it.
Washing
When the bag needs cleaning, hand washing is recommended in the original instructions. Use cool water and a gentle detergent, and soak the bag for about 15 minutes. Do not wring or twist it. Instead, gently squeeze out excess water with a clean towel.
Reshape the bag while it is damp and allow it to air dry flat away from direct sunlight. The source specifically advises avoiding the washing machine and treating the handmade bag gently.
Storage
For storage, lightly stuff the bag with tissue paper to help maintain its shape. Keep it in a cool, dry place away from direct sunlight. Avoid hanging it by the strap for long periods because this can stretch the strap and distort the shape of the bag.
For longer storage, the original care instructions suggest placing the bag inside a cotton bag to protect it from dust while allowing the yarn to breathe.
Troubleshooting Guide
My Two Squares Are Different Sizes
Compare your tension and stitch placement across both motifs. The original pattern recommends maintaining consistent tension and blocking the squares before assembly. Blocking can help the pieces lay flat and match more closely in size.
The Side Panel Feels Too Rigid
Check whether your stitches are being pulled too tightly. The original side-panel instructions specifically advise against overly tight stitches because the panel needs flexibility for joining with the flower squares.
The Seams Look Uneven
Use stitch markers to identify the seaming positions and match the stitches as you work. Keep the seam tension loose rather than pulling the joined pieces tightly together.
The Button Does Not Line Up
Before permanently sewing the button, fold the top closed and test the placement. The button should be positioned in the center of one side opening, with the chain loop created on the opposite side.
Frequently Asked Questions
How many granny squares are needed?
The design uses two identical African flower granny squares, one for the front and one for the back.
What size is the finished bag?
The original description gives an approximate finished size of 6 x 6 inches, with each flower square measuring approximately 6 inches (15 cm).
What crochet hook sizes are used?
The flower motif squares use a 4.0mm hook, while the sides use a 3.5mm hook.
What yarn is recommended?
The recommended yarn is Loopara 5ply combed cotton, also described in the tutorial as Loopara 5 ply milk cotton yarn.
Can I change the colors?
Yes. The original tutorial specifically notes that you can choose the colors you like. The sample uses turquoise and coral, but other coordinated color combinations can be used without changing the technical stitch instructions.
How many rounds are in each flower square?
Each African flower granny square is completed in six rounds.
How many single crochet are worked across the side-panel rows?
The side-panel instructions specify eight single crochet per row.
How many rounds of single crochet finish the bag opening?
After the three-sided seaming is complete, work two rounds of single crochet around the opening.
How is the bag closed?
The closure uses a button sewn in the center of one side opening and a chain loop created on the opposite side. The loop is secured with a slip stitch and the ends are woven in.
Quick Pattern Reference
- Flower squares: Make 2 identical.
- Square size: Approximately 6 inches (15 cm).
- Round 1: Magic ring, ch 3, 15 dc, sl.
- Round 2: Change color; repeated dc groups with ch-1 spaces.
- Round 3: Repeated groups of 7 dc.
- Round 4: Change color; (7 sc, dc) 8 times.
- Round 5: Change color; decorative treble puff stitch repeat 4 times.
- Round 6: Hdc and dc groups with chain-2 sections; fasten off and weave in ends.
- Side panel: Double-sided single crochet technique with eight-stitch working rows.
- Assembly: Seam three sides, leaving the top open.
- Opening: Two rounds of single crochet.
- Closure: Button and chain loop.
Final Finishing Checklist
- Two identical six-round African flower granny squares completed.
- Both squares checked for matching size and tension.
- Square ends woven in.
- Side panel completed with the specified eight-stitch working rows.
- Flower squares aligned with the side panel.
- Three sides seamed with loose, even tension.
- Top opening left open.
- Two rounds of single crochet worked around the opening.
- Button sewn in the center of one side opening.
- Chain loop created on the opposite side.
- Closure tested before final finishing.
- Loose ends secured and woven in.
- Bag reshaped and blocked again after seaming if needed.

Enjoy Your Finished Crochet Granny Square Bag
This crochet single granny square bag brings together several satisfying elements of crochet in one compact project. The African flower motif creates the decorative centerpiece, while the side panel provides the structure needed to transform two flat squares into a useful little bag.
The construction also makes the project approachable because the main decorative component is repeated. Once you understand the six rounds of the first flower square, you can make the second using the same sequence. From there, the project moves into the practical stages of creating the side panel, joining the pieces, finishing the opening, and adding the button closure.
For the cleanest result, focus on consistency rather than speed. Count the repeated groups, maintain even tension, compare the two squares before assembly, and use stitch markers when aligning the seams. These small habits can make a noticeable difference in a compact project where every edge is easy to see.
The finished approximately 6 x 6 inch bag is sized for small essentials and can add a handmade accent to an everyday outfit. Whether you keep the original turquoise-and-coral inspiration or create your own color combination, the same six-round flower construction and assembly method can produce a charming accessory with a distinctly handmade character.
Once the final ends are woven in and the button closure has been tested, your African flower granny square bag is ready to use. Treat it gently, wash it by hand when necessary, reshape it while damp, and store it carefully so the crochet structure stays in good condition.
Most importantly, enjoy the process. This project is small enough to complete as a focused crochet session while still giving you practice with color changes, repeated stitch groups, textured puff stitches, structured side construction, seaming, and finishing details.