
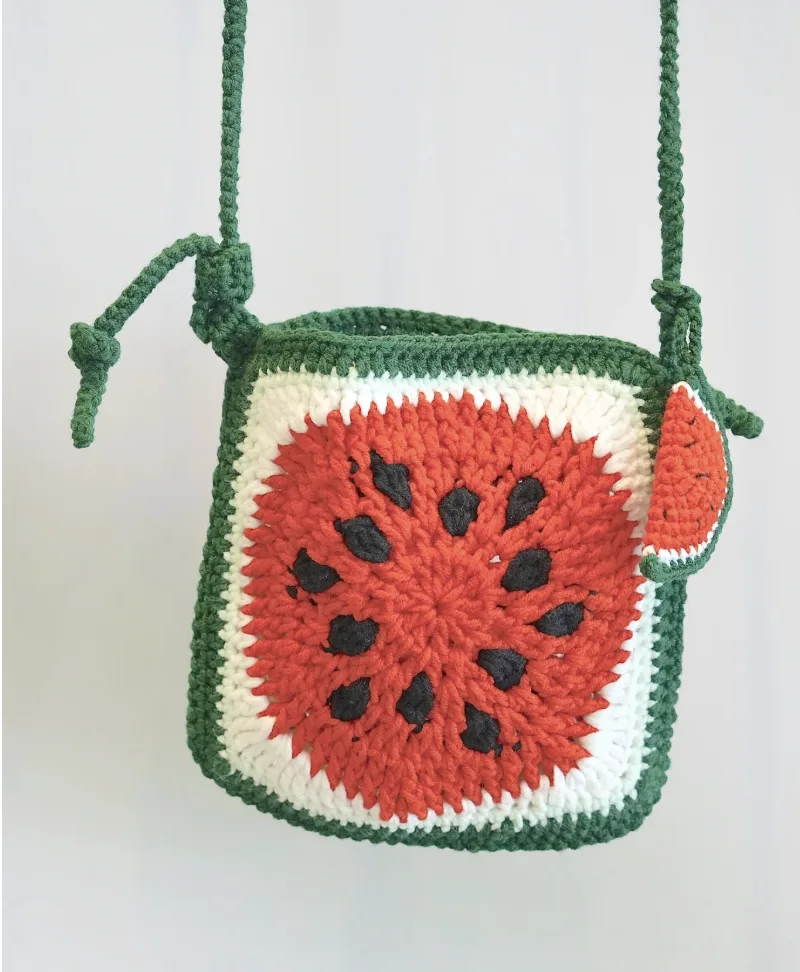

If you love small crochet accessories with a playful handmade character, this Watermelon Granny Square Mini Bag is a delightful project to add to your crochet list. The design combines a traditional granny-square construction with a watermelon-inspired color sequence, black embroidered seeds, a green border, a crocheted strap, and a tiny watermelon pendant.
The finished bag is designed to be compact and colorful. Each granny square measures about 5 inches (13 cm) across, and two squares are used to create the front and back of the bag. Once assembled, the finished bag measures approximately 5 x 5 inches (13 x 13 cm). The original design describes it as a convenient little accessory for carrying small everyday items such as a phone, keys, and lip balm.
This guide keeps the original construction and technical information intact while organizing the project into clear stages. The important part is to treat the two granny squares as matching panels: consistent tension, even chain spaces, and careful color changes will help the finished bag look balanced.
Project Overview
The project is made from several separate crocheted components that are joined at the finishing stage. First, you make two watermelon granny squares. Next, you create the strap and the small watermelon pendant. The two granny squares are then joined on three sides, leaving the top open. A small fabric piece is crocheted and sewn around the opening area, the strap is assembled, and the pendant is attached.
- Granny square panels: Make 2.
- Approximate granny square size: 5 inches (13 cm) across.
- Approximate finished bag size: 5 x 5 inches (13 x 13 cm).
- Strap: Crab Stitch Cord construction.
- Watermelon pendant: Make 1.
- Hook: 2.3mm.
- Yarn: Loopara 4ply combed cotton.
The original color list is Loopara 4ply combed cotton in White 01, Green 07, Green 18, Red 65, and Black 90. The color roles in the design create the watermelon appearance: red forms the fruit center, black creates the seed details, white forms the rind, and the two greens form the outer edging and finishing elements.
Materials You Will Need

- Loopara 4ply combed cotton: White 01, Green 07, Green 18, Red 65, Black 90
- 2.3mm crochet hook
- Scissors
- Yarn needle
- Stitch marker
The pattern recommends the 2.3mm hook. The source notes that a 2mm hook can be considered for looser crocheters, while a 2.5mm hook may suit someone who naturally crochets tightly. The important goal is to maintain the structure of the granny squares so that the two panels remain consistent in size.
US Crochet Abbreviations
The pattern uses standard US crochet terminology. Keep this reference nearby while working through the rounds.
- magic ring: magic ring
- ch: chain
- sc: single crochet
- dc: double crochet
- tr: treble crochet
- hdc: half double crochet
- sl st: slip stitch
- bo: bobble stitch
- FP dc: front post double crochet
- inc: increase
Before You Begin the Granny Squares
Because the bag uses two panels, one of the most useful preparation steps is to focus on consistency. Try to keep your tension as steady as possible from the first round through the dark green border. The source specifically recommends maintaining consistent tension so that the two squares are the same size.
Color changes are another important checkpoint. The design moves from red to black details, back through red, then into white, light green, and dark green. Leaving sufficiently long yarn tails at color changes gives you room to weave the ends in securely later.
The chain spaces also contribute to the shape of the square. Try to keep them relatively even rather than making some spaces noticeably tighter or looser than others. If you are unfamiliar with bobble stitches, practicing the stitch before beginning the main square can make Round 3 easier to manage.
Make the Two Watermelon Granny Squares
You will make two identical watermelon granny square panels. Complete the first square through Round 9, then repeat the entire process to create the second square.
Round 1: Start the Watermelon Center

Round 1: Using red yarn, create a magic ring. Chain 3, chain 1. Work (double crochet, chain 1) 11 times. Slip stitch to the top of the starting chain-3 to join.
At this stage, concentrate on creating a secure magic ring and keeping the center compact. The red center establishes the foundation for the watermelon design.
Round 2: Build the Circular Center

Round 2: Continuing with red, chain 3, chain 1, double crochet in the same stitch. Repeat [(chain 1, double crochet) (chain 1, double crochet, chain 1, double crochet)] 5 times. Chain 1, double crochet, chain 1. Slip stitch to top of starting chain-3.
Round 3: Add the First Black Seed Details

Round 3: With red, chain 3, chain 1. Switch to black, work a bobble stitch, chain 1. Repeat [(Red: chain 1, (double crochet, chain 1, double crochet, chain 1), (chain 1, double crochet, chain 1, double crochet, chain 1) Black: bobble stitch, chain 1)] 5 times. Red: chain 1, (double crochet, chain 1, double crochet, chain 1), double crochet, chain 1. Slip stitch to top of starting chain-3.
Round 3 is a useful place to slow down and check your color placement. The black bobble stitches are integrated into the red section, so careful switching between the two colors helps preserve the visual rhythm of the design.
Round 4: Continue the Seed Pattern

Round 4: Chain 3, chain 1, double crochet, (chain 1, double crochet, chain 1, double crochet), chain 1, double crochet, chain 1. Repeat [(Black: bobble stitch, chain 1, Red: chain 1, double crochet, chain 1, (double crochet, chain 1, double crochet, chain 1), (double crochet, chain 1, double crochet, chain 1), double crochet, chain 1)] 5 times. Black: bobble stitch, chain 1. Red: chain 1, double crochet, chain 1. Slip stitch to top of starting chain-3.
Round 5: Expand the Red Section

Round 5: Red: chain 3, chain 1, double crochet. Repeat [(chain 1, double crochet, chain 1, double crochet, (chain 1, double crochet, chain 1, double crochet))] 13 times. Chain 1, double crochet, chain 1, double crochet, chain 1. Slip stitch to top of starting chain-3.
Round 6: Create the Textured Transition

Round 6: Chain 3, chain 1. Repeat [(front post double crochet, chain 1) 6 times, (front post double crochet, chain 1, front post double crochet, chain 1)] 8 times. Slip stitch to top of starting chain-3.
This round is a good checkpoint before the color changes that form the outer watermelon rind. Make sure the front post double crochet stitches are worked consistently so the textured transition remains even around the square.
Round 7: Add the White Rind

Round 7: Switch to white. Chain 3, double crochet increase, treble increase, (3 treble crochets), treble increase, double crochet increase, double crochet, half double crochet, half double crochet, [(5 single crochets, half double crochet, half double crochet, double crochet, double crochet increase, treble increase, (3 treble crochets), treble increase, double crochet increase, double crochet, half double crochet, half double crochet)] 3 times, 5 single crochets, half double crochet, half double crochet, double crochet, slip stitch to top of chain-3.
Round 7 changes the visual character of the square. The white yarn separates the juicy red center from the green outer edge. Work carefully through the different stitch heights, particularly the treble crochet and increases.
Round 8: Work the Light Green Border

Round 8: Change to light green. Chain 1, 6 single crochet, 3 single crochet in next stitch. Repeat (21 single crochet, 3 single crochet in next stitch) 3 times. Work 16 single crochet. Slip stitch to first single crochet.
Round 9: Finish the Dark Green Edge

Round 9: Switch to dark green. Chain 2, 8 half double crochet, 3 half double crochet in next stitch. Repeat (23 half double crochet, 3 half double crochet in next stitch) 3 times. Work 17 half double crochet. Slip stitch to top of starting chain-2.
Fasten off and weave in all ends.
Repeat Rounds 1 through 9 to make the second watermelon granny square. Compare the two finished panels before assembly. They should be as close as possible in size and tension so the sides align naturally when joined.
Make the Crab Stitch Cord Strap

The strap is worked as a simple Crab Stitch Cord. Leave a long tail before beginning. Chain 2, single crochet in the 2nd chain from the hook, and turn.
Repeat [single crochet in left 2 strands, turn] to the desired length. Chain 1, fasten off, and weave in the ends.

Because the original instructions specify working to the desired length rather than giving a fixed number of chains or rows, keep the strap length consistent with the way you plan to position it during assembly. The important instruction is to leave the long tail and secure the finished ends properly.
Make the Watermelon Pendant
The small pendant is a separate decorative watermelon element. Make 1. It uses the same general watermelon color story and adds a playful finishing detail to the completed bag.
Pendant Round 1

Round 1: Create a magic ring. Chain 1, work 7 single crochet into the ring. Slip stitch to join, chain 1.
Pendant Rounds 2 Through 6
Round 2: Increase in each stitch around, making 7 increases. Slip stitch to join, chain 1.
Round 3: (Single crochet in one stitch, increase in the next stitch) Repeat this sequence 7 times. Slip stitch to join, chain 1.
Round 4: Repeat (Single crochet, increase, single crochet) 7 times. Slip stitch to join, chain 1.
Round 5: Repeat (3 single crochets, increase) 7 times. Slip stitch to join, chain 1.
Round 6: Repeat (2 single crochets, increase, 2 single crochets) 7 times. Slip stitch to join, fasten off.

Pendant Round 7: White Border

Round 7: Switch to white yarn. Chain 1, repeat (5 single crochets, increase) 7 times. Slip stitch to join, fasten off.
Pendant Round 8: Embroider the Seeds

Round 8: Using a single strand of black yarn, embroider watermelon seeds onto the red portion of the pendant.
The source recommends small, evenly spaced stitches for the seed embroidery. Keeping the stitches visually balanced helps the pendant maintain the recognizable watermelon appearance.
Pendant Round 9: Green Edge and Stuffing

Round 9: Using green yarn folded in half for thickness, chain 1. Work an increase, then 22 single crochet, then another increase. Slip stitch to join, fasten off. Weave in ends.
Stuff with poly-fil halfway through this round for a plump appearance. Add the stuffing gradually so it distributes evenly rather than creating one overly full area.
Pendant Round 10: Create the Hanging Loop

Round 10: Chain 30, slip stitch to join, fasten off. Weave in ends.
Join the Two Granny Square Panels
Once both watermelon squares are complete, the next stage is turning the flat panels into a bag. The original construction uses a slip stitch join. Before joining, mark the joining positions with stitch markers.

Step 1: Use slip stitch join. Mark joining positions with stitch markers.
Step 2: Insert the hook through all loops of one side, slip stitch. Keep tension loose to maintain shape.

Step 3: Insert the hook through all loops of the other side, slip stitch.

Step 4: Continue joining, matching stitches.

Step 5: Join three sides, leaving top open.

Step 6: After joining, single crochet around the bag opening for reinforcement.

Create and Sew the Fabric Piece
The next small crocheted section works with the opening and is sewn into place. Keep the original row count exactly as written.
Step 1: On one side of opening, single crochet into gaps of first 3 rows.

Step 2: Work 3 single crochets, chain 1, turn. Repeat for 6 rows.

Step 3: Leave long tail, fasten off.
Step 4: Sew flap, reinforcing with a second pass. Knot and weave in ends on inside.

Build the Strap Attachment
A second small crocheted piece is used to organize the strap area.
Step 1: Work chain 4, 3 single crochets in 2nd chain from hook, chain 1, turn. Repeat for 8 rows. Leave long tail, fasten off.

Step 2: Thread strap through Fabric piece, fold. Wrap the strap fabric piece around the two straps, sew, weave in ends.

Step 3: Knot one strap end.

Step 4: Sew other end to bag exterior, reinforcing with multiple stitches.

Attach the Watermelon Pendant
The final decorative step is simple: hang the crocheted watermelon pendant on the bag. Its chain-30 loop makes it possible to attach the pendant as a small hanging accessory.

Step 5: Hang the crocheted watermelon pendant on the bag, and the whole watermelon bag is finished!
Important Construction Checkpoints
Before considering the project complete, take a moment to inspect the major construction points. The two granny squares should have matching dimensions. The three joined sides should remain flexible rather than being pulled too tightly. The top opening should remain clearly defined, and the reinforcement around that opening should not distort the square shape.
- Make exactly 2 watermelon granny squares.
- Keep the granny squares approximately 5 inches (13 cm) across.
- Use the specified 2.3mm hook for the main pattern.
- Keep the color sequence and color changes in their original positions.
- Complete all 9 rounds of each granny square.
- Use a loose tension when slip-stitch joining the panels.
- Join three sides and leave the top open.
- Reinforce the bag opening with single crochet.
- Make the fabric piece for 6 rows as specified.
- Make the separate strap attachment piece for 8 rows.
- Make 1 watermelon pendant.
- Stuff the pendant with poly-fil halfway through Round 9.
- Finish the pendant with chain 30 in Round 10.
Troubleshooting and Finishing Advice
If the Two Squares Are Different Sizes
The source emphasizes consistent tension. If one square is noticeably larger or smaller, compare your stitch tension and chain spaces before proceeding with assembly. Matching panels make the joining stage much easier and help the finished bag retain its intended 5 x 5 inch (13 x 13 cm) approximate dimensions.
If the Color Changes Look Untidy
Leave long tails whenever changing colors. This gives you enough yarn to weave the ends in securely after completing the square. The watermelon design depends on clear transitions between red, black, white, light green, and dark green, so neat finishing helps preserve the visual separation of each section.
If the Joining Feels Too Tight
The original joining instructions specifically say to keep the tension loose to maintain the shape. A tight slip stitch seam can pull the sides inward, so avoid deliberately tightening every joining stitch.
If the Pendant Looks Too Flat
The pattern instructs you to stuff with poly-fil halfway through Round 9. Add the stuffing gradually for an even distribution rather than concentrating it in one location.
Care and Cleaning
After using the finished bag, gently remove surface debris with a soft, dry cloth. Allow it to air out in a well-ventilated area before storing. Regularly inspect the bag for loose threads and trim them carefully with small scissors when necessary.
For minor soiling, spot clean with a damp cloth and mild, pH-neutral soap. For more thorough cleaning, hand wash in cool water with a gentle detergent suitable for delicate fabrics. Gently agitate the bag, then rinse thoroughly with cool water until the soap residue is removed.
Do not wring or twist the bag because this can distort the crochet work. Instead, gently press out excess water and reshape the bag while damp. Air dry it flat on a clean, absorbent towel, away from direct sunlight or heat sources.

Storage Tips
Make sure the bag is completely dry before storing it. To help preserve its form, lightly stuff it with acid-free tissue paper. Keep it in a cool, dry environment away from direct sunlight, which can contribute to color fading.
If you have a dust bag, it can be used for protection. A cotton pillowcase is another option for shielding the crochet from dust and potential snags. Avoid long-term hanging storage because the strap can stretch and the bag may become distorted. Instead, store the finished piece flat or standing upright in a clean, spacious area.
Quick Reference for the Finished Project
- Project: Watermelon Granny Square Mini Bag
- Granny squares: Make 2
- Square size: About 5 inches (13 cm) across
- Finished bag: Approximately 5 x 5 inches (13 x 13 cm)
- Yarn: Loopara 4ply combed cotton
- Colors: White 01, Green 07, Green 18, Red 65, Black 90
- Hook: 2.3mm
- Main square: 9 rounds
- Strap: Crab Stitch Cord
- Pendant: Make 1
- Pendant: 10 rounds
- Pendant stuffing: Poly-fil halfway through Round 9
- Pendant hanging loop: Chain 30 in Round 10
- Bag assembly: Slip stitch join on three sides
- Bag opening: Reinforced with single crochet
Frequently Asked Questions
How many granny squares are needed?
The pattern requires 2 watermelon granny squares, one for the front and one for the back of the mini bag.
What size is each granny square?
Each granny square measures about 5 inches (13 cm) across.
What is the finished size of the bag?
The assembled mini bag is approximately 5 x 5 inches (13 x 13 cm).
What crochet hook size does the pattern use?
The specified hook is 2.3mm.
What yarn is used?
The pattern uses Loopara 4ply combed cotton in White 01, Green 07, Green 18, Red 65, and Black 90.
How many watermelon pendants should I make?
Make 1 watermelon pendant. It is attached to the finished bag as a decorative element.
When is the pendant stuffed?
Poly-fil is added halfway through Round 9 of the pendant.
How many chains make the pendant loop?
Round 10 uses chain 30 to create the hanging loop.
How are the two bag panels joined?
The original pattern uses a slip stitch join. The panels are joined on three sides, leaving the top open.
How can the granny squares stay neat during assembly?
Keep the joining tension loose and match the stitches carefully. Consistent tension throughout the granny squares is also important so the panels have matching dimensions.
Final Thoughts
This Watermelon Granny Square Mini Bag brings together several useful crochet techniques in one compact project: working in rounds, changing colors, using bobble stitches, creating front post double crochet texture, shaping with different stitch heights, crocheting a cord strap, embroidering small details, stuffing a small crocheted piece, and sewing components together.
The project is especially satisfying because the watermelon image develops gradually. The red center establishes the fruit, black bobble details introduce the seeds, the white round creates the rind transition, and the two green rounds complete the outer edge. Once the two panels are joined, the separate strap and pendant turn the squares into a recognizable miniature bag.
For the cleanest result, focus less on rushing through the rounds and more on maintaining consistent tension, preserving the specified stitch sequence, keeping color changes organized, and securing every yarn end properly. These details make a noticeable difference in the finished appearance.
When the assembly is complete, the result is a compact 5 x 5 inch (13 x 13 cm) crochet accessory with a playful watermelon theme and a matching hanging pendant. It is a small project, but it offers plenty of opportunities to practice precision and finishing skills while creating something practical and decorative.