
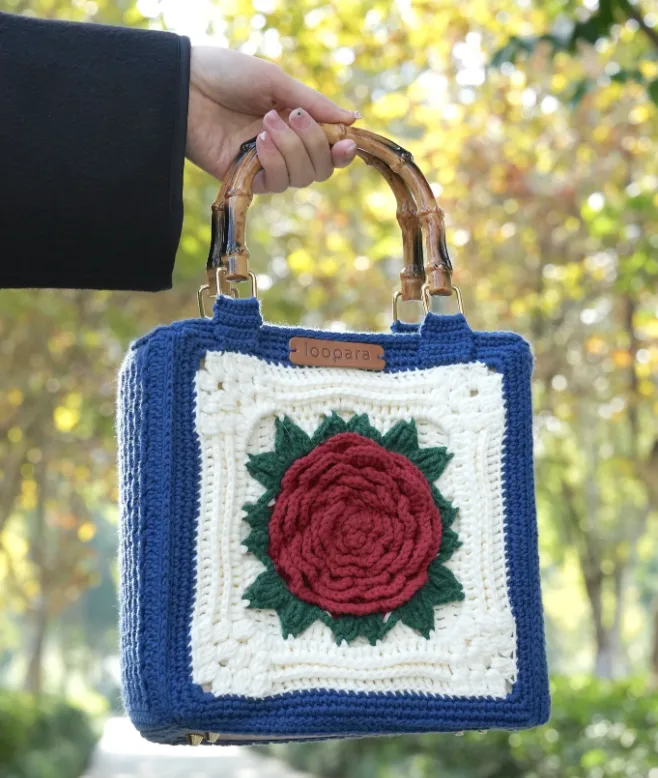

If you love crochet projects that combine decorative detail with everyday usefulness, this Rose Granny Square Hand Bag is a beautiful project to add to your collection. The design brings together a rich crimson red rose, emerald green leaves, a crisp white granny square background, and a royal blue border. A natural bamboo handle completes the look and adds an elegant finishing detail.
The finished handbag is designed to be both decorative and practical. It measures approximately 8.6 x 8.6 x 3.5 inches (22 x 22 x 9 cm), giving you a useful amount of room for daily essentials without making the project unnecessarily bulky.
This tutorial follows the original pattern closely, from the individual flower and leaves to the granny square, side panels, bag bottom, clasps, lining, grid board, zipper, seams, and straps. The construction includes several different crochet techniques, but the work becomes much easier when each component is completed separately and checked before assembly.
What Makes This Crochet Handbag Special?
The main visual feature is the rose-centered granny square. Instead of using a conventional plain granny square, this design builds a layered flower through alternating front-loop and back-loop work, chain spaces, and progressively larger petal groups. The result is a dimensional rose that stands out against the surrounding square.
The floral motif is supported by separate crocheted leaves, while the white background provides strong contrast. The royal blue border frames the square and gives the finished handbag a modern edge. Behind the decorative crochet, the construction uses grid panels and lining to create a more structured bag.
The pattern calls for two identical squares measuring approximately 8.6 x 8.6 inches, one for the front and one for the back. In addition, the finished bag requires a bottom and two side panels.
Materials and Tools
Gather all of the materials before beginning. Having the support materials ready is particularly helpful because this handbag involves both crochet and assembly work.
- Loopara 5ply combed cotton yarn: Green 10, Red 26, Blue 45, White 61
- 3.0mm crochet hook
- Scissors
- Stitch marker
- Yarn needle
- Bag bottom
- Grid panels
- Lining
- Positioning clip
- U-shaped bamboo bag handles
- Zipper
Yarn and Hook Choice
The original project uses Loopara 5 ply milk cotton yarn. Its smooth texture and stitch definition are suited to the detailed rose petals as well as the structured granny square background.
The specified colors are crimson red for the rose, emerald green for the leaves, pure white for the granny square background, and royal blue for the border. The pattern uses a 3.0mm hook throughout the project to produce a firm fabric suitable for a bag.
The source notes that crocheters who naturally work tightly may prefer a 3.5mm hook, while loose crocheters may consider a 2.75mm hook. The important point is achieving a firm fabric while maintaining consistent tension so the pieces match correctly.
US Crochet Abbreviations
- ch – chain
- sc – single crochet
- dc – double crochet
- hdc – half double crochet
- tr – treble crochet
- dtr – double treble crochet
- sl – slip stitch
- fpdc – front post double crochet
- bpdc – back post double crochet
- bo – bobble stitch
- picot – picot stitch
- FLO – front loops only
- BLO – back loops only
- inc – increase
- st – stitch
- sp – space
Begin With the Rose Flower
The flower is made once and forms the central decorative element of the granny square. The first fifteen rounds build the rose through alternating rounds that create the layered petal effect.

Round 1
Create a magic ring. Work 6 single crochet into the ring, slip stitch to join. Chain 1.
Round 2
Working in front loops only, repeat [single crochet, (4 double crochet)] 3 times. Slip stitch to join. Chain 1.
Round 3
Working in back loops only, repeat (single crochet, chain 3) 5 times. Slip stitch to join. Chain 1.

Round 4
Repeat (single crochet, half double crochet, 2 double crochet, half double crochet) 5 times. Slip stitch between first half double crochet and double crochet. Chain 1.
Round 5
Repeat (single crochet, chain 4) 6 times. Add one group between double crochet and half double crochet on left side of third petal. Slip stitch to join, chain 1.
Round 6
Repeat (single crochet, half double crochet, 3 double crochet, half double crochet) 6 times. Slip stitch to join. Chain 1.

Rounds 7–10
Round 7: Repeat (single crochet, chain 4) 7 times. Slip stitch to join. Chain 1.
Round 8: Repeat (single crochet, half double crochet, 4 double crochet, half double crochet) 7 times. Slip stitch to join. Chain 1.
Round 9: Repeat (single crochet, chain 5) 8 times. Slip stitch to join. Chain 1.
Round 10: Repeat (single crochet, half double crochet, 5 double crochet, half double crochet) 8 times. Slip stitch to join. Chain 1.

Rounds 11–15
Round 11: Repeat (single crochet, chain 6) 8 times. Slip stitch to join. Chain 1.
Round 12: Repeat (single crochet, half double crochet, 6 double crochet, half double crochet) 8 times. Slip stitch to join. Chain 1.
Round 13: Repeat (single crochet, chain 6) 8 times. Slip stitch to join.
Round 14: Repeat (single crochet, half double crochet, 7 double crochet, half double crochet) 8 times. Slip stitch to join. Chain 1.
Round 15: Repeat (single crochet, chain 7) 8 times. Slip stitch to join. Fasten off and weave in ends securely.

Keep your tension consistent while making the flower. The front-loop and back-loop rounds are especially important for maintaining the layered petal effect. The chain spaces help create the natural opening of the rose, so they should remain loose enough to preserve the flower’s shape.
Make the Crocheted Leaves

The leaves add the emerald green botanical detail around the rose. Follow the complete repeat carefully because the leaf structure uses several taller stitches together with picots and chain spaces.
Repeat [(chain 2, double crochet, treble, double treble, picot, treble, double crochet, chain 2, slip stitch) twice, (chain 4, double crochet, treble, picot, chain 3, slip stitch, chain 3, treble, picot, double crochet, chain 4, slip stitch in next stitch)] 4 times.
Fasten off and weave in ends.

Build the Granny Square
The granny square is where the rose and leaf elements become part of the structured bag panel. The square uses bobble stitches and back post double crochet to create a textured background before the royal blue border is added.

Round 1
Chain 1, then work (single crochet, chain 1, 3 treble crochet, chain 1, single crochet, chain 4, single crochet, chain 1, 3 treble crochet, chain 1, single crochet, chain 7) 4 times around. Slip stitch to join, fasten off, and weave in ends.
Round 2
Chain 2, work [(2 double crochet, chain 1, bobble stitch, chain 3, bobble stitch, chain 1, 2 double crochet), 17 double crochet] 4 times around. Work 2 slip stitches, chain 2.

Round 3
Work [(Chain 1, bobble stitch, chain 1, bobble stitch, chain 3, bobble stitch, chain 1, bobble stitch, chain 1), 21 back post double crochet] 4 times. Slip stitch to join, chain 2.
Round 4
Work [(Chain 1, bobble stitch, chain 1, bobble stitch, chain 1, bobble stitch, chain 3, bobble stitch, chain 1, bobble stitch, chain 1, bobble stitch, chain 1), 21 back post double crochet] 4 times. Slip stitch to join, fasten off, weave in ends.
Rounds 5 and 6: Add the Border

Round 5: Change to border color. Chain 1, work [(5 single crochet), 33 single crochet in back loops only] 4 times. Slip stitch to join, chain 1.
Round 6: Work (2 single crochet, single crochet increase, 35 single crochet) 4 times. Slip stitch to join, fasten off, weave in ends.
Keep your tension consistent, particularly around bobble stitches and chain spaces. When working the back post stitches, align them with the previous rounds for an even texture. The border should be worked slightly looser to help prevent curling.
Construct the Side Panels
Make 2 side panels. These pieces provide the depth that transforms the two square panels into a three-dimensional handbag.

Round 1: Chain 16, work in the second chain from hook, make 15 single crochets, chain 3, turn.
Round 2: Work 14 double crochets, chain 3, turn.
Round 3: Work 1 front post double crochet, then repeat 1 double crochet 7 times, chain 3, turn.
Round 4: Work 1 back post double crochet, then repeat 1 double crochet 7 times, chain 3, turn.
Round 5: Repeat steps 3 and 4 until you have 22 rows of double crochet (end with right side facing).

Round 6: Work single crochets along the side, making 2 single crochets in each chain space (work loosely).
Round 7: Work 15 single crochets along the other side.
Round 8: Continue with single crochets along the side, 2 single crochets in each chain space.
Round 9: Work 15 single crochets along the final side, slip stitch, fasten off.
Prepare the Bag Bottom

Attach stitch markers according to the pattern. Work 3 single crochets in marked holes, 2 single crochets in unmarked holes, slip stitch, chain.
Position with right side determined—the bumpy side will be bottom, facing you.
Work 108 single crochets in back loops only (BLO), slip stitch, fasten off.
Work one round of slip stitches around the bottom holes.
Make the Four Bag Clasps
Make 4 clasps for the strap rings.
Round 1: On strap rings, repeat (8 single crochets, chain, turn) 6 times.
Round 2: Work decrease, 4 single crochets, decrease, slip stitch, leave long tail and fasten off.
Understand the Bag Layout Before Assembly

The layout shows the assembly points for the Rose Granny Square Handbag. The green arrows indicate where the pieces should be joined. The arrangement uses two rose squares alternating with two textured panels to form the front of the bag.
Take time to position the components before permanently joining them. This is especially useful when working with decorative motifs because the orientation of each square affects the finished appearance.
Prepare the Grid Board and Lining

Preparation Step 1
Place grid board under crochet pieces and mark cutting lines.

Preparation Step 2: Cut main body first, then side panels.
Preparation Step 3: Place lining fabric under grid board, mark cutting lines.
Preparation Step 4: Cut lining 1cm outside marked lines.

Attach the Grid Board

Position the crochet piece over the grid board. Use clips to secure the position.

Insert hook through both crochet stitch and grid board, then work single crochets, matching stitches one-to-one. Repeat for side panels.
Attach the Lining

Place the lining fabric on the inside of the bag, fold it along the line, and sew to the last row of single crochets. Ensure a secure and neat finish. Repeat for the side panels.
Connect the Bag Pieces
The main seams are completed with careful stitch matching. Use stitch markers first so the pieces remain correctly positioned while you work.

Step 1: Secure with stitch markers.
Step 2: Follow the seaming direction shown in the image, using mattress stitch seaming.
Step 3: Pick up half stitches on each side, matching stitches one-to-one. Keep working yarn below the hook on your left hand.

Step 4: Keep seaming tension loose to maintain bag shape. Secure with a slip stitch at the end, fasten off, and weave in ends.
Step 5: Use whip stitch for the bottom seam.

Step 6: Pick up all stitches with sewing needle, matching stitches one-to-one. Keep working yarn below the hook on your left hand.
Pull the seam tight enough to be secure. Knot and weave in ends at finish. Bag seaming is complete. Work one round of single crochet around bag opening. Bag construction is complete.
Install the Zipper

Step 1: Chain 43, work 40 double crochets for 4 rows.

Step 2: Connect to bag opening using mattress stitch, sew zipper to top row of connector pieces using whip stitch. Ensure neat, secure attachment on both sides.
Attach the Straps and Bamboo Handles

Position the crocheted strap pieces on the outer edge of the bag opening, aligning the bottom edge with the white section. Thread your needle with the reserved yarn tail and sew securely in place.
The U-shaped bamboo bag handles provide the final structural and decorative detail. Once the straps are securely attached, the handbag has its completed practical form.
Beginner Checkpoints Before You Finish
- Check that the two main granny square panels are identical and approximately 8.6 x 8.6 inches.
- Maintain consistent tension so the matching panels align during assembly.
- Pay close attention to front-loop-only and back-loop-only instructions in the flower.
- Keep chain spaces sufficiently open to preserve the rose’s layered shape.
- Keep the border slightly looser to help prevent curling.
- When working the side panels, alternate the front post and back post double crochet instructions as written.
- Match stitches one-to-one during grid-board attachment and seaming.
- Keep the seaming tension loose enough to maintain the shape of the bag.
- Secure and weave in ends carefully after fastening off.
Care and Cleaning
Because the handbag combines textured crochet, lining, structural materials, and bamboo handles, gentle care is important. After use, remove dust and debris with a soft brush, paying particular attention to the raised rose and leaf details. Check the bamboo handles and seams regularly to ensure they remain secure.
Avoid overloading the bag because excessive weight can affect its shape and place unnecessary stress on the decorative motifs and construction.
Light Cleaning
For light cleaning, spot clean with a white cloth dampened with cool water and mild wool detergent.
Deeper Cleaning
If deeper cleaning is required, hand wash gently in cool water. Do not wring or twist the handbag because this can damage the rose details and distort the granny squares. Press excess water out between clean towels, then reshape the bag while damp. Air dry flat away from direct sunlight to help preserve the colors, particularly the red rose and green leaves.
Storage
Before storing the handbag, make sure it is completely clean and dry. Lightly stuff it with acid-free tissue paper to maintain its shape and prevent creasing. Store it flat or standing upright in a cool, dry location away from direct sunlight.
Do not hang the bag by its bamboo handles during storage because this can place strain on the attachments. A cotton storage bag is recommended instead of plastic so the fibers can breathe.
Common Construction Mistakes to Avoid
The most important part of this project is accuracy rather than speed. The rose contains several rounds with increasing stitch groups and changing chain-space lengths, so it is useful to finish each round carefully before moving forward.
Another important checkpoint is the granny square texture. Bobble stitches and back post double crochet create the decorative surface, so keeping those stitches aligned helps the finished square look clean and even.
During assembly, avoid pulling the seams excessively tight. The source specifically instructs you to keep the seaming tension loose to maintain the bag shape. Stitch matching should also remain one-to-one where instructed.
Finished Rose Granny Square Hand Bag

The completed Rose Granny Square Hand Bag measures roughly 8.6 x 8.6 x 3.5 inches (22 x 22 x 9 cm). Its combination of floral texture, contrasting colors, structured construction, and natural bamboo hardware gives it a distinctive handmade character.
The project can also inspire different color interpretations. The original pattern suggests combinations such as dusty pink with sage green, deep burgundy with forest green, or purple with silver leaves. The border color can also be coordinated with favorite outfits while retaining the same construction.
Final Thoughts
This handbag is a rewarding project because it combines several crochet skills within one finished accessory. The rose introduces layered floral construction, the leaves add botanical texture, the granny square uses bobble stitches and post stitches, and the side panels create the depth required for a practical bag.
The assembly stage then brings the crocheted components together with grid board, lining, mattress stitch, whip stitch, a zipper, strap pieces, and U-shaped bamboo handles. Taking the project one component at a time makes the construction easier to manage and gives you clear opportunities to check your work before moving on.
Most importantly, keep the technical instructions exactly as written while working through the project. Consistent tension, careful stitch placement, accurate matching, and secure finishing will help preserve the intended shape and appearance of this elegant Rose Granny Square Hand Bag.
Once the final seams are secured and the straps are attached, you have a practical handmade accessory that combines vintage-inspired granny square charm with a structured modern handbag design.