
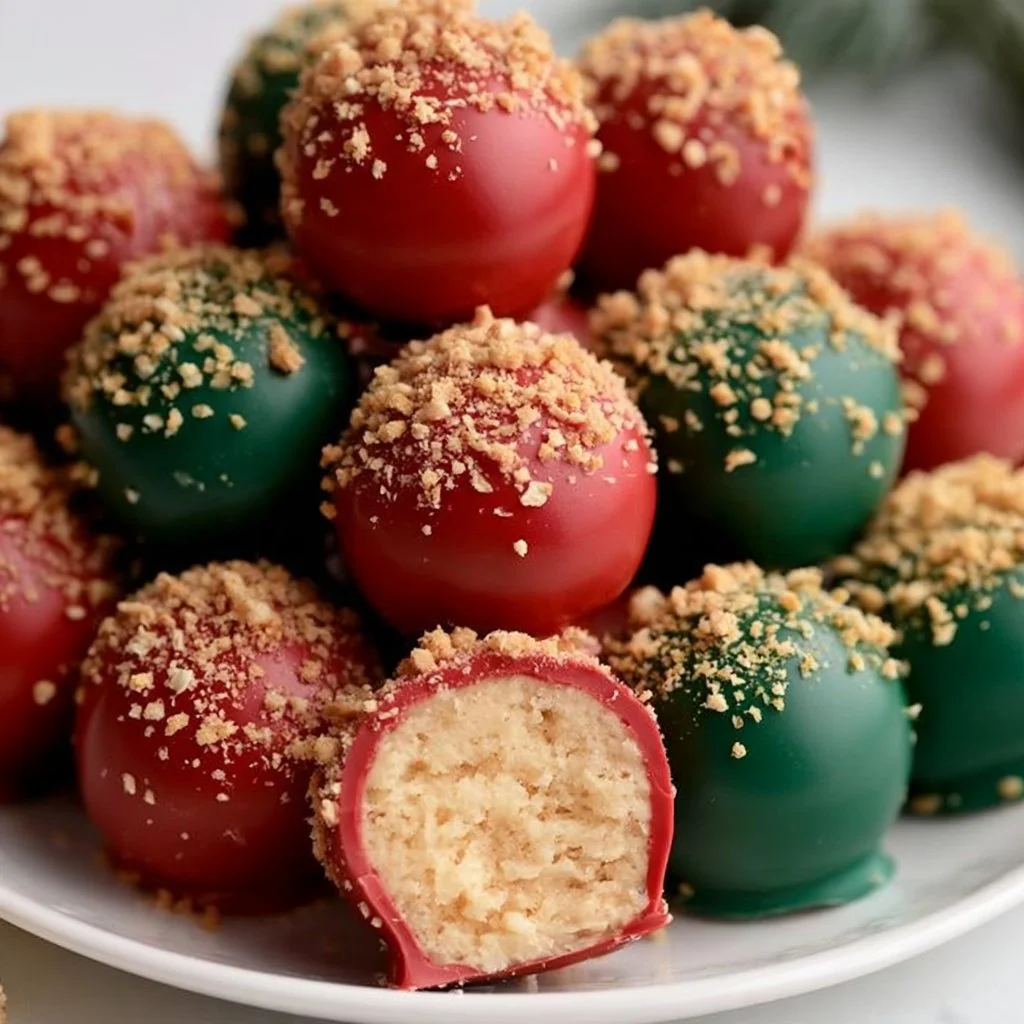
Festive Butterfinger Balls
There’s something wonderfully nostalgic about treats that combine irresistible flavors and playful aesthetics, and Festive Butterfinger Balls are the perfect representation of this delightful category. Imagine an indulgent dessert that melds the sweet and crunchy elements of Butterfinger candy bars with the creamy richness of peanut butter, all beautifully coated in vibrant chocolate. The process of creating these little delights is uncomplicated, making it accessible for cooks of all skill levels, from novice bakers to seasoned culinary enthusiasts. With a preparation time that accommodates even the busiest of schedules, these festive treats can be made quickly, allowing you to focus on the joy of sharing them with friends and family.
The simplicity of the ingredient list is also a key feature of this recipe. It provides a perfect balance of flavors—sweet, salty, creamy, and crunchy—that makes each bite an exciting experience. Each Butterfinger ball is not only a feast for the taste buds but also a visual treat, adorned in cheerful colors that summon the spirit of celebration. Their bright, festive appearance makes them an ideal option for a variety of occasions, whether as an eye-catching addition to a holiday dessert table, as a whimsical offering at a birthday party, or simply as a sweet surprise for an afternoon snack.
Whether you’re an experienced baker looking for a stellar addition to your repertoire or a curious beginner eager to whip up something delicious, Festive Butterfinger Balls guarantee a rewarding baking experience. They are sure to impress guests at any gathering, sparking joy not only from their flavor but also from the nostalgia associated with the classic Butterfinger candy bars. As they garner smiles and compliments, the easy preparation, quick assembly, and delightful flavor profile ensure that they will be a hit at any festivity.
What Makes This Recipe Special
What sets Festive Butterfinger Balls apart from other sweets and chocolate-covered confections is their delightful interplay of textures and flavors. Starting with the foundation of crushed Butterfinger candy bars, which provide a crispy crunch and a distinctive peanut butter flavor, this recipe masterfully combines creaminess from the peanut butter and sweetness from the powdered sugar. The final presentation, vividly colored chocolate coatings, transforms these treats into a beautifully festive offering.
When it comes to preparation, the simplicity of the steps required is another distinguishing feature. Unlike more complex desserts that involve multiple cooking techniques or lengthy baking processes, these Butterfinger Balls require no baking at all. The assembly is straightforward, making them an excellent option for a quick treat or a last-minute dessert for guests. This ease also makes them highly accessible for kids, turning the preparation into a fun family activity.
Additionally, these bites are incredibly versatile regarding flavors. While the recipe focuses on the classic Butterfinger experience, subtle variations in flavor can be introduced by experimenting with different coatings, such as using dark or white chocolate instead of the traditional colored melts. Each variation provides an opportunity to play with flavors and colors, ensuring that the Butterfinger Balls remain fresh and exciting no matter how many times you make them.
Finally, the approachability of the ingredients further enhances the appeal of this recipe. Most of the components can be found in any grocery store, making it easy for home cooks of all backgrounds to gather what they need. This compatibility with everyday ingredients doesn’t dilute the flavor or visual impact of the final product, ensuring that anyone can create a stunning dessert without the need for specialized or hard-to-find items.
Ingredient Overview and Helpful Notes
The star ingredients of this festive treat contribute significantly to the flavor, texture, and aesthetics of the finished product. Each plays a vital role in ensuring that the Butterfinger Balls are not only delicious but also delightful to look at. First and foremost, crushed Butterfinger candy bars provide the sweet, buttery goodness that is synonymous with the candy itself. Their signature combination of milk chocolate and peanut butter flavors creates a robust base that flavors the entire treat.
Peanut butter is another essential ingredient, adding creaminess and richness that pairs beautifully with the crunch of the Butterfinger pieces. When selecting peanut butter for this recipe, it’s advisable to choose a smooth version rather than a chunky one. Smooth peanut butter ensures an even distribution throughout the Butterfinger mixture, providing a consistent texture. Additionally, opting for fresh peanut butter without added sugars can enhance the flavor profile, balancing sweetness with the nutty taste of peanuts.
Powdered sugar serves a dual purpose in this recipe. Not only does it sweeten the mixture, but its fine, powdery texture allows it to blend seamlessly with the peanut butter and crushed Butterfinger. When measuring powdered sugar, it’s essential to sift it before adding it to the mixture to prevent any lumps. The right consistency is key to achieving perfectly formed balls that hold together well.
The colorful chocolate melts used for coating are what truly elevate the Festive Butterfinger Balls. Their vibrant hues not only add visual appeal but also create a sweet, glossy finish that contrasts beautifully with the textured filling. When melting chocolate, it’s important to do so gently, either in a microwave at low power or over a double boiler, to avoid scorching the chocolate. This step calls for cautious monitoring to achieve a smooth, even coating.
In summary, each ingredient in the Festive Butterfinger Balls contributes distinctive qualities that enhance the overall flavor and appearance. The harmonious blend of sweet and salty aromas alongside enticing textures makes this recipe a standout choice for any celebration. Paying attention to ingredient quality and preparation ensures that the Butterfinger Balls are not only visually appealing but also irresistibly delicious.
Nutrition & Recipe Details
When it comes to enjoying delicious treats, understanding the nutritional content can help you make informed choices. The values provided here can serve as general guidelines, but actual nutritional information may vary depending on the specific products used and portion sizes.
| Item | Value |
|---|---|
| Prep time | 15 minutes |
| Cook time | 0 minutes |
| Store time | Up to 1 week |
| Calories | Approx. 150 per ball |
| Protein | 2g |
| Carbohydrates | 20g |
| Fat | 7g |
Understanding these values can help you decide how best to incorporate this sweet treat into your diet, whether you’re indulging during a celebration or looking for a fun bite-sized snack.
How to Make Festive Butterfinger Balls
The preparation of Festive Butterfinger Balls is wonderfully straightforward, perfect for both novice and seasoned cooks. Gathering all the ingredients beforehand and having measuring cups and mixing bowls ready will streamline the process, allowing you to enjoy the experience without unnecessary delays. One of the great things about this recipe is that it requires no baking, enabling a quick turnaround from preparation to presentation.
You will need a large mixing bowl to combine the ingredients, a baking sheet lined with wax paper for setting the chocolate-dipped balls, and a microwave-safe bowl for melting the chocolate. Before getting started, it’s advisable to crush the Butterfinger candy bars into small pieces, ensuring that they blend well with the peanut butter and powdered sugar mixture. It’s also wise to prepare the red and green chocolate melts to have them ready when you finish rolling the balls.
Ingredients
| Ingredient | Quantity |
|---|---|
| Crushed Butterfinger candy bars | 1 ½ cups |
| Peanut butter | 1 cup |
| Powdered sugar | 2 cups |
| Red chocolate melts | 1 cup |
| Green chocolate melts | 1 cup |
Before starting the actual mixing, ensure that your countertop is clean and your tools are ready. Crush the Butterfinger bars using a rolling pin or in a food processor until you achieve a coarse texture, ensuring there are no large chunks. If using jars of peanut butter, make sure to stir it to incorporate the oils back into the mixture before measuring. Having everything prepped in advance will make the process smoother and much more enjoyable.
Step-by-Step Instructions
-
Combine Base Ingredients: In a large mixing bowl, combine the crushed Butterfinger candy bars, peanut butter, and powdered sugar. Use a spatula or your hands to mix until everything is well blended. The mixture should be thick and sticky, allowing you to form it into balls easily. If it’s too crumbly, you can add a bit more peanut butter to achieve the desired consistency.
-
Form the Balls: Once the mixture is combined, take a small amount and roll it into small balls, approximately the size of a tablespoon. Make sure to pack them firmly but gently to keep a uniform shape. Place the formed balls on the prepared baking sheet lined with wax paper, ensuring there’s space between them so they don’t stick together.
-
Chill the Balls: Once all the balls are formed, place the baking sheet in the refrigerator for about 20 minutes. This chilling step is important as it firms up the mixture, making it easier to coat in chocolate later.
-
Melt the Chocolate: While the balls are chilling, prepare to melt the chocolate melts. Divide the red and green chocolate into separate microwave-safe bowls. Microwave each one in 30-second intervals, stirring well in between, until fully melted and smooth. Be cautious to avoid overheating, as chocolate burns easily.
-
Dip the Balls: Remove the chilled balls from the refrigerator. Using a fork, dip half of the balls into the melted red chocolate, allowing any excess to drip off before placing them back onto the wax paper. Repeat the process for the remaining balls with green chocolate. Ensure they are completely coated for a vibrant presentation.
-
Let Them Set: Allow the chocolate-coated balls to set on the wax paper at room temperature. Alternatively, you can speed up the process by placing them in the refrigerator for a few minutes until the chocolate hardens. Pay attention to avoid any condensation forming during this process, as it can make the chocolate lose its shine.
-
Serve: Once the chocolate has set, your festive Butterfinger balls are ready to be served! These treats can be presented on a colorful platter, making them a spectacle at any gathering. Enjoy the smiles as your friends and family indulge in these delightful desserts!
Combining crushed Butterfingers, peanut butter, and powdered sugar in a bowl. Roll into small balls and refrigerate for 20 minutes. Melt the red chocolate and green chocolate melts separately. Dip half the balls into red chocolate and the other half into green. Let them set on wax paper. Serve these festive Butterfinger balls for a holiday treat!
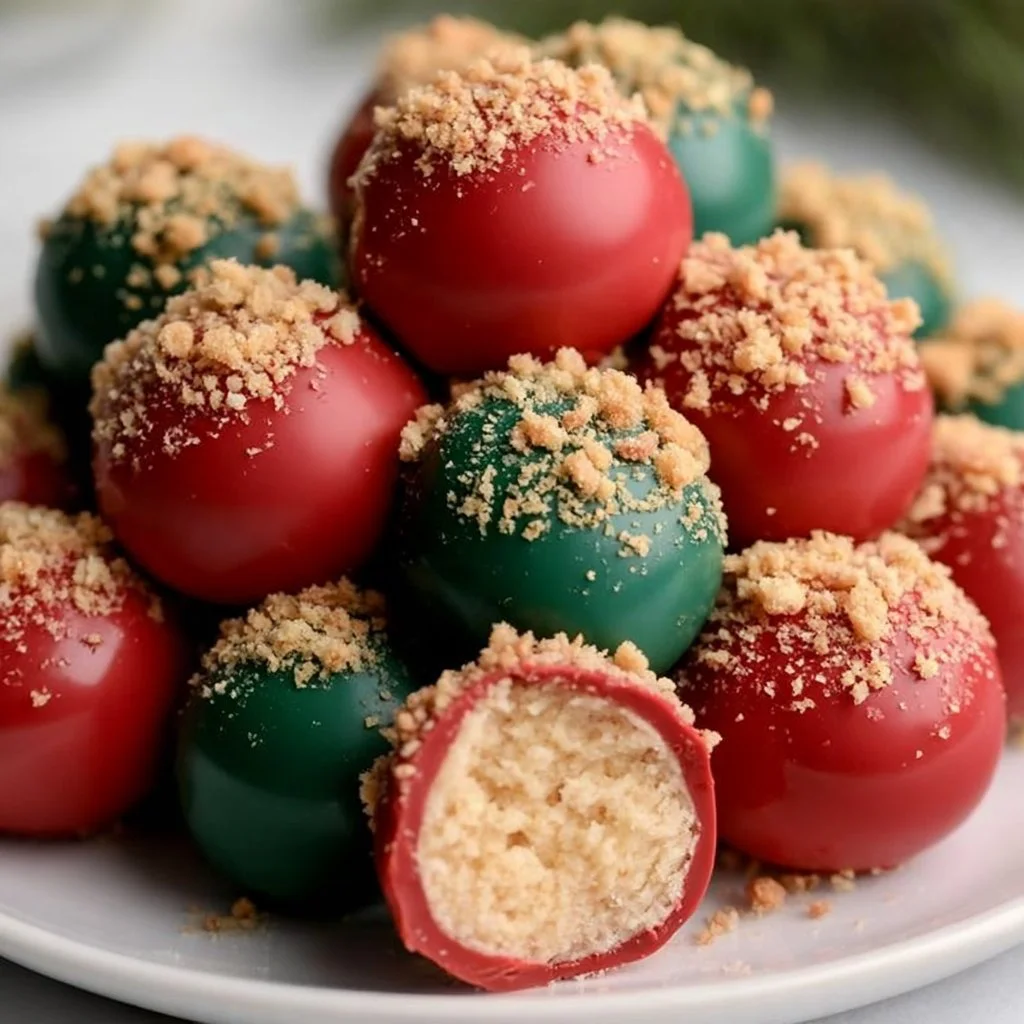
Understanding the Flavor and Texture
The allure of Festive Butterfinger Balls lies in their harmonious blend of flavors and textures that make each bite a delight. With the crispy, crunchy texture of crushed Butterfinger candy mingling alongside the creamy smoothness of peanut butter, the initial bite is both inviting and satisfying. The sweetness from the powdered sugar enhances this sensory experience, creating a wonderfully balanced flavor profile. The colorful chocolate coating adds an additional layer of sweetness, complementing the underlying flavors beautifully.
In terms of appearance, the bright red and green nuggets are instantly recognizable and evoke feelings of celebration and joy. The glossy finish of the chocolate melts adds an appealing sheen, making them irresistible to the eye. The contrast between the colorful exterior and the tan hue of the filling also creates a sense of depth, inviting anyone to take a closer look.
Texture plays an equally critical role in the overall enjoyment of these treats. The combination of the crunchy bits from the Butterfinger and the silky smooth peanut butter offers a pleasing mouthfeel that captures the essence of a perfect sweet treat. The initial crunch gives way to a creamy center, creating an engaging eating experience that keeps you coming back for more. Achieving this ideal balance relies heavily on following the preparation process carefully, ensuring that each element harmonizes perfectly.
Recognizing a successful result is easy with these treats. The balls should be firm enough to hold their shape while still yielding to the pressure of a bite. The chocolate coating should be smooth and shiny, indicating proper melting and cooling. Together, these attributes result in a treat that is not just tasty but also visually impressive and satisfying to eat.
Pro Tips
A few small techniques can make a big difference in ensuring that your Butterfinger Balls turn out perfectly every time. Here are some helpful tips worth considering before, during, and after preparation.
| Tip | Description |
|---|---|
| Use Quality Ingredients | Opting for fresh, high-quality Butterfinger bars and natural peanut butter can significantly enhance the flavor of the finished product. Quality ingredients lead to a more enjoyable taste experience. |
| Temperature is Key | Ensure that your ingredients are at room temperature, especially the peanut butter, as this will help it blend more smoothly with the other components and prevent clumping. |
| Chill Properly | Don’t skip the chilling step! Chilling the balls for the recommended time helps them maintain shape during the chocolate-dipping process and solidifies the candy coating more effectively. |
| Creative Coatings | Experiment with different types of chocolate melts, such as dark chocolate or even flavored varieties, to create unique flavors and fun variations on the classic Butterfinger Ball! |
Additionally, taking the time to clean your utensils and workspace as you go can help prevent any cross-contamination of flavors. Always remember to use dry tools for melting chocolate, as moisture can ruin the texture of melted chocolate, leading to clumping or seizing.
Why You’ll Love This Recipe
Festive Butterfinger Balls are a delightful concoction that brings together textures and flavors in a way that few desserts can match. Their creamy, crunchy, and perfectly sweet nature makes them a crowd-pleaser at any event. What’s more, the straightforward preparation process means that even first-time bakers can confidently dive in without feeling overwhelmed, ensuring that everyone gets a chance to impress their friends and family.
The recipe allows for flexibility with its simple components, making it suitable for different occasions, from family gatherings to holiday celebrations. It embodies the spirit of sharing and joy, becoming an unforgettable addition to any table. Those who might not typically enjoy baking will find this treat accessible, while seasoned cooks will appreciate the simplicity paired with the satisfaction of creating something so visually appealing and tasty.
Another advantage is that you can easily customize this recipe to suit your preferences. You can play around with the chocolate coatings and even add spices or flavor extracts to enhance the filling. This adaptability means that every batch can be a little different, keeping the experience fresh and exciting. These Butterfinger Balls encapsulate the joy of baked treats—simple, fun, and irresistibly delicious.
How to Serve Festive Butterfinger Balls
When it comes to serving these delightful treats, presentation is just as crucial as taste. After you’ve created your colorful Butterfinger Balls, displaying them with flair will elevate their appearance. Arrange them on a festive platter or tiered serving stand to give them the spotlight they deserve. This will not only make them a focal point at your gathering but also encourage guests to dig in and enjoy.
Consider complementing the Butterfinger Balls with a variety of lively garnishes. Edible glitter, chocolate shavings, or sprinkled holiday-themed decorations can add a touch of whimsy and creativity. If desired, you can pair them with small servings of fresh fruit or nuts, providing contrasting flavors and textures that enhance the overall experience.
Serving beverages alongside your Butterfinger Balls can also elevate the occasion. A warm cup of milk, hot chocolate, or even a chilled glass of flavored sparkling water can be delightful companions to help balance out the sweetness of the dessert. Additionally, for adult gatherings, consider offering a selection of warm spice-infused teas or rich coffee for a sophisticated touch.
For larger gatherings such as parties or potlucks, these treats make for easy portioning. You can prepare individual servings by placing the balls in decorative mini cupcake liners, creating a charming visual display that is both inviting and convenient for guests to grab and go.
Be mindful that while you can serve these treats at room temperature, keeping them in a cool area will prevent the chocolate coating from being too soft, allowing for a consistently delightful experience regardless of the setting.
How to Store Festive Butterfinger Balls
Proper storage of your Festive Butterfinger Balls ensures they stay delicious for as long as possible. After allowing them to set completely, it’s essential to cool them down to room temperature if you’ve chilled them initially. Once cooled, they should be transferred to an airtight container. You can separate layers with parchment paper to avoid sticking, which will help maintain their pristine shape and coating.
These treats can be kept at room temperature for up to a few days. However, if you live in a warmer climate, it’s advisable to store them in the refrigerator, where they can last up to one week. Avoid leaving them out in hot conditions for extended periods, as this could lead to the chocolate becoming too soft and losing its appealing texture.
When considering long-term storage, you also have the option of freezing these Butterfinger Balls. Place them in a single layer on a baking sheet and freeze until solid, then transfer them to a freezer-safe container for up to three months. Keep in mind that while they can be frozen, the texture of the chocolate may change slightly upon thawing, though they will still be delicious.
When you’re ready to enjoy your frozen treats, simply remove them from the freezer and let them sit at room temperature for a few minutes before serving. This will allow for the chocolate to soften slightly and regain its original texture, enhancing the overall taste experience.
Tips to Make Festive Butterfinger Balls
To perfect the art of making Festive Butterfinger Balls, here are some practical cooking tips that can improve the consistency and overall quality of the treats.
First, pay careful attention when combining the ingredients. Mixing the Butterfinger, peanut butter, and powdered sugar should be done thoroughly yet gently to avoid overworking the mixture. Overmixing can lead to a denser texture in the balls, diverging from the intended lightness and airiness.
Secondly, when rolling the balls, make sure they are uniform in size. This not only makes them visually appealing but also ensures consistent chocolate coating and flavor distribution. Using a cookie scoop can help achieve this uniformity easily.
Manage your timing wisely during the chilling step. While 20 minutes is generally sufficient, if the mixture still feels too soft for rolling into balls, consider refrigerating for a little longer. This extra chilling will help firm things up and allow for easier handling.
Lastly, maintain the right temperature while melting chocolate. High heat can quickly ruin chocolate by creating a grainy or thick consistency. Instead, use low heat and stir frequently, checking for smoothness continuously to achieve the best dipping consistency.
Taking the time to focus on these aspects will ensure your Festive Butterfinger Balls come out perfect, ready to impress guests, family, and, of course, yourself!
Variations and Substitutions
While the traditional recipe for Festive Butterfinger Balls holds its own fascinating array of flavors and textures, there are numerous ways to personalize and adapt it to cater to individual preferences or dietary needs. Here are several realistic variations and substitutions you can consider while maintaining the integrity of the recipe.
-
Organic Variations: For those conscious about ingredients, consider using organic Butterfinger candy bars and natural peanut butter without added sugars or oils. This choice enhances the overall quality of the treat and maintains the flavor profile while being mindful of ingredient sourcing.
-
Gluten-Free Option: If gluten is a concern, select gluten-free Butterfinger bars and ensure that the powdered sugar is certified gluten-free. These simple swaps make the recipe suitable for guests following gluten-free diets without sacrificing taste.
-
Dairy-Free Alternative: For a dairy-free variation, substitute the traditional Butterfinger bars with dairy-free chocolate bars that provide a similar flavor and texture. Additionally, use a plant-based peanut butter, such as almond or cashew butter, for a nutty alternative that’s just as delicious.
-
Flavored Coatings: Experiment with flavored chocolate melts! For a fun twist, try adding a hint of peppermint extract to the melted chocolate for a seasonal twist, or use white chocolate and add a few drops of food coloring to create a marbled effect. This will not only enhance the flavor but also create a visually stunning treat.
-
Add-Ins: For those looking to experiment further, consider adding finely chopped nuts or crispy rice cereal to the Butterfinger mixture. This will introduce a new texture and flavor to the traditional filling while providing added crunch.
These variations allow you to keep the essence of the original recipe while tailoring it to fit personal preferences, dietary restrictions, or simply for the fun of trying something new.
Storage and Reheating
Proper storage is key to keeping your Butterfinger Balls fresh and tasty. After they have been coated in chocolate and set, you can leave them at room temperature in an airtight container for a limited period. However, if you want to extend their shelf life, refrigeration is the way to go! These festive treats can last up to a week in the fridge.
If you need to store them for longer, consider freezing them. Place them in a single layer on a baking sheet to prevent sticking and freeze until firm. Then transfer them into a freezer-safe container, layered with parchment paper if necessary, and they can last up to three months. To thaw, just take them out and let them sit at room temperature for about 20 minutes before serving.
Reheating these treats is generally not necessary, as they are best enjoyed cold or at room temperature. If you do need to soften them slightly after refrigeration or freezing, a careful reheat in the microwave for just a few seconds can restore their original texture. Be cautious, as overheating can cause chocolate to melt excessively and spoil the appearance or taste.
Always take care to ensure that any leftovers are sealed tightly, as exposure to air can affect their freshness.
Customization Ideas
Customization is one of the best aspects of recipe-making, and your Butterfinger Balls can be tailored to suit your taste and occasion. One popular way to add flair is through toppings. Try sprinkling different types of crushed candies, such as crushed Oreos for a Cookies and Cream vibe or colorful sprinkles for a festive touch. These toppings not only add texture but also enhance the visual appeal.
Another idea is to add a flavor twist to the filling itself. Consider incorporating flavored extracts such as vanilla, almond, or even a hint of sea salt to elevate the taste profile. These small adjustments can dramatically change the overall flavor, making your treats uniquely yours.
When it comes to presentation, how you serve the Butterfinger Balls can make a considerable difference. Consider placing them in decorative boxes tied with ribbons or stacked in mason jars for gift-giving. They can also be displayed on tiered cake stands at parties, transforming an everyday treat into an impressive centerpiece.
Also, if you want a lower-calorie option, consider reducing the size of each ball. Smaller portions allow for easy portion control while still enjoying the rich flavors of the Butterfinger Balls. These tiny bites can provide a satisfying sweet fix without overindulging.
Personalization offers a world of creativity and enhances the enjoyment of the recipe. Feel free to play around with these suggestions to discover your favorite rendition of Festive Butterfinger Balls!
Common Mistakes to Avoid
Making Festive Butterfinger Balls can be a fun and simple process, yet there are a few common pitfalls that you may encounter along the way. Being aware of these mistakes can help you achieve the best results.
-
Incorrect Measurements: Using the wrong proportions of ingredients can affect the texture. Measuring ingredients accurately, particularly the powdered sugar and peanut butter, is essential for consistency. Always level off your measuring cups for precise amounts.
-
Overmixing: While thorough mixing is necessary, overworking the mixture can lead to dense balls that lose their lightness. Combine just until blended; the goal is to achieve a uniform texture without overworking the filling.
-
Skipping the Chilling Time: Chilling the mixture is crucial for holding the shape of the balls when they are dipped in chocolate. Attempting to dip warm balls can lead to shape distortion. Always allow enough time for chilling before proceeding to the chocolate coating.
-
Improper Chocolate Melting: Heating chocolate too quickly or at too high a temperature can ruin the melting process. Use a microwave at low power or a double boiler to keep the temperature controlled, stirring frequently to achieve smoothness.
-
Not Allowing for Proper Setting: It’s tempting to rush the setting phase, but allowing the chocolate to set completely at room temperature or in the fridge is key to achieving a nice finish. Rushing this process can lead to a messy appearance or soft chocolate that doesn’t hold up well.
Avoiding these common mistakes can lead to a more beautiful, decadent, and satisfying experience when making your Festive Butterfinger Balls.
Serving Occasions
The charm of Festive Butterfinger Balls extends beyond their flavor; they also shine in their versatility for various occasions. These treats are particularly well-suited for holiday gatherings, as their colorful chocolate coatings perfectly embody the festive spirit. Whether served at Christmas parties, New Year’s celebrations, or Halloween festivities, they add an element of joy and sweetness that guests will love.
Moreover, they make for a fantastic treat at birthday parties, where the vibrant colors can brighten up any dessert table. Kids and adults alike will enjoy the playful nature of chocolate-coated treats, making them a hit for any celebratory moment.
These balls can also shine during casual gatherings, such as family dinners or game nights. Lightweight and easy to pick up, they offer an excellent treat for those looking for a satisfying bite without the need for plates or utensils. They’re perfect for guests to grab as they mingle or watch the game.
Lastly, these simple yet delightful treats are great to have on hand for everyday snacking. They can be an energizing treat after school, a sweet addition to lunch boxes, or simply a quick pick-me-up for afternoon cravings. Their easy preparation ensures you can whip up a batch whenever the mood strikes, making them a go-to recipe for sweet satisfying bites.
Why Make This Recipe?
Choosing to make Festive Butterfinger Balls offers a multitude of benefits that extend beyond their irresistible taste and delightful textures. First, their simplicity stands out amid a world of complicated recipes. The straightforward process allows even novice cooks to create something impressive without the anxiety of complex baking techniques, making it a perfect gateway to baking.
Furthermore, the adaptability of this treat makes it a powerful addition to any recipe collection. The variations and substitutions mean that it can easily accommodate dietary restrictions or seasonal preferences, ensuring that no one has to miss out on a delicious sweet treat. The ability to customize makes it enjoyable for the cook and the guests alike.
In terms of practicality, these butter balls are not just for special occasions. Their ability to be prepared quickly and stored effectively means you can have a delicious treat available whenever the mood strikes, whether it’s unexpected guests or a cozy movie night at home.
Finally, foregoing store-bought confections in favor of homemade treats is not only more satisfying but can also be healthier when high-quality ingredients are chosen. You control what goes in, creating a sweet delight that aligns with your taste while delivering joy to those who share in the experience. This balance of convenience, versatility, and scrumptious flavor makes Festive Butterfinger Balls a recipe worth keeping in regular rotation.
Make-Ahead Preparation
One of the advantages of preparing Festive Butterfinger Balls is their flexibility for make-ahead preparation. Several steps in the process can be done in advance, making entertaining more manageable and less stressful. For example, you can prepare the mixture a day prior to when you plan to serve them. Simply combine all the filling ingredients, roll them into balls, and refrigerate them until you are ready to dip them in chocolate.
Additionally, the chocolate melts can also be prepared ahead of time. Melt them in advance and store them in separate airtight containers in the fridge; just remember to reheat them gently when it’s time to dip the balls. This way, all your ingredients are ready when you are, allowing for a smooth and quick assembly process on the day of serving.
However, it’s important to note that while the filling can be stored, coating the balls with chocolate should be done closer to the serving time for the best texture and appearance. Coating them too far in advance can lead to a change in texture, especially if the chocolate coating is prone to softening over time. The festive appearance is part of their appeal, and fresh chocolate always looks more appetizing.
By organizing these preparation steps, you can ensure that your Festive Butterfinger Balls not only taste amazing but also look fantastic when it’s time to enjoy them, making your entertaining experience more enjoyable.
Equipment and Kitchen Preparation
Having the right equipment can make all the difference when it comes to preparing Festive Butterfinger Balls effectively and efficiently. Here’s a brief overview of the essential tools you’ll need to have on hand for this delicious endeavor.
First, it is beneficial to have mixing bowls that can accommodate the volume of the filling. A large bowl will make it easier to mix the ingredients without them spilling over the sides as you combine everything together. A spatula or wooden spoon will help mix and fold the ingredients, ensuring the filling is thoroughly combined.
Next, you’ll need a baking sheet lined with wax paper or parchment paper to set the balls before serving. This prevents sticking and makes for easy cleanup afterward. Having an additional baking sheet can also expedite the process if you’re making a larger batch, allowing you to roll and set more balls at once.
When it comes time to melt the chocolate, you can either use a microwave-safe bowl or a double boiler setup to delicately melt the chocolate without burning it. Microwaving chocolate should be done in short bursts to prevent overheating, and stirring is crucial to ensure it melts evenly.
Finally, measuring cups are essential for accurate ingredient preparation. Make sure you have both liquid and dry measuring cups on hand for the different ingredients—this step is vital to maintaining the right balance of flavors in your Butterfinger Balls.
Organizing your workstation ahead of time will save you stress during the cooking process. Ensure all ingredients are measured out, and any tools are ready to use, allowing for a streamlined experience as you create your delightful festive treats.
FAQs
Q1: Can I use other types of chocolate melts?
A: Yes! While the red and green chocolate melts provide a festive touch, you can use any type of chocolate, such as dark, milk, or white chocolate. Each variety will contribute a different flavor profile to your Butterfinger Balls and can be fun to experiment with.
Q2: How long will Festive Butterfinger Balls last?
A: If stored in an airtight container at room temperature, these treats will typically stay fresh for about a week. However, they can be refrigerated for longer freshness or frozen for up to three months.
Q3: Can I make these Butterfinger Balls gluten-free?
A: Absolutely! Use gluten-free Butterfinger bars and ensure that the powdered sugar is also certified gluten-free. This way, everyone can enjoy these delicious treats!
Q4: What if my chocolate doesn’t melt smoothly?
A: If your chocolate becomes clumpy or thick, it may have been overheated. You can try adding a teaspoon of vegetable oil or shortening to help smooth it out. Be sure to melt chocolate in low increments to prevent this from happening.
Q5: Can I add other flavors or ingredients to the filling?
A: Yes! Feel free to experiment by adding crushed nuts, powdered flavored mixes, or extracts like vanilla or almond to customize the flavor of your Butterfinger Balls to your taste.
Q6: How do I know if my mixture is the right consistency?
A: The filling should be thick enough to roll into balls without falling apart. If it feels too sticky or soft, try adding a little more powdered sugar or chilling it for a bit longer before rolling.
Q7: What’s the best way to store them?
A: The best method is to place the Butterfinger Balls in an airtight container. If stacking, use parchment paper between layers to prevent them from sticking together.
Q8: Can children help make these Butterfinger Balls?
A: Absolutely! This recipe is simple enough for children to help with under supervision. Rolling the balls and dipping them in chocolate are fun, hands-on activities that they will love!
Disclaimer
Nutritional information is approximate and may vary based on ingredient brands, substitutions, portion sizes, and preparation methods.
Print
Festive Butterfinger Balls
- Total Time: 35 minutes
- Yield: 24 servings 1x
- Diet: Vegetarian
Description
Delightful, no-bake treats combining the crunchy sweetness of Butterfinger candy with creamy peanut butter, all coated in colorful chocolate melts.
Ingredients
- 1 ½ cups crushed Butterfinger candy bars
- 1 cup smooth peanut butter
- 2 cups powdered sugar
- 1 cup red chocolate melts
- 1 cup green chocolate melts
Instructions
- Combine the crushed Butterfinger, peanut butter, and powdered sugar in a large mixing bowl until well blended.
- Form small balls, about the size of a tablespoon, and place them on a baking sheet lined with wax paper.
- Chill the balls in the refrigerator for about 20 minutes.
- Melt the red and green chocolate melts in separate microwave-safe bowls.
- Dip half of the balls into the red chocolate and the other half into the green. Allow excess chocolate to drip off.
- Let the chocolate-coated balls set at room temperature or in the refrigerator until the chocolate hardens.
- Serve the festive Butterfinger Balls on a decorative platter and enjoy!
Notes
You can use different types of chocolate melts for variation. Feel free to experiment with flavors and colorful coatings.
- Prep Time: 15 minutes
- Cook Time: 0 minutes
- Category: Dessert
- Method: No-Bake
- Cuisine: American
Nutrition
- Serving Size: 1 ball
- Calories: 150
- Sugar: 18g
- Sodium: 90mg
- Fat: 7g
- Saturated Fat: 1.5g
- Unsaturated Fat: 5g
- Trans Fat: 0g
- Carbohydrates: 20g
- Fiber: 1g
- Protein: 3g
- Cholesterol: 0mg