

Halloween Cookies
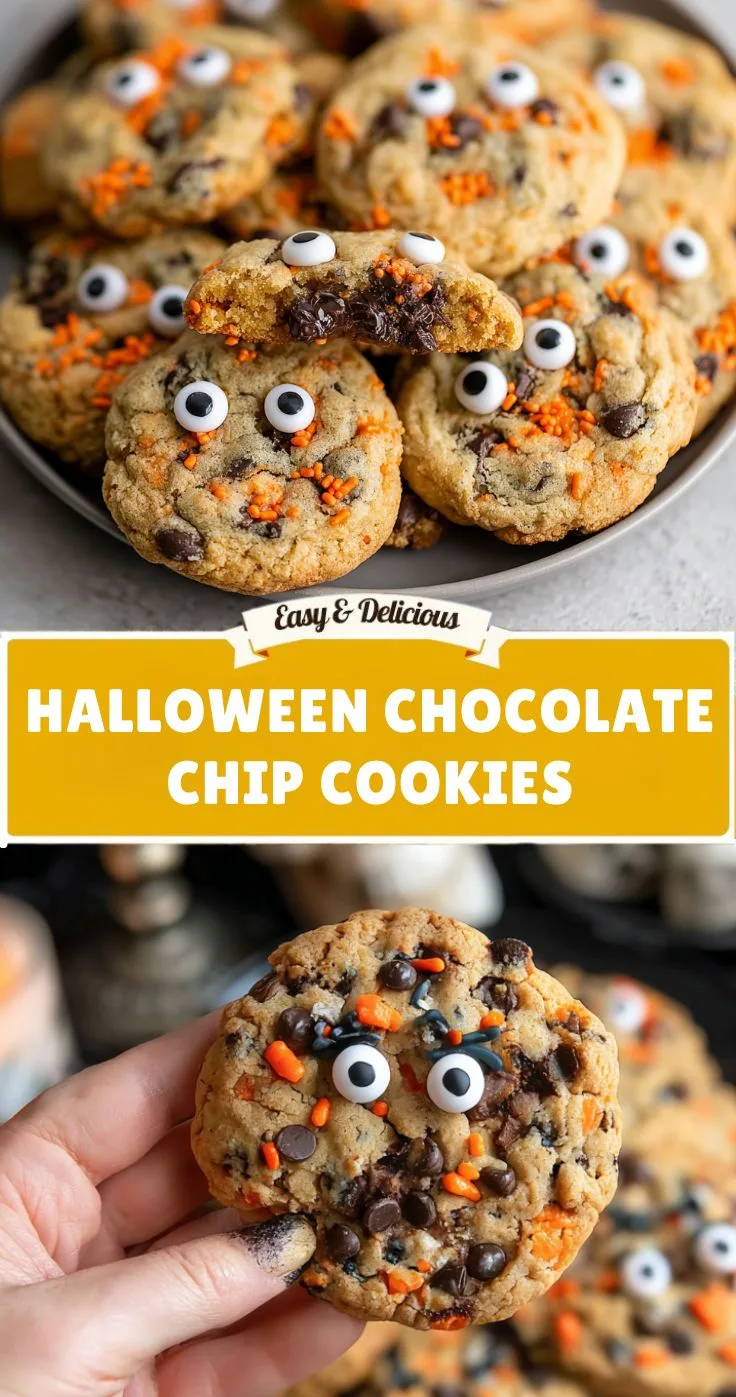
Halloween is the perfect excuse to take a classic favorite and give it a festive makeover. These Halloween Chocolate Chip Cookies combine everything you love about a traditional chocolate chip cookie—soft, chewy centers, golden edges, buttery flavor, and plenty of gooey chocolate—with colorful Halloween candies and spooky decorations.
They are simple enough for a weeknight baking project but festive enough for a Halloween party. With candy eyes, colorful M&Ms, Reese’s pieces, or seasonal sprinkles, each cookie can have its own personality. You can make them cute, spooky, colorful, or a combination of all three.
The cookie dough comes together quickly using basic pantry ingredients. Brown sugar provides a rich, caramel-like sweetness and helps create a chewy texture, while granulated sugar contributes to the golden edges. Semi-sweet chocolate chips add plenty of chocolate in every bite, and Halloween candies make the cookies instantly recognizable as a seasonal treat.
These cookies are especially fun to make with kids because the decorating stage is easy and creative. Everyone can choose their favorite candies and create their own spooky cookie designs.
Whether you are preparing treats for a Halloween gathering, a trick-or-treat party, a family movie night, or simply want something sweet to enjoy on a cozy October evening, these Halloween Chocolate Chip Cookies are an easy recipe to keep in your seasonal baking collection.
Why You’ll Love These Halloween Cookies
Classic Chocolate Chip Cookie Flavor
Even though these cookies are decorated for Halloween, the base is still a classic chocolate chip cookie. The combination of butter, brown sugar, granulated sugar, vanilla, and semi-sweet chocolate creates a familiar flavor that both kids and adults love.
Soft and Chewy Texture
The brown sugar helps give the cookies their soft, chewy centers, while baking until the edges are lightly golden keeps the middle tender.
Quick Preparation
The recipe requires just 15 minutes of preparation and about 12 minutes of baking, making it a convenient option when you need a festive dessert without spending hours in the kitchen.
Easy to Customize
Use M&Ms, candy eyes, Reese’s pieces, or Halloween sprinkles. You can mix and match decorations depending on what you have available.
Perfect for Kids
Children can help mix the dough, add the chocolate chips, and decorate the cookie tops with Halloween candies.
Recipe Details
| Detail | Information |
|---|---|
| Prep Time | 15 minutes |
| Cook Time | 12 minutes |
| Total Time | 27 minutes |
| Difficulty | Easy |
| Best For | Halloween parties, family baking, trick-or-treat gatherings |
| Serving | 1 cookie |
Ingredients
Unsalted Butter
Use 1 cup (2 sticks) of softened unsalted butter.
Softened butter is important because it creams smoothly with the sugars. Allow the butter to soften at room temperature rather than melting it completely.
Brown Sugar
You will need 1 cup of packed brown sugar.
Brown sugar contributes moisture and a rich sweetness while helping create the chewy texture that makes these cookies so satisfying.
Granulated Sugar
Add ½ cup of granulated sugar.
The combination of brown sugar and granulated sugar creates a balanced cookie with soft centers and lightly crisp edges.
Eggs
Use 2 large eggs.
Eggs bind the ingredients together and help create the structure of the cookies.
Vanilla Extract
Add 2 teaspoons of vanilla extract to enhance the buttery and chocolate flavors.
All-Purpose Flour
You will need 2½ cups of all-purpose flour.
Measure the flour carefully. Adding significantly more flour than needed can make the cookies dense and dry.
Baking Soda and Baking Powder
Use 1 teaspoon of baking soda and ½ teaspoon of baking powder.
These ingredients help the cookies rise and spread properly during baking.
Salt
Add ½ teaspoon of salt to balance the sweetness and bring out the chocolate flavor.
Semi-Sweet Chocolate Chips
Use 1½ cups of semi-sweet chocolate chips.
You can distribute them throughout the dough so that nearly every bite contains melted chocolate.
Halloween Candy
Use 1 cup of Halloween-themed candy, such as M&Ms, candy eyes, Reese’s pieces, or festive sprinkles.
For the best presentation, reserve some of the candies for decorating the tops of the cookies.
How to Make Halloween Chocolate Chip Cookies
Step 1: Preheat the Oven
Preheat your oven to 350°F (175°C).
Line two baking sheets with parchment paper.
Parchment helps prevent the cookies from sticking and makes cleanup much easier. It also provides a consistent surface for the cookies to bake on.
Set the prepared baking sheets aside while you make the dough.
Step 2: Cream the Butter and Sugars
Place the softened butter in a large mixing bowl.
Add the brown sugar and granulated sugar.
Beat the mixture until it becomes smooth and fluffy.
This step is important for the texture of the cookies. Properly creaming the butter and sugar helps create a lighter cookie while distributing the sugar evenly throughout the mixture.
If using an electric mixer, scrape down the sides of the bowl as needed so everything combines evenly.
Step 3: Add the Eggs and Vanilla
Add the eggs one at a time, mixing after each addition.
Once the eggs are incorporated, add the vanilla extract.
Mix until the mixture is smooth and evenly combined.
Avoid mixing excessively at this stage. Once everything is incorporated, move on to the dry ingredients.
Step 4: Combine the Dry Ingredients
In a separate bowl, whisk together:
- 2½ cups all-purpose flour
- 1 teaspoon baking soda
- ½ teaspoon baking powder
- ½ teaspoon salt
Whisking helps distribute the leavening agents and salt throughout the flour.
Gradually add the dry mixture to the wet ingredients.
Mix until the ingredients are just combined.
Do not overmix the dough. Once the flour disappears, stop mixing. Overworking the dough can make the finished cookies less tender.
Step 5: Add the Chocolate Chips and Candy
Add the 1½ cups of semi-sweet chocolate chips.
Then add approximately half of your Halloween candy.
Fold everything gently into the dough until the chocolate chips and candies are distributed throughout.
Save some of the Halloween candies for decorating the cookie tops later.
This gives the cookies a more colorful and festive appearance.
Step 6: Scoop and Decorate
Use a cookie scoop or spoon to portion the dough into balls of approximately 2 tablespoons each.
Place the dough balls on the prepared baking sheets, leaving enough space between them for the cookies to spread.
Gently press a few extra chocolate chips or Halloween candies onto the tops.
If you are using candy eyes, you can add some before baking depending on the type of candy. For a cleaner appearance, candy eyes can also be added after baking.
Try not to overload the tops. A few well-placed decorations can look more attractive than covering the entire surface.
Step 7: Bake the Cookies
Place the baking sheets in the preheated oven.
Bake for approximately 10–12 minutes.
The edges should be lightly golden while the centers still look soft.
Do not worry if the centers appear slightly underdone when you first remove the cookies. They will continue cooking from the residual heat of the baking sheet as they cool.
For soft and chewy cookies, avoid baking until the entire surface looks completely firm.
Step 8: Cool and Serve
Once the cookies are out of the oven, let them rest on the baking sheet for about 2 minutes.
This allows them to firm up enough to handle without losing their soft texture.
Then carefully transfer them to a cooling rack.
If you enjoy warm cookies, serve them while the chocolate chips are still slightly melted and gooey.
For Halloween parties, allow them to cool completely before arranging them on a serving platter.
Tips for the Best Halloween Chocolate Chip Cookies
Use Softened Butter
The butter should be soft enough to mix easily but not melted.
Melted butter changes the texture and can cause the cookies to spread differently.
Do Not Overmix
Once you add the flour, mix only until the dough comes together.
Overmixing can develop too much gluten and make the cookies less tender.
Reserve Candy for the Tops
Mixing some candy into the dough gives you colorful pieces throughout the cookies, while reserving some for the tops creates a much more festive appearance.
Watch the Baking Time
The difference between a soft cookie and an overbaked cookie can be only a couple of minutes.
Remove the cookies when the edges are golden and the centers still look soft.
Use Parchment Paper
Parchment makes cleanup easier and helps prevent the cookies from sticking to the baking sheet.
How to Make Them Extra Spooky
The decorating possibilities are almost endless.
Candy Eyeball Cookies
Press candy eyes onto the cookies for a simple monster-inspired design.
For the best appearance, add the candy eyes after baking if the specific candy you are using does not hold up well to oven heat.
Halloween M&M Cookies
Use seasonal orange, black, yellow, or other Halloween-colored candies to create a festive color palette.
Monster Cookies
Add several candy eyes to each cookie. Different sizes and arrangements can make each cookie look like a different little monster.
Reese’s Pieces Cookies
Reese’s pieces add both color and a peanut-butter flavor that pairs especially well with chocolate chips.
Sprinkle Cookies
For an easy option, add Halloween-themed sprinkles before baking.
Make-Ahead and Freezing Instructions
One of the biggest advantages of this recipe is that the dough can be prepared ahead of time.
Instead of baking all the cookies immediately, scoop the dough into individual portions and place the dough balls in a freezer-safe container or bag.
Freeze the dough until firm.
When you are ready to bake, you can bake the frozen dough balls directly from the freezer. The original recipe recommends adding approximately 2 extra minutes to the baking time.
Keep an eye on the first batch because oven temperatures and cookie sizes can vary.
Freezing individual dough portions also makes it easy to bake only as many cookies as you need.
How to Store Halloween Cookies
Once completely cooled, store the cookies in an airtight container at room temperature for up to 5 days.
Keeping the container tightly sealed helps prevent the cookies from drying out.
If you are layering the cookies in the container, parchment paper can be placed between layers to help protect the decorations.
For the best texture, allow refrigerated or chilled dough to come closer to the appropriate baking condition before following your chosen preparation method.
How to Serve Halloween Chocolate Chip Cookies
These cookies are versatile enough for almost any Halloween occasion.
Halloween Dessert Table
Arrange the cookies on a large festive platter with the colorful candy decorations facing upward.
Mix different designs together so the platter looks playful and varied.
Trick-or-Treat Gathering
Serve them alongside other Halloween snacks and desserts after trick-or-treating.
Halloween Movie Night
Pair warm chocolate chip cookies with your favorite hot or cold drink for a cozy October evening.
Kids’ Baking Party
Prepare bowls of different Halloween candies and let children decorate their own cookies before baking.
This turns the recipe into both a dessert and an activity.
Frequently Asked Questions
Can I use salted butter?
Yes, although the recipe calls for unsalted butter. If you use salted butter, keep in mind that the overall salt level will be slightly different.
Can I use different chocolate chips?
Absolutely. Semi-sweet chocolate chips are recommended, but you can experiment with other chocolate varieties depending on the flavor you prefer.
Can I use only Halloween sprinkles?
Yes. Halloween sprinkles can be used instead of candy pieces or alongside them.
When should I add candy eyes?
It depends on the candy eyes you are using. Some can be added before baking, while others are better added after baking so they retain their shape.
Why are my cookies spreading too much?
Several factors can affect spreading, including butter temperature, flour measurement, dough temperature, and oven temperature. Make sure the butter is softened rather than melted and measure the flour carefully.
Why are my cookies too dry?
Overbaking is one common reason. Remove the cookies when the edges are golden but the centers still look soft.
Can I freeze the cookie dough?
Yes. Scoop the dough into balls and freeze them. The dough can be baked directly from frozen, with approximately 2 additional minutes of baking time.
How long do the baked cookies last?
Stored in an airtight container at room temperature, the cookies can last for up to 5 days.
Nutrition Information
The estimated nutrition per cookie is:
| Serving Size | Calories | Protein | Carbs | Fat | Fiber | Sugar |
|---|---|---|---|---|---|---|
| 1 cookie | 210 | 2g | 27g | 10g | 1g | 18g |
Nutrition disclaimer: Nutrition information is estimated and can vary depending on the brands of butter, chocolate chips, candies, flour, and other ingredients used. Preparation methods and cookie sizes can also affect the final values. For specific dietary needs, calculate nutrition using the exact ingredients and quantities.
Why These Halloween Cookies Are Perfect for October
There is something especially fun about taking a familiar recipe and giving it a seasonal twist. Chocolate chip cookies are already a crowd favorite, so adding Halloween candy makes them feel special without making the recipe complicated.
The combination of golden cookie edges, soft centers, melted chocolate, and colorful candy creates a dessert that looks festive while still tasting familiar.
They are also a great recipe for busy Halloween preparations. With only 27 minutes of prep and baking time, you can have a fresh batch ready quickly.
The recipe is flexible enough for different occasions too. Make simple sprinkle-covered cookies for a casual family night, add candy eyes for a spooky party, or use a mixture of colorful candies for a fun dessert table.
A Fun Halloween Baking Activity
These cookies are particularly well suited to baking with children.
Prepare the dough yourself or let older children help with the mixing. Once the dough is ready, set out small bowls of Halloween candies.
Each person can decorate their own cookie dough balls with a different combination of candy.
Some cookies can have lots of candy eyes, while others can be covered with colorful M&Ms or sprinkles.
The finished cookies will not all look identical, and that is part of the fun.
For a Halloween party, you can even turn the decorating stage into a friendly creative activity where everyone designs their own spooky cookie.
Final Thoughts
These Halloween Chocolate Chip Cookies take a classic homemade cookie and turn it into a festive treat that is perfect for the spooky season.
With a soft and chewy center, golden edges, plenty of semi-sweet chocolate chips, and colorful Halloween candies, they offer the familiar comfort of chocolate chip cookies with a fun seasonal appearance.
They are quick enough for a casual October baking session and festive enough for a Halloween party. You can keep the decorations simple or get creative with candy eyes, M&Ms, Reese’s pieces, and sprinkles.
Whether you are baking with kids, preparing treats for guests, or simply craving a warm chocolate chip cookie on a cool October evening, these Halloween Chocolate Chip Cookies are an easy and delicious choice.
Bake a batch, decorate them with your favorite Halloween candies, and enjoy a spooky-sweet treat that brings plenty of festive fun to the table.