
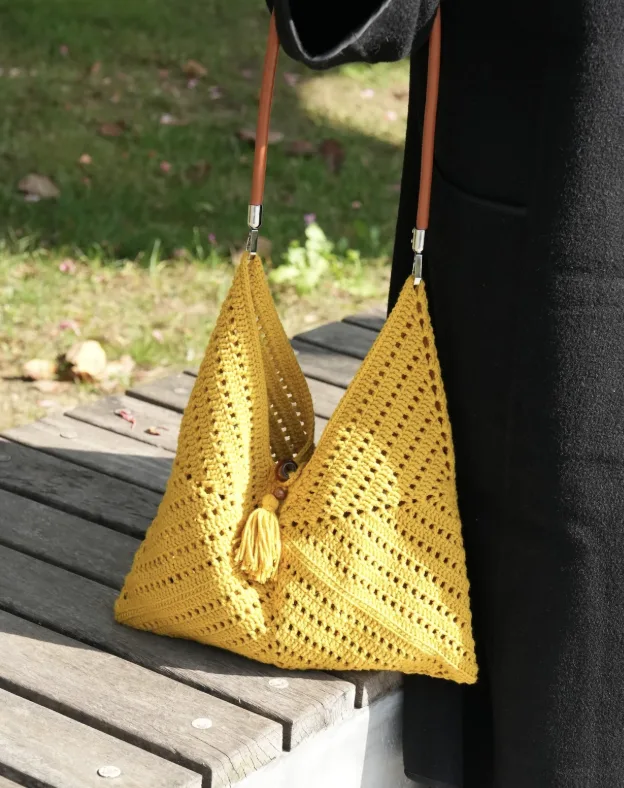
If you love the classic look of granny squares but want something more structured and practical than a traditional colorful design, this Solid Granny Square Bag is a wonderful project to make. The finished bag combines three solid granny squares into a clean, sophisticated everyday tote with a textured fabric, a structured silhouette, wooden bead details, a chain strap, and a handmade tassel.

This tutorial follows the original pattern closely and keeps its technical details intact. The bag is made using three 9-inch solid granny squares. Once assembled, the finished project measures 12.9 inches in height and 12.5 inches in width. The design uses one solid color, making it particularly appealing if you enjoy simple, coordinated accessories with texture rather than multiple color changes.
Why This Solid Granny Square Bag Is Worth Making
A granny square bag does not have to be bright or heavily patterned to make a statement. This design takes the familiar granny square concept and turns it into a more refined monochromatic accessory. The solid construction gives the squares a dense appearance and helps the finished bag maintain its shape.
The original design recommends a single solid shade such as gold, charcoal, or taupe for versatile styling. If you prefer a stronger statement, rich navy or deep burgundy can also create an attractive result. Because the bag uses one color throughout, the texture of the stitches becomes the main visual feature.
The completed bag is designed as an everyday accessory. At approximately 12.9 inches high and 12.5 inches wide, it provides useful space while keeping a clean silhouette. The construction is based on three granny squares, each measuring 9 inches.
Project Details at a Glance
- Project: Solid Granny Square Bag
- Number of granny squares: 3
- Granny square size: 9 inches
- Finished bag height: 12.9 inches
- Finished bag width: 12.5 inches
- Yarn: Loopara 5ply combed cotton, Gold 32
- Hook: 3.0mm
- Terms: US crochet terms
- Construction: Solid granny squares joined with whipstitch
- Strap: 20 chain stitches
- Tassel wrapping: Approximately 30 wraps around four fingers
Materials You Will Need
Gather all of your supplies before beginning. The original pattern uses Loopara 5ply combed cotton in Gold 32 and a 3.0mm crochet hook. The smaller hook size is intentional because it produces a sturdy, dense fabric that helps the finished squares hold their shape.

- Loopara 5ply combed cotton, Gold 32
- 3.0mm crochet hook
- Scissors
- Yarn needle
- Stitch marker
- Bag strap
- Large wooden beads
- Small wooden beads
Understanding the Crochet Abbreviations
The pattern uses US crochet terminology. Becoming familiar with the abbreviations before starting will make the round-by-round instructions easier to follow.
- Magic ring: Used to begin the granny square.
- ch: Chain.
- dc: Double crochet.
- hdc: Half double crochet.
- sl: Slip stitch.
- sk: Skip.
Keep your stitch marker nearby while working. Consistent tension is especially important for this project because three separate squares need to reach the same finished size before assembly.
How the Solid Granny Square Is Built
You will make 3 granny squares. Each square is worked through Round 13 and should measure 9 inches. The construction alternates between rounds containing double crochet stitches and rounds that create the open spaces and corners needed to expand the square.
Although the square looks increasingly complex as it grows, the basic concept is repetitive. Pay close attention to the corner groups and the number of stitches specified in each round. Keeping each square consistent will make the later assembly much easier.
Round 1

Round 1: Magic ring, Chain 3, 2 double crochet, (chain 3, 3 double crochet) 3 times, chain, half double crochet.
Work this first round carefully because it establishes the foundation and the four corner areas of the square. Keep your chain spaces clear so that the following round can be worked into the correct locations.
Round 2

Round 2: Chain 4, (double crochet, skip 1, chain) twice, [(double crochet, chain 3, double crochet), (chain, skip 1, double crochet) twice, chain] 3 times, double crochet, chain, half double crochet.
Round 3

Round 3: (Chain 3, double crochet), [7 double crochet, (2 double crochet, chain 3, 2 double crochet)] 3 times, 7 double crochet, (2 double crochet, chain, half double crochet).
Round 4

Round 4: (Chain 4, double crochet), (chain, skip 1, double crochet) 5 times, chain, [(double crochet, chain 3, double crochet), chain, double crochet, (chain, skip 1, double crochet) 5 times, chain] 3 times, (double crochet, chain, half double crochet).
Round 5

Round 5: (Chain 3, double crochet), [15 double crochet, (2 double crochet, chain 3, 2 double crochet)] 3 times, 15 double crochet, (2 double crochet, chain, half double crochet).
Round 6

Round 6: (Chain 4, double crochet), (chain, skip 1, double crochet) 9 times, chain, [(double crochet, chain 3, double crochet), chain, double crochet, (chain, skip 1, double crochet) 9 times, chain] 3 times, (double crochet, chain, half double crochet).
Round 7

Round 7: (Chain 3, double crochet), [23 double crochet, (2 double crochet, chain 3, 2 double crochet)] 3 times, 23 double crochet, (2 double crochet, chain, half double crochet).
Round 8

Round 8: (Chain 4, double crochet), (chain, skip 1, double crochet) 13 times, chain, [(double crochet, chain 3, double crochet), chain, double crochet, (chain, skip 1, double crochet) 13 times, chain] 3 times, (double crochet, chain, half double crochet).
Round 9

Round 9: (Chain 3, double crochet), [31 double crochet, (2 double crochet, chain 3, 2 double crochet)] 3 times, 31 double crochet, (2 double crochet, chain, half double crochet).
Round 10

Round 10: (Chain 4, double crochet), (chain, skip 1, double crochet) 17 times, chain, [(double crochet, chain 3, double crochet), chain, double crochet, (chain, skip 1, double crochet) 17 times, chain] 3 times, (double crochet, chain, half double crochet).
Round 11

Round 11: (Chain 3, double crochet), [39 double crochet, (2 double crochet, chain 3, 2 double crochet)] 3 times, 39 double crochet, (2 double crochet, chain, half double crochet).
Round 12

Round 12: (Chain 4, double crochet), (chain, skip 1, double crochet) 21 times, chain, [(double crochet, chain 3, double crochet), chain, double crochet, (chain, skip 1, double crochet) 21 times, chain] 3 times, (double crochet, chain, half double crochet).
Round 13 and Finishing the Square

Round 13: (Chain 3, double crochet), [47 double crochet, (2 double crochet, chain 3, 2 double crochet)] 3 times, 47 double crochet, 2 double crochet, chain 3, slip stitch, Weave in ends.
After completing the first square, make two additional squares using exactly the same instructions. Before moving to assembly, compare the three squares to make sure they have the same overall dimensions and a consistent appearance.
Important Tension Tips for the Granny Squares
Consistent tension is one of the most useful things you can focus on during this project. Since the bag is assembled from three individual squares, differences between the squares can become noticeable during sewing.
- Keep your tension consistent throughout each round.
- Work your turning chains at the same height each time.
- Keep the corner spaces clear and easy to identify.
- Make your slip stitches snug, but do not pull them excessively tight.
- Finish each square cleanly and weave in the ends before assembly.
The original pattern specifically recommends consistent tension and turning chains of the same height. It also advises making joining slip stitches snug without making them too tight, which helps create seamless-looking corners.
Assembling the Three Granny Squares
Once all three 9-inch squares are finished, the next stage is transforming them into the body of the bag. The original construction uses a whipstitch. Take your time during this stage because the alignment of the squares determines how polished the final bag will look.
Step 1: Align the Squares

Step 1: First, align and pin the 3 granny squares together with stitch markers.
Step 2: Prepare the Sewing Needle

Step 2: Thread your sewing needle, leaving a long tail.
Step 3: Begin the Whipstitch

Step 3: This bag uses a whipstitch for assembly. Place squares back-to-back and whipstitch through the outer loops. Reinforce the starting point by stitching twice for security.
Step 4: Continue Along the Seam

Step 4: Following the arrow direction, continue whipstitching through outer loops. At joining points, also stitch through outer loops. Keep tension moderate – not too tight to avoid curling and not too loose to avoid gaps.
Step 5: Work Through the Middle Join

Step 5: When reaching the middle of the bag, catch the outer loops of all three squares, then continue stitching to the end.
Step 6: Secure the Seam

Step 6: Reinforce the final stitch by stitching twice, weave in ends and cut.
Building the Upper Side of the Bag
After the main squares are joined, the pattern continues with a series of short construction steps that shape the upper side of the bag. Follow the specified stitch placement carefully and turn the work where instructed.
Step 7

Step 7: Start new thread, chain 3, pull through the third stitch on the side, 2 double crochet, pull through the third stitch on the side.
Step 8

Step 8: Chain 3, pull through the third stitch on the side, turn work, increase with double crochet, 3 double crochet, increase with double crochet, pull through the third stitch on the side.
Step 9

Step 9: Chain 3, pull through the third stitch on the side, turn work, increase with double crochet, 5 double crochet, increase with double crochet, pull through the third stitch on the side.
Step 10

Step 10: Chain 3, pull through the third stitch on the side, turn work, increase with double crochet, 7 double crochet, increase with double crochet, pull through the third stitch on the side.
Step 11: Repeat on the Other Side


Step 11: Repeat steps 7-10 on the other side. Don’t cut yarn – instead, chain 1 and work one round of single crochet without increases or decreases. Finally, slip stitch to join, weave in ends and cut yarn.
This step is important because the single crochet round provides the finishing edge without adding increases or decreases. Keep the tension consistent as you work around the opening.
Step 12: Attach the Large Wooden Beads

Step 12: Thread sewing needle, and attach large wooden beads securely, spacing them every 3 double crochet. Weave in ends and cut yarn.
How to Make the Chain Strap
The chain strap is deliberately simple. It uses 20 chain stitches and is secured firmly to the bag opening. Leave yarn tails at both ends so the strap can be attached securely.


Step 1: Work 20 chain stitches. Leave tails at both ends. Secure firmly to bag opening.
How to Make the Crochet Tassel
The tassel adds a decorative finishing detail to the bag and works together with the wooden bead elements. The original instructions use four fingers as a simple measuring guide for wrapping the yarn.
Tassel Step 1

Step 1: Wrap yarn around four fingers about 30 times. Cut and secure with a 20cm length through loops. Knot firmly to hold tassel shape.
Tassel Step 2

Step 2: Thread through wooden bead and secure.
Tassel Step 3

Step 3: Secure the assembly below the large wooden bead, weaving in the ends neatly before trimming.
Tassel Step 4

Step 4: Wrap tassel 1cm below bead, securing with two rounds. Pull ends to inside with crochet hook.
For a polished tassel, keep the yarn wraps tight and even around your fingers. The original instructions also recommend securing the points firmly and trimming the ends neatly.
Finishing the Bag Neatly
Finishing work is especially important for a bag because the seams and attachment points need to withstand regular handling. The original pattern recommends consistent tension during assembly and secure stitching around the joining areas.
- Reinforce the beginning and ending points of the whipstitched seams.
- Keep whipstitch tension moderate so the fabric does not curl or develop gaps.
- Weave in ends neatly before trimming.
- Secure wooden beads firmly.
- Leave sufficient tails when attaching the chain strap.
- Keep the tassel wraps even for a polished appearance.
Common Construction Checkpoints
Before moving from one major stage to the next, it helps to pause and inspect your work. This is particularly useful when making three matching granny squares.
- After Round 1: Check that the foundation and corner spaces are clearly established.
- After Round 5: Check that the square remains evenly shaped.
- After Round 9: Compare the developing shape with your other squares if more than one has already been started.
- After Round 13: Confirm that each finished square measures 9 inches.
- Before assembly: Align all three squares before sewing.
- During whipstitching: Keep tension moderate to avoid curling or gaps.
- Before attaching beads: Complete the single crochet finishing round and weave in ends.
- Before attaching the tassel: Make sure the wooden bead and tassel assembly is secure.
Care and Cleaning for Your Finished Bag
A handmade crochet bag benefits from gentle care. The original pattern recommends brushing away dirt or dust after use and avoiding overstuffing so the bag can retain its intended shape.
Daily Care
Brush off dirt and dust after each use. Avoid overstuffing the bag because excessive weight can affect its shape. If you find a loose thread, trim it carefully with scissors rather than pulling it.
Washing
When the bag needs cleaning, hand wash it using cool water and mild detergent. Gently squeeze the bag to clean it, but do not wring or twist it. After washing, reshape the bag while damp and lay it flat to dry in a well-ventilated area away from direct sunlight.
Storage
Store the bag flat, or gently stuff it with tissue paper to help maintain its shape. When it is not being used, a dust bag or pillowcase can help protect the stitches from dust. Avoid hanging the bag by its handles for long periods because this can cause stretching.
Can You Use Another Color?
The original project is designed as a monochromatic bag, and the listed yarn is Loopara 5ply combed cotton in Gold 32. The design description also suggests neutral shades such as gold, charcoal, and taupe, while navy and deep burgundy can provide a bolder appearance.
If you choose to explore color changes, remember that the original granny square instructions themselves are written for a single solid color. Changing the color arrangement would create a different visual version of the project rather than the exact monochromatic design shown here.
Helpful Tips Before You Start
For a smooth experience, prepare your materials first and work through the granny squares systematically. Because the project contains 13 rounds per square and three squares are required, keeping the work organized will make the assembly stage easier.
- Use the specified 3.0mm hook with the recommended yarn.
- Make all three squares using the same tension.
- Check the size of each square before assembly.
- Use stitch markers to help hold the squares in position.
- Place the squares back-to-back for the whipstitch seam.
- Do not make the joining stitches excessively tight.
- Reinforce the starting and final stitches of the seams.
- Attach the large wooden beads securely.
- Keep the 20-chain strap firmly attached at both ends.
- Secure the tassel carefully before trimming the ends.
Final Thoughts
The Solid Granny Square Bag is a great example of how a simple crochet building block can become a practical accessory. Three 9-inch solid granny squares, worked in one color with a 3.0mm hook, create the foundation for a structured bag measuring 12.9 inches high and 12.5 inches wide.
The project is especially appealing if you enjoy crochet patterns that emphasize stitch texture, clean construction, and practical finishing details. From the carefully repeated granny square rounds to the whipstitched assembly, wooden beads, 20-chain strap, and handmade tassel, every stage contributes to the final character of the bag.
Take your time with the three squares, keep your tension consistent, and pay close attention to the joining instructions. With the technical details preserved exactly as specified in the pattern, you can work through the project one stage at a time and finish with a handmade bag designed for everyday use.