

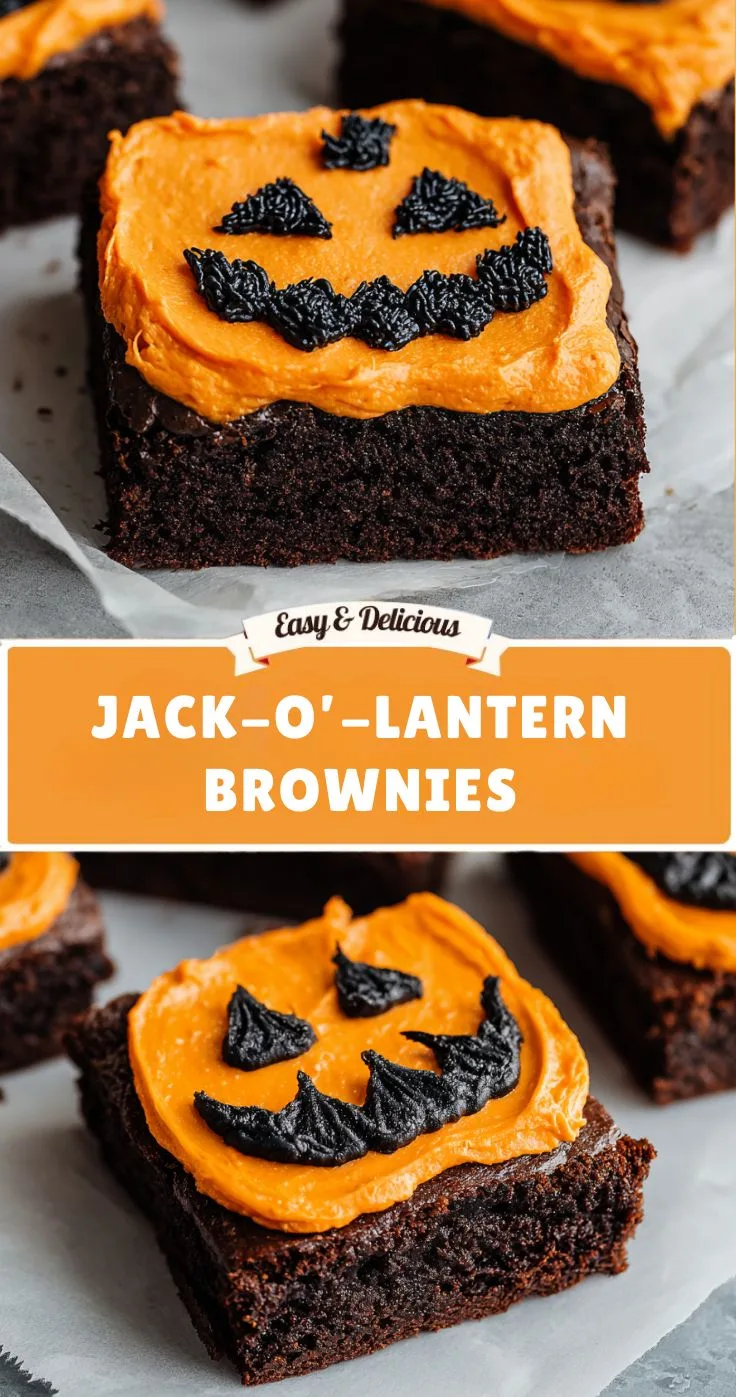
Halloween desserts are even more fun when they look as festive as they taste, and these Jack-O’-Lantern Brownies are an easy way to bring plenty of spooky charm to your dessert table. Rich, fudgy brownies are cut into round pumpkin shapes, covered with bright orange candy melts, and decorated with chocolate Jack-O’-Lantern faces.
The best part is that you do not need advanced decorating skills to make them. A round cookie cutter or even the rim of a glass transforms an ordinary brownie slab into individual pumpkin-shaped treats. From there, orange candy melts create the pumpkin color, while melted chocolate makes it easy to pipe funny, spooky, or surprised expressions.
A green M&M or another green candy becomes the little pumpkin stem, completing the look. If you want something more playful, marshmallows can be used to create a raised, three-dimensional pumpkin effect.
These brownies are perfect for Halloween parties, school events, bake sales, family gatherings, or a cozy Halloween movie night. They are simple enough for beginners and fun enough to make with children.
Why You’ll Love These Jack-O’-Lantern Brownies
There are plenty of reasons these festive brownies deserve a place on your Halloween menu.
They Start With an Easy Brownie Mix
Using a boxed brownie mix saves time and makes the recipe approachable. Simply prepare the mix according to the package instructions, bake it in a 9×13-inch pan, and let it cool before decorating.
They Look Like Tiny Pumpkins
The round brownie shape creates an instant pumpkin base. The orange coating and chocolate faces complete the transformation.
Every Pumpkin Can Be Different
One of the most enjoyable parts of the recipe is creating the faces. You can make every Jack-O’-Lantern unique.
Try scary expressions, goofy smiles, surprised faces, sleepy eyes, or traditional triangular eyes and noses.
They Are Great for Kids
Children can help cut the brownies, decorate the pumpkin faces, and add the green candy stems. Just make sure an adult handles the oven and hot melted candy.
Recipe Details
Prep Time: 15 minutes
Cook Time: 25 minutes
Total Time: 40 minutes
Yield: Approximately 12–15 brownies, depending on cutter size
Pan: 9×13-inch baking pan
Ingredients
Brownie Base
1 box brownie mix:
Use your favorite boxed brownie mix and prepare it with the eggs, oil, water, or other ingredients listed on the package.
A fudgy-style brownie mix works particularly well because the brownies need to be sturdy enough to cut into circles while remaining rich and soft.
Orange Candy Melts
You will need 1 cup orange candy melts.
These create the bright pumpkin-orange coating. They are convenient because they are designed to melt smoothly and set into a firm coating.
If you do not have orange candy melts, you can use orange frosting or white chocolate tinted orange with food coloring.
Melted Chocolate
Use ½ cup chocolate chips, melted, for drawing the Jack-O’-Lantern faces.
Dark or semi-sweet chocolate provides a strong contrast against the orange coating.
Marshmallows
12–15 large marshmallows are optional.
They can be used to create an extra raised pumpkin effect if you want the brownies to have more dimension.
Green Candy
Green M&Ms or other green candy-coated chocolates are used as pumpkin stems.
They are simple, colorful, and require no additional preparation.
Parchment Paper
Parchment paper helps prevent the brownies from sticking to the baking pan and makes it easier to remove the brownie slab before cutting.
How to Make Jack-O’-Lantern Brownies
Step 1: Prepare the Brownie Batter
Start by preparing the brownie mix according to the package instructions.
Because different brownie mixes have different requirements, follow the instructions on the specific box for the correct amount of eggs, oil, and water.
Mix the batter until everything is combined.
Avoid overmixing. Once the ingredients are incorporated, stop stirring.
Step 2: Prepare the Baking Pan
Line a 9×13-inch baking pan with parchment paper.
If possible, leave a little parchment overhang on two opposite sides of the pan. This will give you handles for lifting the cooled brownie slab out later.
Lightly grease the parchment if your brownie mix tends to stick.
Step 3: Bake the Brownies
Pour the brownie batter into the prepared pan and spread it into an even layer.
Bake according to the package instructions until the brownies are fudgy and set.
The original recipe uses approximately 25 minutes of baking time, but the exact time can vary depending on the brownie mix and your oven.
Avoid overbaking because you want the brownies to remain soft and fudgy.
Once baked, remove the pan from the oven and allow the brownies to cool completely.
Do not try to cut or decorate the brownies while they are still warm.
Why Cooling Is Important
Cooling the brownies completely is one of the most important steps in this recipe.
Warm brownies are softer and more fragile, which makes them difficult to cut into clean circles. The orange candy coating can also melt or slide if the brownie is still warm.
For the cleanest shapes, let the brownie slab cool completely in the pan before removing it.
If you have time, you can even chill the cooled brownies briefly. Slightly chilled brownies are often easier to cut into neat shapes.
Step 4: Remove the Brownie Slab
Once the brownies have cooled, use the parchment paper to carefully lift the entire brownie slab from the pan.
Place it on a large cutting board.
If necessary, trim away uneven edges before cutting the circles.
Save the brownie scraps rather than throwing them away. They are perfect for snacking, crumbling over ice cream, or layering into a simple dessert cup.
Step 5: Cut the Pumpkin Shapes
Use a round cookie cutter to cut circles from the brownie slab.
A small or medium round cutter works well because it creates individual pumpkin-shaped treats.
If you do not have a cookie cutter, use the rim of a clean drinking glass.
Press the cutter firmly into the brownie and lift it straight up.
Try to cut the circles close together so you can get as many pumpkin brownies as possible from the slab.
Depending on the size of your cutter, you should get approximately 12–15 individual brownie circles.
Step 6: Melt the Orange Candy
Place the orange candy melts in a microwave-safe bowl.
Heat them in approximately 30-second intervals, stirring thoroughly after each interval.
Continue until the candy melts are smooth and easy to spread.
Stir well between heating intervals because the candy may continue melting from the residual heat of the bowl.
Do not overheat the candy melts. Excessive heat can make the mixture thick or difficult to work with.
If the mixture becomes too thick, follow the instructions on your specific candy melt product for the appropriate melting aid.
Step 7: Coat the Brownie Pumpkins
Place the brownie circles on a parchment-lined surface.
Spread or drizzle the melted orange candy over each brownie.
You want enough orange coating to cover the top surface and create a vibrant pumpkin appearance.
A spoon or small spatula can be used to spread the coating.
You can also drizzle the orange candy over the brownies for a more rustic look.
Allow the coating to begin setting before moving on to the chocolate faces.
Step 8: Melt the Chocolate
Place the chocolate chips in a microwave-safe bowl.
Heat them in short intervals, stirring between each one, until completely smooth.
Transfer the melted chocolate to a piping bag or a small zip-top bag.
If using a zip-top bag, cut off just a tiny piece from one corner.
A small opening gives you more control when drawing the Jack-O’-Lantern faces.
Step 9: Create the Pumpkin Faces
Now comes the most creative part.
Pipe chocolate onto each orange brownie to create a Jack-O’-Lantern expression.
Traditional pumpkin faces can include:
- Triangle-shaped eyes
- A small triangle nose
- A wide zigzag mouth
But you do not have to follow the traditional design.
Try making some pumpkins:
- Happy
- Scary
- Surprised
- Sleepy
- Silly
- Angry
- Goofy
The variety makes the finished platter more entertaining.
If children are helping, let them choose the expressions they want to create.
Step 10: Add the Green Stems
While the orange coating is still soft, press a green M&M or other green candy onto the top of each brownie.
Position it slightly toward the upper edge so it resembles a pumpkin stem.
If the coating has already hardened, add a tiny dab of melted chocolate underneath the candy to help secure it.
The green stem provides a simple but effective finishing detail.
Optional Step: Create 3D Pumpkin Brownies
For an extra playful presentation, use the large marshmallows included in the ingredient list.
Place one marshmallow on top of each brownie before adding the orange coating.
Then spoon the melted orange candy over the marshmallow and allow it to flow down the sides.
This creates a raised pumpkin effect instead of a flat brownie.
You can then add the chocolate face to the front of the coated marshmallow and finish with a green candy stem.
This version is especially fun for Halloween parties because the pumpkins have more height and dimension.
Tips for Perfect Jack-O’-Lantern Brownies
Use Completely Cooled Brownies
Warm brownies are difficult to cut cleanly.
Always allow the brownie slab to cool completely before using the cookie cutter.
Use a Sharp Cutter
A sharp round cutter creates cleaner edges than a dull cutter.
Press straight down and lift straight up rather than twisting excessively.
Do Not Make the Chocolate Opening Too Large
When piping the pumpkin faces, a small opening gives you better control.
You can always make the lines thicker by going over them again.
It is much harder to fix a face made with too much chocolate.
Work While the Orange Coating Is Soft
If you want to add sprinkles or other decorations, do so before the candy melts set.
This allows the decorations to stick securely.
Make Different Faces
A platter of identical pumpkins can look nice, but a collection of different expressions feels much more playful.
Try making every brownie slightly different.
What If You Don’t Have Orange Candy Melts?
There are several alternatives.
Orange Frosting
Use prepared orange frosting and spread a thin layer over the brownie circles.
White Chocolate and Food Coloring
Melt white chocolate and carefully tint it with orange food coloring.
Use a small amount of coloring and make sure it is compatible with the chocolate you are using.
Orange Decorating Icing
A ready-made orange decorating icing can also work if you want a simple option.
The goal is simply to create the bright orange pumpkin appearance.
Halloween Face Ideas
The face design is where you can really personalize these brownies.
For a traditional Jack-O’-Lantern, make triangular eyes and a zigzag smile.
For a scary pumpkin, create narrow eyes and a wide jagged mouth.
For a silly pumpkin, make large round eyes and a crooked smile.
For a surprised pumpkin, use large eyes and a small open mouth.
For a sleepy pumpkin, pipe curved closed eyes.
You can even create a whole family of pumpkin faces, with different expressions on every brownie.
Make-Ahead Instructions
These brownies are excellent for Halloween entertaining because much of the work can be completed ahead of time.
Bake the brownies earlier in the day and allow them to cool completely.
Cut the circles and decorate them several hours before your event.
Once the orange coating and chocolate faces have set, transfer the brownies to an airtight container.
If stacking is necessary, place parchment paper between layers to help protect the decorations.
How to Store Jack-O’-Lantern Brownies
Store decorated brownies in an airtight container for up to 3 days.
Keep them away from direct sunlight and excessive heat because the orange candy coating can soften in warm conditions.
If you are making them in advance, choose a cool, dry location.
If your kitchen is particularly warm, refrigeration may help keep the decorations firm. Allow the brownies to sit briefly before serving if you prefer a softer brownie texture.
Serving Ideas
These Jack-O’-Lantern Brownies are perfect for serving as individual Halloween desserts.
Arrange them on a large platter with the pumpkin faces facing upward.
For an extra festive presentation, surround the brownies with:
- Halloween sprinkles
- Wrapped Halloween candies
- Mini marshmallows
- Chocolate chips
- Candy corn
- Orange and green candies
You can also serve them alongside vanilla ice cream for a simple Halloween dessert.
A scoop of vanilla ice cream next to a bright orange pumpkin brownie creates a delicious contrast between cold and fudgy textures.
Halloween Party Display
For a Halloween party, presentation can make these brownies the centerpiece of your dessert table.
Use a black or dark-colored serving tray to make the orange pumpkins stand out.
Arrange them in rows or create a large circle.
You can place additional green candies around the platter to reinforce the pumpkin theme.
If you are serving several Halloween desserts, place the Jack-O’-Lantern Brownies near other chocolate treats, cookies, cupcakes, or candy.
The bright orange color makes them particularly eye-catching on a dessert table.
Making These Brownies With Kids
This is an excellent recipe for a Halloween baking activity.
Adults can prepare and bake the brownies while children can participate in the decorating stage.
Children can help:
- Cut the cooled brownie circles.
- Spread the orange coating.
- Choose pumpkin expressions.
- Pipe or place the chocolate faces.
- Add the green stems.
- Arrange the finished brownies on the serving platter.
The face decorating can become a creative activity where each child designs their own pumpkin.
Just remember that melted candy and chocolate can become hot, so an adult should handle the microwave and supervise the decorating process.
Frequently Asked Questions
Can I use homemade brownies?
Yes. You can use your favorite homemade brownie recipe instead of boxed brownie mix. Bake the brownies in a 9×13-inch pan so you have a large slab that can be cut into circles.
Can I make square Jack-O’-Lantern brownies?
Absolutely. You do not have to cut the brownies into circles. Square brownies can also be decorated with orange candy and pumpkin faces.
The round shape simply makes them look more like traditional pumpkins.
Can I use orange frosting?
Yes. Orange frosting is a convenient alternative to candy melts.
Keep in mind that frosting may remain softer than candy melts, so storage and handling may be slightly different.
What can I do with leftover brownie scraps?
Do not throw them away. Use the scraps as a topping for ice cream, mix them into a dessert parfait, or simply enjoy them as a snack.
Can I use other colors?
Yes. Orange is the classic choice, but you can create green monster pumpkins, purple Halloween pumpkins, or even black-and-orange designs.
How far ahead can I make these?
They can be prepared ahead and stored in an airtight container for up to three days.
For the best appearance, keep them in a cool, dry environment.
Can I use different candy for the stems?
Yes. Green M&Ms are convenient, but other small green candies can also work.
Nutrition Information
The estimated nutrition per brownie is:
| Serving Size | Calories | Protein | Carbs | Fat | Fiber | Sugar |
|---|---|---|---|---|---|---|
| 1 brownie | 320 | 4g | 42g | 15g | 2g | 30g |
Nutrition information is estimated and may vary depending on the brownie mix, candy melts, frosting, chocolate, marshmallows, and other ingredients used. Portion size can also affect the final nutritional values.
Why These Brownies Are Perfect for Halloween
Jack-O’-Lanterns are one of the most recognizable symbols of Halloween, so turning brownies into tiny pumpkin faces is an easy way to make dessert feel instantly festive.
The recipe is also wonderfully approachable. You are not required to create elaborate fondant decorations or make complicated shapes from scratch. A round cutter, orange coating, melted chocolate, and a few green candies are enough to transform a simple brownie into a Halloween centerpiece.
The customization is another major advantage. Every pumpkin can have its own personality. You can create a tray of scary pumpkins for a spooky party or make cute, silly faces for a children’s celebration.
They are also practical for entertaining. The brownies can be baked ahead of time, decorated before guests arrive, and stored in an airtight container until serving.
Most importantly, they combine festive presentation with the rich chocolate flavor everyone expects from a good brownie.
Final Thoughts
These Jack-O’-Lantern Brownies are a fun and easy Halloween dessert that turns a simple boxed brownie mix into a tray of adorable pumpkin treats.
The fudgy chocolate base is cut into round shapes, covered in vibrant orange candy, decorated with chocolate faces, and finished with little green candy stems. The result is colorful, festive, and delicious.
Whether you choose traditional triangular faces, goofy smiles, spooky expressions, or a completely different design for every brownie, the decorating process is part of the fun.
They are perfect for Halloween parties, school celebrations, family baking activities, bake sales, or a cozy night watching Halloween movies.
Make them ahead, let everyone create their own pumpkin expressions, and arrange the finished brownies on a festive platter. These Jack-O’-Lantern Brownies are sure to bring plenty of Halloween spirit to the dessert table—and they are just as enjoyable to make as they are to eat.