

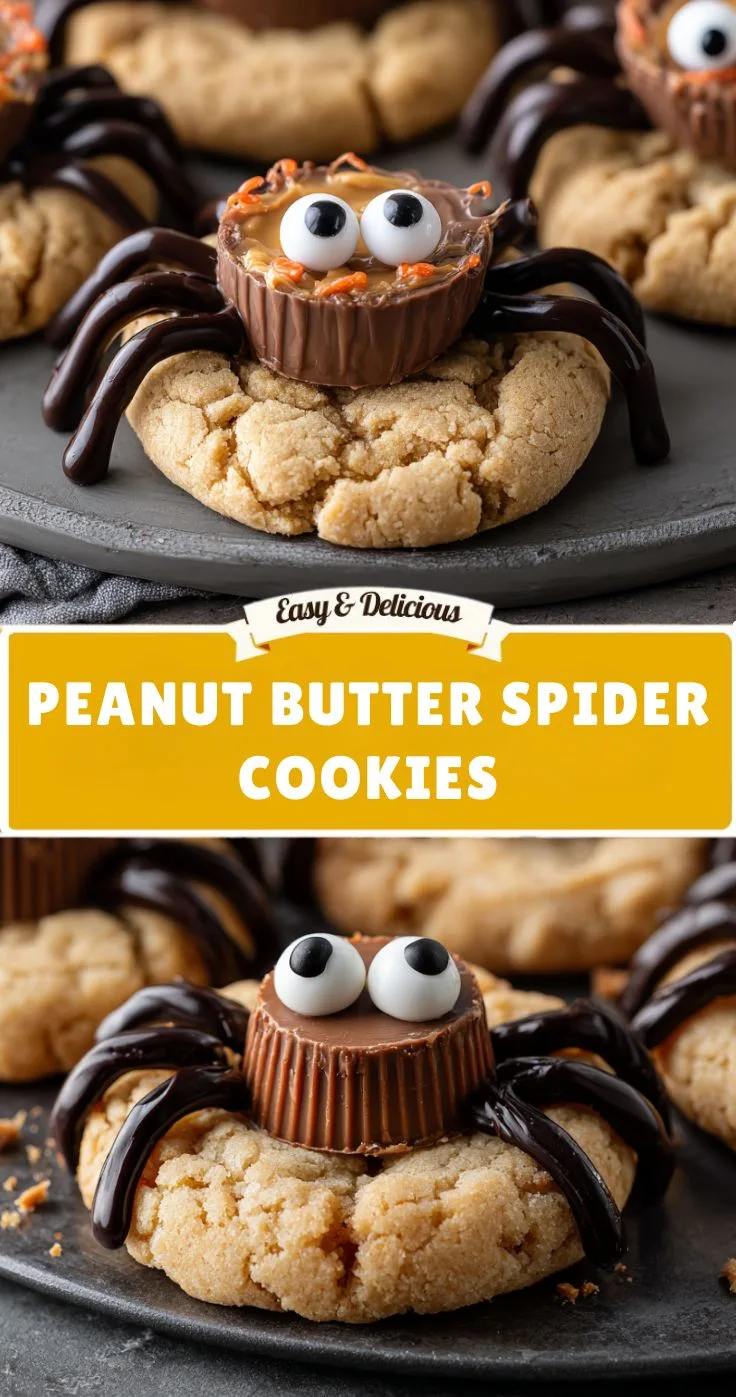
Halloween baking is always more fun when you can turn an ordinary cookie into something spooky, playful, and completely irresistible. These Spider Peanut Butter Cookies are a perfect example. Soft, chewy peanut butter cookies are topped with chocolate truffle “spiders,” complete with eight chocolate legs and tiny candy eyes.
The combination of peanut butter and chocolate makes these cookies especially delicious, while the spider decoration gives them a festive Halloween makeover. Even better, the decorating process is simple enough for beginner bakers and fun enough for kids to participate.
The cookie itself starts with a classic mixture of softened butter, creamy peanut butter, granulated sugar, and brown sugar. After adding an egg, vanilla, flour, baking soda, and salt, the dough is shaped into small balls and baked until lightly golden.
While the cookies are still warm, a small indentation is pressed into the center of each one. A chocolate truffle is then placed into that little well to create the spider body. Once the cookies have chilled, melted chocolate is piped around each truffle to form eight tiny legs.
Finally, two edible candy eyes bring each spider to life.
With 15 minutes of preparation, 10 minutes of baking, and a short chilling period, these cookies are a fun addition to any Halloween dessert table.
Why You’ll Love These Spider Peanut Butter Cookies
Chocolate and peanut butter
Few dessert combinations are as satisfying as peanut butter and chocolate. The soft peanut butter cookie provides a rich, nutty base for the chocolate spider topping.
They look impressive
The finished cookies look like detailed Halloween decorations, but the technique is actually quite simple.
Fun for kids
Children can help roll the dough into balls, place the chocolate bodies, and add the candy eyes.
Great for Halloween parties
The individual spider cookies are easy to arrange on a platter and serve to guests.
Perfect for beginner bakers
The cookie dough is straightforward, and the spider decoration does not require advanced decorating skills.
Recipe Details
| Detail | Information |
|---|---|
| Prep Time | 15 minutes |
| Cook Time | 10 minutes |
| Chill Time | 15 minutes |
| Total Time | 40 minutes |
| Servings | Approximately 24 cookies |
| Difficulty | Easy |
| Method | Baking |
| Best For | Halloween parties, kids’ treats, dessert tables |
Ingredients
½ Cup Unsalted Butter
Use softened unsalted butter so it can cream smoothly with the peanut butter and sugars.
Allow the butter to soften at room temperature rather than melting it. Softened butter helps create the right cookie dough consistency.
½ Cup Creamy Peanut Butter
Creamy peanut butter provides the signature flavor and soft texture of these cookies.
Use a smooth peanut butter that mixes easily with the softened butter.
½ Cup Granulated Sugar
Granulated sugar contributes sweetness and helps create the cookie’s texture.
½ Cup Packed Brown Sugar
Brown sugar adds sweetness and helps give the cookies a soft, chewy texture.
Pack it firmly into the measuring cup for an accurate amount.
1 Large Egg
The egg helps bind the ingredients together and provides structure.
1 Teaspoon Vanilla Extract
Vanilla enhances the peanut butter and chocolate flavors.
1½ Cups All-Purpose Flour
Flour provides the structure for the cookie dough.
Measure carefully to avoid adding too much flour, which can make the cookies dry.
1 Teaspoon Baking Soda
Baking soda helps the cookies rise and spread during baking.
¼ Teaspoon Salt
A small amount of salt balances the sweetness and enhances the peanut butter and chocolate flavors.
24 Chocolate Truffle Candies
The chocolate truffles become the bodies of the spiders.
You can use truffles such as Lindt-style chocolate truffles or Reese’s Miniatures, depending on what you have available.
½ Cup Chocolate Chips
The chocolate chips are melted and piped to create the spider legs and attach the eyes.
Semi-sweet chocolate works well, although another suitable chocolate can be used.
48 Candy Eyeballs
Two edible candy eyes are used for each spider.
The contrast between the dark chocolate body and bright eyes creates the classic creepy-cute Halloween appearance.
How to Make Spider Peanut Butter Cookies
Step 1: Preheat the Oven
Preheat your oven to 350°F (175°C).
Line a baking sheet with parchment paper.
Parchment helps prevent the cookies from sticking and makes cleanup easier.
If you are baking multiple batches, prepare additional sheets or allow the baking sheet to cool between batches.
Step 2: Make the Peanut Butter Cookie Dough
Place the softened butter, creamy peanut butter, granulated sugar, and brown sugar into a large mixing bowl.
Using a hand mixer or stand mixer, cream the ingredients together until the mixture is light and fluffy.
This step helps incorporate air into the mixture and creates a smooth base for the dough.
Add the large egg and vanilla extract.
Beat again until everything is evenly combined.
The mixture should look creamy and smooth before you add the dry ingredients.
Step 3: Combine the Dry Ingredients
In a separate bowl, whisk together the all-purpose flour, baking soda, and salt.
Mixing the dry ingredients separately helps distribute the baking soda and salt evenly throughout the flour.
Gradually add the dry ingredients to the peanut butter mixture.
Mix until just combined.
Avoid overmixing once the flour has been incorporated. Overmixing can make the cookies less tender.
The finished dough should be soft enough to roll but firm enough to hold its shape.
Step 4: Shape the Cookies
Scoop out approximately tablespoon-sized portions of dough.
Roll each portion between your hands to form a smooth ball.
Place the dough balls on the parchment-lined baking sheet, leaving approximately 2 inches between each cookie.
The spacing is important because the cookies will spread as they bake.
Continue until all of the dough has been shaped.
Step 5: Bake the Cookies
Place the baking sheet in the preheated oven.
Bake the cookies for approximately 9–10 minutes, or until they are lightly golden.
Do not wait for them to become deeply browned.
The cookies should still be relatively soft when they come out of the oven because they will continue to firm as they cool.
Step 6: Create the Center Indentation
Immediately after removing the cookies from the oven, use the back of a spoon to gently press a small indentation into the center of each cookie.
You want to create a shallow well that can hold the chocolate truffle.
Work while the cookies are still warm because they are easier to shape at this stage.
Be careful not to press too deeply and break through the cookie.
After making the indentations, allow the cookies to cool for approximately 5 minutes.
Step 7: Add the Chocolate Spider Bodies
While the cookies are still slightly warm, place one chocolate truffle into the center indentation of each cookie.
Press it gently into the cookie so it sits securely.
The residual warmth from the cookie will help the chocolate settle into the center.
Avoid leaving the cookies in a very hot environment for too long because you do not want the truffles to completely melt.
Once all the spider bodies are in place, transfer the cookies to the refrigerator.
Chill for approximately 15 minutes.
This helps the chocolate firm up and makes the spiders easier to decorate.
Step 8: Melt the Chocolate
Place the chocolate chips into a microwave-safe bowl.
Heat them in 20-second intervals, stirring well after each interval.
Continue until the chocolate is smooth and completely melted.
Do not overheat the chocolate.
If a few small pieces remain after heating, stir thoroughly before continuing. The residual heat will often finish melting them.
Step 9: Pipe the Spider Legs
Transfer the melted chocolate into a piping bag.
If you do not have one, use a clean zip-top bag and snip off a very small corner.
Place the tip near the chocolate truffle and pipe thin chocolate lines outward.
Create eight legs for each spider.
The legs do not need to be perfectly identical.
For a more realistic appearance, slightly curve the lines rather than making every leg completely straight.
Try to distribute the legs around the chocolate body so the spider looks balanced.
Work relatively quickly so the chocolate remains fluid enough to pipe.
Step 10: Add the Candy Eyes
Use a small dab of melted chocolate as edible “glue.”
Attach two candy eyeballs to the front of each chocolate truffle.
Press them gently into place.
Allow the chocolate to set completely before moving or serving the cookies.
The combination of the round chocolate body, eight legs, and bright candy eyes creates the finished spider design.
Tips for Perfect Spider Cookies
Chill the truffles if necessary
If your kitchen is warm or the chocolate truffles are becoming too soft, briefly chilling the cookies before piping the legs can make decorating much easier.
Use a small piping opening
A small opening allows you to create thin spider legs instead of thick chocolate lines.
If the opening is too large, the legs can become heavy and difficult to control.
Don’t overbake the cookies
The cookies should be lightly golden after approximately 9–10 minutes.
Overbaking can make them dry instead of soft and chewy.
Work on parchment
Parchment makes the cookies easier to remove from the baking sheet and simplifies cleanup.
Make different spiders
Not every spider needs to look identical.
Change the angle of the eyes or curve the legs differently to give each cookie its own personality.
Easy Candy Substitutions
If you do not have chocolate truffles, there are several alternatives.
Reese’s Peanut Butter Cups
Mini peanut butter cups provide another chocolate-and-peanut-butter combination and make excellent spider bodies.
Rolos
Rolos can create a smaller, rounded spider body with a caramel center.
Mini Chocolate Sandwich Cookies
Small chocolate sandwich cookies can also be used as spider bodies for a slightly different design.
The important thing is to choose a chocolate candy that is appropriately sized for the cookie.
Make-Ahead Instructions
These cookies are convenient for preparing ahead of a Halloween event.
You can bake the cookies one day in advance and decorate them the following day.
Store the undecorated cookies in an airtight container once completely cool.
When you are ready to prepare them for your party, add the chocolate bodies, pipe the legs, and attach the candy eyes.
This can save valuable time when you are preparing multiple Halloween dishes.
How to Store Spider Peanut Butter Cookies
Store the finished cookies in an airtight container at room temperature for up to 4 days.
If you prefer longer freshness, refrigeration can also be used.
When refrigerated, the chocolate spider bodies and legs will become firmer.
Allow the cookies to sit at room temperature briefly before serving if you prefer a softer cookie texture.
If stacking the cookies, place parchment paper between layers to reduce the chance of the decorations rubbing together.
How to Serve
Arrange the spider cookies on a large Halloween platter.
For a dramatic presentation, place them in a loose circle or arrange them in rows with the spider legs clearly visible.
You can also serve them alongside other Halloween cookies and desserts.
Because the cookies already have such a strong visual design, they do not require much additional decoration.
A simple dark-colored serving tray is enough to make the chocolate spiders stand out.
A Fun Halloween Decorating Activity
These cookies are particularly good for making with children.
Adults can prepare and bake the cookies, while children can participate in the decorating stage.
Set out the chocolate bodies, candy eyes, and melted chocolate.
Let each child create their own spider.
Some spiders may have perfectly straight legs, while others may have curly or uneven legs. Some may have eyes positioned close together, while others may look wonderfully silly.
That variety is part of what makes homemade Halloween treats special.
Always supervise children around hot baking trays and melted chocolate.
Frequently Asked Questions
Can I use crunchy peanut butter?
The recipe calls for creamy peanut butter because it produces a smooth cookie dough. Crunchy peanut butter can change the texture and make shaping the cookies slightly different.
Can I use homemade peanut butter cookie dough?
Yes. If you already have a favorite peanut butter cookie recipe, you can use it as the base and follow the same decorating method.
What can I use instead of chocolate truffles?
Mini peanut butter cups, Rolos, or mini chocolate sandwich cookies can work as alternatives.
How many legs should each spider have?
The recipe uses eight chocolate legs per spider to create the traditional spider appearance.
Why do I need to chill the cookies?
Chilling helps the chocolate truffle bodies firm up before you pipe the legs and attach the eyes.
Can I make the cookies ahead of time?
Yes. The cookies can be baked a day ahead and decorated the next day.
How long do they stay fresh?
Store them in an airtight container at room temperature for up to 4 days.
Can I freeze the cookies?
The baked cookie base can generally be frozen, but the finished chocolate decorations may not look exactly the same after freezing and thawing. For the best appearance, decorate closer to serving time.
Nutrition Information
The estimated nutrition per cookie is:
| Serving Size | Calories | Protein | Carbs | Fat | Fiber | Sugar |
|---|---|---|---|---|---|---|
| 1 cookie | 210 | 4g | 25g | 11g | 2g | 16g |
These nutrition values are estimates and may vary depending on the specific peanut butter, chocolate truffles, chocolate chips, candy eyes, and final cookie size used.
For specific dietary or medical concerns, check the nutrition labels of your ingredients and consult a qualified nutrition professional.
Why These Spider Cookies Are Perfect for Halloween
Halloween desserts are all about transforming familiar foods into something unexpected.
A classic peanut butter cookie is already delicious, but adding a chocolate truffle, eight chocolate legs, and two candy eyes turns it into a completely different dessert.
The finished spiders are creepy without being frightening, making them particularly suitable for family Halloween celebrations.
They also have a great balance of textures. The cookie is soft and chewy, the chocolate body provides a rich topping, and the candy eyes add a little crunch.
Most importantly, they are fun.
Guests will immediately recognize the spider design, and children will love choosing their favorite spider from the serving platter.
Perfect for Halloween Parties
If you are hosting a Halloween party, these cookies can be prepared in advance and arranged on a dessert table.
Place them alongside cupcakes, brownies, cookies, and other Halloween sweets for a colorful dessert spread.
They are also a great choice for classroom-style celebrations because they are individually portioned and easy to serve.
If you are making them for a large group, simply multiply the ingredient quantities while keeping the same decorating technique.
Final Thoughts
These Spider Peanut Butter Cookies are a delicious combination of soft peanut butter cookies and rich chocolate, transformed into adorable Halloween spiders with just a few simple decorations.
The recipe is easy enough for beginner bakers, fun enough for children to help with, and impressive enough for a Halloween party.
With a preparation time of 15 minutes, only about 10 minutes in the oven, and a short chilling period, you can create a whole platter of creepy-cute cookies without spending all day baking.
Whether you are preparing treats for a Halloween bash, classroom celebration, family gathering, or cozy night at home, these spider cookies are sure to crawl their way into everyone’s heart.
Soft peanut butter cookies, chocolate spider bodies, eight little legs, and candy eyes make these Halloween treats as fun to decorate as they are delicious to eat.