
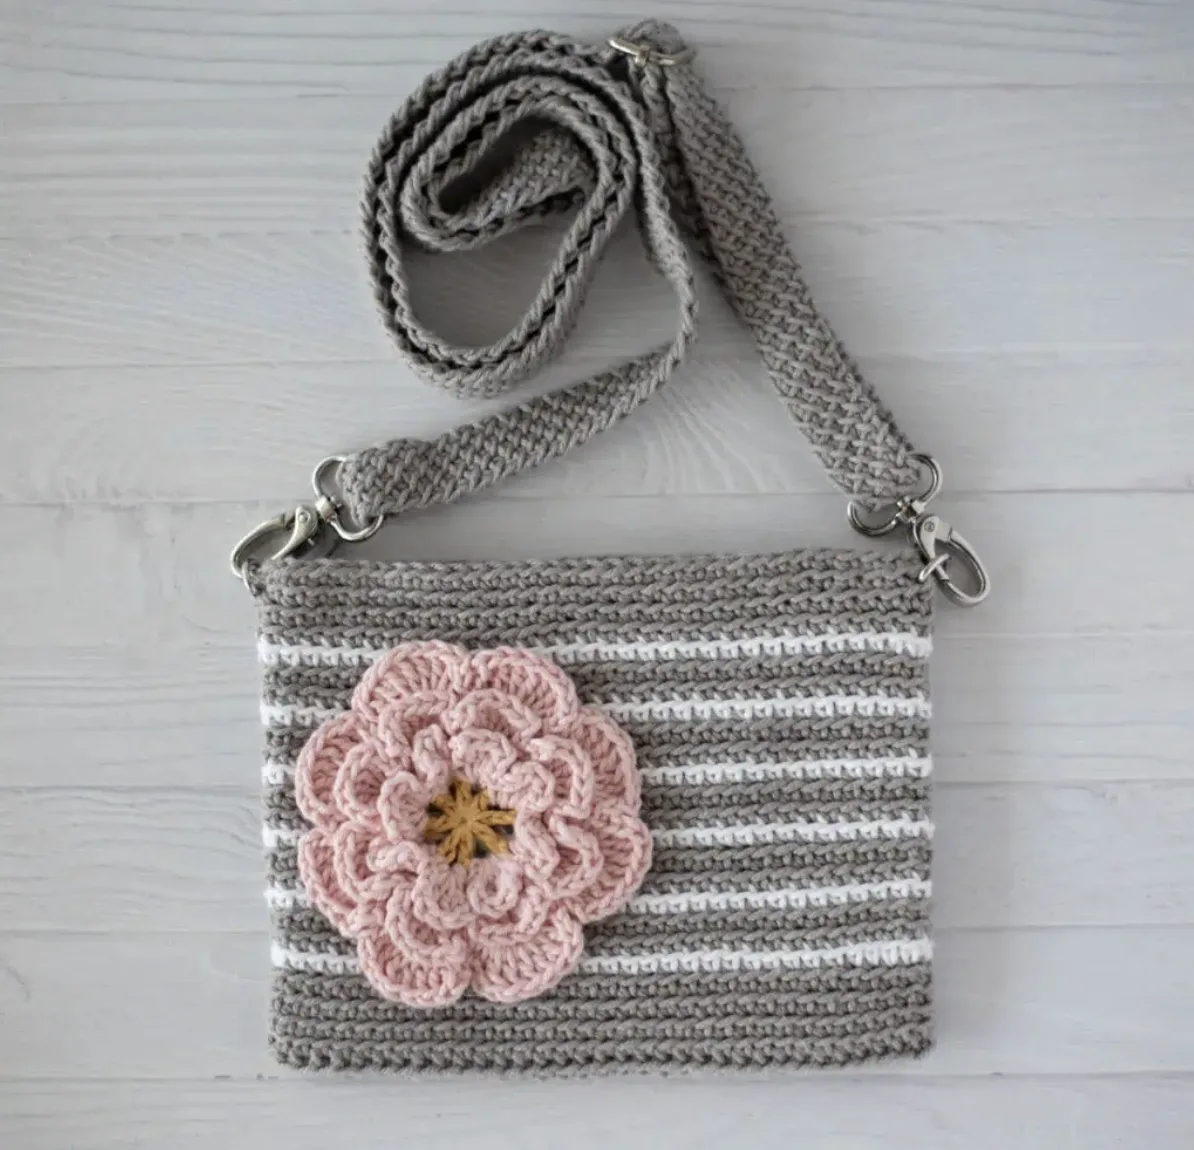
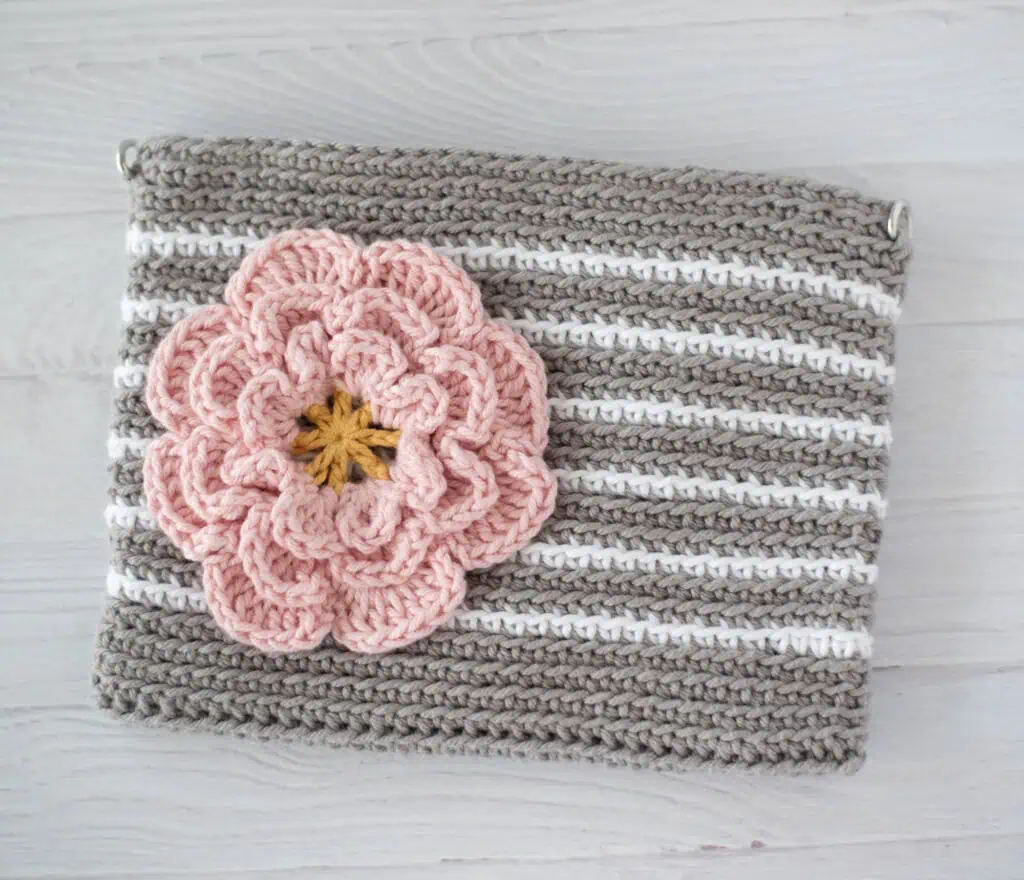
The Wander Bloom Crossbody Bag is a small crochet bag designed to combine everyday usefulness with decorative detail. Its compact shape is approximately 8 inches wide by 6 inches tall, excluding the strap, making it suitable for carrying essentials such as a phone and cash while keeping the overall project relatively small.
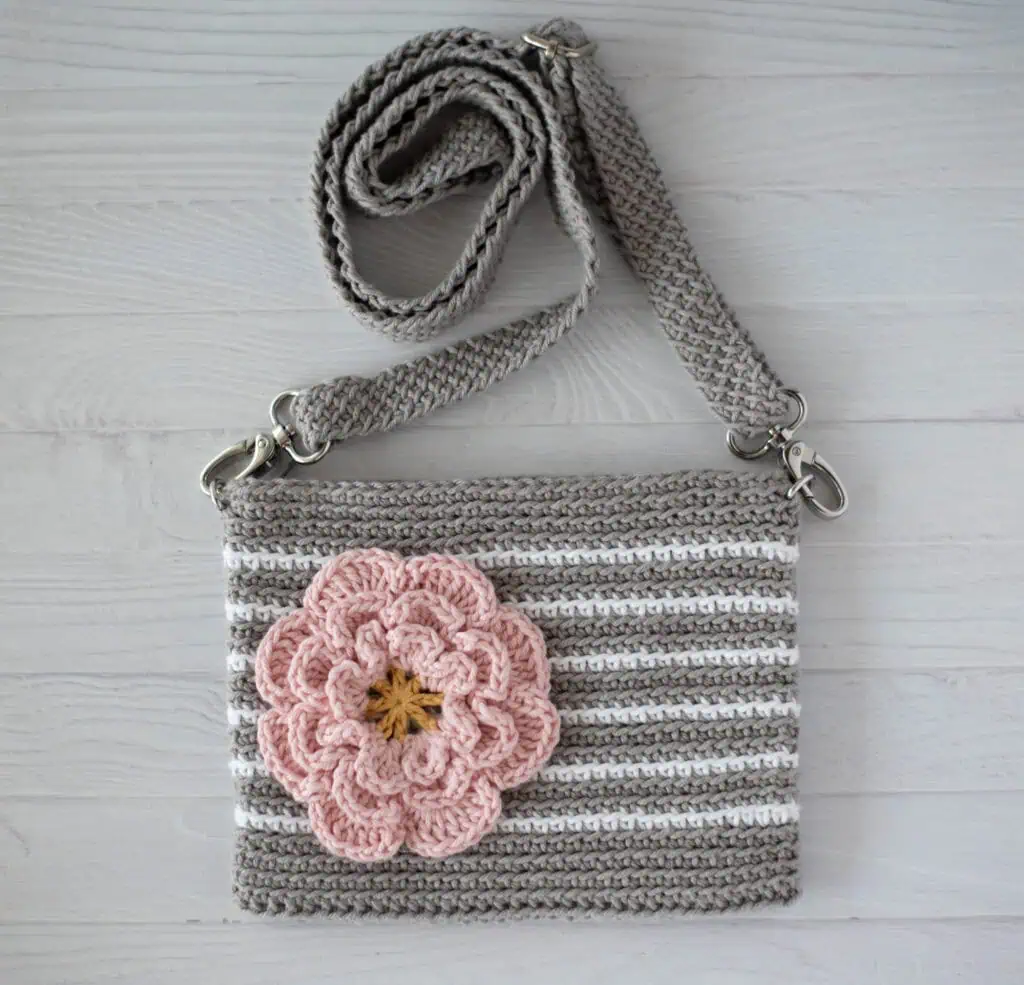
The design combines several techniques in one project. The main bag is crocheted in continuous rounds using single crochet worked through the back loop only. Silver and white yarn create the striped body, while a layered flower in blush pink and yellow adds the focal decorative element. The shoulder strap uses a Tunisian modified simple stitch worked with a regular crochet hook, producing a diagonal-looking strap with pointed ends.
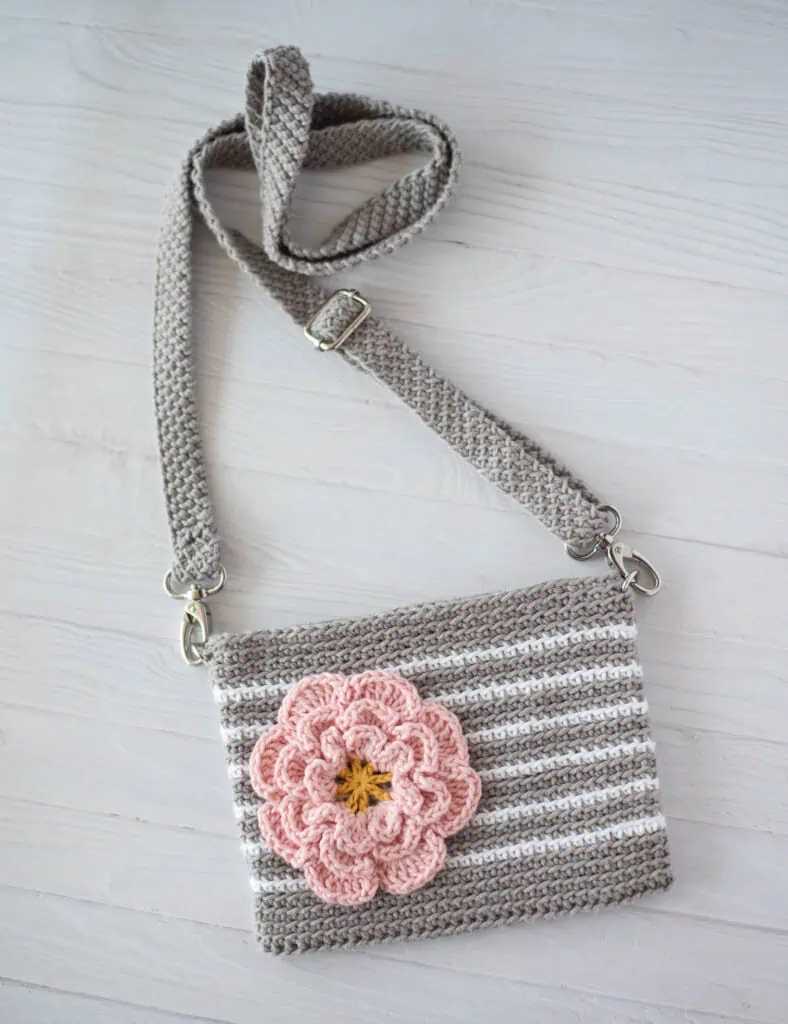
Another distinctive feature is the purse hardware. Two half D rings are incorporated directly into the final rounds of the bag, while two 1-inch oval swivel snap hooks and a 1-inch moving bar slide are used with the strap. The moving bar slide allows the strap length to be adjusted.
This guide keeps the original construction and technical instructions intact while organizing the project into clear stages so you can follow the bag from materials and gauge through the flower, body, strap, and hardware assembly.
Project Overview
The Wander Bloom Bag uses worsted weight cotton yarn and a US G/6 4.0 mm crochet hook. The sample uses WeCrochet Dishie cotton yarn. The main body is silver with white stripes, and the flower uses blush pink with a small amount of Brulee yellow for the center.
The finished bag measures approximately 8 inches wide by 6 inches tall, excluding the strap. The original gauge is about 17 single crochet stitches to 4 inches with the specified yarn and hook. The gauge does not need to be exact.
The bag itself is constructed from 68 stitches worked in continuous rounds. The strap is worked separately and then assembled with the purse hardware. The flower is also made separately and sewn onto the completed bag using the long strand left at the end of the flower.
Materials You Will Need
- Worsted weight cotton yarn, with the sample using WeCrochet Dishie
- Silver: 145 yards
- White: 30 yards
- Blush: 25 yards
- Brulee: 2 yards
- US G/6 4.0 mm crochet hook
- Two ½ D rings, nickel finish
- Two 1-inch oval swivel snap hooks, nickel finish
- One 1-inch moving bar slide, nickel finish
- Tapestry needle
- Optional zipper and fabric for a lining, plus sewing needle and coordinating thread
The original pattern also points crocheters toward resources for crochet abbreviations, US-to-UK stitch conversion, basic crochet skills, stitch tutorials, and an invisible seamless join. These resources can be useful if you encounter terminology that is unfamiliar while working through the project.
Important Crochet Abbreviations
- ch = chain
- sc = single crochet
- hdc = half double crochet
- dc = double crochet
- sl st = slip stitch
- st = stitch(es)
- BLO = work through back loop only
Gauge and Finished Measurements
With the yarn and hook specified for the project, the stated gauge is approximately 17 single crochet stitches to 4 inches, or about 4.25 stitches per inch. The pattern specifically notes that the gauge does not need to be exact.
The completed bag is approximately 8 inches wide by 6 inches tall, not including the shoulder strap. The sample strap is made 60 inches long for a crossbody bag with an adjustable bar slide, although the original instructions allow the strap length to be adjusted to your needs.
Before You Begin the Flower
The flower is made separately from the bag and is constructed in six rounds. It uses a magic ring as its foundation. The design creates three-dimensional-looking layers by working later rounds behind the petals formed earlier.
One particularly important instruction occurs in R3 and R5: the previously made petals are pushed forward so that you can work behind them. This creates the chained spaces used for the next layer of petals. Keeping the petals positioned forward during these rounds helps preserve the intended construction.
Making the Wander Bloom Flower
Flower Center — Round 1
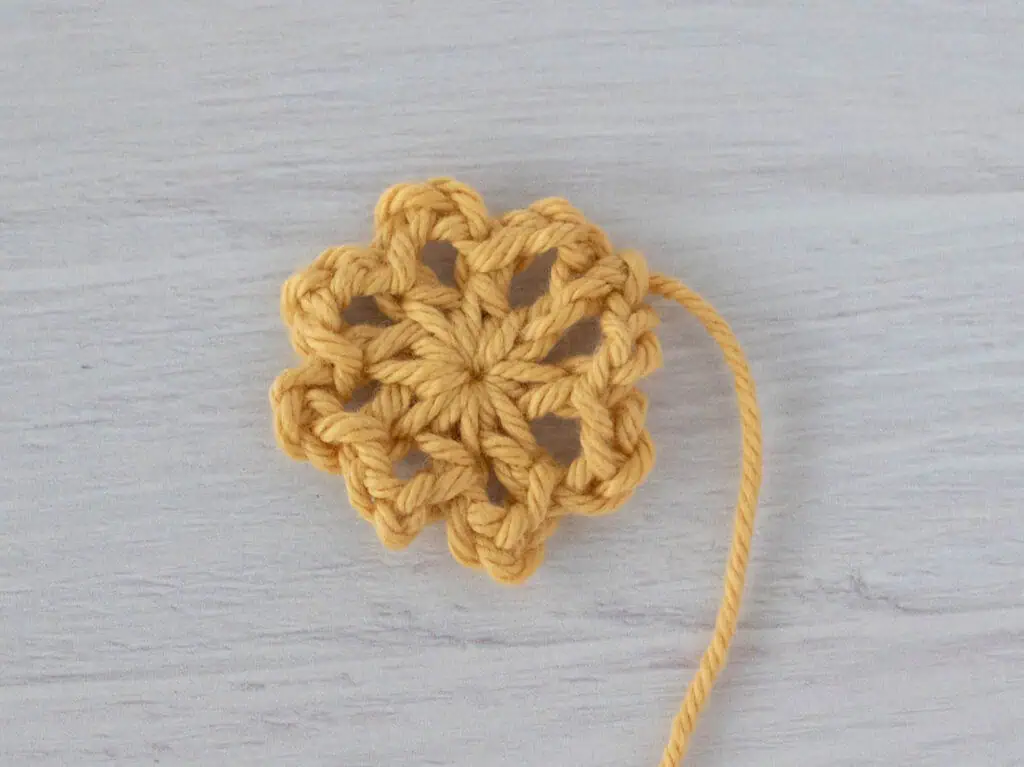
With Bruelee (Yellow) color yarn, make a magic ring.
R1: Ch 5, which counts as the first hdc and ch3. Working in the magic ring, work hdc, ch 3. Repeat from the asterisk 7 times for a total of 8 spaced hdc. Join with a sl st to the 2nd starting ch. Fasten off.
First Layer of Pink Petals — Round 2
Join Blush pink yarn into any chain-3 space.
R2: Ch 1, then work (sc, ch 2, 3dc, ch 2, sc) into the same space as joining. This creates one petal. In the next space, work the same sequence: (sc, ch 2, 3dc, ch 2, sc). Repeat around.
Do not join at the end of the round. This round creates a total of 8 petals.
Creating the Spaces Behind the Petals — Round 3
For R3, push the petals from R2 forward. The next round is worked behind those petals, using the original hdc stitches from the flower center to create the next set of chained spaces.
R3: Push petals forward. Work ch 4, sc into the top of the next hdc from round 1. Repeat around for a total of 8 ch-4 loops. Do not join at the end of the round.
Second Layer of Petals — Round 4
R4: In the next ch-4 loop, work (sc, ch 2, 5dc, ch 2, sc). This creates one petal. Repeat around for a total of 8 petals. Do not join at the end of the round.
Creating the Outer Petal Spaces — Round 5
Round 5 uses the same general construction idea as R3. Push the petals forward so that you can work behind them.
R5: Push petals forward to work behind them. Work ch 6, skip petal and work a sc into the next sc from round 3. Repeat around for a total of 8 ch-6 loops. Do not join at the end of the round.
Final Flower Petals — Round 6
R6: Working in the ch-6 loops, work (sc, ch 2, 7dc, ch 2, sc). This makes one petal. Repeat around for a total of 8 petals.
Fasten off the pink yarn, leaving a very long strand for sewing the appliqué onto the bag. Weave in the other ends, making sure the center of the magic ring is tight and secure.
Building the Crochet Bag
The main bag begins with a chain of 34 using Silver yarn. Unlike a flat rectangle worked back and forth, the foundation chain is worked around both sides so that the piece forms the beginning of the bag body. The bag is then worked continuously without joining each round.
Foundation and First Round
With Silver yarn, chain 34.
R1: Single crochet in the 2nd chain from the hook and in each chain until the last chain. Work 3sc in the last chain. Rotate the work and continue along the opposite side of the chain. Sc in each chain across until the very last chain. Work 2 stitches in the last chain.
This totals 68 stitches, including the 3 stitches worked at either end. Do not join. The rows are worked in continuous rounds.
Creating the Initial Texture
R2-5: Sc in back loop only around, maintaining 68 stitches.
Working in BLO is an important part of the appearance and construction of the bag. Continue to maintain the 68-stitch count as you move through these rounds.
Understanding the Stripe Sequence
The body uses alternating Silver and White rounds. Because the bag is worked in continuous rounds, changing colors can create a slight jog. The original instructions suggest carrying the unworked yarn on the wrong side until it is needed again. If the slight jog is not a concern, you can proceed as written. A jogless join technique can alternatively be used when changing colors.
The stripe sequence is as follows:
- R6: White, sc in BLO around, 68 st
- R7-8: Silver, sc in BLO around, 68 st
- R9: White, sc in BLO around, 68 st
- R10-11: Silver, sc in BLO around, 68 st
- R12: White, sc in BLO around, 68 st
- R13-14: Silver, sc in BLO around, 68 st
- R15: White, sc in BLO around, 68 st
- R16-17: Silver, sc in BLO around, 68 st
- R18: White, sc in BLO around, 68 st
- R19-20: Silver, sc in BLO around, 68 st
- R21: White, sc in BLO around, 68 st
- R22-23: Silver, sc in BLO around, 68 st
At every stage, the stitch count remains 68 stitches. Keeping track of the round numbers and color changes is especially useful here because the stripes are part of the finished appearance.
Adding the D Rings
The D rings are crocheted directly into Round 24. Before beginning this round, stop and mark the 3 stitches on each side of the bag.
The pattern notes that these will not necessarily be the very first stitch of the round because stitches shift slightly when working continuously in the round. Lay the bag flat and determine the 3 stitches at the top of each side of the bag before proceeding.
R24: Continuing with Silver, sc in the BLO to the first marked stitch. Hold the flat side of the D ring against the stitches. Work a sc over the D ring and through both loops of the bag at the same time over the next 3 stitches. Continue with sc in the BLO until reaching the second side.
Repeat the same process for the second D ring, working a sc over the D ring and through both loops for 3 stitches. Sc BLO for the remaining stitches in the row.
The completed round has 68 stitches.
Final Bag Round
R25: Sc in BLO around, maintaining 68 stitches. Fasten off. Slip stitch to the next stitch or use an invisible join. Weave in the ends.
The main body of the bag is now complete. The D rings provide the attachment points for the shoulder strap.
Creating the Tunisian Modified Simple Stitch Strap
The shoulder strap is one of the distinctive parts of the Wander Bloom design. It is worked using a Tunisian modified simple stitch on a regular crochet hook.
The technique creates a slight increase on the right side and a slight decrease on the left side, which makes the work slant. As a result, the finished strap looks as though its rows are worked diagonally. Each end forms a point that will be sewn down during finishing.
Beginning the Strap
To begin, chain 5. Pull up a loop in the 2nd chain from the hook and in each chain across.
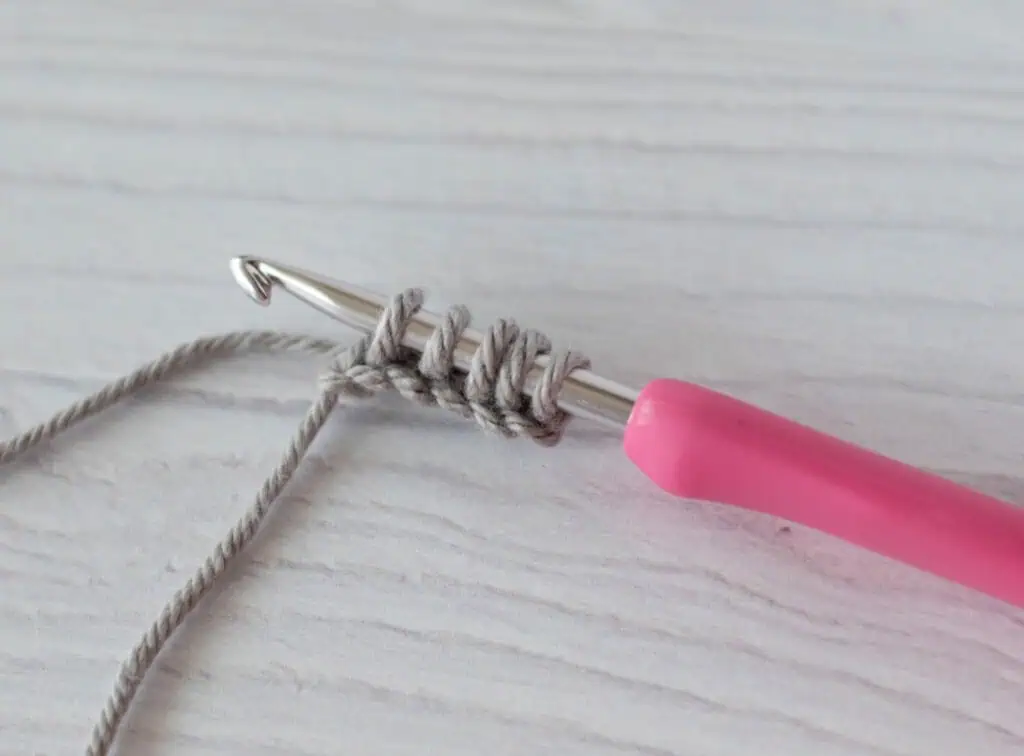
Then yarn over and pull through 2 loops. Repeat from the asterisk across until only one loop remains. There are 5 stitches.
Working the Modified Simple Stitch
Each row begins with the same basic setup. There is a vertical bar directly to the left of the hook and a loop between the two bars.
Chain 1 to start the row. Insert the hook through the next vertical bar and top loop.
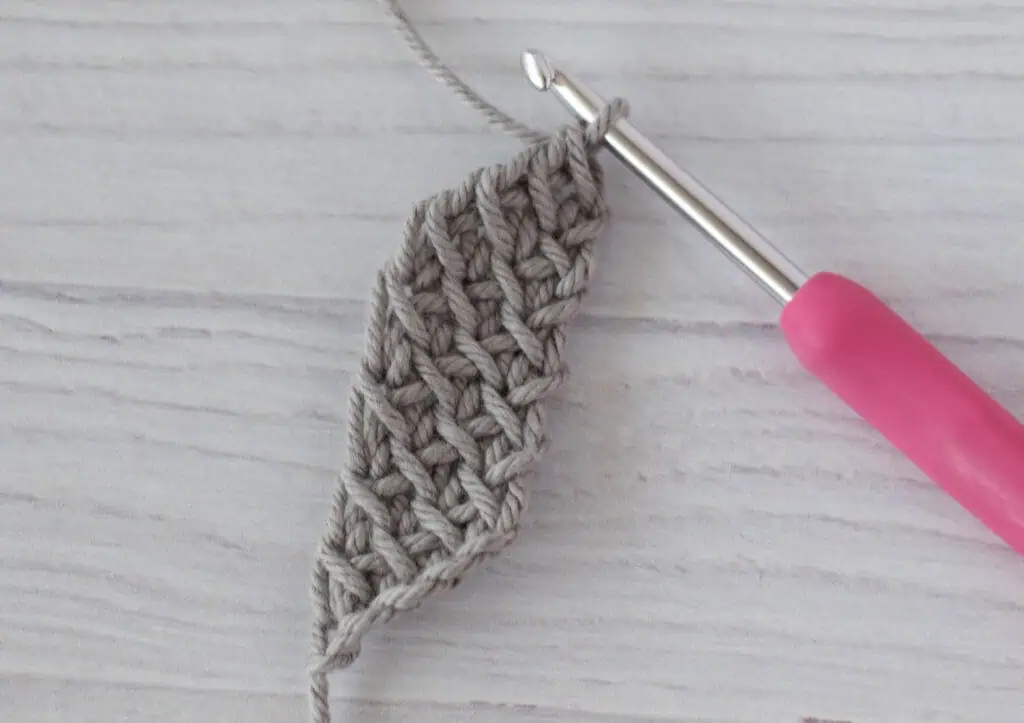
Yarn over and pull a loop through. Two loops are now on the hook.
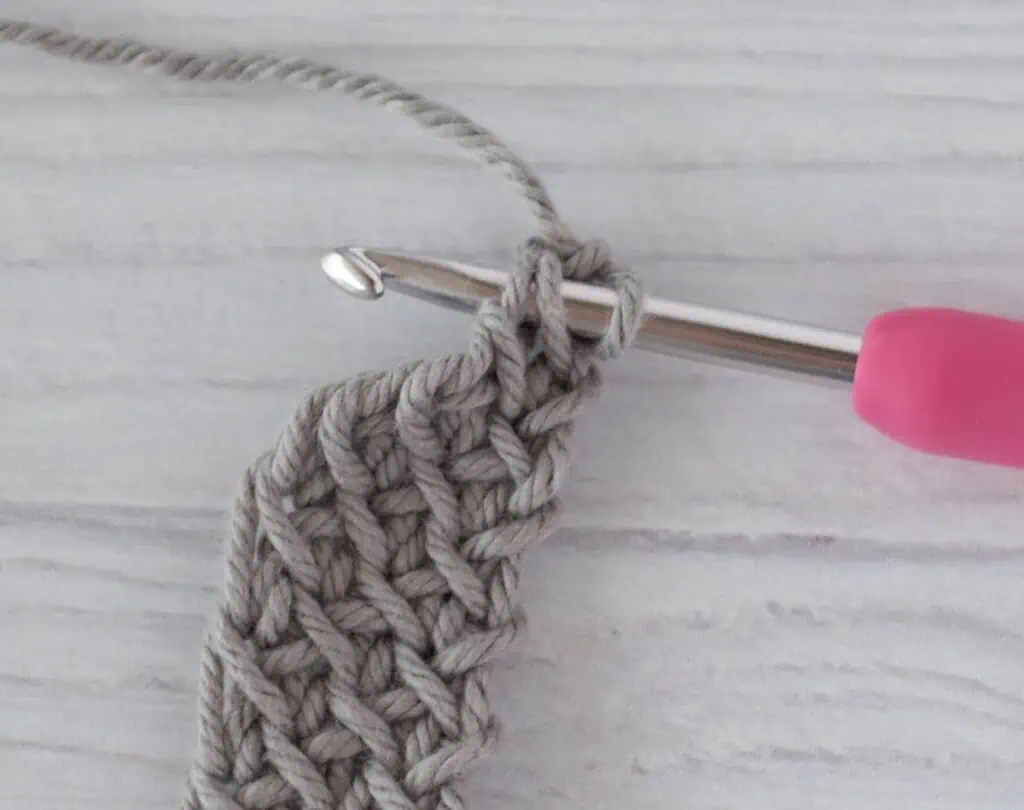
Repeat this process across the row until 5 loops are on the hook.
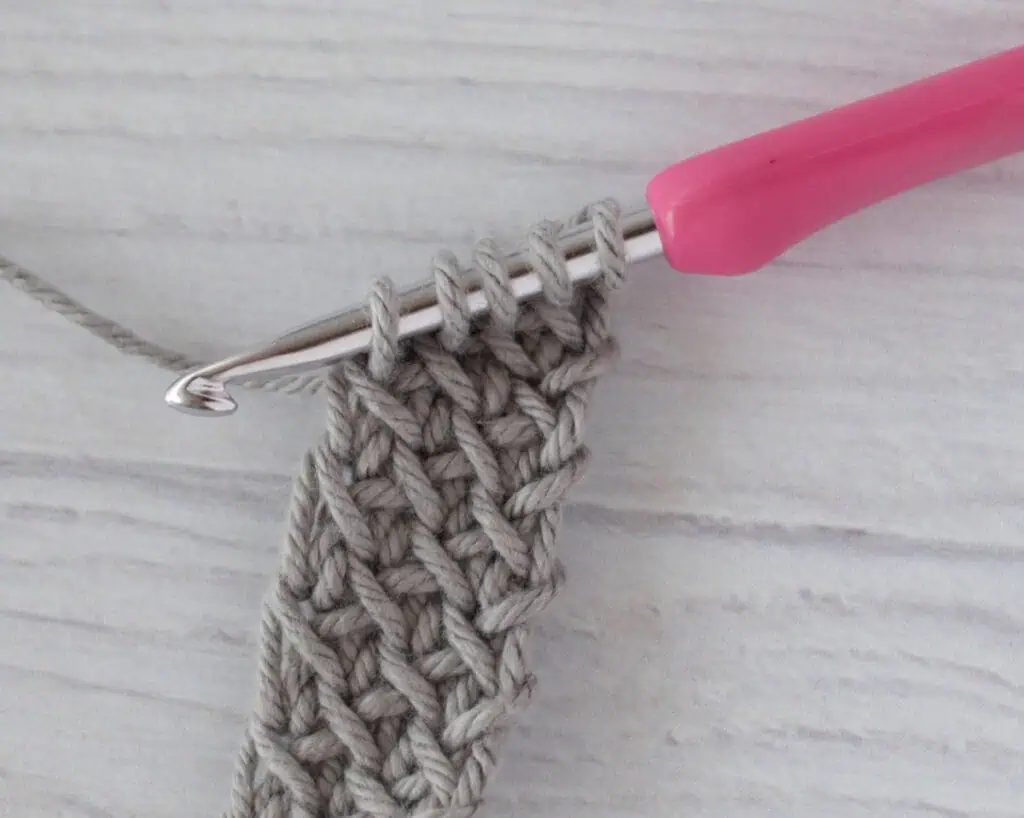
For the second half of the row, yarn over and pull through the first 2 loops on the hook. Repeat across the row.
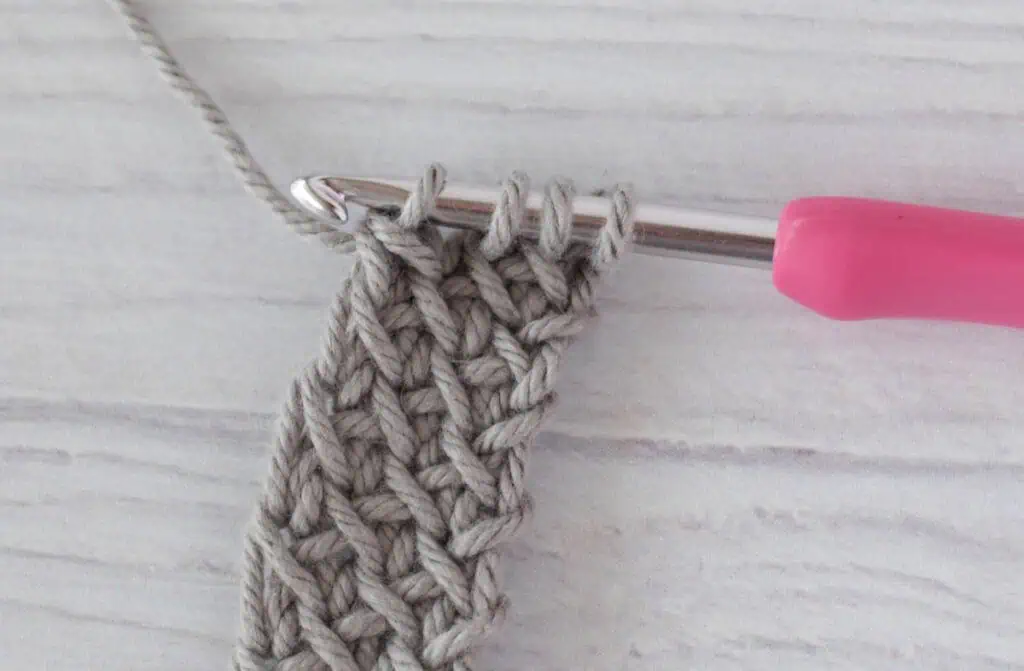
At the end of the row, there is one loop on the hook.
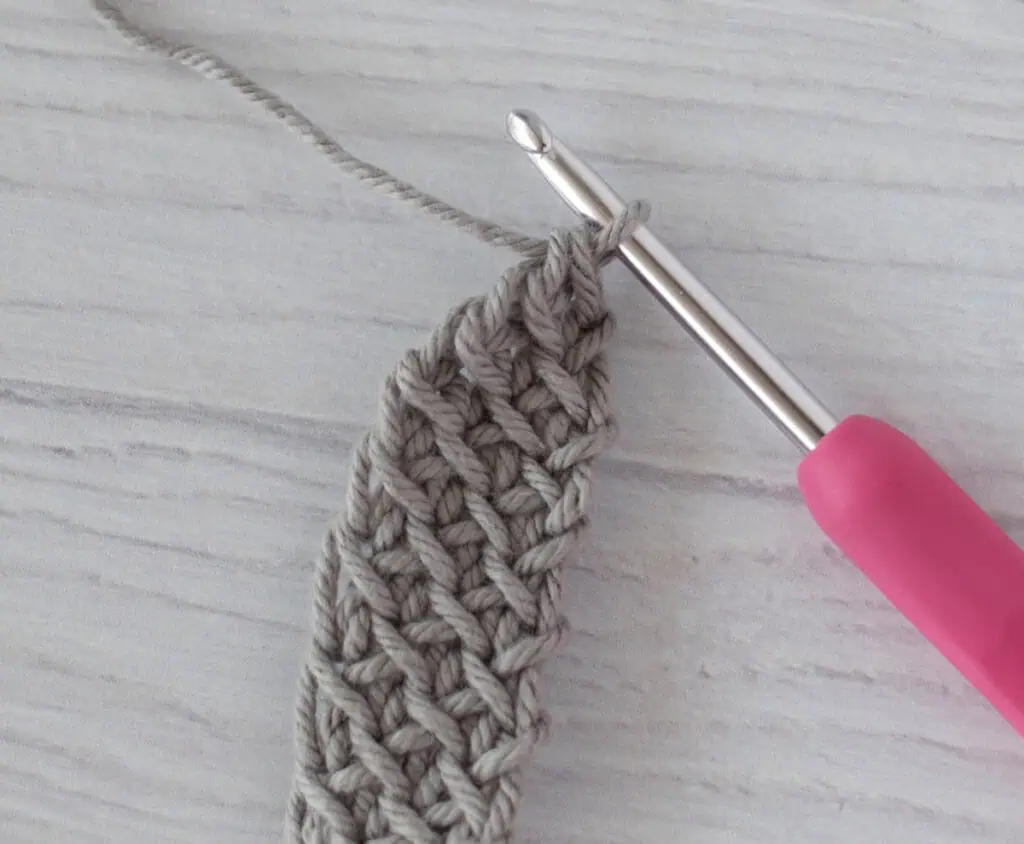
Continue working the Tunisian modified simple stitch, remembering to chain 1 at the start of each row. Continue until the strap reaches the desired length. The sample strap is 60 inches long for a crossbody bag with an adjustable bar slide. The pattern allows the length to be adjusted to suit your needs.
Attaching the Purse Hardware
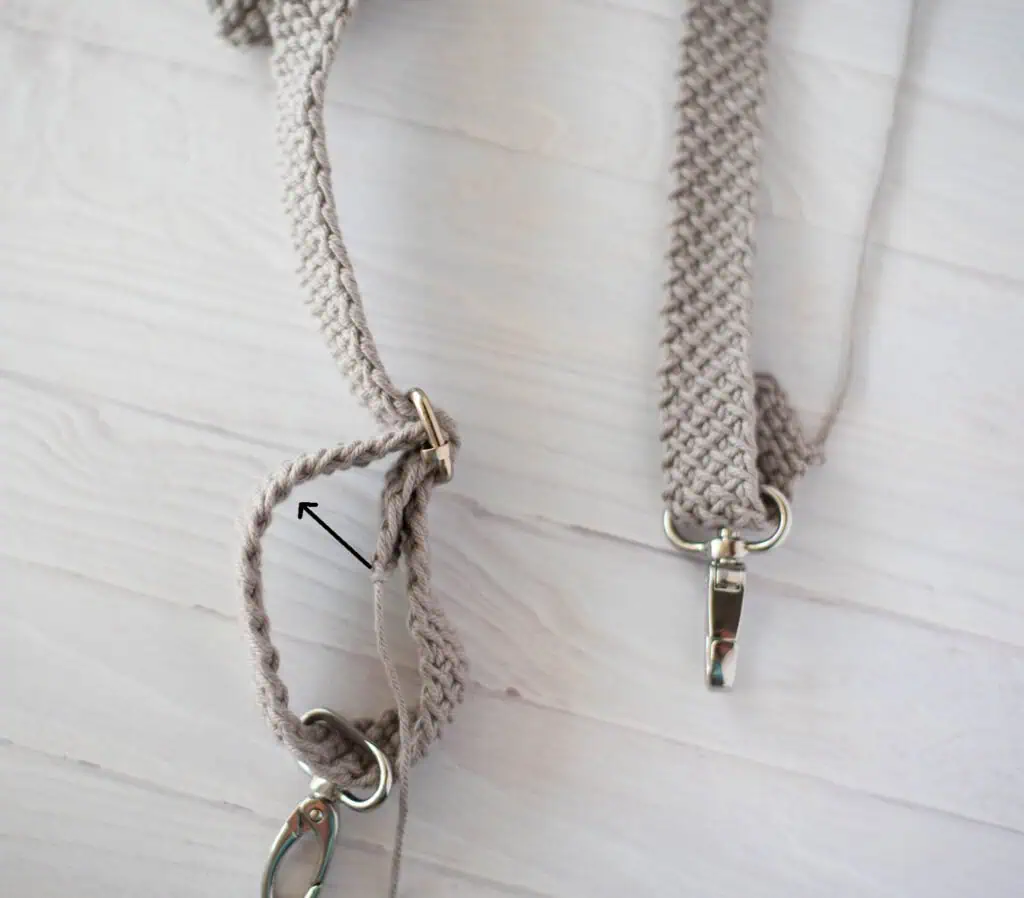
Once the strap is complete, the next stage is threading it through the moving bar slide and swivel snap hook. The original instructions note that attaching the bar slide can be confusing, so following the sequence carefully is helpful.
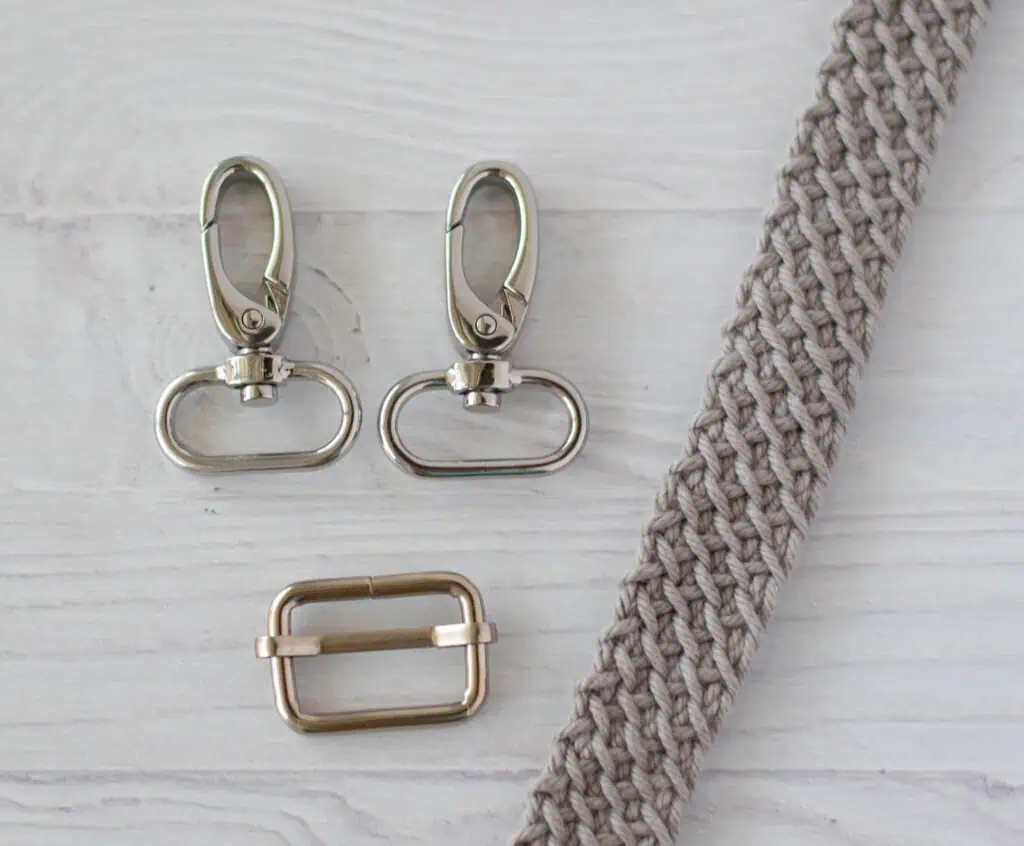
First, thread the strap through the bar slide and then through one of the swivel snap hooks.
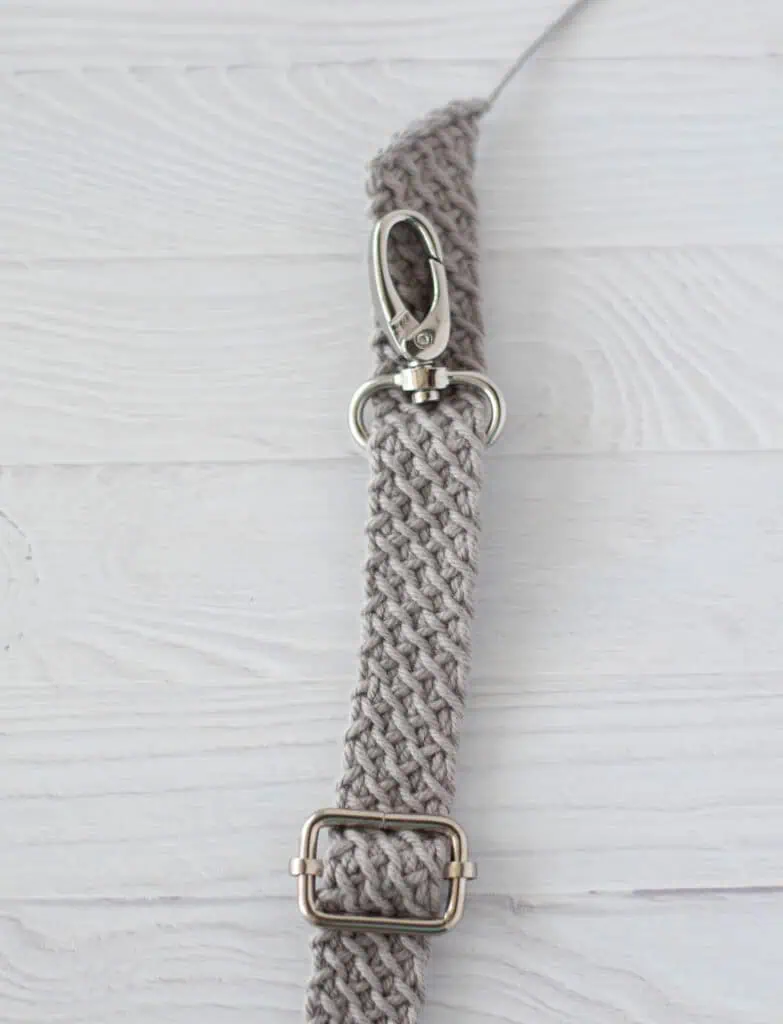
Take the end of the strap and insert it behind the portion of the strap already positioned in the bar slide. You may need to push the strap out to make everything fit and then snug it up again.
Leave the small piece at the end and sew it to the strap following the placement shown in the original construction instructions. When finished, the strap should be able to loosen and tighten, allowing the length to be adjusted.
Sewing the Flower onto the Bag
The completed flower is designed to be sewn onto the front of the bag. During R6, the pink yarn is intentionally left with a very long strand so it can be used to sew the appliqué onto the bag.
Before sewing, make sure the center of the flower is secure and that the other yarn ends have been woven in. The flower’s layered construction is created by the petals being pushed forward during R3 and R5, so handle the completed flower in a way that preserves those layers while positioning it on the bag.
The original project photos show the flower positioned prominently on the front of the striped bag, creating the signature Wander Bloom appearance.
Optional Ways to Close the Bag
The bag can be left open or finished with a closure. The original instructions describe several options rather than requiring one specific closure method.
- Hand sew a zipper in place.
- Sew a fabric lining with a zipper.
- Sew a fabric lining with purse magnets.
- Crochet a simple chain loop and sew on a button.
If you choose to add a closure, the optional materials listed for the project include a zipper and fabric for a lining, along with a sewing needle and coordinating thread.
Useful Stitch-Count Checkpoints
This pattern has several useful points where checking the stitch count can help keep the construction on track.
- The first bag round totals 68 stitches.
- R2-5 are worked in BLO with 68 stitches.
- Every stripe round from R6 through R23 maintains 68 stitches.
- R24, including the D rings, has 68 stitches.
- R25 has 68 stitches.
- The flower has 8 petals in R2, R4, and R6.
- R3 creates 8 ch-4 loops.
- R5 creates 8 ch-6 loops.
- The strap begins with 5 stitches.
These checkpoints are particularly helpful when working continuous rounds because there is no join marking the beginning and end of every round.
Helpful Construction Tips
Keep the Continuous Rounds Organized
The bag does not use joined rounds. Instead, the instructions say to continue working in continuous rounds. Because of this construction, the stitches can shift slightly, which is especially important when locating the 3 marked stitches on each side for the D rings.
Pay Attention to the Color Changes
The stripe sequence alternates Silver and White according to specific round numbers. Carrying the unused yarn on the wrong side until it is needed again can make the color changes easier to manage. The pattern also notes that color changes worked in the round can create a slight jog and gives a jogless join technique as an alternative.
Do Not Miss the BLO Instruction
R2 through R25 of the bag are specifically described as sc in BLO around, except where R24 adds the D rings over both loops. Maintaining awareness of whether you are working through the back loop or both loops is important for following the original construction accurately.
Take Care with the D Ring Placement
The D rings are added during R24 rather than sewn on afterward. The marked stitches need to be identified by laying the bag flat because the beginning of a continuous round may not line up exactly with the side of the bag.
Follow the Strap Structure Carefully
The strap is different from the main body because it uses a Tunisian modified simple stitch on a regular crochet hook. Each row begins with chain 1, and the forward and return portions of the row are worked differently. The finished construction naturally slants because of the slight increase on the right and decrease on the left.
Troubleshooting and Checkpoints
If the bag body does not appear to have the expected width or shape, first check the stitch count rather than changing the stated pattern. The body should maintain 68 stitches through the listed rounds.
If the stripe pattern does not appear as expected, compare the current round with the color sequence from R6 through R23. The white rounds occur at R6, R9, R12, R15, R18, and R21, with Silver used in the specified two-round intervals between them.
If the D rings appear uneven, lay the bag flat again and reassess the three marked stitches on each side. The pattern specifically notes that the side stitches are not necessarily the first stitch of the round.
If the strap does not look diagonal, review the modified simple stitch placement and make sure the strap is being worked according to the stated forward and return process. The diagonal effect is an intentional feature of this construction.
Quick Project Checklist
- Prepare the specified worsted weight cotton yarn and US G/6 4.0 mm hook.
- Make the yellow flower center with a magic ring.
- Complete the 8-petal pink flower through R6.
- Leave the long pink strand for sewing the flower appliqué.
- Chain 34 with Silver yarn for the bag.
- Complete the bag foundation with 68 stitches.
- Work the continuous BLO rounds while following the Silver and White stripe sequence.
- Mark the 3 stitches on each side before R24.
- Crochet the two D rings into R24.
- Complete R25 and fasten off.
- Make the strap beginning with chain 5.
- Work the Tunisian modified simple stitch until the strap reaches the desired length.
- The sample strap is 60 inches long.
- Thread the strap through the moving bar slide and swivel snap hook.
- Sew the strap end securely so the adjustment mechanism can loosen and tighten.
- Sew the completed flower onto the front of the bag.
- Add an optional zipper, lining, magnets, or button-and-chain closure if desired.
Frequently Asked Questions
How big is the finished Wander Bloom Bag?
The finished bag is approximately 8 inches wide by 6 inches tall, excluding the strap.
What crochet hook size is used?
The pattern uses a US G/6 4.0 mm crochet hook.
How many stitches are in the bag?
The bag body is maintained at 68 stitches. R1 totals 68 stitches, and the subsequent listed rounds maintain that stitch count.
How long is the sample strap?
The sample strap is 60 inches long for a crossbody bag with an adjustable bar slide. The instructions allow the strap length to be adjusted to your needs.
Does the strap use a Tunisian crochet hook?
No. The pattern specifically describes the strap as a Tunisian modified simple stitch worked on a regular crochet hook.
Can the bag be made without the hardware?
The original instructions describe the purse hardware as part of the design, including two ½ D rings, two 1-inch oval swivel snap hooks, and one 1-inch moving bar slide. The instructions also note that the strap can instead be adjusted to a fixed length and sewn directly onto the bag if preferred.
Can the bag have a closure?
Yes. The original pattern gives several possibilities: a hand-sewn zipper, a fabric lining with zipper, a fabric lining with purse magnets, or a simple crocheted chain loop sewn to a button.
Finishing the Wander Bloom Bag
Once the flower, bag body, and strap are complete, the project comes together through the combination of the decorative appliqué and adjustable hardware. The silver and white striped body provides the foundation, while the layered blush flower supplies the decorative focal point.
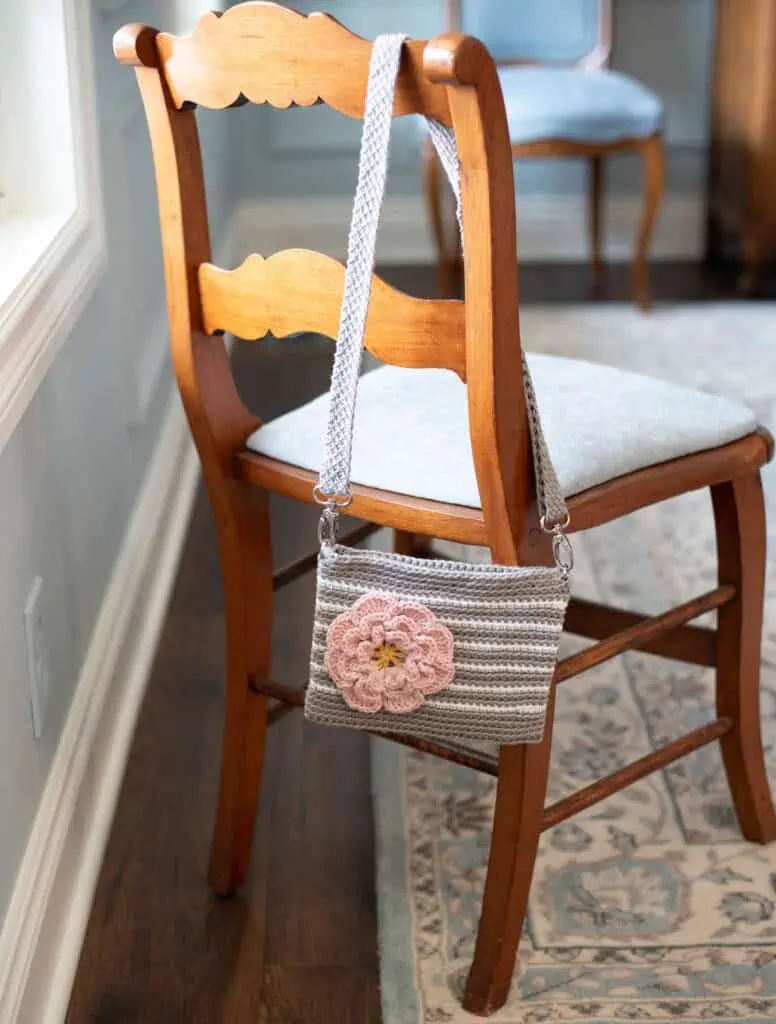
The hardware gives the strap an adjustable feature, while the D rings are integrated directly into the upper sides of the bag. The flower is sewn onto the front using the long strand reserved during R6. Together, these details give the project its distinctive finished appearance.
Final Thoughts on the Project
The Wander Bloom Crochet Bag brings together a compact bag construction, decorative crochet flower, striped colorwork, continuous BLO rounds, integrated purse hardware, and a Tunisian-inspired strap. Although the project contains several different techniques, each section has a defined purpose and can be checked against its stitch counts and round numbers as you work.
The main bag remains consistent at 68 stitches, making stitch-count checks straightforward. The flower follows a repeating eight-petal structure, while the strap uses five stitches as its foundation and continues until the desired length is reached. The sample’s 60-inch strap creates a crossbody-style bag with an adjustable bar slide.
For the cleanest result, take particular care with the continuous rounds, the placement of the D rings, the layered construction of the flower, and the threading of the strap through the hardware. The finished project is a small practical accessory with plenty of room for color and finishing variations while retaining the original construction of the Wander Bloom design.