
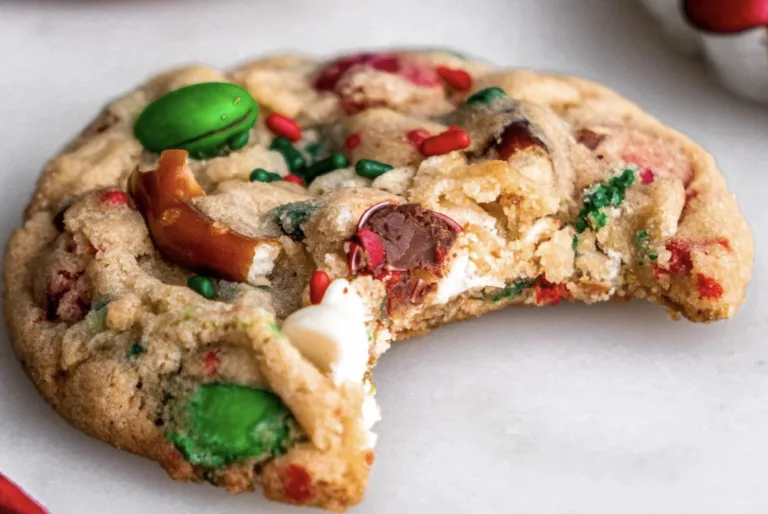
Christmas Kitchen Sink Cookies are the perfect combination of sweet, salty, crunchy, and chewy. Packed with red and green M&M’s, creamy white chocolate chips, crunchy pretzel pieces, crushed potato chips, and festive sprinkles, these colorful cookies bring plenty of holiday cheer to any dessert table.
If you love cookies with a little bit of everything, this recipe is an excellent choice. Every bite offers a delicious contrast of textures and flavors, from the buttery cookie dough to the salty crunch of pretzels and potato chips. The white chocolate adds sweetness, while the red and green candies and sprinkles make these cookies look especially festive for Christmas.
One of the best things about this recipe is how quickly it comes together. There is no need to chill the dough before baking, so you can prepare the cookies and have them ready in about 30 minutes. They are also fun to make with children, who can help fold in the colorful candies, chocolate chips, and crunchy mix-ins.
Whether you are preparing a Christmas cookie platter, baking for a holiday party, or putting together homemade gifts for friends and family, these Christmas Kitchen Sink Cookies are a fun and delicious addition to your holiday baking list.
Why You’ll Love These Christmas Kitchen Sink Cookies
The Perfect Sweet and Salty Combination
These cookies combine several flavors in one delicious treat. The brown sugar and white chocolate provide sweetness, while the pretzels and potato chips add a salty crunch. Red and green M&M’s bring extra chocolate flavor and a festive appearance.
The combination keeps every bite interesting without relying on a single ingredient for all the flavor.
Easy to Make
You do not need complicated equipment or advanced baking skills to make these cookies. An electric mixer, a mixing bowl, a spatula, and a couple of baking sheets are enough to get started.
The dough comes together in a few simple steps, and because it does not require chilling, you can move directly from mixing to baking.
Perfect for Christmas
Red and green candies and sprinkles give these cookies a cheerful holiday look. They are ideal for Christmas dessert tables, cookie exchanges, family gatherings, and seasonal parties.
You can also package them in decorative cookie boxes or bags to give as homemade holiday gifts.
Fun for Kids to Help Make
Children can help measure ingredients, add the mix-ins, and decorate the dough balls with extra candies and chocolate chips. The variety of colorful ingredients makes the preparation process especially enjoyable.
For younger children, an adult should handle the electric mixer, oven, and hot baking sheets.
Easy to Customize
Kitchen sink cookies are designed to include a variety of mix-ins, so you can adapt the recipe to your preferences. You can replace one of the existing additions with butterscotch chips, peanut butter chips, nuts, or other chocolate chips.
For the best results, substitute ingredients rather than continually adding more. The dough already contains several mix-ins, and too many additions can make the cookies difficult to hold together.
Ingredients for Christmas Kitchen Sink Cookies
These cookies use familiar baking ingredients combined with sweet and salty additions. For the most reliable results, measure everything carefully and prepare the mix-ins before making the dough.
Butter and Sugars
Salted butter: Use 3/4 cup of softened salted butter. Softened butter is easier to cream with the sugars and helps create a smooth, well-mixed dough. It should be soft enough to press gently with a finger but not melted.
Light brown sugar: Use 3/4 cup of packed light brown sugar. Brown sugar contributes sweetness, moisture, and a rich flavor that complements the salty mix-ins.
Granulated white sugar: Use 1/4 cup of granulated sugar. Combined with brown sugar, it helps balance the cookie’s sweetness and texture.
Egg Yolks and Vanilla
Egg yolks: This recipe requires 2 egg yolks at room temperature. They help bind the dough and contribute to a rich cookie texture.
Vanilla bean paste or vanilla extract: Use 2 teaspoons. Vanilla bean paste offers a rich vanilla flavor, but vanilla extract is also suitable.
Dry Ingredients
All-purpose flour: Use 1 1/2 cups of all-purpose flour, spooned into the measuring cup and leveled. Proper measurement is particularly important because too much flour can make the cookies dry or crumbly.
Baking powder: Use 1/2 teaspoon. It helps the cookies rise slightly as they bake.
Baking soda: Use 1/2 teaspoon. It contributes to the cookies’ spread and texture.
Salt: Use 1/2 teaspoon to balance the sweetness and bring out the flavors of the other ingredients.
Christmas Mix-Ins
Red and green M&M’s: Use 1/2 cup. These colorful candies add chocolate flavor and give the cookies their Christmas appearance.
White chocolate chips: Use 1/3 cup. Good-quality white chocolate chips provide a creamy sweetness that works well with the salty ingredients.
Pretzel pieces: Use 1/3 cup of pretzel pieces. Break the pretzels into small pieces so they distribute evenly throughout the dough.
Potato chip pieces: Use 1/3 cup of crushed potato chip pieces. They add a distinctive salty crunch and help create the signature kitchen sink cookie flavor.
Red and green jimmies: Use 2 tablespoons. These festive sprinkles add extra color. Jimmies are a good choice because they generally hold their shape better during baking than some other sprinkle varieties.
Equipment You’ll Need
Gather your equipment before starting so the preparation process is simple and organized.
- Large mixing bowl
- Electric hand mixer or stand mixer
- Measuring cups and spoons
- Rubber spatula
- Two baking sheets
- Parchment paper
- Cookie scoop or spoon
- Cooling rack
- Optional large circular cookie cutter for shaping the baked cookies
Parchment paper helps prevent sticking and makes cleanup easier. A cookie scoop can also help divide the dough into evenly sized portions so the cookies bake more consistently.
How to Make Christmas Kitchen Sink Cookies
Follow these steps to prepare the cookie dough, add the mix-ins, and bake a batch of colorful Christmas cookies.
Step 1: Prepare the Oven and Baking Sheets
Preheat your oven to 350°F. Line two baking sheets with parchment paper and set them aside.
Preparing the baking sheets before mixing the dough makes it easier to transfer the cookie portions directly to the oven. Make sure the parchment paper lies flat so the dough balls have a stable surface.
Step 2: Cream the Butter and Sugars
Place the softened salted butter, packed light brown sugar, and granulated white sugar in a large mixing bowl.
Using an electric mixer, beat the butter and sugars together for approximately 2 minutes, or until the mixture looks light and fluffy.
This step is important because it helps create the foundation for the cookie texture. Make sure the butter is softened rather than melted, as melted butter can change how the cookies spread during baking.
Scrape down the sides of the bowl if necessary so the ingredients mix evenly.
Step 3: Add the Egg Yolks and Vanilla
Add the 2 room-temperature egg yolks and the vanilla bean paste or vanilla extract to the butter and sugar mixture.
Mix on medium speed for approximately 2 minutes, until the mixture becomes pale in color and fluffy.
Do not stop mixing as soon as the ingredients appear combined. Beating the egg yolks thoroughly into the butter and sugar helps create the intended cookie texture.
If some of the mixture sticks to the sides of the bowl, scrape it down with a spatula before continuing.
Step 4: Mix in the Dry Ingredients
Add the all-purpose flour, baking powder, baking soda, and salt to the bowl.
Mix until the dry ingredients are incorporated and no large pockets of flour remain. Avoid unnecessary mixing once the dough comes together.
The dough should be thick enough to hold the candies and crunchy additions without becoming overly dry.
For the best results, measure the flour carefully. Spoon it into your measuring cup and level the top with the back of a knife instead of dipping the measuring cup directly into the flour container.
Step 5: Fold in the Mix-Ins
Add the red and green M&M’s, white chocolate chips, pretzel pieces, potato chip pieces, and red and green jimmies to the dough.
Use a rubber spatula to fold everything together gently. Continue until the additions are distributed throughout the dough.
Try not to crush the pretzels and potato chips too much while mixing. Keeping some small pieces intact helps preserve their crunchy texture.
You want each cookie to contain a mixture of candies, chocolate, pretzels, potato chips, and sprinkles. If some ingredients gather at the bottom of the bowl, gently fold the dough a few more times to distribute them.
Step 6: Portion the Cookie Dough
Divide the dough into 20 balls.
Place the dough balls on the prepared baking sheets, leaving approximately 2 inches between each portion. The cookies need enough space to spread during baking.
For a more uniform appearance, use a cookie scoop or measure similar amounts of dough for each cookie.
Optional decoration: Press a few extra M&M’s, white chocolate chips, pretzel pieces, or sprinkles onto the tops of the dough balls before baking. This is optional, but it helps make the finished cookies look colorful and attractive.
Step 7: Bake the Cookies
Place the baking sheets in the preheated oven and bake for 10–12 minutes.
Choose the baking time according to your preferred texture:
- 10 minutes: The centers will be softer and chewier.
- 12 minutes: The edges will be crisper.
Keep an eye on the cookies as they approach the end of the baking time. Oven temperatures and baking sheets can vary, so the cookies may need slightly different timing.
Avoid overbaking if you prefer a soft center. The cookies will continue to settle as they cool on the baking sheet.
Step 8: Shape the Cookies if Desired
For a neat, round appearance, you can shape the cookies immediately after removing them from the oven.
While the cookies are still hot and soft, place a large circular cookie cutter around one cookie. Gently swirl the cutter around the edges to guide the cookie into a more even circle.
Repeat with the remaining cookies as needed.
This technique is optional. It is particularly useful if some cookies spread unevenly or if you want them to look more uniform on a Christmas cookie platter.
Be careful when handling the hot baking sheet, and avoid pressing down on the cookies themselves.
Step 9: Cool the Cookies
Let the cookies cool on the baking sheets for 5 minutes.
This brief resting period allows them to firm up enough to move without breaking apart. Then transfer the cookies to a cooling rack and let them cool for another 10 minutes.
Allowing the cookies to cool properly also gives the chocolate and other ingredients time to settle.
Once cooled, the cookies are ready to serve, package, or store.
Tips for the Best Christmas Kitchen Sink Cookies
Measure the Flour Correctly
Accurate flour measurement is one of the most important steps in cookie baking. Too much flour can make the dough dry and the finished cookies less tender.
Instead of scooping flour directly from its container with a measuring cup, use a spoon to transfer the flour into the cup. Level the top with the back of a knife.
For greater accuracy, weigh the flour. One cup of all-purpose flour equals approximately 125 grams, so the 1 1/2 cups required for this recipe equal approximately 187.5 grams.
Use Properly Softened Butter
The butter should be soft enough to cream smoothly with the sugars but should not be melted or greasy.
Butter that is too cold may not combine properly with the sugars. Melted butter can change the dough’s consistency and affect how the cookies spread.
If you have time, allow the butter to soften at room temperature before beginning.
Beat the Egg Yolks Thoroughly
After adding the egg yolks and vanilla, mix for the full 2 minutes or until the mixture looks pale and fluffy.
This step helps incorporate the ingredients evenly and contributes to the desired texture. Do not rush straight to the flour as soon as the yolks disappear into the mixture.
Keep the Mix-Ins in Small Pieces
Break the pretzels and potato chips into small pieces before adding them to the dough. Large pieces can make it harder to portion the cookies evenly and may cause the dough to break apart.
You do not need to crush everything into fine crumbs. A combination of small crunchy pieces and slightly larger pieces gives the cookies a more interesting texture.
Reserve Extra Mix-Ins for the Tops
If you want bakery-style cookies with visible colorful toppings, reserve a few extra candies, chocolate chips, and pretzel pieces for decoration.
Press them gently into the tops of the dough balls before baking. This small step makes the cookies look more festive without changing the main recipe.
Avoid Overloading the Dough
Although kitchen sink cookies are known for their variety of mix-ins, adding too many ingredients can make the dough difficult to handle.
The recipe already includes five different additions. If you want to experiment, replace one ingredient with another rather than adding several more.
Adjust the Baking Time to Your Preference
Bake for about 10 minutes for a chewier center or closer to 12 minutes for crispier edges.
Because the cookies contain several mix-ins, look at the overall shape and edges rather than judging them only by the color of the candies. Let them rest on the baking sheet before moving them to a rack.
Variations and Substitutions
One of the most enjoyable things about kitchen sink cookies is how easy they are to customize. Keep the original recipe’s balance of ingredients in mind when making changes.
Try Different Chocolate Chips
You can replace the white chocolate chips with milk chocolate or dark chocolate chips if you prefer a different chocolate flavor.
Butterscotch chips are another option for a sweeter, caramel-like taste. Peanut butter chips can also work if you enjoy the combination of peanut butter and chocolate.
For the most reliable results, substitute a similar quantity rather than adding another full portion of chips.
Change the Candies
Red and green M&M’s give these cookies their Christmas look, but other candy-coated chocolates can be used if needed.
For a holiday presentation, choose candies in colors that match your Christmas dessert table. Keep the quantity similar so the dough maintains its intended consistency.
Add Nuts
Chopped nuts can add another crunchy element. If you decide to use them, replace part of an existing mix-in rather than increasing the total amount of additions.
Be mindful of nut allergies when baking for parties, cookie exchanges, or school events.
Experiment With Sprinkles
Red and green jimmies are ideal for a Christmas theme, but other festive sprinkle combinations can also work.
Choose sprinkles intended for baking and avoid using a type that melts or bleeds color excessively in the oven.
Make Them for Other Holidays
Although this recipe is designed for Christmas, you can adapt the appearance for other occasions by changing the candy and sprinkle colors.
Use pastel colors for spring celebrations, orange and black for Halloween, or red and pink for Valentine’s Day. The sweet-and-salty combination remains the same.
Can You Make the Dough Ahead of Time?
Yes. The cookie dough can be prepared in advance if you want to save time on the day you plan to bake.
According to the original recipe, the dough can be kept in the refrigerator for up to 3 days or in the freezer for up to 2 weeks.
When you are ready to bake, bring the dough back to room temperature before baking, as recommended in the original instructions. If the dough has become too firm to portion easily, allow it additional time to soften.
If you are preparing the dough ahead for a Christmas gathering, consider portioning it into balls before storing it. This can make baking day more convenient, although the dough should still be brought to room temperature before baking.
Frequently Asked Questions
Can I Add Different Mix-Ins?
Yes. You can replace one of the existing mix-ins with butterscotch chips, peanut butter chips, nuts, milk chocolate chips, or dark chocolate chips.
Because the dough already contains several additions, it is best to substitute rather than add too many extra ingredients. This helps the cookies hold their shape and keeps the dough manageable.
Can I Make the Cookie Dough Ahead of Time?
Yes. The dough can be refrigerated for up to 3 days or frozen for up to 2 weeks.
Bring the dough to room temperature before baking, following the original recipe’s instructions.
Do I Need to Chill the Dough Before Baking?
No. The recipe is designed to be baked without chilling the dough first. After mixing and portioning the dough, you can place the cookies directly into the preheated oven.
Skipping the chilling step is one reason this recipe is convenient when you want homemade Christmas cookies in a short amount of time.
How Do I Make the Cookies Chewier?
For chewier centers, bake the cookies for approximately 10 minutes rather than the full 12 minutes.
Allow them to rest on the baking sheet for 5 minutes after baking. They will continue to settle as they cool, so avoid leaving them in the oven longer than necessary.
How Do I Make the Cookies Round?
Use the circular cookie-cutter method immediately after baking. While the cookies are still hot and soft, gently swirl a large circular cookie cutter around each cookie to guide the edges into a round shape.
This is optional, but it can create a more uniform appearance.
How Should I Store Christmas Kitchen Sink Cookies?
Store leftover cookies in an airtight container for up to 3 days, according to the original recipe.
Allow the cookies to cool completely before placing them in the container. Storing them while warm can trap moisture and affect their texture.
Are These Cookies Good for Christmas Cookie Exchanges?
Yes. Their colorful appearance and combination of sweet and salty ingredients make them a fun addition to a Christmas cookie exchange.
Let the cookies cool completely before arranging them on a platter or packaging them. If stacking them, use care so the candies and chocolate pieces do not become damaged.
Can Children Help Make These Cookies?
Yes. Children can help measure ingredients with supervision, add the mix-ins, and decorate the dough balls with extra candies and sprinkles.
An adult should operate the mixer when appropriate and handle the oven and hot baking sheets.
How to Serve Christmas Kitchen Sink Cookies
These cookies are delicious on their own, but they also fit beautifully into a holiday dessert spread.
- Christmas cookie platters: Arrange them with sugar cookies, chocolate cookies, and other seasonal favorites.
- Holiday parties: Serve them alongside brownies, bars, and bite-sized desserts.
- Hot chocolate: Pair a cookie with a warm mug of hot chocolate for a cozy winter treat.
- Homemade gifts: Place completely cooled cookies in a decorative box or food-safe bag for friends, neighbors, and family.
- Cookie exchanges: Their colorful appearance makes them stand out among traditional Christmas cookies.
For a more polished presentation, arrange the cookies so the red and green candies and sprinkles are visible. A few extra mix-ins pressed into the tops before baking can help create that look.
Christmas Kitchen Sink Cookies Recipe Card
Prep Time: 15 minutes
Cook Time: 10 minutes
Yield: 20 cookies
Oven Temperature: 350°F
Ingredients
- 3/4 cup salted butter, softened
- 3/4 cup light brown sugar, packed
- 1/4 cup granulated white sugar
- 2 egg yolks, at room temperature
- 2 teaspoons vanilla bean paste or vanilla extract
- 1 1/2 cups all-purpose flour, spooned and leveled
- 1/2 teaspoon baking powder
- 1/2 teaspoon baking soda
- 1/2 teaspoon salt
- 1/2 cup red and green M&M’s
- 1/3 cup white chocolate chips
- 1/3 cup pretzel pieces
- 1/3 cup potato chip pieces
- 2 tablespoons red and green jimmies
Instructions
- Preheat the oven to 350°F. Line two baking sheets with parchment paper.
- In a large bowl, cream the softened salted butter, light brown sugar, and granulated sugar with an electric mixer for 2 minutes, until light and fluffy.
- Add the egg yolks and vanilla. Mix on medium speed for 2 minutes, until pale and fluffy.
- Add the flour, baking powder, baking soda, and salt. Mix until combined.
- Fold in the M&M’s, white chocolate chips, pretzel pieces, potato chip pieces, and sprinkles with a spatula.
- Divide the dough into 20 balls and arrange them 2 inches apart on the prepared baking sheets.
- If desired, press extra mix-ins onto the tops of the dough balls.
- Bake for 10–12 minutes. Bake for about 10 minutes for chewier centers or 12 minutes for crisper edges.
- If desired, use a large circular cookie cutter to shape the cookies immediately after baking.
- Cool on the baking sheets for 5 minutes, then transfer to a cooling rack and cool for another 10 minutes.
- Store leftover cookies in an airtight container for up to 3 days.
Final Thoughts
Christmas Kitchen Sink Cookies are a festive way to bring sweet, salty, crunchy, and chewy flavors together in one easy dessert. The combination of M&M’s, white chocolate chips, pretzels, potato chips, and colorful sprinkles makes every cookie feel special.
Since the dough does not require chilling, these cookies are a convenient option for busy holiday baking days. Make them for a Christmas party, share them at a cookie exchange, or package them as homemade gifts.
Follow the simple steps, measure the flour carefully, and choose your preferred baking time for chewy centers or crispier edges. These colorful cookies are a fun addition to any Christmas baking collection.