
Introduction
Looking for a quick, festive Christmas treat that is easy to make and perfect for sharing? These Chocolate-Covered Christmas Pretzel Rods are a delicious combination of crunchy, salty pretzels and sweet chocolate coating, finished with colorful holiday sprinkles, crushed candy canes, or decorative chocolate drizzles.
This no-bake Christmas recipe is ideal for busy holiday schedules because it requires very little preparation and no oven. Simply melt your favorite candy coating, dip the pretzel rods, add festive decorations, and let them set. In approximately 40 minutes, including cooling time, you can have a beautiful batch of homemade treats ready for serving or gifting.
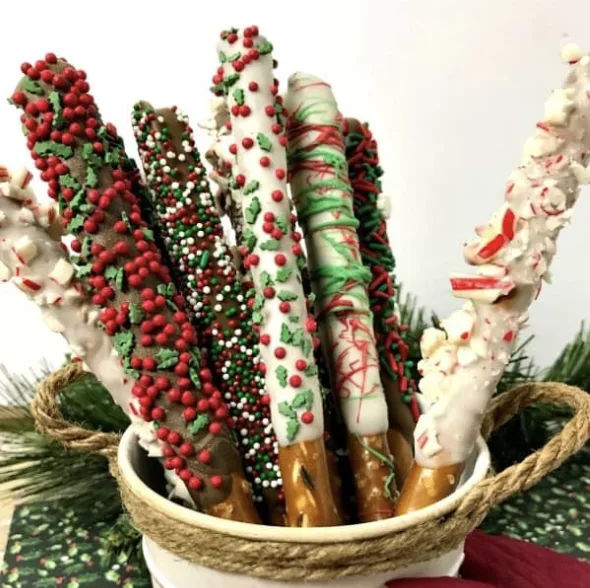
One of the best things about these Christmas Pretzel Rods is how easy they are to customize. Use milk chocolate, semisweet chocolate, or white chocolate for the base. Add green or red candy melts for decorative stripes, or cover the coating with Christmas sprinkles for extra color and texture.
The sweet-and-salty combination makes these treats especially appealing. The pretzels provide a crisp, savory crunch, while the chocolate adds sweetness. Crushed peppermint candies introduce a refreshing seasonal flavor, and colorful sprinkles make every rod look festive.
These chocolate-dipped pretzels are perfect for Christmas cookie platters, holiday dessert boards, school parties, and homemade food gifts. You can arrange them in a mug to create an edible bouquet or place them in decorative bags and boxes for friends, teachers, coworkers, and neighbors.
If you want an easy Christmas dessert that looks impressive without complicated baking techniques, this Christmas Pretzel Rods Recipe is a wonderful choice.
Why You Will Love These Christmas Pretzel Rods
No Baking Required
These pretzel rods are prepared without an oven. The only heating required is melting the chocolate or candy coating.
This makes the recipe convenient when your oven is already occupied with Christmas cookies, cakes, or other holiday dishes.
Simple Ingredients
The main ingredient is pretzel rods, which are coated with chocolate or candy melts and decorated with seasonal toppings.
You can use a few basic ingredients or choose several colors and sprinkle varieties to create a more elaborate assortment.
Sweet and Salty Flavor
The combination of crunchy pretzels and sweet chocolate creates a satisfying balance of flavors.
The saltiness of the pretzels contrasts with the chocolate coating, while crushed candy canes add a peppermint flavor that fits naturally into the Christmas season.
Easy to Customize
You can make each pretzel rod look different by changing the chocolate, decorations, and drizzling patterns.
Use white chocolate for a snowy appearance, milk chocolate for a classic flavor, or green and red candy melts for a colorful holiday design.
Perfect for Homemade Gifts
Chocolate-covered pretzel rods are easy to package individually or arrange in gift containers.
Place them in clear food-safe bags, tie them with festive ribbon, or arrange several rods in a decorative mug to create a simple edible gift.
Fun for Family Activities
Children can help add sprinkles and decorations once an adult has melted the chocolate and prepared the dipping station.
The recipe is forgiving, so the finished pretzels do not need to look identical. Different patterns and colorful toppings can make a homemade batch even more charming.
Christmas Pretzel Rods Ingredients
The original recipe does not specify exact quantities for the pretzel rods or each type of chocolate coating. The ingredients below follow the supplied recipe, so adjust the amounts according to the number of pretzels you want to prepare.
1. Pretzel Rods
Pretzel rods form the crunchy base of this recipe.
Their long shape makes them easy to dip and decorate, and they provide a convenient handle for eating the finished treat.
Choose whole pretzel rods without cracks whenever possible. Broken rods can be more difficult to dip evenly and may not look as attractive when packaged as gifts.
The original method recommends coating approximately two-thirds of each rod, leaving the remaining section uncovered so it can be held comfortably.
2. Brown Candy Coating, Milk Chocolate, or Chocolate Almond Bark
Choose one of these options for a classic chocolate-covered pretzel.
Brown candy melts are convenient for dipping because they are designed to melt into a coating. Milk chocolate morsels and chocolate almond bark are alternatives mentioned in the original recipe.
Chocolate provides the sweet contrast to the salty pretzel. It also serves as the base for colorful decorations and additional chocolate drizzles.
Choose a chocolate product that melts smoothly and follow its package instructions.
3. White Candy Coating, White Chocolate, or Vanilla Almond Bark
White chocolate creates a lighter coating and gives the pretzel rods a snowy Christmas appearance.
It works especially well with red and green sprinkles, crushed candy canes, and colored chocolate drizzles.
White candy coating is one of the options suggested in the original recipe. White chocolate morsels or vanilla almond bark can also be used.
4. Green Candy Coating
Green candy melts are useful for creating decorative stripes or adding another color to your Christmas pretzel assortment.
Drizzle green coating over pretzels that have already been dipped in chocolate or white candy coating.
You can also use green coating as the main dip for some rods to create a varied selection.
5. Red Candy Coating
Red candy melts add another traditional Christmas color.
Use them to create stripes, decorative patterns, or contrasting drizzles over white or brown chocolate.
Combining red and green decorations helps make the pretzel rods look festive without requiring complicated decorating techniques.
6. Assorted Christmas Sprinkles
Sprinkles provide color, texture, and variety. The original recipe suggests several options:
- Confetti Holly Mix.
- Red, green, and white nonpareils.
- Christmas snowflake sprinkles.
- Crushed peppermints or candy canes.
You can use one variety throughout the batch or prepare several different designs.
Smaller sprinkles can be scattered over the melted coating, while larger decorative pieces are best placed individually.
7. Vegetable Shortening, If Needed
If the melted candy coating becomes too thick, the original recipe suggests adding 2 teaspoons of vegetable shortening to help thin it.
Do not add other liquids to the candy coating, because they may cause it to seize and harden.
Add shortening only when necessary, stirring carefully until the coating reaches a consistency suitable for dipping.
Equipment You Will Need
You do not need specialized baking equipment to prepare Christmas Pretzel Rods.
Gather the following items before beginning:
- A microwave-safe bowl or double boiler.
- A spoon or spatula for stirring the chocolate.
- A tray or baking sheet.
- Waxed paper or parchment paper.
- A spoon or fork for drizzling chocolate.
- Small bowls for assorted sprinkles.
- A piping bag or suitable utensil for decorative chocolate, if desired.
Waxed paper is specifically recommended in the original recipe because it makes the hardened coating easier to release.
A microwave is convenient, but you can also melt the candy coating in a double boiler according to the product instructions.
How to Make Christmas Pretzel Rods Step by Step
Follow these steps to prepare chocolate-covered pretzel rods with festive decorations.
Step 1: Prepare Your Work Area
Line a tray or baking sheet with waxed paper or parchment paper.
Arrange the pretzel rods, melted chocolate bowls, and decorations within easy reach.
If you are using several colors of candy coating, place each color in a separate bowl and prepare the sprinkles before you begin dipping.
Having everything ready is important because sprinkles need to be added while the chocolate coating is still soft.
Step 2: Melt the Chocolate or Candy Coating
Melt your chosen candy coating according to the package directions.
You can use a microwave or a double boiler.
If using the microwave, heat the coating in short intervals and stir between each interval. Continue until the coating is melted and smooth.
Be careful not to overheat the chocolate or candy melts. According to the original recipe, overheated candy coating can become too thick to use comfortably.
If the coating is too thick, add 2 teaspoons of vegetable shortening and stir until it is incorporated. Avoid adding water or other liquids, which can cause the coating to seize.
Prepare the other colors in separate bowls if you plan to make red, green, white, and brown designs.
Step 3: Dip the Pretzel Rods
Hold a pretzel rod by its uncovered end.
Pour or spoon the melted coating over approximately two-thirds of the rod. You can also dip the rod into the bowl if the container is deep enough.
Rotate the pretzel gently so the chocolate covers the desired area.
Allow excess coating to drip back into the bowl. Gently shake the rod if needed to remove extra chocolate, taking care not to break the pretzel.
Leaving the lower portion uncovered creates a convenient handle and gives the finished treat a clean appearance.
Repeat with the remaining pretzel rods.
Step 4: Add Sprinkles Immediately
If you want to decorate the pretzels with sprinkles, add them immediately after dipping.
While the coating is still soft, rotate the pretzel rod so the sprinkles can adhere to different sides.
Smaller sprinkles can be scattered over the coating, while larger decorations are easier to position individually.
You can use red, green, and white nonpareils, Christmas snowflake sprinkles, a holly-themed sprinkle mix, or crushed candy canes.
For a more varied presentation, decorate some rods with one type of sprinkle and others with different combinations.
Step 5: Place the Pretzels on Waxed Paper
After dipping and decorating, place each pretzel rod on the prepared tray.
Leave a little space between the rods so they do not touch one another while the coating hardens.
Waxed paper helps the finished pretzels release easily once the chocolate has set.
Handle the rods gently to avoid disturbing the sprinkles or spreading the coating across the tray.
Step 6: Allow the First Coating to Harden
If you plan to add decorative chocolate drizzles, let the initial coating set completely before continuing.
This helps the second color remain visible instead of blending into the base coating.
The original recipe lists approximately 20 minutes of cooling time, although the actual time may vary depending on the coating and room temperature.
Check that the coating is firm before adding the next layer.
Step 7: Add Decorative Chocolate Drizzles
Melt your chosen contrasting candy coating, such as red, green, white, or brown.
Use a spoon or fork to drizzle the melted coating over the hardened pretzel rods.
Move your hand back and forth to create thin stripes or decorative lines.
For example, drizzle red and green coating over white chocolate-covered pretzels for a traditional Christmas appearance. White chocolate drizzles also look attractive over milk chocolate.
You do not need to create perfectly straight lines. Slight variations give homemade treats a decorative, handmade appearance.
Once you have finished drizzling, gently lift each pretzel and move it to a clean section of waxed paper before the additional coating sets. This helps prevent the rods from sticking to hardened chocolate that may have collected underneath.
Step 8: Let the Pretzel Rods Dry Completely
Leave the decorated pretzels undisturbed until all the chocolate coating has hardened.
Do not package or stack them while the coating is still soft, as this can smear the decorations and cause the rods to stick together.
Once the coating is completely firm, transfer the pretzels to a serving tray or airtight storage container.
Your Christmas Pretzel Rods are now ready to enjoy or give as homemade gifts.
Tips for the Best Chocolate-Covered Pretzel Rods
Avoid Overheating the Candy Coating
Overheating can make the coating too thick and difficult to use.
Heat gently according to the package directions and stir regularly. If the coating becomes too thick, the original recipe recommends adding 2 teaspoons of vegetable shortening.
Do not add water or other liquids.
Prepare the Decorations Before Dipping
Have your sprinkles and crushed candy canes ready before melting the chocolate.
The coating begins to set as it cools, so decorations should be added immediately after dipping.
Add Large Decorations Individually
Small sprinkles are easy to scatter across the coating, but larger decorations are best placed one at a time.
This gives you more control over the finished appearance and helps prevent decorations from falling off.
Coat Approximately Two-Thirds of Each Rod
Leaving the bottom section uncovered creates a natural handle.
It also reduces the chance of getting chocolate on your fingers while eating the finished treat.
If you prefer a different appearance, you can adjust the dipped portion to suit your presentation.
Let the First Layer Set Before Drizzling
Allow the base coating to harden completely before adding another color.
This helps the drizzle stand out and prevents the two coatings from blending together.
Move the Rods to Clean Waxed Paper
When adding a second layer of chocolate, move the rods to a clean section of waxed paper before the coating hardens completely.
This helps prevent the pretzels from sticking to excess chocolate underneath.
Experiment with Colors and Patterns
You do not need to use the same decoration for every pretzel.
Prepare a combination of white chocolate rods with red and green drizzles, brown chocolate rods with crushed peppermint, and green-coated rods with colorful sprinkles.
A variety of patterns can make the finished batch look especially attractive on a Christmas dessert table.
Christmas Pretzel Rods Variations
White Chocolate Pretzel Rods
Dip the pretzels in white candy coating or white chocolate.
Add red and green sprinkles, snowflake decorations, or crushed candy canes while the coating is still soft.
For an extra decorative finish, drizzle red or green chocolate over the hardened white coating.
Milk Chocolate Pretzel Rods
Use milk chocolate morsels, brown candy melts, or chocolate almond bark for a classic chocolate flavor.
Add Christmas sprinkles or crushed peppermint candies before the chocolate sets.
Milk chocolate creates a rich contrast with the salty pretzel and works well for simple holiday gifts.
Red and Green Drizzled Pretzels
Dip the rods in white or brown chocolate and allow the coating to harden.
Melt red and green candy coating separately, then drizzle both colors over the pretzels.
This is an easy way to create a colorful Christmas design without covering the entire rod in multiple layers of chocolate.
Crushed Candy Cane Pretzel Rods
Dip the rods in white or milk chocolate, then sprinkle crushed candy canes over the coating.
The peppermint pieces add a festive flavor and a crunchy texture.
Add them immediately after dipping so they adhere before the chocolate hardens.
Snowflake Pretzel Rods
Use white chocolate as the base and add Christmas snowflake sprinkles.
You can finish the design with a light drizzle of contrasting chocolate or leave the rods simple and white for a winter-inspired appearance.
Mixed Christmas Sprinkle Pretzels
Prepare several bowls of decorations, such as red and green nonpareils, holly-themed sprinkles, and crushed peppermint.
Decorate different pretzel rods with different combinations to create a varied assortment.
This option is especially useful when preparing a large batch for a holiday party or gift exchange.
How to Serve Christmas Pretzel Rods
Add Them to a Christmas Dessert Table
Arrange the finished rods on a platter alongside cookies, brownies, chocolate-covered Oreos, and other holiday treats.
Their long shape and colorful decorations help add height and variety to a dessert table.
Create a Christmas Cookie Platter
Chocolate-covered pretzel rods make an attractive addition to a Christmas cookie platter.
Combine them with traditional cookies and other small desserts for a mixture of sweet and salty flavors.
Make a Pretzel Bouquet
The original recipe suggests arranging the rods in a coffee mug to create a bouquet-style gift.
Choose a clean mug or suitable container and arrange the pretzels so the decorated ends are visible.
This makes a simple presentation for teachers, friends, and neighbors.
Package Them as Homemade Gifts
Place the hardened pretzel rods in food-safe bags or decorative gift boxes.
Arrange them carefully so the chocolate coating does not rub against other rods. Add a ribbon or seasonal gift tag for a festive finish.
Serve Them at Holiday Parties
Place the rods in a tall serving container or lay them out on a tray.
Their convenient shape makes them easy for guests to pick up and enjoy without needing plates or utensils.
How to Store Chocolate-Covered Christmas Pretzel Rods
Store at Room Temperature
The original recipe recommends storing chocolate-dipped pretzel rods in an airtight container at room temperature.
Make sure the coating has hardened completely before closing the container.
Keep the pretzels in a cool, dry place away from direct sunlight and heat.
Should You Refrigerate Pretzel Rods?
The original recipe advises against refrigeration because it may cause the pretzels to soften.
For the best texture, store them in an airtight container at room temperature rather than placing them in the refrigerator.
Can You Make Pretzel Rods Ahead of Time?
Yes. These treats are convenient for preparing before a holiday gathering or gift exchange.
Once the chocolate has fully set, store the rods in an airtight container until you are ready to serve or package them.
Preparing them ahead can help reduce the amount of work required on the day of your celebration.
Christmas Pretzel Rods Recipe Details
- Recipe name: Chocolate-Covered Christmas Pretzel Rods
- Course: Dessert
- Cuisine: American
- Preparation time: 15 minutes
- Melting time: 5 minutes
- Cooling time: Approximately 20 minutes
- Total time: Approximately 40 minutes
- Cooking method: No-bake
Ingredients
- Pretzel rods, quantity as needed
- Brown candy coating, milk chocolate morsels, or chocolate almond bark
- White candy coating, white chocolate morsels, or vanilla almond bark
- Green candy coating
- Red candy coating
- Assorted Christmas sprinkles, such as Confetti Holly Mix, red, green, and white nonpareils, or Christmas snowflake sprinkles
- Crushed peppermint candies or candy canes, optional
- 2 teaspoons vegetable shortening, optional, if the coating needs thinning
Note: The original recipe does not provide exact quantities for the pretzel rods, chocolate coatings, or sprinkles. Use amounts appropriate for the batch size you plan to make.
Instructions
- Prepare a tray lined with waxed paper or parchment paper.
- Melt the candy coating according to its package directions, taking care not to overheat it.
- If the coating is too thick, add 2 teaspoons of vegetable shortening and stir until smooth. Do not add other liquids.
- Pour the coating over approximately two-thirds of each pretzel rod and gently shake off excess chocolate.
- Immediately add sprinkles or crushed candy canes, rotating the rods so the decorations adhere around the coating.
- Place the rods on the prepared paper and allow the initial coating to harden.
- If desired, melt contrasting candy coating and drizzle it over the pretzel rods using a spoon or fork.
- Move the rods to clean waxed paper before the additional coating sets.
- Allow the chocolate to harden completely before serving or packaging.
- Store the finished pretzels in an airtight container at room temperature.
Frequently Asked Questions
Can I Use Different Types of Chocolate?
Yes. The original recipe suggests white chocolate, milk chocolate, semisweet chocolate, chocolate almond bark, and candy melts.
Choose the coating that best suits your preferred flavor and decoration style.
Why Is My Candy Coating Too Thick?
The coating may have been overheated or may have thickened as it cooled.
The original recipe recommends adding 2 teaspoons of vegetable shortening to help thin it. Do not add water or other liquids, as they can cause the coating to seize.
When Should I Add the Sprinkles?
Add sprinkles immediately after dipping, while the chocolate coating is still soft.
If you wait until the chocolate hardens, the decorations may not stick properly.
Can I Use Crushed Candy Canes?
Yes. Crushed peppermint candies and candy canes are suggested toppings.
Sprinkle them over the freshly dipped rods so that the pieces adhere to the melted chocolate.
Can I Decorate the Pretzels with More Chocolate?
Yes. Allow the initial coating to set completely, then drizzle melted red, green, white, or brown candy coating over the rods.
Move the decorated pretzels to clean waxed paper before the additional coating hardens.
How Long Do Chocolate-Covered Pretzel Rods Last?
The supplied recipe does not specify an exact storage duration.
It recommends storing the finished rods in an airtight container at room temperature and avoiding refrigeration to help prevent the pretzels from softening.
Can I Make These with Children?
Yes. Adding sprinkles and other decorations can be a fun family activity.
An adult should handle the hot melted chocolate and supervise dipping. Allow the coating to cool and harden before serving.
Are Christmas Pretzel Rods Good for Gifts?
Yes. Their shape makes them easy to arrange in bags, boxes, or a decorative mug.
Allow the chocolate to set completely before packaging to help protect the decorations.
Final Thoughts
These Chocolate-Covered Christmas Pretzel Rods are a simple way to prepare a festive holiday treat without baking.
Crunchy pretzels, sweet chocolate, and colorful Christmas decorations combine to create a snack that is easy to customize and attractive enough for parties, cookie platters, and homemade gifts.
The key to success is melting the coating gently, adding sprinkles while it is still soft, and allowing each layer to harden before adding more decorations.
Make a batch with white chocolate and crushed candy canes, try red and green drizzles, or combine several designs for a colorful holiday assortment.
Serve the finished rods at your next Christmas gathering or arrange them in a decorative mug for a thoughtful edible gift. With simple ingredients and an easy preparation method, this recipe is a practical addition to your Christmas treat collection.