
Introduction
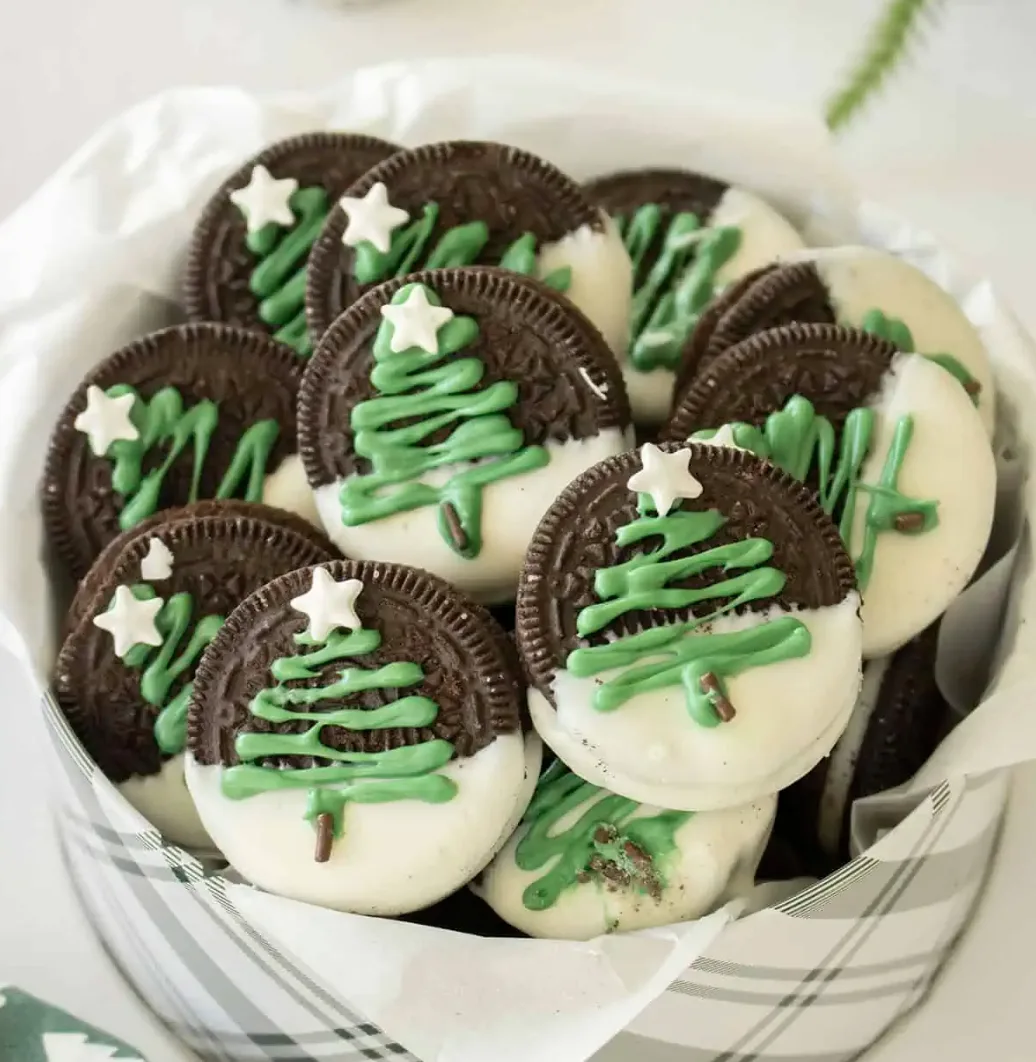
Looking for a quick and festive Christmas dessert that looks beautiful without requiring hours of baking? These Christmas Oreos are an easy no-bake treat made with Oreo cookies, white melting chocolate, and green candy melts. Decorated with tiny candy stars and chocolate sprinkles, they turn ordinary sandwich cookies into adorable Christmas tree treats.
This recipe is perfect for busy holiday schedules because it requires only three main ingredients and takes approximately 15 minutes from start to finish. There is no need to prepare cookie dough, turn on the oven, or wait for freshly baked cookies to cool. Instead, you simply dip the Oreos in melted white chocolate, decorate them with green chocolate trees, and finish each tree with a star and a small chocolate trunk.
One of the most charming details is the half-dipped design. By coating only half of each Oreo in white chocolate, you create a snowy background that makes the green Christmas tree stand out. The contrast between the white coating and the green decoration gives each cookie a festive appearance without complicated decorating techniques.
These chocolate-covered Christmas Oreos are ideal for Christmas cookie exchanges, holiday dessert boards, family gatherings, school celebrations, and homemade gifts. You can arrange them on a platter, place them in a decorative cookie tin, or package them in gift boxes to share with friends and neighbors.
They are also easy to customize. You can experiment with different Christmas tree designs, cover the entire cookie in chocolate, use mint-flavored Oreos, or change the decorations to suit your holiday theme.
If you need a simple Christmas dessert that is beginner-friendly, attractive, and easy to prepare ahead of time, these decorated Oreo cookies are an excellent addition to your holiday recipe collection.
Why You Will Love These Christmas Oreos
They Require Only Three Main Ingredients
The basic recipe uses Oreo cookies, white melting chips, and green melting wafers. Candy stars and chocolate sprinkles are optional decorative additions that make the cookies look like miniature Christmas trees.
Because the ingredient list is short, shopping and preparation are straightforward.
No Baking Is Required
Traditional Christmas cookies often require mixing, chilling, rolling, cutting, and baking. These chocolate-covered Oreos skip those steps entirely.
The cookies are ready to decorate once the chocolate has melted, making this recipe especially convenient when your kitchen is already busy preparing holiday meals and desserts.
They Are Ready in Approximately 15 Minutes
The original recipe lists 10 minutes of preparation time and 5 minutes of cooking time for melting the chocolate, giving a total time of approximately 15 minutes.
The exact time needed for the chocolate to harden can vary depending on your kitchen temperature and the type of chocolate used.
They Look Beautiful on a Christmas Dessert Table
The combination of white chocolate, green Christmas trees, and colorful candy stars creates a festive design with minimal effort.
The half-dipped appearance resembles a snowy field, making each cookie look like a little winter scene.
They Are Great for Homemade Gifts
Christmas Oreos are easy to arrange in cookie tins, decorative boxes, and food-safe gift bags.
Their small size makes them convenient for sharing with friends, family members, teachers, and coworkers during the holiday season.
They Are Easy to Customize
You can change the chocolate coating, experiment with different tree shapes, or use alternative Christmas decorations.
You can also use mint-flavored Oreo cookies for a festive variation that introduces a different flavor while keeping the same general preparation method.
Christmas Oreos Ingredients
This recipe makes 15 decorated cookies. Here is what you need to prepare the original version.
1. Oreo Cookies
You will need 15 Oreo cookies.
Oreo cookies provide the crunchy chocolate cookie base and creamy filling for the finished dessert. Their round shape makes them suitable for decorating with Christmas trees.
You can use the original Oreo variety or a similar store-brand sandwich cookie.
For a different flavor, consider using green mint-flavored Oreos. Their festive color and mint flavor can make the finished cookies feel even more seasonal.
Choose cookies that are intact and not badly cracked. Whole cookies are easier to dip and decorate because they can be handled without breaking apart.
2. White Melting Chips
The recipe uses 6 ounces of white melting chips.
White melting chocolate creates the snowy coating on the bottom half of each cookie. It also provides a light background that contrasts with the green Christmas tree decoration.
The original recipe uses white melting wafers with added vanilla flavor.
Melting wafers are convenient because they are designed to melt into a coating suitable for dipping. Follow the product instructions and heat the chocolate gently to help maintain a smooth consistency.
If you prefer to use ordinary white chocolate chips, you may need to add approximately 1 teaspoon of shortening to help the chocolate melt more smoothly. The coating may also take longer to harden.
3. Green Melting Wafers
You will need 3 ounces of green melting wafers.
These wafers are melted and transferred to a piping bag or resealable plastic bag. The green chocolate is then piped back and forth over the white-dipped portion of each Oreo to create a Christmas tree.
Green candy melts are useful because they provide the color needed for the tree without requiring you to mix food coloring into white chocolate.
If you cannot find green melting wafers, the original recipe suggests using white chocolate chips with suitable green food coloring, along with shortening as needed to improve the consistency.
4. Candy Stars
You will need 15 candy stars, one for each Christmas tree.
The stars are placed at the top of the green chocolate trees to create a classic Christmas tree decoration.
Small stars are ideal because they fit neatly on the cookies without overwhelming the design.
Use tweezers or carefully position each star by hand while the green chocolate is still soft enough for the decoration to adhere.
5. Chocolate Jimmies
The recipe includes ¼ cup of chocolate jimmies as an optional decoration.
Chocolate jimmies are small chocolate sprinkles used to create the tree trunks. They add a little detail to the finished design and help the green chocolate trees look more recognizable.
If you prefer a simpler appearance, you can omit them. The Christmas trees will still look festive with the green branches and candy stars.
Equipment Needed
You do not need special baking equipment for this recipe. Prepare the following items before beginning:
- A baking sheet or flat tray.
- Parchment paper.
- Two microwave-safe bowls.
- A spoon or spatula for stirring the chocolate.
- A piping bag or resealable plastic bag.
- Scissors for cutting a small opening in the bag.
- Tweezers, if needed, for positioning the candy stars.
A tall cup can also be helpful when transferring melted green chocolate into a piping bag. Place the bag inside the cup and fold its top over the rim to hold it open while you fill it.
Preparing your equipment before melting the chocolate makes the decorating process easier because the melted coating can begin to thicken as it cools.
How to Make Christmas Oreos Step by Step
Follow these instructions to create half-dipped Oreo cookies decorated with green Christmas trees.
Step 1: Prepare the Baking Sheet
Line a baking sheet or flat tray with parchment paper.
The parchment paper provides a nonstick surface for the dipped cookies and makes it easier to lift them after the chocolate has hardened.
Place the prepared tray near your work area so you can transfer each cookie to it immediately after dipping.
Step 2: Melt the White Chocolate
Place the 6 ounces of white melting chips in a microwave-safe bowl.
Heat the chocolate for 30 seconds, then remove the bowl and stir. Continue heating in 30-second intervals, stirring between each interval, until the chocolate is melted and smooth.
Stirring between intervals helps distribute the heat and prevents some areas from becoming excessively hot while other pieces remain solid.
Avoid heating the chocolate longer than necessary. Once the wafers have melted, stir until the mixture is uniform.
If the chocolate seems too thick to dip easily, you may need to adjust its consistency according to the product instructions. Do not add water, as it can cause melted chocolate to seize.
Step 3: Dip Each Oreo Halfway
Take one Oreo cookie and dip approximately half of it into the melted white chocolate.
Allow excess chocolate to drip back into the bowl before transferring the cookie to the parchment-lined baking sheet.
Repeat with the remaining cookies until all 15 Oreos have been half-dipped.
The half-dipped design is an important part of the original recipe. It creates the appearance of a snowy field beneath the green Christmas tree.
If you prefer, you can dip each cookie completely in white chocolate instead. This produces a different appearance but still provides a suitable background for the green decoration.
Step 4: Allow the White Chocolate to Begin Setting
Place the dipped cookies on the prepared baking sheet.
Allow the white chocolate coating to begin setting before decorating. The surface should be firm enough to support the green design without allowing the colors to spread excessively.
The exact setting time depends on the temperature of your kitchen and the chocolate product you use.
Avoid moving the cookies unnecessarily while the coating is soft. Keeping them on the parchment-lined tray helps preserve the smooth finish.
Step 5: Melt the Green Candy Wafers
Place the 3 ounces of green melting wafers in a separate microwave-safe bowl.
Heat for 30 seconds, then stir. Continue heating in 30-second intervals, stirring between each interval, until the wafers are melted and smooth.
The green chocolate should be fluid enough to pipe through a small opening but thick enough to maintain its shape when applied to the cookie.
If the mixture becomes too thick, follow the manufacturer’s instructions for adjusting its consistency. A small amount of suitable shortening may help, but add it gradually if needed.
Step 6: Transfer the Green Chocolate to a Piping Bag
Spoon the melted green chocolate into a piping bag or resealable plastic bag.
If using a resealable bag, cut a very small opening in one bottom corner.
Start with a small opening because you need control over the flow of chocolate when drawing the trees. A large opening can make it difficult to create narrow branches and pointed tree shapes.
If the chocolate begins to cool and thicken while you work, gently warm it again as needed, using short intervals and stirring carefully.
Step 7: Pipe the Christmas Trees
Take one half-dipped Oreo and pipe a green Christmas tree onto the white chocolate area.
Use a back-and-forth motion, gradually changing the width of the lines to create a triangular tree shape. Begin near the top with a narrow section, then make the branches wider as you move toward the bottom.
The green chocolate should resemble a simple evergreen tree rather than a perfectly detailed illustration.
Repeat the design on each cookie.
Do not worry if the trees are not identical. Small variations give homemade Christmas cookies a charming appearance.
If you want more control, practice piping a tree on a piece of parchment paper before decorating the Oreos.
Step 8: Add the Candy Star
While the green chocolate is still soft, place a candy star at the top of each tree.
The star creates the traditional finishing touch and makes the tree shape immediately recognizable.
Work carefully so the star remains centered. If you are using tweezers, gently position the decoration without pressing too hard into the green chocolate.
It is best to add the stars before the green coating has completely hardened. Once the chocolate sets, the decorations may not adhere as easily.
Step 9: Create the Tree Trunk
Place a chocolate jimmy at the bottom of each green tree to create a small trunk.
The chocolate sprinkle adds a final detail without requiring additional melted chocolate or complicated piping.
If you prefer a minimalist design, you can leave off the trunk. The green tree and candy star will still look festive.
Step 10: Let the Cookies Set Completely
Leave the decorated Oreos on the parchment-lined baking sheet until the chocolate has hardened.
Avoid stacking or packaging them while the coating is still soft, as this may smear the decorations or cause the cookies to stick together.
Once the chocolate has fully set, carefully lift the cookies from the parchment paper and arrange them on a serving platter or transfer them to a storage container.
Your Christmas Tree Oreos are ready to serve, share, or package as holiday gifts.
Tips for the Best Christmas Oreos
Use Melting Wafers for Convenience
Melting wafers are a practical choice because they are designed to melt into a coating.
White melting wafers create the snowy background, while green melting wafers provide the color needed for the Christmas trees.
If you substitute ordinary chocolate chips, you may need to adjust the consistency and allow more time for the coating to harden.
Heat the Chocolate in Short Intervals
Microwave the chocolate for 30 seconds at a time and stir between intervals.
This approach helps you monitor the consistency and reduces the risk of overheating.
Stop heating once the chocolate has melted and become smooth.
Keep the Piping Opening Small
A small opening gives you better control when drawing the trees.
If the opening is too large, the green chocolate may come out too quickly and produce thick, uneven branches.
You can always enlarge the opening slightly if the chocolate does not flow easily.
Decorate Before the Green Chocolate Sets
Add the candy stars and chocolate trunks while the green chocolate is still soft.
This helps the decorations adhere without needing additional melted chocolate.
Work on a few cookies at a time if the chocolate is setting quickly in your kitchen.
Experiment with Different Designs
The Christmas tree is a simple decoration, but you can create variations using the same basic method.
Try different tree shapes, make the branches wider or narrower, or use alternative festive decorations.
You can also decorate some cookies with a full white chocolate coating and others with a half-dipped design to create variety on a cookie platter.
Thin Thick Chocolate Carefully
If the melting chocolate seems too thick, the original recipe suggests adding a small amount of shortening.
Add it gradually and stir thoroughly, following the instructions for the chocolate you are using.
If you are using regular white chocolate chips instead of melting wafers, the recipe specifically notes that approximately 1 teaspoon of shortening may be needed.
Allow Enough Time for Setting
Although the recipe takes about 15 minutes to prepare, the cookies may need additional time for the coating to harden completely.
The exact time varies with the type of chocolate and the room temperature.
Wait until the decorations are firm before stacking or packaging the cookies.
Christmas Oreos Variations
Use Mint-Flavored Oreos
For a festive flavor variation, use green mint-flavored Oreo cookies.
The mint flavor pairs well with chocolate and can complement the Christmas theme. The green cookie filling also adds a subtle seasonal touch when the cookies are broken open.
Keep the same dipping and decorating process.
Make Fully Chocolate-Covered Oreos
The original recipe uses a half-dipped design, but you can dip each cookie completely in white chocolate if you prefer.
A full coating creates a brighter background for the green Christmas tree.
Make sure excess chocolate drips off before placing each cookie on parchment paper.
Use White Chocolate Chips Instead of Melting Wafers
If you cannot find white melting wafers, ordinary white chocolate chips can be used.
The original recipe recommends adding approximately 1 teaspoon of shortening to help the chips melt more smoothly. The coating may take longer to harden.
For the green decoration, add suitable green food coloring to white chocolate as needed. Use coloring appropriate for chocolate and follow its product instructions.
Try Different Christmas Decorations
Candy stars and chocolate jimmies create the classic tree design, but you can experiment with other small decorations.
Use festive sprinkles or other suitable candy decorations to create different looks.
Choose decorations that fit the size of the Oreo and can adhere to the chocolate before it hardens.
Create a Mixed Christmas Cookie Platter
Make a selection of designs by varying the tree shapes, dipping styles, and decorations.
Some cookies can feature half-dipped trees, while others can be completely coated in white chocolate. This gives your dessert platter variety without requiring a completely different recipe.
How to Serve Christmas Oreos
Add Them to a Christmas Cookie Board
Arrange the decorated Oreos alongside Christmas cookies, chocolate treats, and other seasonal desserts.
Their green trees and white chocolate coating add a festive appearance and help create a visually appealing dessert board.
Serve Them at Holiday Parties
Place the cookies on a serving plate or decorative tray for Christmas gatherings.
Because they are individually portioned, guests can easily take one without needing utensils.
Include Them in Cookie Exchanges
Christmas Oreos are a practical choice for cookie exchanges because they are easy to make in batches and do not require baking.
Allow the chocolate to harden completely before transporting the cookies. Arrange them in a container with enough room to prevent the decorations from rubbing against one another.
Package Them as Homemade Gifts
Place the finished cookies in a decorative tin or food-safe gift box.
Arrange them in a single layer when possible to protect the Christmas tree decorations. If you need to stack them, use suitable food-safe separators and make sure the chocolate coating is fully set.
Add a ribbon or gift tag for a festive presentation.
Serve Them with Hot Chocolate
These chocolate-covered cookies pair nicely with hot chocolate or another favorite holiday drink.
Their crunchy cookie base and sweet coating make them an easy addition to a Christmas movie night or afternoon treat.
How to Store Christmas Oreos
Store at Room Temperature
Once the chocolate has fully hardened, transfer the cookies to an airtight container.
The original recipe states that Christmas Oreos can be stored at room temperature for approximately three to four weeks.
Keep the container in a cool, dry location away from direct sunlight and heat. Warm conditions can soften the chocolate coating and affect the decorations.
There is generally no need to refrigerate them if they are stored appropriately at room temperature.
Can You Freeze Christmas Oreos?
Yes. The original recipe recommends freezing the cookies in an airtight, freezer-safe container for longer storage.
It gives a possible storage period of up to three months for the best taste and texture, while also mentioning a longer period of up to six months. For the best quality, follow the shorter three-month recommendation.
Protect the cookies from moisture and avoid placing heavy items on top of the container.
How to Thaw Frozen Christmas Oreos
The original recipe recommends thawing frozen cookies in the refrigerator before enjoying them.
Keep them protected in their container during thawing to reduce the risk of moisture affecting the chocolate coating.
Once thawed, handle the cookies gently and check that the decorations remain intact before serving.
Christmas Oreos Recipe Details
- Recipe name: Christmas Oreos
- Course: Dessert or snack
- Yield: 15 cookies
- Preparation time: 10 minutes
- Melting time: Approximately 5 minutes
- Total preparation time: Approximately 15 minutes, excluding any additional time needed for the chocolate to set
- Cooking method: No-bake
- Main ingredients: Oreo cookies, white melting chips, and green melting wafers
- Decorations: Candy stars and optional chocolate jimmies
Ingredients
- 15 Oreo cookies
- 6 ounces white melting chips
- 3 ounces green melting wafers
- 15 candy stars, for the tree toppers
- ¼ cup chocolate jimmies, optional, for the tree trunks
Instructions
- Line a baking sheet with parchment paper.
- Place the white melting chips in a microwave-safe bowl.
- Microwave for 30 seconds, stir, and repeat in short intervals until the chocolate is melted and smooth.
- Dip each Oreo halfway into the white chocolate and place it on the prepared baking sheet.
- Put the green melting wafers in a separate microwave-safe bowl.
- Microwave for 30 seconds, stir, and repeat until the green wafers are melted.
- Transfer the green chocolate to a piping bag or resealable plastic bag.
- Cut a very small opening in the bag.
- Pipe a green Christmas tree onto the white chocolate portion of each Oreo using a back-and-forth motion.
- Add a candy star to the top of each tree.
- Use chocolate jimmies to create the tree trunks.
- Allow the chocolate to harden completely before serving or storing.
Nutrition Information
The original recipe reports the following nutritional values per cookie:
- Calories: 109 kcal
- Carbohydrates: 17 g
- Protein: 1 g
- Fat: 5 g
- Saturated fat: 3 g
- Polyunsaturated fat: 0.4 g
- Monounsaturated fat: 1 g
- Trans fat: 0.01 g
- Sodium: 54 mg
- Potassium: 28 mg
- Fiber: 0.3 g
- Sugar: 13 g
- Vitamin A: 0.2 IU
- Calcium: 3 mg
- Iron: 1 mg
These are the figures reported in the original recipe. Actual nutritional values may vary depending on the cookie brand, chocolate products, and decorations used.
Frequently Asked Questions
Can I Make Christmas Oreos Ahead of Time?
Yes. These cookies are suitable for preparing ahead because the chocolate coating can be allowed to harden before the cookies are stored in an airtight container.
The original recipe recommends room-temperature storage for approximately three to four weeks when stored properly.
How Long Do Christmas Oreos Last?
The original recipe states that they can last approximately three to four weeks at room temperature in an airtight container.
For longer storage, they can be frozen. The original instructions recommend enjoying frozen cookies within three months for the best taste and texture.
Do Christmas Oreos Need to Be Refrigerated?
No refrigeration is generally needed according to the original recipe. Store them in an airtight container in a cool, dry place once the chocolate coating has set.
Can I Use Regular White Chocolate Chips?
Yes. The original recipe suggests adding approximately 1 teaspoon of shortening to white chocolate chips to help them melt smoothly.
They may take longer to harden than melting wafers.
Can I Use Green Food Coloring Instead of Green Melting Wafers?
Yes. The original recipe notes that white chocolate chips can be used with suitable green food coloring.
Choose coloring appropriate for chocolate and follow the product instructions. The consistency may differ from ready-made green melting wafers.
What Can I Use Instead of a Piping Bag?
A resealable plastic bag works well. Add the melted green chocolate and cut a small opening in one corner.
Keep the opening small enough to control the flow of chocolate while drawing the Christmas trees.
Can I Dip the Entire Oreo in White Chocolate?
Yes. The original recipe uses half-dipped cookies to create a snowy-field appearance, but a full coating is also an option.
Allow excess chocolate to drip off before placing the cookie on parchment paper.
Why Is My Melted Chocolate Too Thick?
Chocolate may thicken as it cools or because of the product you are using.
The original recipe suggests adding a small amount of shortening when necessary to thin the chocolate. Add it gradually and stir well.
Avoid adding water because it can cause chocolate to seize.
How Do I Keep the Decorations from Smearing?
Allow the white chocolate to begin setting before decorating, and add the candy stars and chocolate jimmies while the green chocolate is still soft.
Once the decorations are in place, let the cookies harden completely before moving, stacking, or packaging them.
Can I Use Different Oreo Flavors?
Yes. The original recipe suggests green mint-flavored Oreos as one possible variation.
Other sandwich cookies may also work, provided they are sturdy enough to dip and decorate.
Final Thoughts
These Christmas Oreos are a simple, festive treat that proves you do not need to bake from scratch to create an attractive holiday dessert.
With Oreo cookies, white melting chocolate, green candy melts, and a few small decorations, you can create miniature Christmas trees in approximately 15 minutes of preparation.
The half-dipped design gives each cookie a snowy background, while the green chocolate branches, candy star, and chocolate trunk complete the festive look.
For the best results, melt the chocolate gently, use a small piping opening, and allow the decorations to harden completely before packaging.
Serve these cookies on a Christmas dessert board, bring them to a cookie exchange, or package them in decorative tins for homemade gifts. You can also experiment with mint-flavored Oreos, full chocolate coatings, and different holiday decorations to create your own version.
If you need an easy Christmas dessert that looks special without requiring complicated baking techniques, these decorated Christmas Oreos are a wonderful choice for the holiday season.