
Introduction
Looking for a cute, festive, and easy dessert to serve during the holiday season? These Strawberry Santas are adorable no-bake Christmas treats made with fresh strawberries and a creamy cheesecake-style filling. They look impressive on a holiday dessert table but are surprisingly simple to prepare, making them perfect for Christmas parties, family gatherings, and festive activities with children.
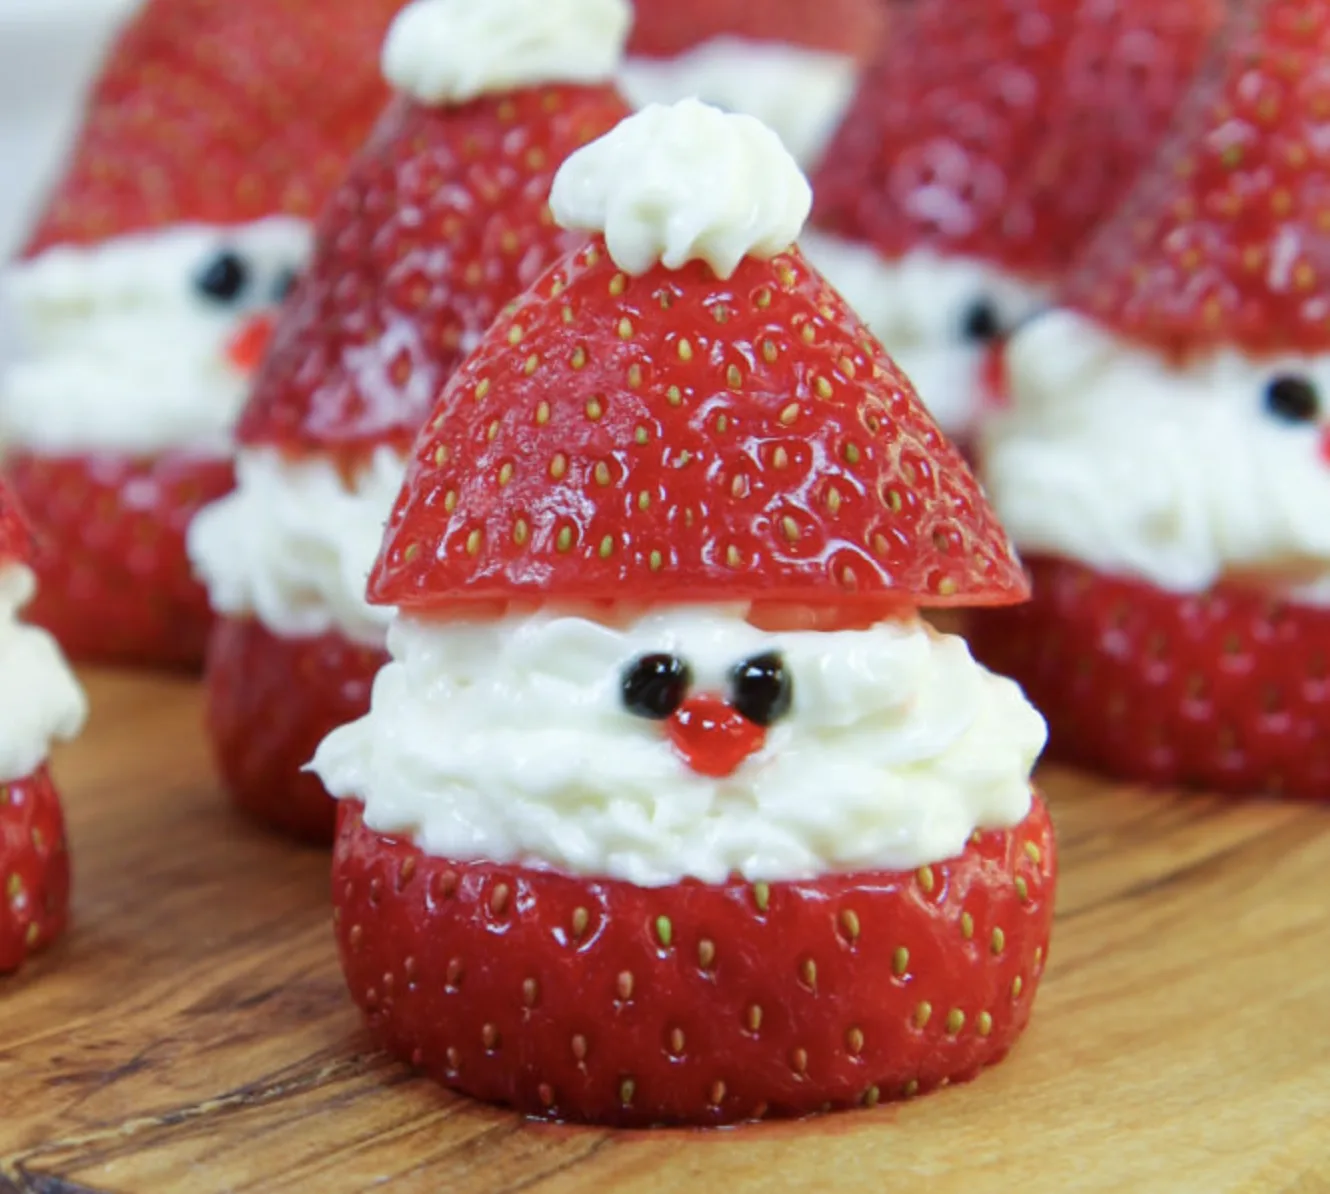
This recipe combines fresh, juicy strawberries with a lightly sweetened cream cheese filling flavored with vanilla. Each strawberry is transformed into a miniature Santa Claus, complete with a red strawberry hat, a fluffy white filling, and a tiny face made with decorative icing.
One of the best things about these Strawberry Santas is that they require only four main ingredients: strawberries, whipped cream cheese, powdered sugar, and vanilla extract. A little red and black decorating icing adds the finishing details that bring each Santa to life.
There is no baking, complicated equipment, or lengthy preparation involved. You can make these Christmas treats in approximately 15 minutes, making them an excellent choice when you need a quick dessert that looks special without spending hours in the kitchen.
These Strawberry Santas are also a lighter alternative to many traditional Christmas desserts. According to the original recipe, each serving contains approximately 49 calories. The filling uses a small amount of powdered sugar, allowing the natural sweetness of the strawberries to remain noticeable.
Whether you are preparing a Christmas dessert platter, looking for a fun recipe to make with your children, or simply want something colorful and delicious for the holidays, these little strawberry Santas are worth trying.
Why You Will Love These Strawberry Santas
They Are Perfect for Christmas
The bright red strawberries and fluffy white filling naturally create the classic colors associated with Santa Claus. With a few simple decorations, ordinary strawberries become festive little desserts.
Arrange them on a serving board or decorative platter to create a cheerful presentation for your holiday table.
They Require Only Four Main Ingredients
You do not need a long shopping list to prepare this recipe. Fresh strawberries, whipped cream cheese, powdered sugar, and vanilla extract form the base of the dessert.
Decorative red and black icing is used to create Santa’s face. Because the ingredients are simple, preparation is straightforward and suitable for beginner home cooks.
They Are Ready in About 15 Minutes
Unlike traditional Christmas cookies and cakes, these treats do not require baking or extended cooking time.
Once the strawberries are washed and cut, you only need to mix the filling, pipe it onto the fruit, and decorate each Santa. The entire recipe takes approximately 15 minutes.
They Are Lightly Sweetened
The cheesecake-style filling contains just two tablespoons of powdered sugar for the entire batch. This gives the cream cheese a pleasant sweetness without overpowering the natural flavor of the strawberries.
The combination creates a dessert that tastes fresh, creamy, and fruity rather than excessively sweet.
They Are Fun to Make with Children
Children can enjoy helping with age-appropriate parts of the preparation, such as arranging the strawberries or decorating the finished Santas.
The process also offers an opportunity to be creative because each strawberry can have its own little expression. An adult should handle knives and any tasks that require careful cutting.
They Are Suitable for Different Occasions
These treats work well for Christmas parties, school celebrations, family gatherings, holiday brunches, and dessert platters.
Their individual size makes them easy to serve, and their festive appearance means you do not need elaborate decorations to make your dessert table look special.
Strawberry Santas Ingredients
The original recipe makes 12 Strawberry Santas. Here is everything you need to prepare them.
1. Fresh Strawberries
You will need 12 large strawberries that are well-shaped and approximately uniform in size.
Fresh strawberries provide the red color of Santa’s body and hat. Their natural sweetness also balances the creamy filling.
Choose strawberries that are firm, bright red, and large enough to hold the cheesecake filling. Similar-sized berries help the finished Santas look consistent when arranged on a serving platter.
Wash the strawberries carefully and dry them completely before cutting. Excess moisture can cause the cream cheese filling to slide off the fruit, making assembly more difficult.
Fresh strawberries are essential for this recipe. Frozen strawberries are not recommended because they become too soft and watery after thawing, making it difficult to maintain the Santa shape.
2. Whipped Cream Cheese
Use 1 cup of whipped cream cheese to make the cheesecake filling.
Whipped cream cheese is lighter and softer than a firm block of cream cheese. It is easier to mix with powdered sugar and vanilla, and it can be piped onto the strawberries with less effort.
Depending on your preferences, you can choose reduced-fat or full-fat whipped cream cheese.
The cream cheese provides the creamy texture that contrasts with the juicy strawberries. It also helps create the white beard and the pom-pom on Santa’s hat.
For the best results, use a cream cheese that is smooth and easy to pipe.
3. Powdered Sugar
The recipe uses 2 tablespoons of powdered sugar to sweeten the cream cheese filling.
Powdered sugar is a good choice because it blends smoothly into the cream cheese without creating a grainy texture.
The amount is relatively small compared with many traditional desserts, allowing the strawberries and vanilla to remain prominent.
Mix the sugar thoroughly with the cream cheese so that the filling has an even flavor and smooth consistency.
4. Vanilla Extract
Add ¼ teaspoon of vanilla extract to the filling.
Vanilla enhances the cheesecake flavor and gives the cream cheese a pleasant aroma. Pure vanilla extract is recommended for its flavor.
Although the quantity is small, it helps make the filling taste more like a simple cheesecake mixture rather than plain cream cheese.
5. Red and Black Decorative Icing
You will also need red and black decorating icing to make Santa’s face.
Use black icing to create the eyes and red icing for the nose. Small dots are enough to give each strawberry a recognizable expression.
Apply the decorations carefully so that the face remains neat and proportional to the size of the strawberry.
Decorating icing is not part of the four main filling ingredients, but it is an important finishing detail for the traditional Strawberry Santa appearance.
Equipment You Will Need
You only need a few basic kitchen tools:
- A small mixing bowl for the cream cheese filling.
- A spoon or spatula for mixing.
- A knife and cutting board for preparing the strawberries.
- A piping bag fitted with a star tip.
- A serving plate or flat tray.
- Red and black decorating icing.
A piping bag with a star tip creates an attractive, textured filling that resembles Santa’s beard. If you do not have a piping bag, a clean resealable plastic bag can be used instead. Simply place the filling inside and cut a small opening in one corner.
The result may look slightly different, but the substitute works well when you want to keep the recipe simple.
How to Make Strawberry Santas Step by Step
Follow these instructions to create strawberry Santas with creamy filling and festive faces.
Step 1: Wash and Dry the Strawberries
Begin by washing all 12 strawberries carefully under clean running water.
Remove any dirt and gently handle the berries to avoid bruising them.
After washing, dry the strawberries thoroughly with a clean kitchen towel or paper towels. Pay particular attention to the surfaces where the cream cheese filling will sit.
Drying is important because wet strawberries can make the filling slippery. If the fruit is damp, the cream cheese may slide off during assembly.
Once the strawberries are clean and dry, place them on a cutting board.
Step 2: Remove the Stems and Cut the Strawberries
Carefully cut off the leafy stem from each strawberry to create a flat base. This allows the strawberry to stand upright on a plate.
Next, cut each strawberry horizontally into sections to create the body and hat.
The bottom section will serve as Santa’s body. The pointed upper section will become the red hat.
Leave enough room for a generous layer of cream cheese filling between the two strawberry pieces. The filling forms Santa’s beard and separates the hat from the body.
Try to make the cuts as even as possible. Uniform pieces are easier to assemble and help the Santas stand more securely.
If a strawberry is especially pointed or uneven, adjust the cut slightly to create a more balanced shape.
Step 3: Prepare the Cheesecake Filling
Place 1 cup of whipped cream cheese in a small mixing bowl.
Add 2 tablespoons of powdered sugar and ¼ teaspoon of vanilla extract.
Mix the ingredients until they are fully combined and the filling looks smooth.
Scrape the sides of the bowl as needed to ensure that the powdered sugar and vanilla are evenly incorporated.
The filling should be creamy enough to pipe while still holding its shape. If it is too soft to create a neat beard, avoid leaving it at room temperature longer than necessary and keep it cool while preparing the strawberries.
Because the recipe uses whipped cream cheese, mixing is generally easier than it would be with a firm block of cream cheese.
Step 4: Transfer the Filling to a Piping Bag
Spoon the cream cheese mixture into a piping bag fitted with a star tip.
The star tip helps create a decorative texture that resembles Santa’s beard and hat trim.
If you do not have a piping bag, use a clean resealable plastic bag. Fill it with the cream cheese mixture and cut a small opening in one corner.
A small opening gives you more control over the amount of filling you pipe onto each strawberry.
Avoid cutting the opening too large at first. You can always make it slightly bigger if necessary.
Step 5: Pipe the Filling onto the Strawberry Bodies
Place the bottom section of each strawberry on a flat plate or serving surface.
Pipe the cream cheese filling onto the top of the strawberry body.
Create a generous layer that is tall enough to resemble Santa’s beard and leave space for the face. The filling should also support the strawberry hat when the top section is added.
Try to keep the amount of filling relatively consistent between strawberries so that the finished Santas look similar.
Do not worry if the first few are not perfectly shaped. The decorative icing and strawberry hats help make each one look festive.
Step 6: Add the Strawberry Hats
Place the pointed upper section of each strawberry on top of the cream cheese filling.
Position it carefully so that it resembles Santa’s red hat.
The filling should remain visible between the body and the hat. This white section creates the beard and the fluffy trim beneath the hat.
If a hat slides or leans, gently reposition it before moving on to the next strawberry.
Step 7: Add the White Pom-Pom
Use the piping bag to add a small dot of cream cheese filling to the tip of each strawberry hat.
This creates Santa’s white pom-pom.
Keep the dot small enough to sit neatly on the pointed end of the strawberry without covering too much of the red fruit.
The star tip can create a textured finish, making the pom-pom look especially decorative.
Step 8: Draw Santa’s Face
Use black decorating icing to add two small dots for Santa’s eyes.
Then use red decorating icing to add a tiny dot for the nose.
Keep the decorations small because the strawberry surface is limited. A few carefully placed dots are enough to give each Santa a recognizable face.
If you are decorating several strawberries, take a moment to check their appearance before serving. Small adjustments can help the Santas look more consistent.
Step 9: Serve Immediately
Once all the strawberries have been assembled and decorated, arrange them on a serving plate.
Serve them soon after preparation for the freshest flavor and best texture.
If you need to wait before serving, refrigerate the finished Santas in an airtight container.
Because fresh strawberries release moisture after cutting, these treats are best enjoyed on the day they are made.
Tips for Perfect Strawberry Santas
Choose Large, Firm Strawberries
Large strawberries provide enough space for the filling and make the Santa shape easier to create.
Choose fruit that is firm and evenly shaped. Very small or misshapen strawberries can be more difficult to cut and assemble.
Dry the Fruit Thoroughly
Moisture is one of the main challenges when working with fresh strawberries and cream cheese filling.
After washing the fruit, dry it completely. This helps the filling adhere to the surface and reduces the chance of the Santa hats slipping.
Use Whipped Cream Cheese
Whipped cream cheese is easier to mix and pipe than a firm block of cream cheese.
It also produces a lighter filling that can be shaped into a beard and hat pom-pom without requiring complicated preparation.
Use a Star Piping Tip
A star tip creates attractive ridges in the filling and makes the Santas look more decorative.
If you do not have one, a resealable plastic bag with a small cut corner is a practical alternative.
Keep the Filling Cool
Cream cheese filling can soften if it sits in a warm kitchen for too long.
Prepare the filling shortly before assembly and keep it cool when possible. This helps it retain its shape when piped onto the strawberries.
Make Small Facial Features
Santa’s face is made with just a few dots of decorative icing.
Avoid adding too much icing, as large dots can overwhelm the strawberry and make the finished dessert look messy.
Serve Soon After Assembly
Cut strawberries are perishable and gradually release juice. The filling may become softer as the dessert sits.
For the best appearance and texture, assemble the Santas shortly before serving.
Strawberry Santas Variations
The original recipe is simple, but there are several ways to change the filling or decorations.
Make Healthier Strawberry Santas
These Strawberry Santas are already a relatively light dessert compared with many traditional Christmas treats.
If you want a different filling, the original recipe suggests replacing the cheesecake center with a thick slice of banana.
This changes the flavor and texture considerably, so the finished dessert will no longer have the same creamy cheesecake filling.
Add Greek Yogurt
For a tangier filling, replace a few tablespoons of the cream cheese with Greek yogurt.
Greek yogurt changes the consistency and flavor of the filling. Choose a thick variety and mix it carefully so that the filling remains suitable for piping.
Because this substitution changes the original recipe, you may need to adjust the consistency before assembling the strawberries.
Make Cannoli-Inspired Strawberry Santas
For a cannoli-inspired variation, replace the cream cheese with ricotta cheese.
Ricotta creates a different texture and flavor from whipped cream cheese, giving the dessert a filling inspired by traditional cannoli.
For the best result, choose ricotta with a consistency suitable for filling the strawberries and avoid using a mixture that is too watery.
Make Them Dairy-Free
Use a suitable vegan cream cheese instead of regular cream cheese.
Different dairy-free cream cheese products vary in texture, so choose one that can be mixed and piped smoothly.
Also check the ingredient labels of the decorative icing and any other additions if you need the entire dessert to be dairy-free.
Change the Face Decorations
If you do not have red and black decorating icing, the original recipe suggests alternatives such as mini chocolate chips, sprinkles, or raisins.
Use small pieces and place them carefully on the cream cheese filling.
Mini chocolate chips can work for the eyes, while a small red decoration can be used for the nose.
Tweezers may help when placing tiny decorations accurately.
Make an Indulgent Version
For a richer dessert, replace the homemade cheesecake filling with vanilla frosting or prepared cream cheese frosting.
This creates a sweeter result and changes the overall flavor, but it can be convenient when you want to save time.
Keep in mind that the original recipe’s nutrition information will no longer apply exactly after changing the filling.
How to Serve Strawberry Santas
Add Them to a Christmas Dessert Platter
Arrange the Santas in neat rows on a serving board or festive plate.
Their bright red color and white filling create a natural Christmas appearance, making them attractive alongside cookies, brownies, and other seasonal treats.
Serve Them at Holiday Parties
These individual desserts are easy to pick up and serve.
Place them on a chilled serving tray when possible, especially if they will be sitting out briefly during a gathering. Return any leftovers to the refrigerator promptly.
Make Them for a Family Christmas Activity
Preparing Strawberry Santas can be a fun family activity.
Adults can wash and cut the strawberries and prepare the filling. Children can help arrange the strawberry pieces, watch the filling being piped, or add decorations under supervision.
The simple assembly makes this recipe suitable for a festive kitchen activity without the need for baking.
Pair Them with Hot Chocolate
Strawberry Santas pair nicely with a warm holiday drink.
Serve them with hot chocolate or white chocolate peppermint hot chocolate for a festive snack. The creamy filling and fresh fruit provide a pleasant contrast to a warm, sweet beverage.
Include Them in a Lighter Dessert Selection
If you are preparing a dessert table with several options, include Strawberry Santas alongside fresh fruit and other small treats.
Their individual portions make it easier for guests to enjoy a sweet bite without committing to a large slice of cake.
Can You Make Strawberry Santas Ahead of Time?
Strawberry Santas are best prepared shortly before serving.
You can assemble them a few hours in advance, but the original recipe does not recommend making them much earlier than that.
Once strawberries are cut, they begin to release moisture. The juice can soften the fruit and seep into the cream cheese filling, affecting both the appearance and texture.
For the best results, prepare the cream cheese filling and wash and dry the strawberries in advance if needed, then assemble the Santas closer to serving time.
Keep the prepared filling refrigerated until you are ready to pipe it.
How to Store Strawberry Santas
Refrigerating Leftovers
If you have leftover Strawberry Santas, place them in an airtight container and refrigerate them.
The original recipe recommends storing leftovers for up to two days, although the texture and flavor are best on the day of preparation.
The strawberries may soften and release juice during storage, so the finished Santas might not look as neat after refrigeration.
Can You Freeze Strawberry Santas?
Freezing is not recommended.
Fresh strawberries contain a high amount of water and can become soft and soggy after freezing and thawing. The cream cheese filling and decorations may also lose their original appearance.
For the best texture, make only as many as you expect to serve and enjoy them fresh.
Can You Use Frozen Strawberries?
No, fresh strawberries are strongly recommended for this recipe.
Frozen strawberries tend to become too soft after thawing to support the filling and maintain the Santa shape.
Fresh, firm fruit makes assembly easier and produces a more attractive result.
Strawberry Santas Recipe Details
- Recipe name: Strawberry Santas
- Course: Dessert or snack
- Cuisine: American
- Yield: 12 Strawberry Santas
- Preparation time: 15 minutes
- Total time: 15 minutes
- Cooking method: No-bake
- Reported calories: 49 calories per Santa
Ingredients
- 12 large strawberries
- 1 cup whipped cream cheese
- 2 tablespoons powdered sugar
- ¼ teaspoon vanilla extract
- Red and black decorative icing for the face
Instructions
- Wash the strawberries carefully and dry them completely.
- Remove the stems to create flat bases, then cut the strawberries into sections to form the bodies and hats.
- In a small mixing bowl, combine the whipped cream cheese, powdered sugar, and vanilla extract until smooth.
- Transfer the filling to a piping bag fitted with a star tip, or use a clean resealable bag with a small opening.
- Place the bottom section of each strawberry on a plate and pipe the cream cheese filling onto it.
- Add the pointed strawberry section on top to create Santa’s hat.
- Pipe a small white pom-pom onto the tip of each hat.
- Use black decorating icing for the eyes and red icing for the nose.
- Serve immediately or refrigerate in an airtight container until ready to serve.
Nutrition Information
The original recipe reports the following nutritional values per serving:
- Calories: 49 kcal
- Carbohydrates: 4 g
- Protein: 2 g
- Fat: 3 g
- Saturated fat: 2 g
- Polyunsaturated fat: 0.1 g
- Monounsaturated fat: 1 g
- Cholesterol: 11 mg
- Sodium: 72 mg
- Potassium: 68 mg
- Fiber: 0.2 g
- Sugar: 3 g
- Vitamin A: 112 IU
- Vitamin C: 7 mg
- Calcium: 32 mg
- Iron: 0.1 mg
These values are the figures reported in the supplied recipe. Actual nutrition may vary depending on the brands of cream cheese, strawberries, and decorating icing used.
Frequently Asked Questions
How Far in Advance Can I Make Strawberry Santas?
You can make them a few hours before serving, but they are best assembled shortly before your event.
Cut strawberries release juice over time, which can soften the fruit and affect the cream cheese filling.
How Should I Store Leftovers?
Store leftovers in an airtight container in the refrigerator for up to two days, as recommended by the original recipe.
For the best texture and appearance, enjoy them on the day they are made.
Can I Freeze Strawberry Santas?
Freezing is not recommended because the strawberries can become soggy after thawing and may no longer hold their shape.
Can I Use Frozen Strawberries?
Fresh strawberries are necessary for the best result. Frozen strawberries generally become too soft and watery for this type of assembly.
Can I Use Regular Cream Cheese Instead of Whipped Cream Cheese?
The original recipe recommends whipped cream cheese because it is lighter and easier to mix and pipe.
Regular cream cheese may produce a thicker filling, so its consistency may differ. If you use it, make sure the filling is smooth enough to pipe and can hold its shape.
What Can I Use Instead of a Piping Bag?
A clean resealable plastic bag works well as an alternative.
Place the cream cheese filling inside and cut a small opening in one corner. Pipe carefully to create the beard and the white pom-pom.
How Do I Make the Santas Look Neat?
Use large, evenly shaped strawberries and dry them thoroughly before assembly.
Pipe similar amounts of filling onto each strawberry and keep the eyes and nose small. These simple techniques help create a consistent appearance.
Can I Replace the Cream Cheese Filling?
Yes. The original recipe suggests banana, Greek yogurt, ricotta cheese, vegan cream cheese, vanilla frosting, or prepared cream cheese frosting as possible variations.
Each substitution changes the texture and flavor, so the results may differ from the original recipe.
Are Strawberry Santas Suitable for Children?
They are a fun Christmas dessert for families. Children can help with decorating and assembly under adult supervision.
An adult should handle cutting the strawberries and any other tasks involving sharp tools.
How Many Strawberry Santas Does the Recipe Make?
The recipe makes 12 Strawberry Santas using 12 large strawberries.
Are Strawberry Santas Low in Calories?
The original recipe reports approximately 49 calories per Santa. The actual amount depends on the ingredients and decorations used.
The recipe uses fresh fruit and a lightly sweetened cream cheese filling, making it a smaller dessert option compared with many traditional Christmas sweets.
Final Thoughts
These Strawberry Santas are a charming way to add something festive and fresh to your Christmas celebrations.
Made with 12 large strawberries, whipped cream cheese, powdered sugar, vanilla extract, and a little decorative icing, they turn simple ingredients into miniature Santa Claus treats.
The no-bake preparation takes approximately 15 minutes, and the assembly is easy enough for a family holiday activity. The lightly sweetened cheesecake filling pairs beautifully with the fresh strawberries, while the red hats, white beards, and tiny faces make the finished desserts especially appealing.
For the best results, choose firm strawberries, dry them thoroughly, and pipe the filling carefully. Assemble the Santas close to serving time to preserve their shape and freshness.
Serve them on a Christmas dessert platter, alongside hot chocolate, or as a fun treat for a holiday gathering. Because they are best enjoyed fresh, prepare the amount you need and refrigerate any leftovers promptly.
If you are looking for a simple Christmas dessert that is colorful, fun, and easy to prepare, these Strawberry Santas are a wonderful addition to your holiday recipe collection.