
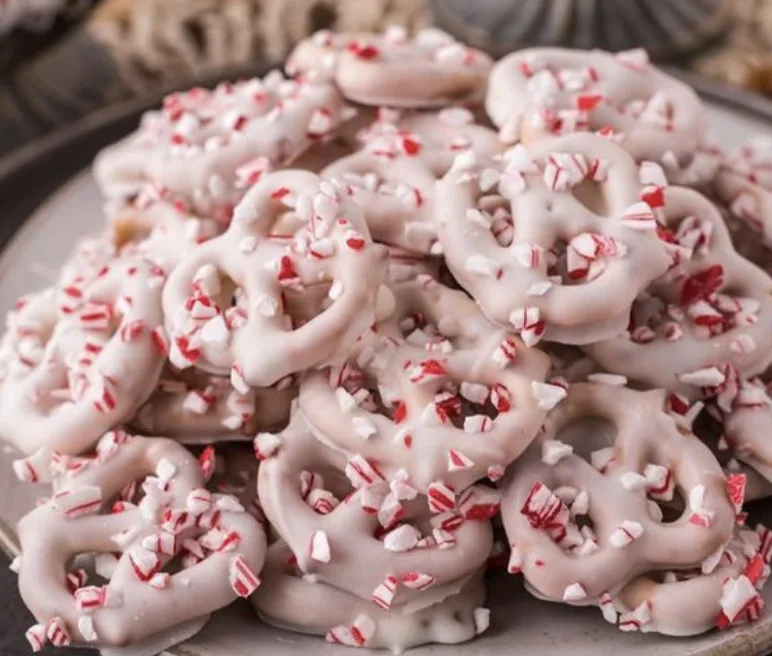
Candy Cane Peppermint Pretzels are a simple, festive holiday treat that combines crunchy pretzels, smooth white candy coating, and crushed peppermint candy. With their sweet, salty, and minty flavor, these chocolate-covered pretzels are perfect for Christmas cookie trays, holiday parties, homemade gifts, and winter celebrations.
One of the best things about this recipe is how easy it is to prepare. You only need three ingredients, approximately 15 minutes of hands-on preparation, and a little patience while the candy coating hardens. There is no complicated baking process, no cookie dough to prepare, and no special decorating skills required.
Each pretzel is coated in melted white candy melts and topped with crushed candy canes. The creamy coating balances the saltiness of the pretzels, while the peppermint pieces add a refreshing flavor and a festive crunch.
These treats are also easy to customize. You can coat the entire pretzel or dip only half of it, switch to milk or dark chocolate melts, or use pretzel rods instead of mini pretzels. Whether you need a last-minute Christmas snack or an attractive addition to a holiday gift box, Candy Cane Peppermint Pretzels are a delicious option.
Why You’ll Love These Candy Cane Peppermint Pretzels
Only Three Ingredients
You do not need a long shopping list to make these Christmas pretzels. The recipe uses mini pretzel twists or pretzel crisps, white candy melts, and crushed candy canes.
These simple ingredients create a combination of flavors and textures that feels special enough for the holiday season.
Sweet, Salty, and Minty
The pretzels provide a salty crunch, the white candy coating adds sweetness, and the crushed candy canes bring a cool peppermint flavor.
Together, these ingredients create a balanced treat that is especially enjoyable during Christmas. The crunchy candy pieces also provide a decorative finish.
Quick and Easy to Prepare
The hands-on preparation takes about 15 minutes, making this recipe convenient when you have a busy holiday schedule.
You simply melt the candy coating, dip the pretzels, add the crushed candy canes, and allow everything to harden. Most of the total time is spent waiting for the coating to set.
Perfect for Christmas Cookie Trays
These peppermint pretzels look beautiful alongside Christmas cookies, brownies, chocolate-covered treats, and other seasonal desserts.
Their white coating and crushed red-and-white candy pieces make them instantly recognizable as a holiday treat. Arrange them on a platter to add variety to your Christmas dessert table.
Great for Homemade Gifts
Candy Cane Peppermint Pretzels are easy to package in food-safe bags, decorative boxes, or holiday containers.
They are a thoughtful homemade gift for friends, family members, neighbors, teachers, and coworkers. Because they can be stored for an extended period when properly sealed, you can prepare them ahead of a holiday gathering or gift exchange.
Easy to Customize
You can adjust the recipe to suit your preferences without changing the basic method.
Try milk chocolate or dark chocolate melts instead of white candy melts. Dip only half of each pretzel for a different appearance, or use full-sized pretzel rods if you have extra coating and crushed candy canes available.
Ingredients for Candy Cane Peppermint Pretzels
This recipe makes approximately 8 servings and uses three simple ingredients.
Mini Pretzel Twists or Pretzel Crisps
Use 30–35 mini pretzel twists or pretzel crisps.
Pretzels provide the crunchy, salty base that makes this treat so satisfying. Mini pretzel twists are easy to dip and serve in small portions, while pretzel crisps offer a flatter shape that can also be coated with candy melts.
Choose pretzels that are fresh and crisp. Since the candy coating adds sweetness, the saltiness of the pretzels helps balance the overall flavor.
If you prefer a larger treat, full-sized pretzel rods are another option. You may need to adjust how you dip them depending on the size of your container and the amount of melted coating available.
White Candy Melts
Use 12 ounces of white candy melts.
White candy melts form the sweet coating around the pretzels. They are designed to melt into a coating that can harden again after dipping.
Follow the package directions when melting them. Proper melting helps create a smooth coating that is easier to work with and allows excess candy to drip away from the pretzels.
If you prefer a different flavor, you can substitute milk or dark chocolate melts. These alternatives give the pretzels a richer chocolate flavor while maintaining the same basic preparation method.
Crushed Candy Canes
Use 1/2 cup of crushed candy canes.
The crushed candy canes add peppermint flavor, a little extra sweetness, and a festive appearance. Their red-and-white pieces contrast beautifully with the white candy coating.
Prepare the crushed candy canes before dipping the pretzels. Once the coating is applied, you should sprinkle the peppermint pieces over each pretzel immediately, while the coating is still wet.
Equipment You’ll Need
Gather the following equipment before you begin:
- Large baking sheet
- Parchment paper
- Microwave-safe bowl or other suitable melting container
- Fork for dipping the pretzels
- Small bowl for the crushed candy canes
- Spoon, if needed, for transferring or sprinkling the candy pieces
- Airtight storage container
A fork is particularly useful because it allows you to lower the pretzels into the melted coating and lift them out without using your fingers. It also helps you shake off excess candy coating before placing the pretzels on the baking sheet.
Parchment paper prevents the coated pretzels from sticking to the baking sheet as the candy coating hardens.
How to Make Candy Cane Peppermint Pretzels
Follow these simple steps to prepare a batch of chocolate-covered peppermint pretzels.
Step 1: Prepare the Baking Sheet
Line a large baking sheet with parchment paper and set it aside.
Make sure the sheet is large enough to hold the pretzels in a single layer without overlapping. Each pretzel needs space so the candy coating can harden without the treats sticking together.
Prepare the crushed candy canes and place them in a small bowl near your work area. Having everything ready before melting the candy coating makes the process easier.
Step 2: Melt the White Candy Coating
Place the 12 ounces of white candy melts in a suitable melting bowl.
Melt the candy according to the instructions on the package. Depending on the product, this may involve using a microwave or another recommended method.
If using a microwave, follow the package directions carefully and stir as instructed. Avoid overheating the candy melts, as this can affect their consistency and make them harder to work with.
The coating should be smooth enough to cover the pretzels evenly. If the melted candy begins to thicken while you are working, follow the manufacturer’s guidance for handling and reheating it.
Step 3: Dip the Pretzels
Take one pretzel and place it into the melted candy coating using a fork.
Turn the pretzel gently so the coating covers it completely. If you prefer a lighter coating, you can dip only half of the pretzel instead.
Lift the pretzel out of the bowl with the fork. Gently shake the fork to allow excess coating to drip back into the bowl.
Removing excess coating helps prevent thick pools of candy from forming around the pretzels on the parchment paper.
Work carefully so the pretzels remain intact and evenly coated.
Step 4: Place the Pretzels on the Baking Sheet
Transfer each coated pretzel to the parchment-lined baking sheet.
Arrange the pretzels in a single layer, leaving a little space between them. This helps keep the treats separate while the coating sets.
Continue dipping the remaining pretzels, shaking off excess coating before placing each one on the sheet.
If the candy coating begins to set before you finish decorating, work in smaller batches so you have enough time to add the peppermint pieces.
Step 5: Add the Crushed Candy Canes
Immediately sprinkle crushed candy canes over the wet candy coating.
The peppermint pieces need to be added before the coating hardens so they can stick securely to the surface.
Distribute the crushed candy canes over the tops of the pretzels. You can add a light sprinkle for a simple appearance or use more pieces for a stronger peppermint flavor and a more decorative finish.
Repeat the process until all the coated pretzels have been topped with crushed candy canes.
Step 6: Allow the Candy Coating to Harden
Leave the pretzels on the parchment-lined baking sheet until the candy coating has fully hardened.
The time required can vary depending on the room temperature and the thickness of the coating.
If you want to speed up the process, place the baking sheet in the refrigerator for approximately 1 hour, as suggested in the original recipe.
Make sure the coating is firm before transferring the pretzels to a serving platter or storage container. Moving them too early can smear the coating or cause the treats to stick together.
Step 7: Serve or Package
Once the candy coating is completely set, the Candy Cane Peppermint Pretzels are ready to enjoy.
Arrange them on a holiday platter, add them to a Christmas cookie tray, or place them in food-safe gift bags or boxes.
For gifting, make sure the coating is fully hardened before packaging the pretzels. This helps preserve their appearance and keeps them from sticking together in the container.
Tips for the Best Candy Cane Peppermint Pretzels
Prepare Everything Before Melting the Candy
Have the parchment-lined baking sheet, crushed candy canes, and dipping fork ready before you melt the candy coating.
The coating can begin to harden as it cools, so preparing your workspace in advance helps you dip and decorate the pretzels efficiently.
Follow the Package Directions for Melting
Different brands of candy melts may have different melting instructions.
Follow the directions on your package and avoid overheating the coating. Smoothly melted candy is easier to use and helps create an even finish.
Shake Off Excess Coating
After dipping each pretzel, gently shake the fork so excess candy coating drips back into the bowl.
This helps prevent large puddles from forming around the pretzels and creates a neater final appearance.
Add the Peppermint Pieces Immediately
Do not wait until the candy coating begins to harden before adding the crushed candy canes.
Sprinkle the peppermint pieces over each pretzel while the coating is still wet. This allows them to stick firmly to the surface.
If you are making a large batch, dip and decorate a few pretzels at a time rather than coating all of them before adding the toppings.
Choose Your Preferred Coating Style
The original recipe coats each pretzel completely, but you can dip only half of each pretzel if you prefer.
Half-dipped pretzels have a slightly different appearance and allow more of the salty pretzel to remain visible. Both styles work well for holiday platters and gift bags.
Let the Coating Set Completely
Allow the candy coating to harden before serving or packaging the treats.
If the coating is still soft, the pretzels may stick together or lose their neat appearance. Refrigerating the baking sheet can help speed up the setting process.
Make a Larger Batch for the Holidays
This recipe can easily be doubled or tripled.
If you are preparing a larger batch, work with enough baking sheets to arrange the pretzels in a single layer. You may also find it easier to dip and decorate the pretzels in smaller batches.
Variations and Substitutions
One of the advantages of this recipe is that you can change the coating or pretzel shape while keeping the same simple method.
Milk Chocolate Candy Cane Pretzels
Replace the white candy melts with milk chocolate melts.
Milk chocolate creates a sweeter, richer chocolate coating that pairs well with the peppermint candy and salty pretzels.
Follow the melting directions for the chocolate product you choose, then dip the pretzels and immediately add the crushed candy canes.
Dark Chocolate Peppermint Pretzels
Dark chocolate melts are another option if you prefer a deeper chocolate flavor.
The slightly more intense chocolate taste provides a contrast to the sweet peppermint pieces. Use the same dipping and decorating process.
Half-Dipped Pretzels
For a different presentation, dip only half of each pretzel into the melted candy coating.
Transfer the pretzels to parchment paper and sprinkle the coated portion with crushed candy canes. Allow the coating to harden before serving.
This style gives each pretzel a clear contrast between the salty, uncovered portion and the sweet, minty coating.
Candy Cane Pretzel Rods
If you have extra melted candy coating and crushed candy canes, try making this recipe with full-sized pretzel rods.
Pretzel rods are longer and can be easier to hold while dipping. You can coat the entire rod or leave part of it uncovered as a handle.
Arrange the coated rods on parchment paper and add the peppermint pieces before the coating sets.
Because rods are larger than mini pretzels, the quantity you can prepare will depend on how much coating you use per piece.
Different Holiday Decorations
The crushed candy canes are the signature topping for this recipe, but you can experiment with the appearance by using different amounts of peppermint pieces.
For a classic Christmas look, sprinkle the candy canes generously over the white coating. For a simpler finish, use a lighter topping so more of the white candy remains visible.
Frequently Asked Questions
How Many Candy Cane Peppermint Pretzels Does This Recipe Make?
The recipe uses 30–35 mini pretzel twists or pretzel crisps and lists 8 servings.
The number of individual pretzels per serving will depend on how you divide the finished batch. The recipe can also be doubled or tripled if you need more treats for a holiday gathering.
How Should I Store Candy Cane Peppermint Pretzels?
Store the finished pretzels in an airtight container at room temperature for approximately 2 weeks, according to the original recipe.
Make sure the candy coating has fully hardened before placing the pretzels in the container. Keep them sealed to help preserve their crisp texture and prevent them from absorbing moisture.
Can I Freeze Candy Cane Peppermint Pretzels?
Yes. The original recipe states that the pretzels can be frozen in an airtight container for up to 6 months.
You can enjoy them straight from the freezer or allow them to come to room temperature before serving.
When freezing, make sure the candy coating is completely set before packing the pretzels. Arrange them carefully in the container to reduce the chance of the pieces sticking together or becoming damaged.
Can I Use Milk or Dark Chocolate Instead of White Candy Melts?
Yes. Milk or dark chocolate melts can be used instead of white candy melts.
The flavor will be different, but the preparation method remains the same. Melt the coating according to the package directions, dip the pretzels, remove excess coating, and add the crushed candy canes while the surface is still wet.
Can I Dip Only Half of Each Pretzel?
Absolutely. The original recipe allows you to coat the entire pretzel or dip only half.
Half-dipping is a good option if you want more of the pretzel’s salty flavor to remain noticeable or prefer a different presentation.
Can I Use Pretzel Rods Instead of Mini Pretzels?
Yes. Full-sized pretzel rods are a suggested variation, especially if you have extra melted candy coating and crushed candy canes.
Dip each rod into the coating, leaving part uncovered if desired. Add the peppermint pieces before the coating hardens.
How Can I Make the Candy Coating Harden Faster?
You can place the baking sheet of coated pretzels in the refrigerator for approximately 1 hour.
Make sure the pretzels are arranged in a single layer and remain undisturbed while the coating sets.
Why Are My Crushed Candy Canes Not Sticking?
The candy cane pieces should be added immediately after each pretzel is dipped, while the candy coating is still wet.
If the coating has already hardened, the peppermint pieces may not adhere properly. To avoid this, decorate each pretzel before moving on to the next one, or work in small batches.
Can I Make These Pretzels Ahead of Time?
Yes. These treats are convenient for preparing ahead of Christmas gatherings because the coating needs time to harden and the finished pretzels can be stored in an airtight container.
You can make them in advance, allow them to set completely, and package them when you are ready to serve or give them as gifts.
Are Candy Cane Peppermint Pretzels Good for Holiday Gifts?
Yes. Their festive appearance and simple ingredients make them a popular homemade gift idea.
Place the hardened pretzels in food-safe gift bags, boxes, or decorative containers. They also make a lovely addition to a mixed Christmas treat box containing cookies, candies, and other homemade desserts.
How to Serve Candy Cane Peppermint Pretzels
These peppermint pretzels are versatile enough for many holiday occasions.
- Christmas cookie trays: Arrange them alongside sugar cookies, chocolate cookies, and other seasonal treats.
- Holiday parties: Serve them in a bowl or on a platter for guests to enjoy as a sweet-and-salty snack.
- Homemade gift boxes: Combine them with other homemade treats in a festive container.
- Christmas dessert tables: Their white coating and peppermint topping add color and variety to a seasonal spread.
- Winter movie nights: Serve them as an easy snack while watching your favorite holiday movies.
- Office or school celebrations: Package individual portions for convenient sharing, taking care to account for any relevant food allergies.
For the best presentation, arrange the pretzels so the crushed candy canes remain visible. A simple white platter can highlight the contrast between the candy coating, red peppermint pieces, and golden pretzels.
Candy Cane Peppermint Pretzels Recipe Card
Prep Time: 15 minutes
Cook Time: 5 minutes
Chill Time: 1 hour
Total Time: 1 hour 20 minutes
Servings: 8
Yield: 30–35 mini pretzel twists or pretzel crisps
Ingredients
- 30–35 mini pretzel twists or pretzel crisps
- 12 ounces white candy melts
- 1/2 cup crushed candy canes
Instructions
- Line a large baking sheet with parchment paper and set it aside.
- Melt the candy melts according to the package directions.
- Using a fork, dip each pretzel into the melted candy coating, making sure it is completely covered. Alternatively, dip only half of the pretzel.
- Gently shake the fork to remove excess coating.
- Transfer the coated pretzel to the parchment-lined baking sheet.
- Immediately sprinkle crushed candy canes over the top while the coating is still wet.
- Repeat with the remaining pretzels.
- Allow the candy coating to harden completely before serving. To speed up the process, place the baking sheet in the refrigerator for approximately 1 hour.
- Store the finished pretzels in an airtight container at room temperature for approximately 2 weeks, or freeze them in an airtight container for up to 6 months.
Storage Notes
- Store at room temperature in an airtight container for approximately 2 weeks.
- Freeze in an airtight container for up to 6 months.
- Enjoy frozen or allow the pretzels to return to room temperature before serving.
- The recipe can be doubled or tripled for larger gatherings.
- Milk or dark chocolate melts can replace the white candy melts.
- Full-sized pretzel rods can be used instead of mini pretzels.
Final Thoughts
Candy Cane Peppermint Pretzels are an easy way to add a festive sweet-and-salty treat to your Christmas celebrations. With just three ingredients, they combine crunchy pretzels, smooth candy coating, and refreshing peppermint pieces into a snack that looks beautiful and tastes delicious.
The preparation is straightforward: melt the coating, dip the pretzels, add the crushed candy canes, and allow everything to harden. You can make them with white, milk, or dark chocolate melts, use mini pretzels or full-sized rods, and choose whether to coat each pretzel completely or dip only half.
Serve them on a Christmas cookie tray, package them as homemade gifts, or prepare a batch ahead of your next holiday gathering. These simple peppermint pretzels are a festive addition to any collection of Christmas treats.