
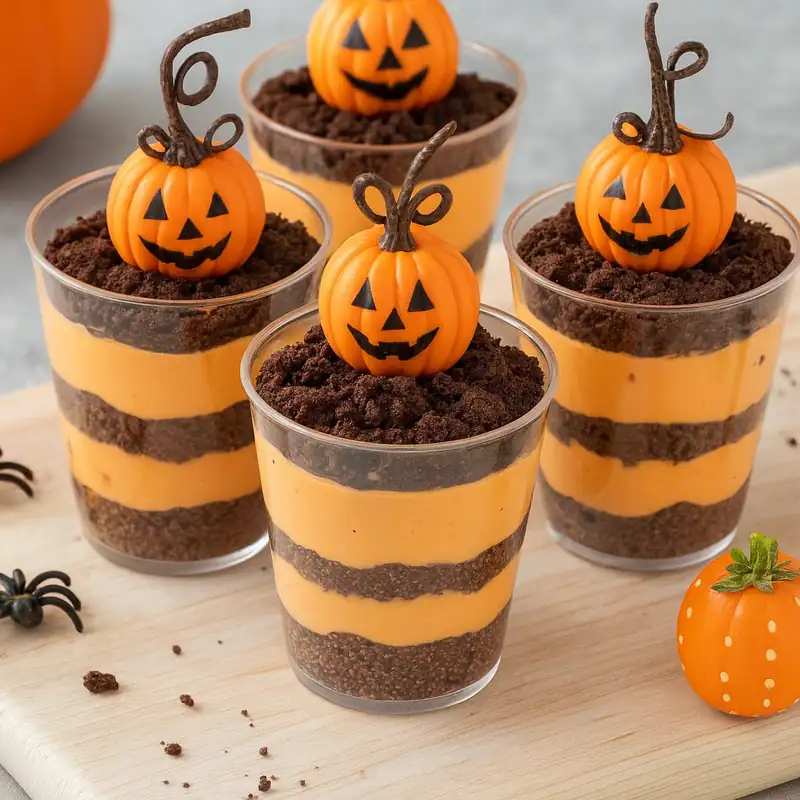
Looking for a Halloween dessert that looks impressive but requires absolutely no baking? These Pumpkin Patch Dirt Cups are the perfect choice. Layers of creamy chocolate pudding, sweet cream cheese filling, and crunchy crushed Oreos are topped with colorful candy pumpkins and green icing vines to create an adorable edible pumpkin patch.
These individual dessert cups are especially fun because they combine several different textures in every spoonful. The chocolate pudding mixture is smooth and fluffy, the crushed Oreos provide a satisfying cookie crunch, and the candy pumpkins add a sweet finishing touch.
Best of all, everything is assembled in individual cups, so there is no need to slice or serve a large dessert. Each guest gets their own miniature pumpkin patch.
These dirt cups are perfect for Halloween parties, children’s celebrations, fall potlucks, family movie nights, classroom-style gatherings, or a simple October dessert. Since the recipe is completely no-bake, it is also a great option when you want something festive without turning on the oven.
The recipe takes only about 15 minutes of preparation, followed by 30 minutes of chilling, making these Pumpkin Patch Dirt Cups an easy last-minute Halloween treat.
Why You’ll Love These Pumpkin Patch Dirt Cups
No Baking Required
There is no oven, cake batter, or complicated baking process. Everything is mixed, layered, decorated, and chilled.
Perfect Individual Portions
Serving the dessert in individual clear cups makes it easy to serve at parties. Guests can simply grab a cup and enjoy.
Fun Halloween Presentation
The crushed Oreos resemble dark garden soil, while the candy pumpkins and green vines create the appearance of a miniature pumpkin patch.
Creamy and Crunchy
The dessert combines fluffy chocolate pudding with creamy cream cheese filling and crunchy Oreo crumbs, creating a delicious contrast of textures.
Great for Kids
Children can help assemble and decorate their own cups. Adding candy pumpkins, gummy worms, and green vines turns dessert preparation into a fun Halloween activity.
Recipe Details
| Detail | Information |
|---|---|
| Prep Time | 15 minutes |
| Chill Time | 30 minutes |
| Total Time | 45 minutes |
| Difficulty | Easy |
| Method | No-Bake |
| Serving Style | Individual cups |
| Best For | Halloween parties, fall gatherings, kids’ events |
Ingredients
Oreo Cookies
You will need 1 package (14 ounces) of Oreo cookies, crushed into fine crumbs.
The cookies create the “dirt” layer that gives this dessert its name. For the most realistic effect, crush the cookies fairly finely while leaving a few slightly larger crumbs for texture.
You can crush them in a food processor or use a sealed plastic bag and a rolling pin.
Cold Milk
Use 2 cups of cold milk.
The milk is combined with the instant chocolate pudding mix to create the chocolate base.
Instant Chocolate Pudding Mix
You will need 1 package (3.9 ounces) of instant chocolate pudding mix.
Instant pudding is ideal for this no-bake recipe because it thickens quickly when combined with cold milk.
Whipped Topping
Use 1 container (8 ounces) of whipped topping, such as Cool Whip, thawed.
The whipped topping makes the cream cheese mixture lighter and fluffier.
Cream Cheese
Use 1 package (8 ounces) of softened cream cheese.
Allow the cream cheese to soften before mixing so that the filling becomes smooth rather than lumpy.
Powdered Sugar
Add ½ cup powdered sugar for sweetness.
Powdered sugar blends easily into the cream cheese without creating a grainy texture.
Vanilla Extract
Use 1 teaspoon vanilla extract.
Vanilla adds another layer of flavor to the creamy filling.
Candy Pumpkins
Use candy pumpkins, such as Mellowcreme pumpkins, for the main decoration.
Place approximately 2–3 pumpkins on each cup, depending on the size of your serving cups.
Green Candy Melts or Green Icing
Green candy melts or green icing are used to create small vines and leaves around the pumpkins.
Gummy Worms
Gummy worms are optional but add an extra creepy Halloween touch.
You can let some of them peek out of the cookie “soil” for a playful effect.

How to Make Pumpkin Patch Dirt Cups
Step 1: Prepare the Chocolate Pudding
Pour 2 cups of cold milk into a large mixing bowl.
Add the 3.9-ounce package of instant chocolate pudding mix.
Whisk the mixture thoroughly until the pudding mix is fully incorporated.
Let the mixture sit for approximately 5 minutes.
During this time, the pudding will thicken.
Once thickened, set the bowl aside while you prepare the cream cheese mixture.
Step 2: Make the Cream Cheese Filling
In a separate mixing bowl, add the softened cream cheese, powdered sugar, and vanilla extract.
Beat the mixture until it becomes smooth and creamy.
Take your time with this step and scrape down the sides of the bowl if necessary.
A smooth cream cheese base will make the finished dessert much easier to combine.
Step 3: Fold in the Whipped Topping
Add the 8 ounces of thawed whipped topping to the cream cheese mixture.
Gently fold the whipped topping in until everything is evenly combined.
Avoid aggressive stirring because you want to maintain the light, fluffy texture of the whipped topping.
The finished mixture should be smooth, creamy, and fluffy.
Step 4: Combine the Chocolate and Creamy Mixtures
Once the pudding has thickened, add it to the cream cheese and whipped topping mixture.
Stir gently until the two mixtures are evenly blended.
You should now have a light, fluffy chocolate mixture that will form the creamy base of your dirt cups.
Avoid overmixing. The goal is to combine the ingredients while keeping the mixture light.
Step 5: Crush the Oreos
Place the Oreos into a food processor and pulse until they become fine crumbs.
If you do not have a food processor, place the cookies inside a sealed plastic bag.
Use a rolling pin to crush them into crumbs.
You do not need every piece to be exactly the same size. A mixture of fine crumbs and tiny cookie pieces creates a more natural-looking soil effect.
Set the crushed cookies aside.
Step 6: Start Building the Dirt Cups
Choose small clear plastic or glass cups.
Clear cups work especially well because guests can see the different layers from the outside.
Begin by adding a layer of the chocolate cream mixture to the bottom of each cup.
The exact amount will depend on the size of your cups, so focus on creating balanced layers rather than measuring each spoonful.
Step 7: Add the Oreo “Dirt”
Sprinkle a generous layer of crushed Oreos over the chocolate mixture.
The dark cookie crumbs should resemble rich garden soil.
For a more dramatic effect, make the cookie layer thick enough to clearly contrast with the creamy chocolate layer underneath.
Step 8: Repeat the Layers
Continue alternating between the chocolate cream mixture and crushed Oreos.
Build the layers until the cups are almost full.
Finish with a generous layer of crushed Oreos on top.
This final layer is important because it creates the “topsoil” where your candy pumpkins will grow.
Step 9: Create the Pumpkin Patch
Now comes the most fun part.
Place 2–3 candy pumpkins on top of each cup.
Arrange them in slightly different positions rather than making every cup identical.
This makes each individual pumpkin patch look unique.
If you are using gummy worms, gently tuck them into the Oreo crumbs so that parts of the worms peek out from the soil.
This creates a playful creepy-crawly effect.
Step 10: Add Green Vines and Leaves
Use green icing or melted green candy melts to pipe small vines around the candy pumpkins.
Create curved lines that extend from the pumpkins across the cookie crumbs.
Add a few small leaf shapes if desired.
The vines do not need to be perfect. Simple curved lines are enough to make the pumpkins look as though they are growing in a miniature garden.
Step 11: Chill Before Serving
Place the finished cups in the refrigerator.
Chill for at least 30 minutes.
This allows the layers to set and gives the dessert a cool, creamy texture.
Keep the cups refrigerated until you are ready to serve them.
Serve cold and enjoy.
Tips for Perfect Pumpkin Patch Dirt Cups
Use Cold Milk
Cold milk helps the instant pudding thicken properly.
Soften the Cream Cheese
Softened cream cheese is much easier to blend smoothly with the powdered sugar and vanilla.
If the cream cheese is too firm, you may end up with small lumps in the filling.
Crush the Cookies Properly
For the most realistic dirt effect, aim for mostly fine crumbs with a few small cookie pieces.
Use Clear Cups
Clear cups show off the alternating chocolate and Oreo layers, making the dessert look more impressive.
Do Not Skip the Chill Time
Allow at least 30 minutes of refrigeration before serving.
The chilling time helps the layers firm up and makes the dessert easier to eat.
Make-Ahead Instructions
These Pumpkin Patch Dirt Cups are especially convenient for parties because they can be made ahead.
Prepare the cups up to 24 hours in advance.
Once assembled, cover the cups and refrigerate them until serving.
If possible, add delicate decorations such as gummy worms or final icing details closer to serving time so they maintain their best appearance.
Keeping the cups chilled also ensures that the pudding and cream layers remain cool and creamy.
Choosing the Right Serving Cups
The serving container can change the appearance of the dessert.
Small Plastic Cups
Small clear plastic cups are excellent for children’s parties and large gatherings.
They make the dessert easy to distribute and can create smaller individual portions.
Glass Dessert Cups
Small glass cups provide a more elegant presentation for adult gatherings or fall dinners.
Mason Jars
Small mason jars create a rustic pumpkin-patch appearance and work especially well for autumn-themed events.
Mini Cups
For a dessert table with many other treats, use miniature cups for smaller portions.
Creative Variations
The basic Pumpkin Patch Dirt Cup can easily be transformed into other Halloween desserts.
Haunted Graveyard Cups
Instead of candy pumpkins, add cookie or chocolate “gravestones.”
You can use Milano-style cookies as simple gravestone decorations and write small messages such as “RIP” with icing.
Witch’s Garden Cups
Replace the pumpkins with candy eyeballs or gummy frogs.
Use green and purple decorations to create a strange magical garden.
Creepy-Crawly Dirt Cups
Add extra gummy worms throughout the Oreo layers and leave several visible on top.
Harvest Dessert Cups
For a fall variation, replace some of the Halloween decorations with candy corn or caramel-style toppings.
Dietary Swaps
The recipe can be adapted depending on your dietary preferences.
Gluten-Free Version
Use gluten-free chocolate sandwich cookies instead of regular Oreos.
Check the labels of the pudding mix and other ingredients to make sure they fit your dietary requirements.
Reduced-Sugar Option
A sugar-free pudding mix can be used if desired.
Keep in mind that changing ingredients may alter the final flavor and texture.
How to Serve Pumpkin Patch Dirt Cups
Halloween Party
Arrange the cups together on a large serving tray.
The different pumpkin decorations create a miniature edible pumpkin patch across the table.
Kids’ Party
Prepare smaller cups and let each child decorate their own dessert.
Fall Potluck
Transport the assembled cups in a chilled container and keep them refrigerated until serving.
Family Movie Night
Serve the dirt cups cold as a fun Halloween dessert after dinner or during a spooky movie.
Frequently Asked Questions
Do Pumpkin Patch Dirt Cups need to be refrigerated?
Yes. The pudding, cream cheese, and whipped topping make refrigeration necessary. Keep the finished cups chilled until serving.
Can I make them the day before?
Yes. The cups can be prepared up to 24 hours ahead. Cover and refrigerate them until you are ready to serve.
Can I use homemade chocolate pudding?
Yes, although the original recipe uses instant chocolate pudding for convenience. If using homemade pudding, make sure it is completely cooled before combining it with the other ingredients.
Can I use another cookie instead of Oreos?
Yes. Another chocolate sandwich cookie can be used, particularly if you need a gluten-free alternative.
Can I use homemade whipped cream?
You can substitute homemade whipped cream, although the texture and stability may differ from the original whipped topping.
What can I use instead of candy pumpkins?
You can use candy corn, gummy candies, candy eyeballs, or other Halloween-shaped candies.
How long can the cups sit at room temperature?
Because they contain milk, cream cheese, and whipped topping, keep them refrigerated and avoid leaving them at room temperature for extended periods.
Can children decorate the cups?
Absolutely. This is one of the best parts of the recipe. Children can add the pumpkins, gummy worms, and sprinkles while creating their own little edible gardens.
Nutrition Information
The estimated nutrition per serving is:
| Serving Size | Calories | Protein | Carbs | Fat | Fiber | Sugar |
|---|---|---|---|---|---|---|
| 1 cup | 410 | 6g | 45g | 21g | 3g | 32g |
Nutrition disclaimer: Nutrition information is estimated using online calculators and may vary depending on the exact brands, ingredients, quantities, serving sizes, and substitutions used. For precise dietary information, calculate the nutrition using the exact products in your recipe.
Why You’ll Love Pumpkin Patch Dirt Cups
These Halloween dirt cups are more than just a dessert. They are also a fun centerpiece for your Halloween table.
The dark Oreo crumbs create the appearance of garden soil, while the creamy chocolate filling forms the base underneath. Bright candy pumpkins add a pop of orange, and green vines bring the miniature garden to life.
The individual presentation makes the dessert feel special without requiring complicated baking or decorating.
They are also extremely practical for busy Halloween celebrations. You can make them the day before, keep them refrigerated, and bring them out when it is time for dessert.
Because there is no baking involved, this is also a great recipe for beginner cooks and young bakers.
A Fun Halloween Decorating Activity
These dirt cups are especially entertaining when everyone gets to make their own.
Set out cups filled with the chocolate and Oreo layers, then provide bowls of candy pumpkins, gummy worms, and green icing.
Children can decide where to place their pumpkins and how many vines to add.
Some can create neat little gardens, while others can make wild, creepy patches filled with gummy worms.
The finished cups can become both dessert and decoration.
Final Thoughts
These Pumpkin Patch Dirt Cups prove that Halloween desserts do not need to be complicated to be impressive.
With creamy chocolate pudding, a smooth cream cheese and whipped topping mixture, crunchy Oreo “soil,” and colorful candy pumpkins, each cup becomes a miniature edible garden.
They are completely no-bake, easy to prepare ahead, and simple enough for children to help decorate.
Whether you are hosting a Halloween party, preparing treats for a fall gathering, or simply looking for a fun October dessert, these dirt cups are a delicious choice.
Grab your Oreos, prepare the creamy chocolate layers, plant a few candy pumpkins, and finish everything with green vines and gummy worms. In just a short time, you will have your own sweet little pumpkin patch ready to enjoy.